
- Hiding Fields on the Checkout Page
- Installing WooCommerce
- Using WooCommerce
- Adding Products in WooCommerce
- Using Your Theme's Header & Footer in a Step
- Embedding a Checkout Form on the Checkout Page
- Hiding WooCommerce Pages and Products
- Using Pricing Tables
- Adding an Affiliate Program
- Setting a Funnel as the Homepage
- Dynamic Offers aka Rule Engine
- Instant Layout for Checkout and Thank You Step
- Adding Products from the URL to the Checkout Page
- Deleting Plugin Data During Uninstallation
- Importing Ready-Made Templates for Funnels and Steps
- Importing and Exporting Funnels and Step
- URL Parameters
- Replacing the Main Checkout Order with an Upsell or Downsell
- Rolling back to a Previous Version
- Using the "Order Custom Field" Rule of Dynamic Offers with Custom Field Editor
- Optin
- Separate Orders
- Setting Up Pre-Checkout Upsell
- Refund Offer
- Applying a Coupon from the URL
- How to Create a Direct Buy-Now Checkout Link for a Product
- How Coupons Work in CartFlows?
- User role manager
- Instant Layout for Upsell and Downsell
- CartFlows Smart Login
- How to Set Preferred Countries on the Checkout Page
- CartFlows Product Options
- How to Set Up Two Step Checkout in CartFlows
- How to Set Up Multistep Checkout in CartFlows
- How to Customize the CartFlows Thank You Page
- Google Address Autocomplete
- Flatsome UX Builder
- ActiveCampaign
- Paypal Reference Transactions
- How PaypPal/Stripe Works
- Enabling Enfold Avia Layout Builder
- Setting Up Authorize.net for Upsell & Downsell
- Supported Payment Gateways
- Setting Quantity and Discount for Products on the Checkout Page
- Adding Custom Payment Gateway Support for One-Click Upsell and Downsell
- Funnel in Test Mode
- Troubleshooting Plugin and Theme Conflicts
- Resolving the "Please Select a Simple, Virtual, and Free Product" Error
- Fixing Endless Loading on the Checkout Page
- Fixing the "We can't seem to find an order for you." Error on the Thank You Page
- Troubleshooting License Activation Issues
- Fixing the "Checkout ID Not Found" Error
- Fixing the "Session Expired" Error Message
- Resolving "Order Does Not Exist" Error on Upsell/Downsell Page
- Fixing the "Sorry, This Product Cannot Be Purchased" Error
- Disabling Auto-fill of Address Fields Based on Zip Code
- Enabling Theme's Scripts & Styles Without Changing Page Template
- Disabling Auto-fill of Checkout Fields
- Allowing Cache Plugins to Cache CartFlows Pages
- Changing the "Choose a Variation" Text
- VAT Field Not Displaying for WooCommerce EU/UK VAT Compliance Plugin
- Enabling the Product Tab on Store Checkout
- Displaying the Order Summary Open on Mobile Devices
- Refreshing the Checkout Page After CartFlows AJAX Calls
- Overview
- Installing Modern Cart Starter
- Installing Modern Cart Pro
- Activating License Key
- Customizing General Settings
- Customizing Cart Tray Labels
- Customizing Cart Icon Settings
- Customizing Cart Tray Styling
- Understanding the Product Recommendations Feature
- Controlling Product Recommendation Source for Empty Cart
How to Customize the CartFlows Thank You Page
The Thank You page is the last step of every CartFlows funnel. It confirms the order and shows the customer what they bought, so it’s a good place to make a strong final impression.
This guide covers choosing which order sections appear, changing the confirmation message, sending customers to a page of your choice after purchase, and styling the page.
How the Thank You Page Works
When a customer completes checkout, and any upsell or downsell offers in the funnel, CartFlows takes them to the Thank You step. The page is built from four order sections, and you choose which of them to show:
- Order Overview — a summary strip with the order number, date, email, total, and payment method.
- Order Details — the products purchased, along with the subtotal, shipping, and total.
- Billing Details — the customer’s billing address.
- Shipping Details — the customer’s shipping address.
A short confirmation message appears above these sections. You can change its wording from the step settings.
How to Open the Thank You Step Settings
Step 1. From your WordPress dashboard, go to CartFlows → Funnels and open the funnel you want to edit.
Step 2. Find the Thank You step and click its Settings (gear) icon.
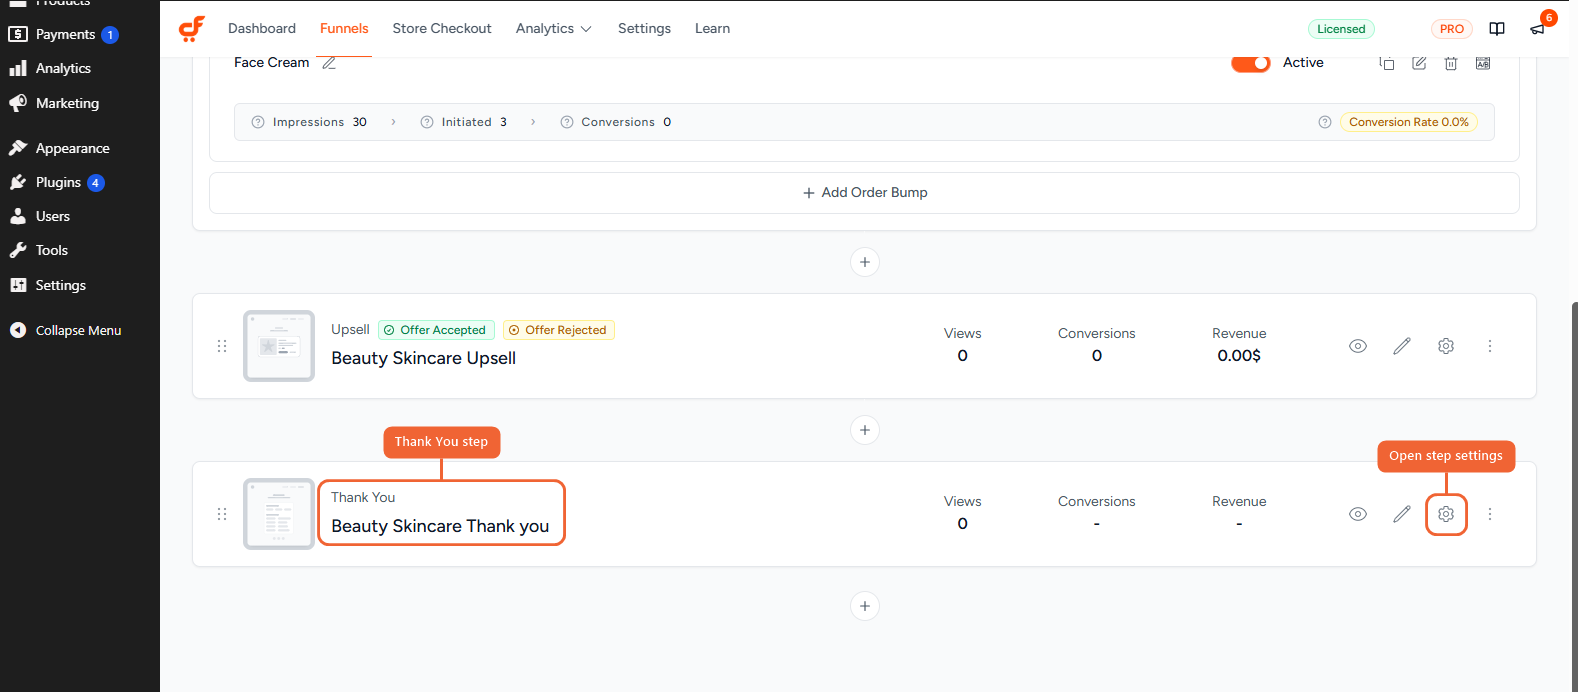
The settings open with the Options, Advanced, and General tabs on the left.
Choose Which Order Sections to Show
Step 1. Click the Options tab.
Step 2. Use the four toggles to show or hide each section of the page:
- Enable Order Overview
- Enable Order Details
- Enable Billing Details
- Enable Shipping Details
All four are on by default. If your page is built with a page builder, see the If You Use a Page Builder section below.
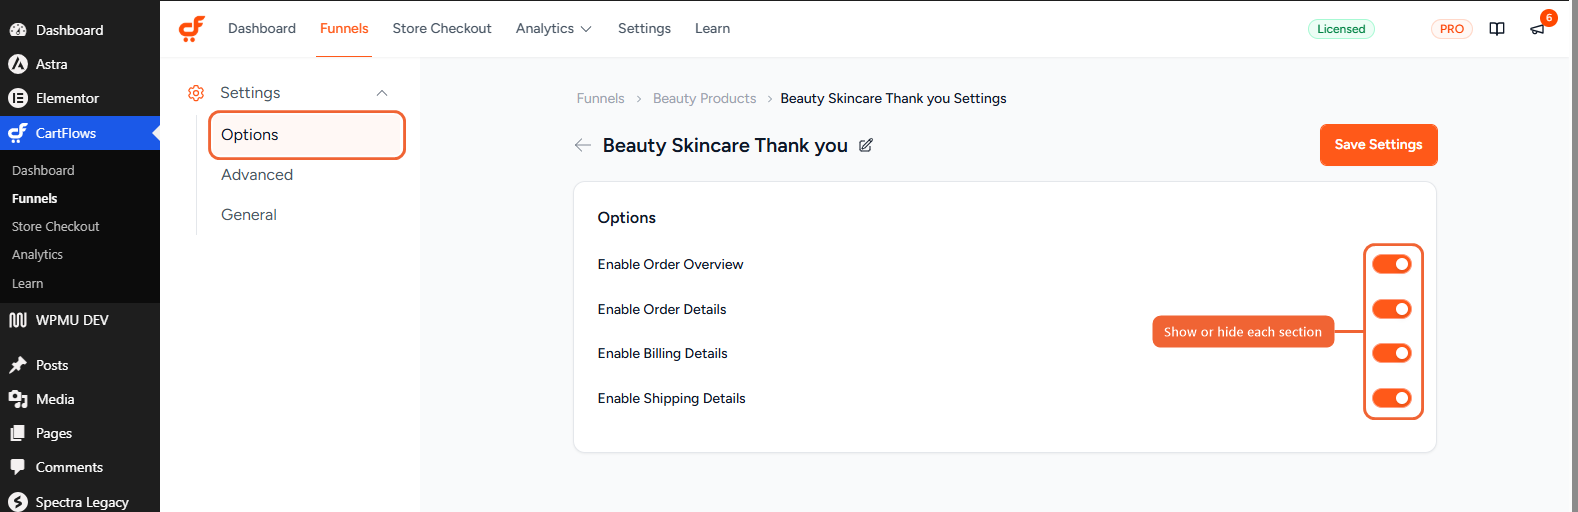
Step 3. Click Save Settings.
Here is where each section appears on the Thank You page.
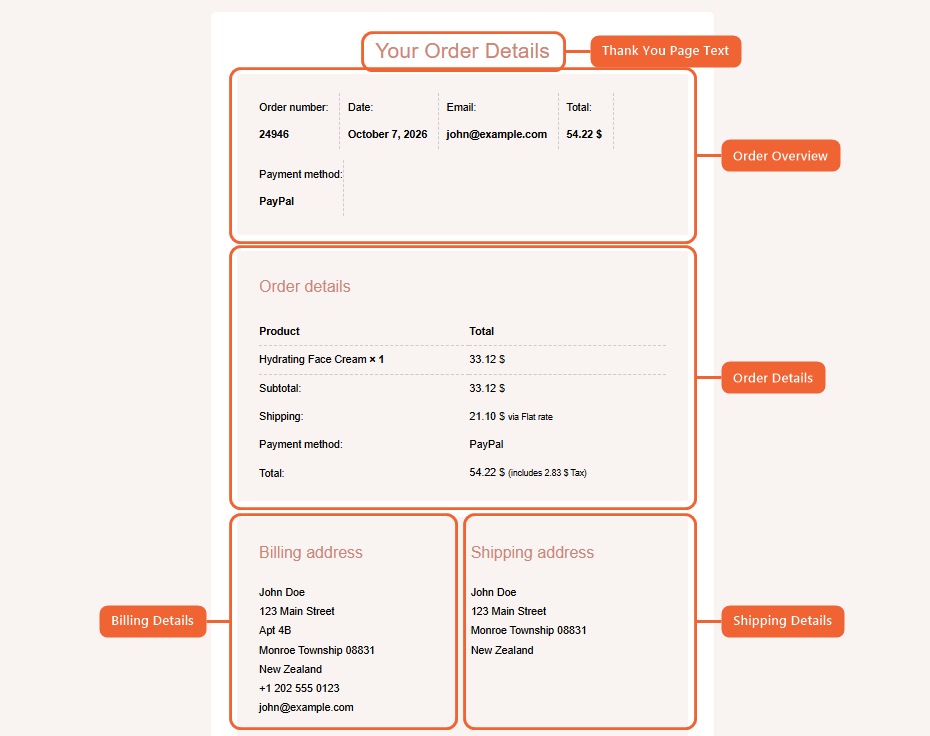
Tip: If you sell digital products that don’t need shipping, turn off Enable Shipping Details for a cleaner page.
Change the Thank You Message
Step 1. Click the Advanced tab.
Step 2. In Thank You Page Text, type the message you want customers to see. The default is “Thank you. Your order has been received.” The message shows on pages using Layout 1.
Step 3. Click Save Settings.
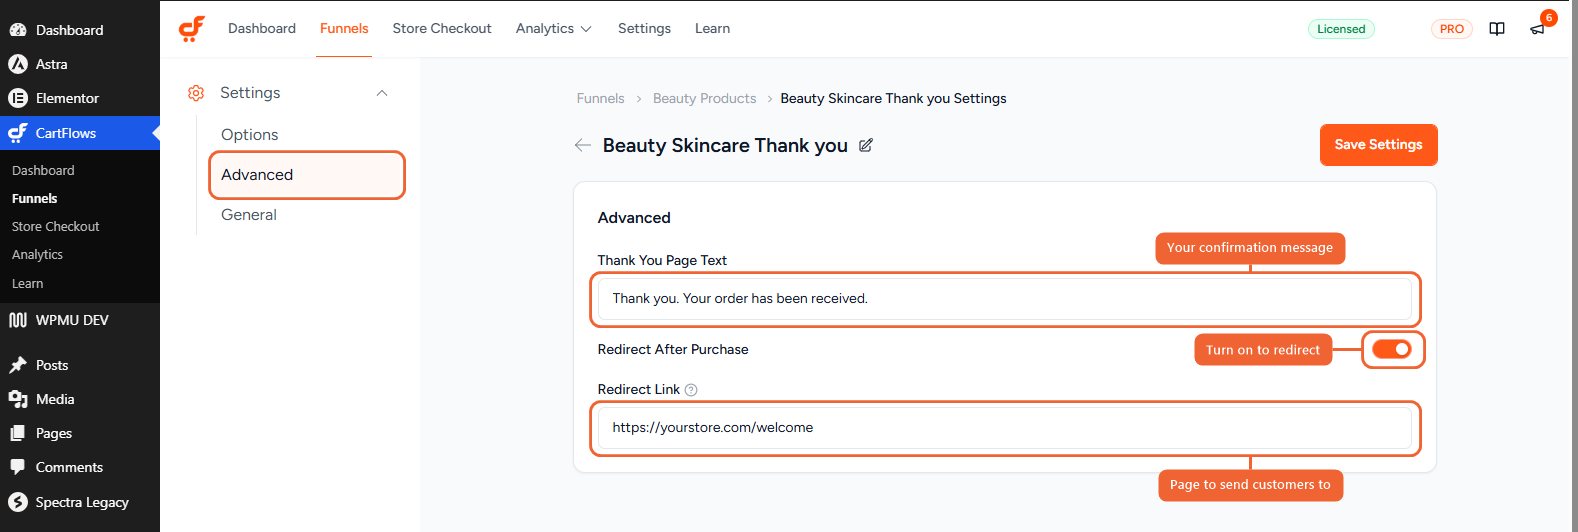
Redirect Customers After Purchase
You can skip the Thank You page and send customers straight to another page instead, such as a welcome page, a course dashboard, or a members area. The order is already complete when the redirect happens, so nothing is lost.
Step 1. On the Advanced tab, turn on Redirect After Purchase.
Step 2. In Redirect Link, enter the full address of the page, starting with https://.
Step 3. Click Save Settings.
Customers are now taken to that page at the end of the funnel, after any upsell or downsell offers.
Choose a Layout
CartFlows includes three ready-made layouts for the order details area. They show the same order information, arranged in different ways.
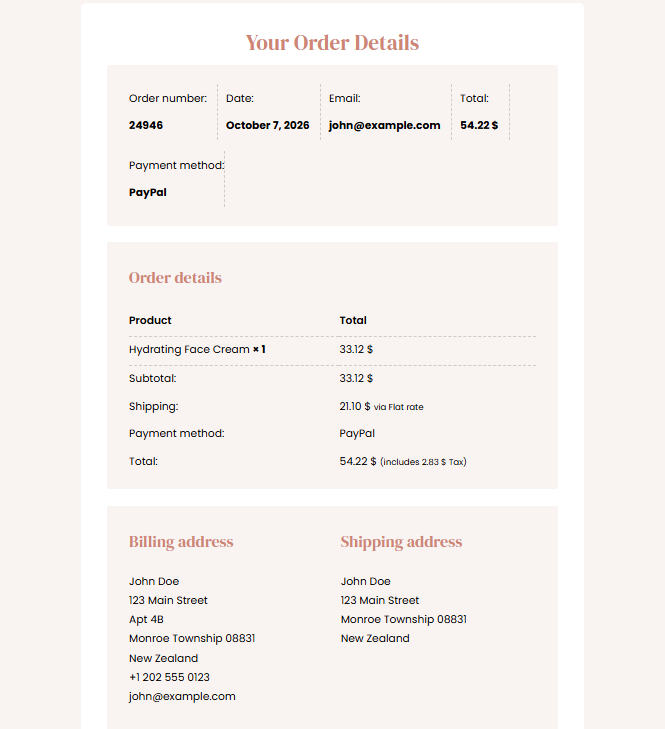
- Layout 1 (default) shows your thank you message at the top, an overview strip with the order number, date, email, total, and payment method, an Order details table, and the billing and shipping addresses side by side.
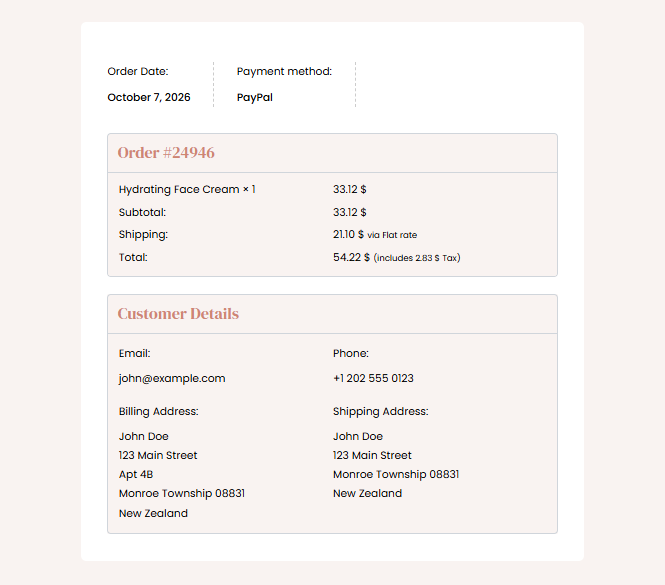
- Layout 2 gives a compact summary of the order date and payment method, followed by an Order # box with the products and totals, and a Customer Details box with the email, phone, and both addresses. Each box has an outline and a header.
- Layout 3 shows the same information as Layout 2, with bold labels in the summary and shaded sections separated by dashed lines instead of outlined boxes.
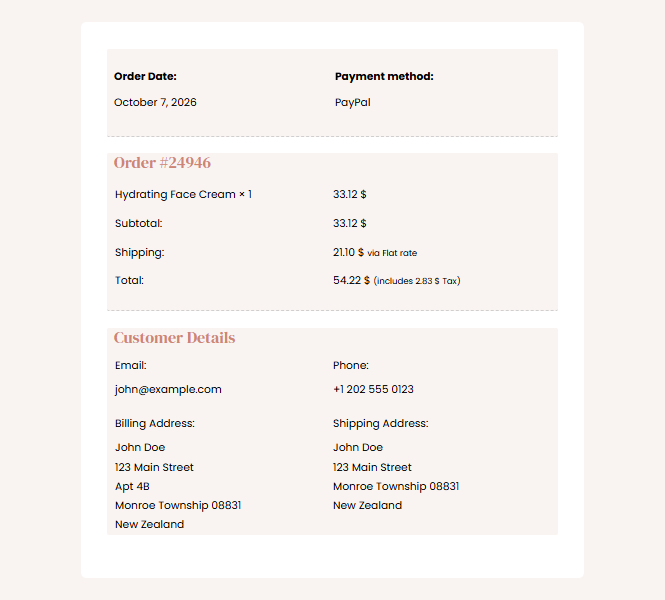
The thank you message appears in Layout 1. Layouts 2 and 3 go straight to the order details.
Where you pick the layout depends on how your page is built, as covered in the next two sections.
If You Use a Page Builder
Pages built with Elementor, the Block Editor, Beaver Builder, or Bricks use the CartFlows Order Details Form widget (a block in the Block Editor). Once it’s on your page, the widget controls how the order details look.
To open it, edit the Thank You page with your page builder and click the order details area.
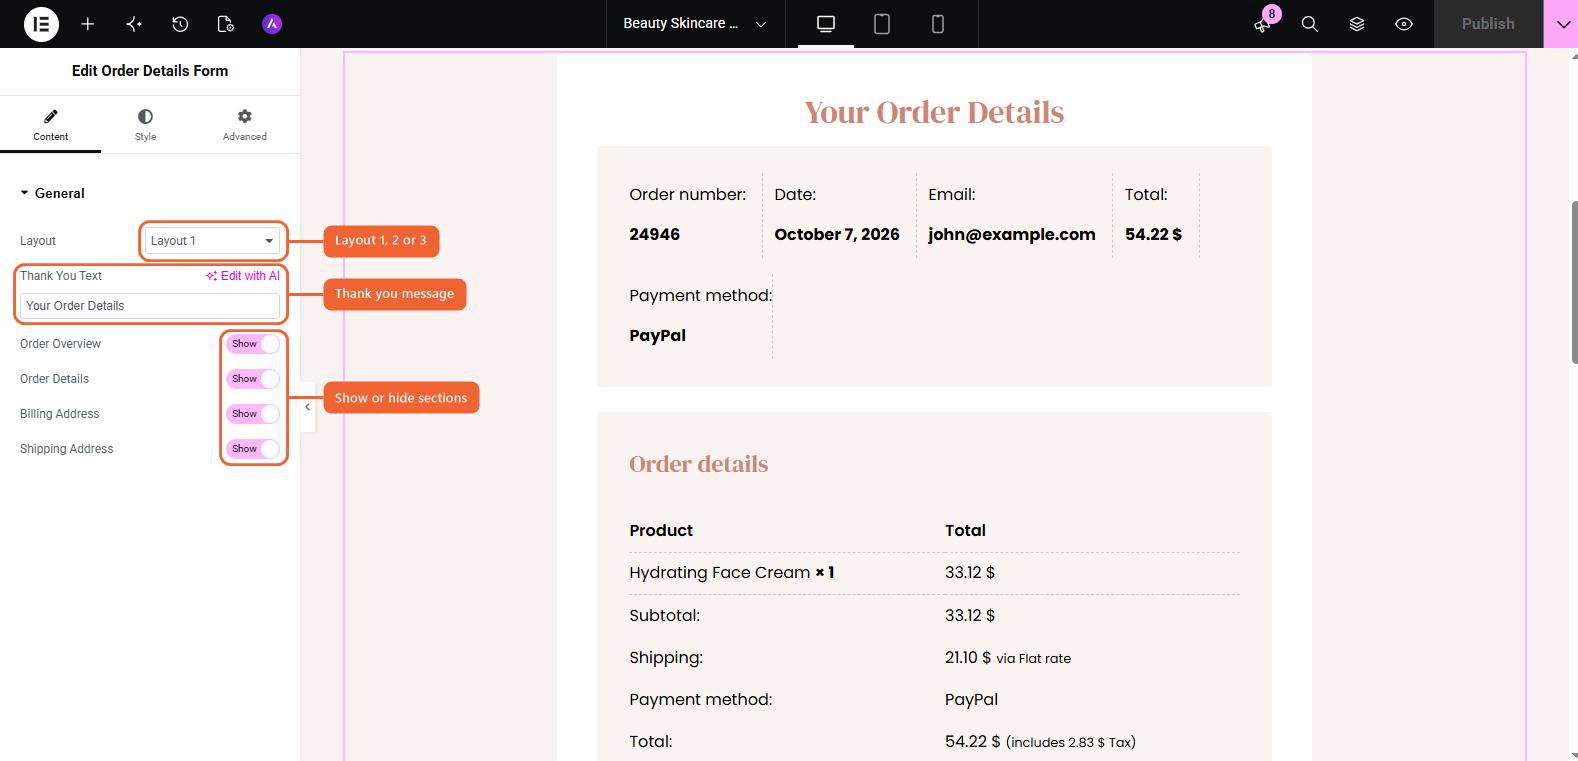
Set these in the widget:
- Layout — choose Layout 1, 2, or 3.
- Thank You Text — your thank you message. When this field has text, it’s shown instead of the step’s Thank You Page Text.
- Order Overview, Order Details, Billing Address, Shipping Address — show or hide each section.
- Style tab — colors, fonts, spacing, and backgrounds.
Set these in the Thank You step settings:
- Redirect After Purchase and Redirect Link.
- Step Slug and custom scripts or CSS on the General tab.
Tip: Keep all four toggles on the step’s Options tab turned on, and show or hide sections from the widget. This keeps every section in one place.
For more on each builder, see CartFlows Elementor Widgets, CartFlows Block Editor Blocks, CartFlows Beaver Builder Modules, or CartFlows Bricks Builder Integration.
If You Use the Shortcode
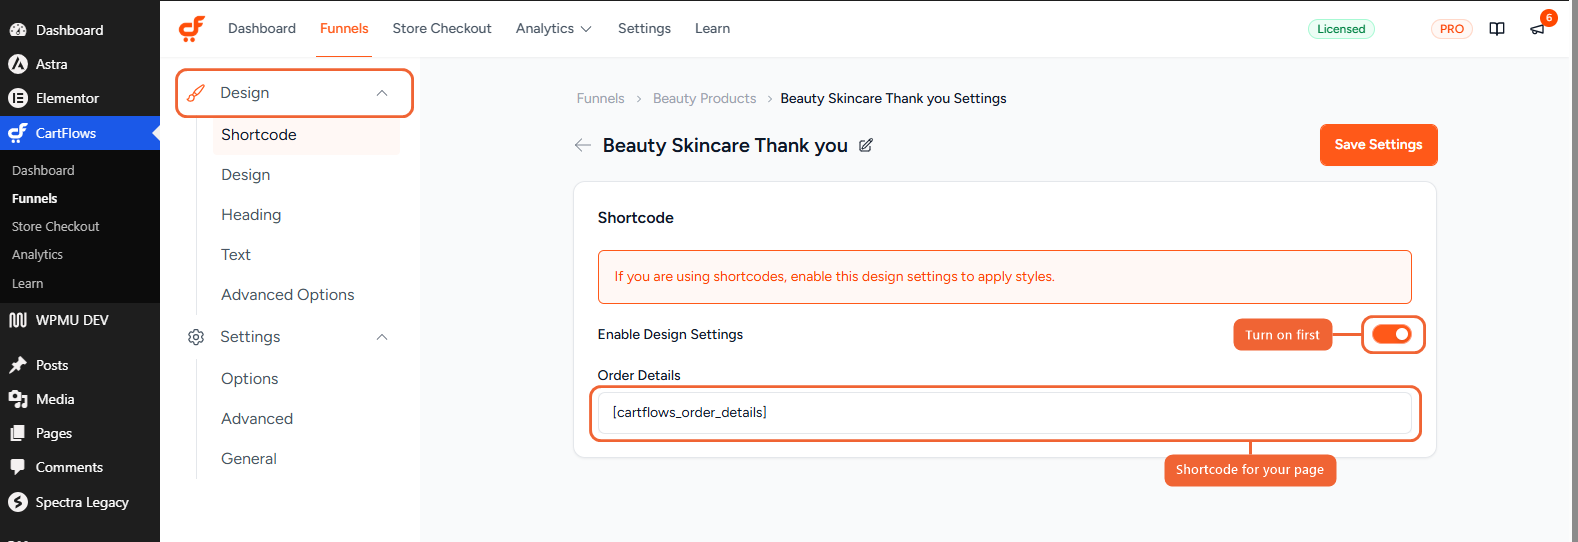
If your page uses the order details shortcode instead of a page builder, style it from the Design tab in the step settings. This tab shows when Show Ready Templates for is set to Other under CartFlows → Settings → General.
Step 1. Click the Design tab.
Step 2. Turn on Enable Design Settings. The shortcode to place on your page, [cartflows_order_details], is shown here too.
Step 3. In the Design tab’s menu on the left, open the Design section and choose a Thank You Skin: Layout 1, Layout 2, or Layout 3.
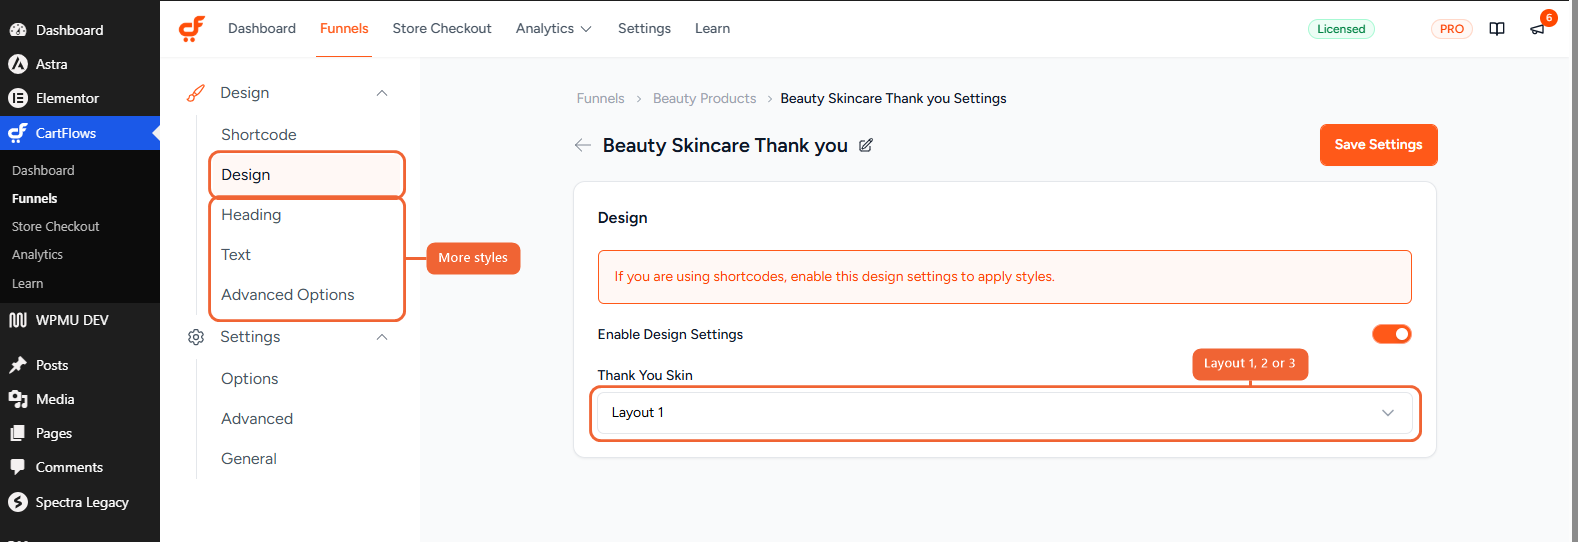
Step 4. Use the other sections to fine-tune the look:
- Heading — heading color and font.
- Text — text color, font, and font size.
- Advanced Options — container width and section background color.
Step 5. Click Save Settings.
Instant Layout: A Ready-Made Thank You Page
Instant Layout is a separate option that replaces the whole Thank You page with CartFlows’ own ready-made design. It’s a clean two-column page with the order confirmation and customer details on one side and the order summary on the other, and it needs no page builder.
To turn it on, open your funnel, click Funnel Settings (gear icon), go to Instant Layout, and turn on the toggle. It applies to the checkout and Thank You steps of that funnel. With Instant Layout on, the step’s Design tab holds its color, font, and button options.
For the full setup, see CartFlows Instant Layout for Checkout & Thank You Step.
Frequently Asked Questions
We don't respond to the article feedback, we use it to improve our support content.