
- Getting Started
- Creating Your First Funnel
- CartFlows Funnel Step Types
- Starting a Funnel from a Product Page
- How to Edit and Customise Funnel Steps
- Using CartFlows with or without Store Checkout
- How to Add /Assign Products to a Checkout Step
- How to Create One-Click Upsell and Downsell Offers
- How to Use Canvas Mode to Visualize Your Sales Funnel
- Hiding Fields on the Checkout Page
- Installing WooCommerce
- Using WooCommerce
- Adding Products in WooCommerce
- Using Your Theme's Header & Footer in a Step
- Embedding a Checkout Form on the Checkout Page
- Hiding WooCommerce Pages and Products
- Using Pricing Tables
- Adding an Affiliate Program
- Setting a Funnel as the Homepage
- Dynamic Offers aka Rule Engine
- Instant Layout for Checkout and Thank You Step
- Adding Products from the URL to the Checkout Page
- Deleting Plugin Data During Uninstallation
- Importing Ready-Made Templates for Funnels and Steps
- Importing and Exporting Funnels and Step
- URL Parameters
- Replacing the Main Checkout Order with an Upsell or Downsell
- Rolling back to a Previous Version
- Using the "Order Custom Field" Rule of Dynamic Offers with Custom Field Editor
- Optin
- Separate Orders
- Setting Up Pre-Checkout Upsell
- Refund Offer
- Applying a Coupon from the URL
- How to Create a Direct Buy-Now Checkout Link for a Product
- How Coupons Work in CartFlows?
- User role manager
- Instant Layout for Upsell and Downsell
- CartFlows Smart Login
- How to Set Preferred Countries on the Checkout Page
- CartFlows Product Options
- How to Set Up Two Step Checkout in CartFlows
- How to Set Up Multistep Checkout in CartFlows
- How to Customize the CartFlows Thank You Page
- How to Set Global Styling for a CartFlows Funnel
- How to Close a Checkout After a Date or Number of Orders
- Adding Order Bumps to WooCommerce Sales Funnel
- Replacing the First Product on Checkout with Order Bump
- Dynamic (Conditional) Order Bumps
- Order Bump AI
- Positions and Styles
- How to Auto-Apply a Coupon When an Order Bump Is Accepted
- How to Add Variable Products to an Order Bump
- How to A/B Test Order Bumps in CartFlows
- Google Address Autocomplete
- Flatsome UX Builder
- ActiveCampaign
- Paypal Reference Transactions
- How PaypPal/Stripe Works
- Enabling Enfold Avia Layout Builder
- Setting Up Authorize.net for Upsell & Downsell
- Supported Payment Gateways
- Setting Quantity and Discount for Products on the Checkout Page
- Adding Custom Payment Gateway Support for One-Click Upsell and Downsell
- Funnel in Test Mode
- Troubleshooting Plugin and Theme Conflicts
- Resolving the "Please Select a Simple, Virtual, and Free Product" Error
- Fixing Endless Loading on the Checkout Page
- Fixing the "We can't seem to find an order for you." Error on the Thank You Page
- Troubleshooting License Activation Issues
- Fixing the "Checkout ID Not Found" Error
- Fixing the "Session Expired" Error Message
- Resolving "Order Does Not Exist" Error on Upsell/Downsell Page
- Fixing the "Sorry, This Product Cannot Be Purchased" Error
- Disabling Auto-fill of Address Fields Based on Zip Code
- Enabling Theme's Scripts & Styles Without Changing Page Template
- Disabling Auto-fill of Checkout Fields
- Allowing Cache Plugins to Cache CartFlows Pages
- Changing the "Choose a Variation" Text
- VAT Field Not Displaying for WooCommerce EU/UK VAT Compliance Plugin
- Enabling the Product Tab on Store Checkout
- Displaying the Order Summary Open on Mobile Devices
- Refreshing the Checkout Page After CartFlows AJAX Calls
- Overview
- Installing Modern Cart Starter
- Installing Modern Cart Pro
- Activating License Key
- Customizing General Settings
- Customizing Cart Tray Labels
- Customizing Cart Icon Settings
- Customizing Cart Tray Styling
- Understanding the Product Recommendations Feature
- Controlling Product Recommendation Source for Empty Cart
How to Create a Direct Buy-Now Checkout Link for a Product
CartFlows lets you create a direct link straight to your checkout page with a specific product already added to the cart. Instead of sending customers through your shop or a landing page first, you can share one link, from an ad, an email, or social media, that takes them straight to checkout, ready to buy.
This is especially useful for:
- Running ads that go straight to checkout for a single product, skipping the shop page entirely
- Sending existing customers a one-click reorder link in an email
- Sharing a pre-filled checkout link with a coupon already applied
- Linking to checkout with a specific product variation (like a size or color) already selected
How It Works
CartFlows Checkout pages can read a few special parameters from the URL and use them to automatically add products to the cart, apply a coupon, and even pre-fill the customer’s checkout fields before they type anything.
You don’t need to build this URL by hand. CartFlows Pro includes a Checkout Link Generator that builds it for you.
Step 1: Open the Checkout Link Generator
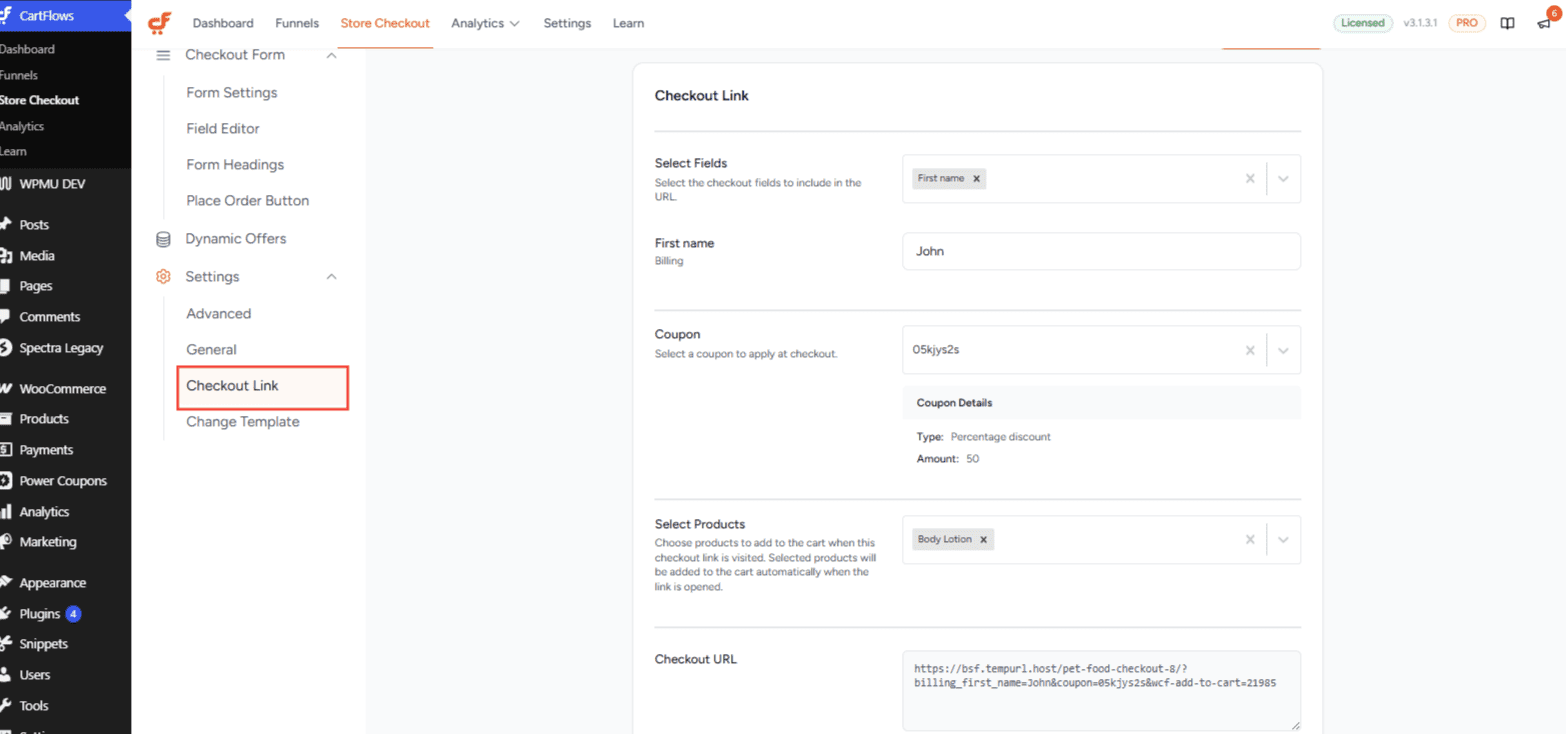
Go to CartFlows > Store Checkout (or Funnel checkout) in your WordPress dashboard, open the settings for the checkout step, then open the Checkout Link tab.
Step 2: Configure Your Link
On this screen, you can select:
- Checkout Step — which published checkout step the link should point to
- Product — the product to pre-add to the cart, including a specific variation of a variable product (e.g. a particular size or color)
- Coupon — optionally auto-apply a WooCommerce coupon (the generator shows its discount type, amount, and expiry so you can confirm you’ve picked the right one)
- Customer Details — optionally pre-fill any billing or shipping field on that checkout step, including custom fields added via the Checkout Field Editor
Step 3: Copy and Use the Generated Link
Copy the link and use it in ad campaigns, email marketing, or social posts.
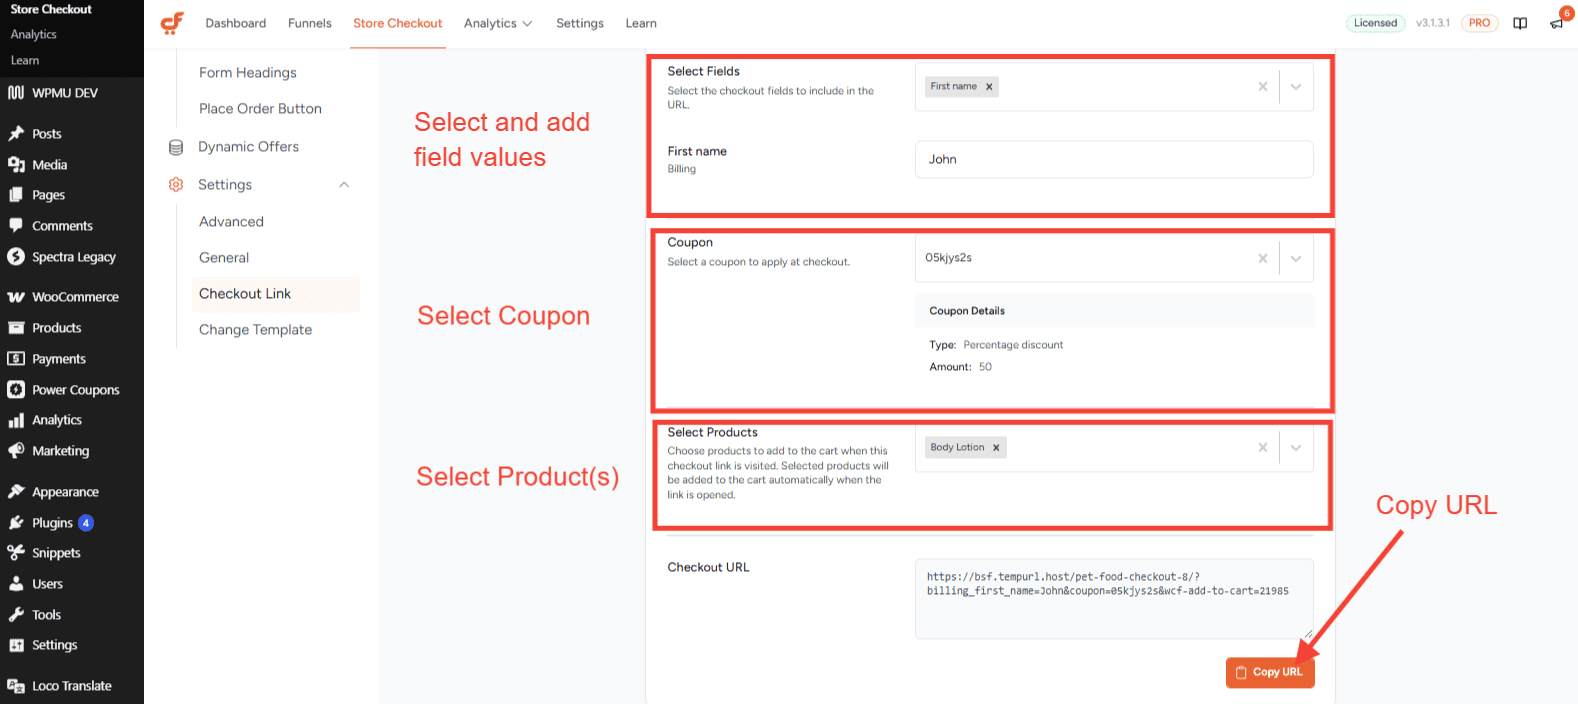
When a customer opens it, they land on checkout with the product already in the cart, any coupon applied, and any pre-filled details in place, ready to complete their order.
Building a Link Manually
| Parameter | Description |
| wcf-add-to-cart | Product ID (or variation ID) to add to the cart. Separate multiple IDs with commas. |
| wcf-qty | Quantity for each product listed in wcf-add-to-cart, in the same order, comma-separated. Defaults to 1 if omitted. |
| coupon | Coupon code to auto-apply. |
| Any checkout field key | Pre-fills that field, e.g. billing_first_name, billing_email, billing_address_1, shipping_address_1, or any custom field from the Checkout Field Editor. |
Example:
https://yourstore.com/checkout-page/?wcf-add-to-cart=1234
&wcf-qty=2&coupon=SAVE10&[email protected]
This link adds product ID 1234 (quantity 2) to the cart, applies the SAVE10 coupon, and pre-fills the billing email field with [email protected].
Note: If you add a shipping_* field to the link (for example shipping_address_1), CartFlows automatically checks the “Ship to a different address” option on checkout so the pre-filled shipping fields are visible right away, instead of staying hidden behind a collapsed section.
Notes
- For variable products, select the specific variation you want in the Checkout Link Generator (or use that variation’s own product ID in wcf-add-to-cart if building the link manually), rather than the parent product ID.
- This feature requires CartFlows Pro.
We don't respond to the article feedback, we use it to improve our support content.