
- Getting Started
- Creating Your First Funnel
- CartFlows Funnel Step Types
- Starting a Funnel from a Product Page
- How to Edit and Customise Funnel Steps
- Using CartFlows with or without Store Checkout
- How to Add /Assign Products to a Checkout Step
- How to Create One-Click Upsell and Downsell Offers
- How to Use Canvas Mode to Visualize Your Sales Funnel
- Hiding Fields on the Checkout Page
- Installing WooCommerce
- Using WooCommerce
- Adding Products in WooCommerce
- Using Your Theme's Header & Footer in a Step
- Embedding a Checkout Form on the Checkout Page
- Hiding WooCommerce Pages and Products
- Using Pricing Tables
- Adding an Affiliate Program
- Setting a Funnel as the Homepage
- Dynamic Offers aka Rule Engine
- Instant Layout for Checkout and Thank You Step
- Adding Products from the URL to the Checkout Page
- Deleting Plugin Data During Uninstallation
- Importing Ready-Made Templates for Funnels and Steps
- Importing and Exporting Funnels and Step
- URL Parameters
- Replacing the Main Checkout Order with an Upsell or Downsell
- Rolling back to a Previous Version
- Using the "Order Custom Field" Rule of Dynamic Offers with Custom Field Editor
- Google Address Autocomplete
- Flatsome UX Builder
- ActiveCampaign
- Paypal Reference Transactions
- How PaypPal/Stripe Works
- Enabling Enfold Avia Layout Builder
- Setting Up Authorize.net for Upsell & Downsell
- Supported Payment Gateways
- Setting Quantity and Discount for Products on the Checkout Page
- Adding Custom Payment Gateway Support for One-Click Upsell and Downsell
- Funnel in Test Mode
- Troubleshooting Plugin and Theme Conflicts
- Resolving the "Please Select a Simple, Virtual, and Free Product" Error
- Fixing Endless Loading on the Checkout Page
- Fixing the "We can't seem to find an order for you." Error on the Thank You Page
- Troubleshooting License Activation Issues
- Fixing the "Checkout ID Not Found" Error
- Fixing the "Session Expired" Error Message
- Resolving "Order Does Not Exist" Error on Upsell/Downsell Page
- Fixing the "Sorry, This Product Cannot Be Purchased" Error
- Disabling Auto-fill of Address Fields Based on Zip Code
- Enabling Theme's Scripts & Styles Without Changing Page Template
- Disabling Auto-fill of Checkout Fields
- Allowing Cache Plugins to Cache CartFlows Pages
- Changing the "Choose a Variation" Text
- VAT Field Not Displaying for WooCommerce EU/UK VAT Compliance Plugin
- Enabling the Product Tab on Store Checkout
- Displaying the Order Summary Open on Mobile Devices
- Refreshing the Checkout Page After CartFlows AJAX Calls
- Overview
- Installing Modern Cart Starter
- Installing Modern Cart Pro
- Activating License Key
- Customizing General Settings
- Customizing Cart Tray Labels
- Customizing Cart Icon Settings
- Customizing Cart Tray Styling
- Understanding the Product Recommendations Feature
- Controlling Product Recommendation Source for Empty Cart
How to Offer a Product Bundle as an Upsell
CartFlows Pro lets you offer a WooCommerce Product Bundle as a one-click upsell or downsell. Instead of offering a single product after checkout, you can present a ready-made set of products, such as a skincare kit, on one offer page and let customers add the whole set with one click.
This guide shows you how to set up a bundle as your offer, how to display it on the offer page, and what your customers see.
How Bundle Upsells Work
A bundle offer works like any other one-click upsell. The difference is that the offer page shows every product in the bundle, along with a single total price.
- After checkout, the customer lands on your upsell page and sees the products included in the bundle.
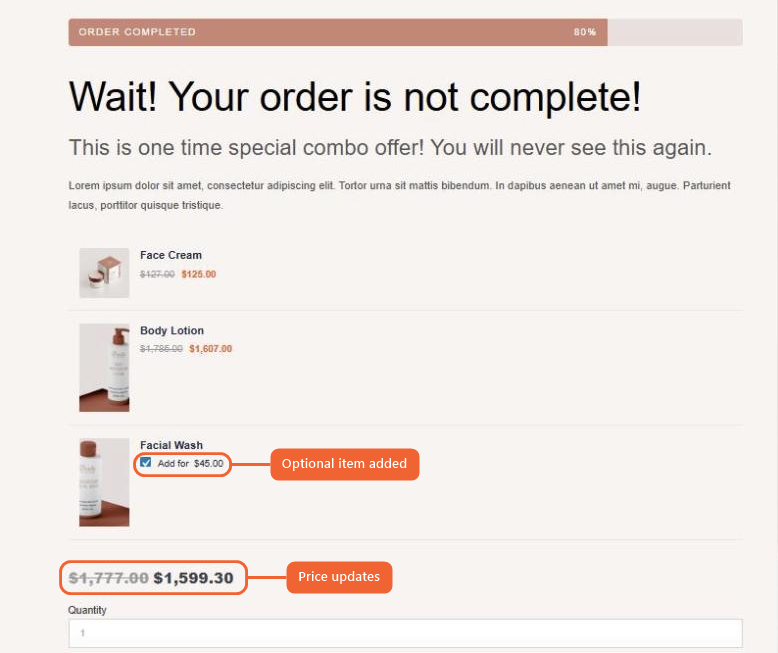
- If the bundle has optional items, the customer can tick the ones they want, and the price updates right away.
- When the customer accepts the offer, the bundle is added to their order without re-entering any payment details.
Your customers get a complete kit in one step, and you can raise your order value with a single offer page.
What You Need
- CartFlows Pro, for one-click upsells and downsells.
- WooCommerce Product Bundles, to create the bundle product.
- A payment method that supports one-click upsells, such as Stripe.
How to Set Up a Bundle Upsell
Setting up a bundle offer takes three parts: creating the bundle, adding it to your upsell step, and showing it on the offer page.
Create the Bundle in WooCommerce
Step 1. Go to Products → Add New and enter a name for your bundle, for example “Glow Skincare Bundle”.
Step 2. In the Product data box, choose Product bundle from the dropdown.
Step 3. Open the Bundled Products tab and add the products you want to include.
Step 4. Click a product in the list to open its settings. Tick Optional for any product the customer should be able to add or leave out. Tick Priced Individually so the bundle price is the total of its products.
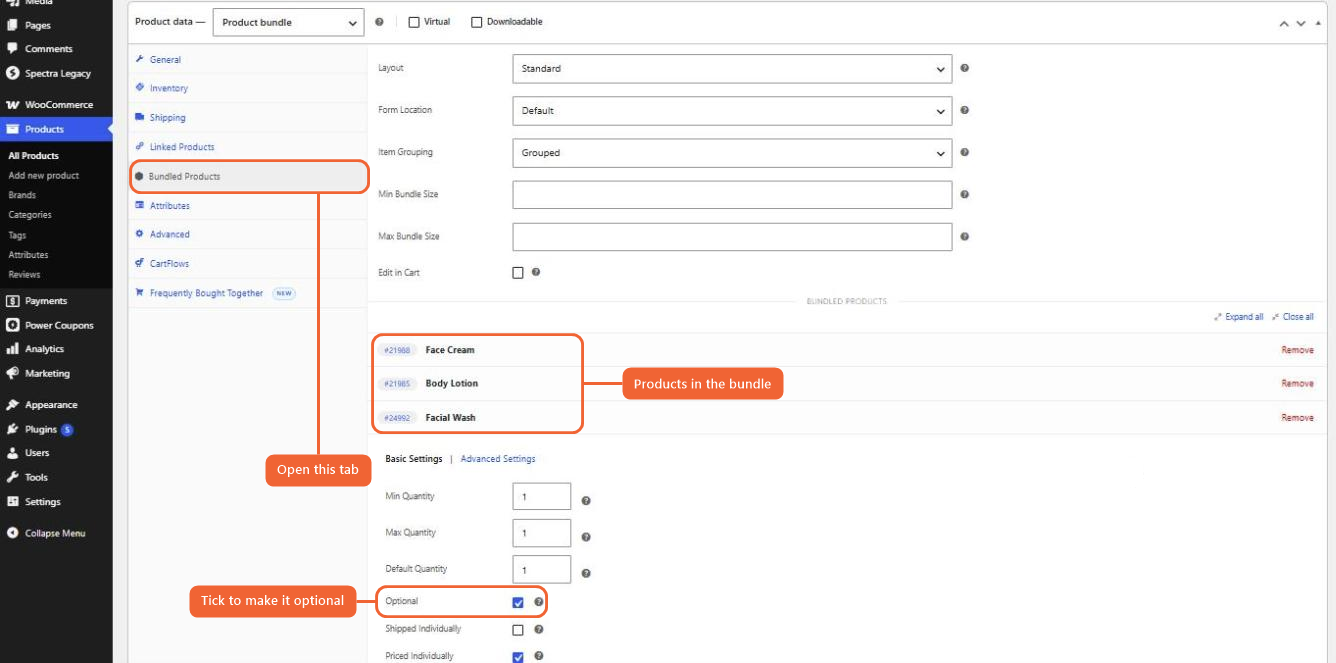
Products without Optional ticked are always part of the bundle. Optional products show a checkbox on the offer page, so customers can choose whether to add them.
Step 5. Click Publish to save the bundle.
Add the Bundle to Your Upsell Step
Step 1. Go to CartFlows → Funnels and open the funnel you want to use.
Step 2. Click the settings icon on your Upsell step.
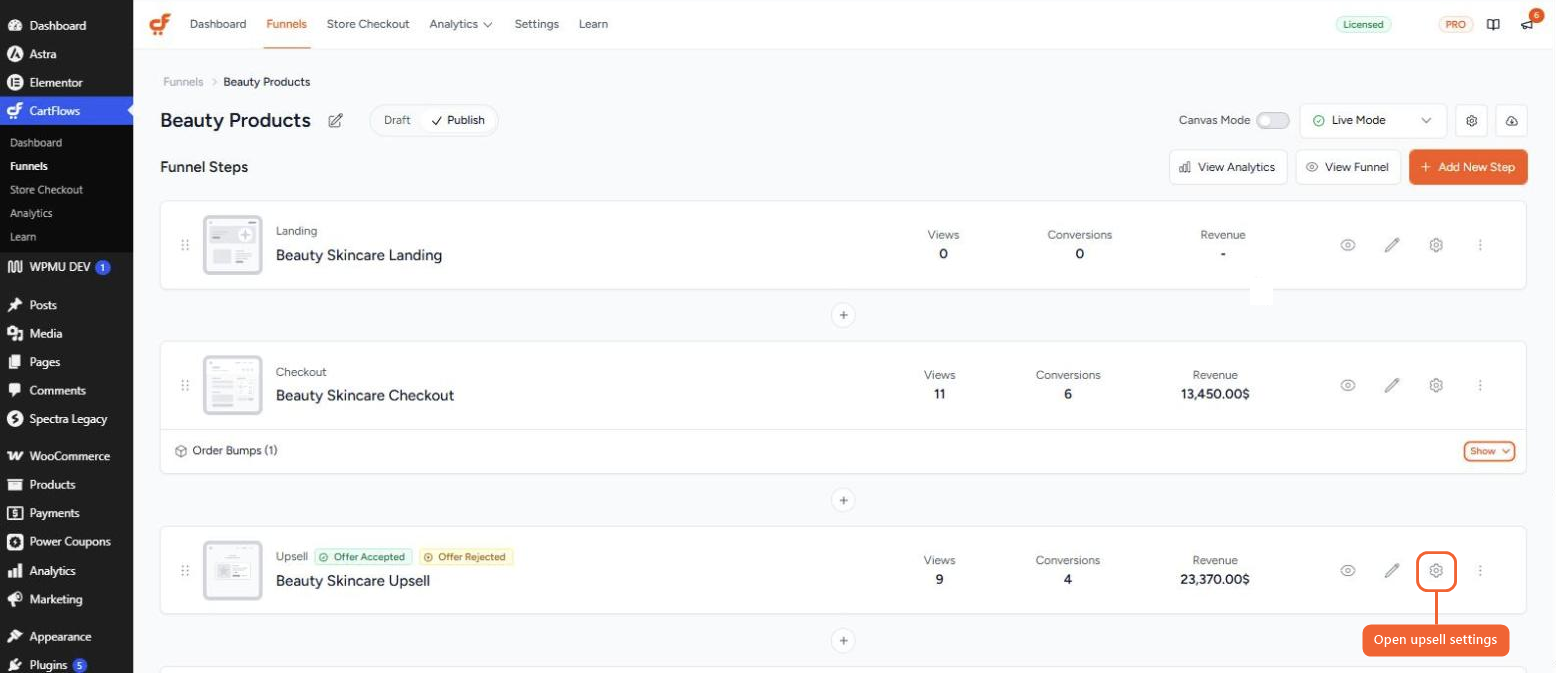
Step 3. In the Products section, search for your bundle. Bundle products are marked with a Bundle label in the results.
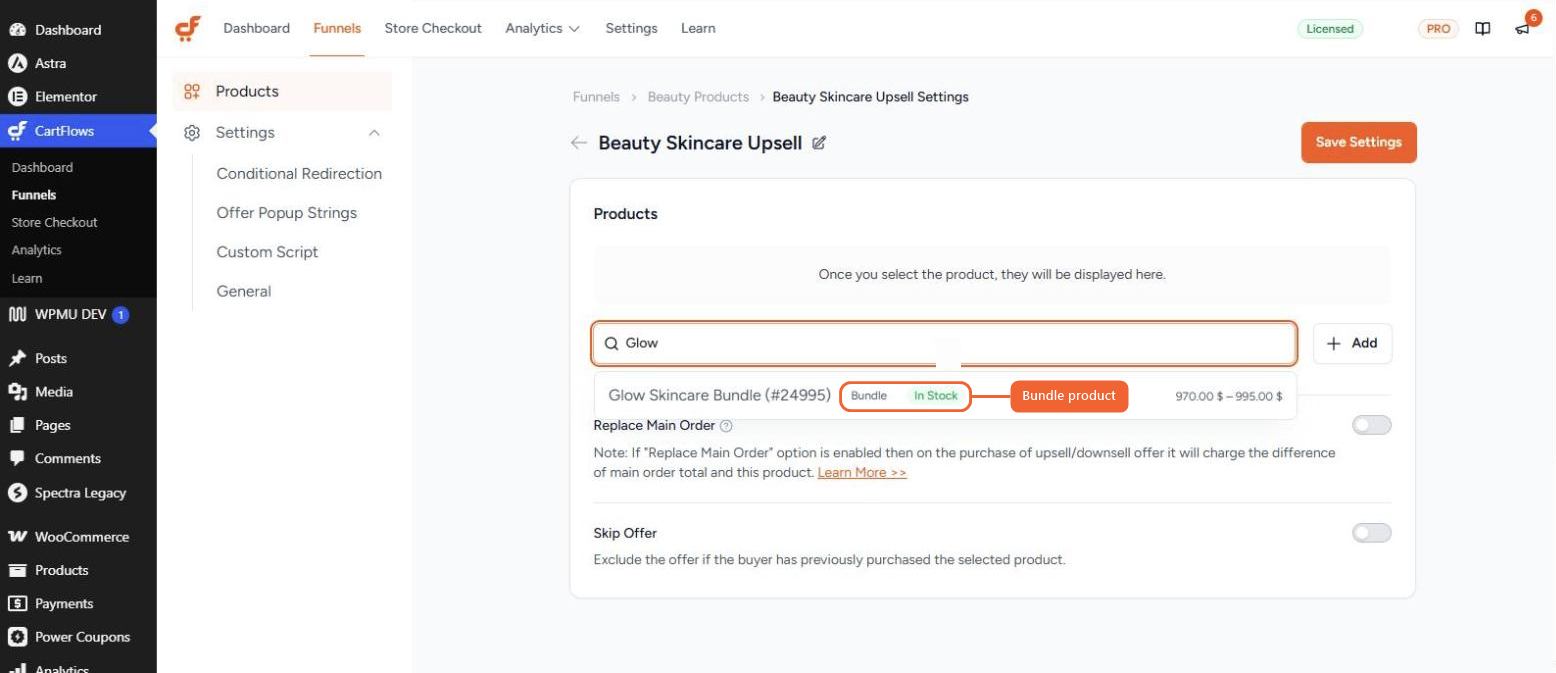
Step 4. Select the bundle and click Add.
Step 5. To offer the bundle at a special price, choose a discount type and enter the amount. The discounted price appears next to the bundle straight away.
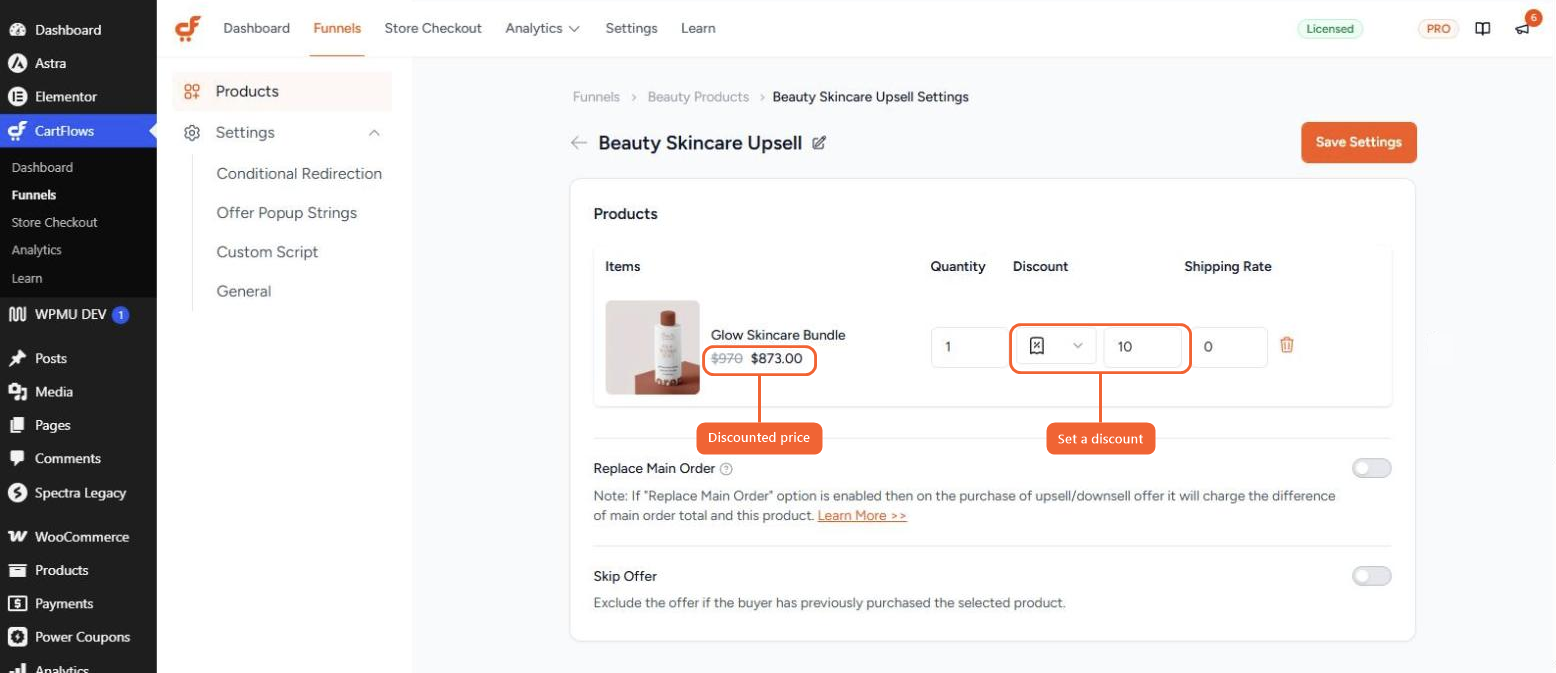
Step 6. Click Save Settings.
Your bundle is now the offer for this upsell step. You can follow the same steps for a downsell step.
Show the Bundle on the Offer Page
To let customers see the products in the bundle and choose optional items, add two CartFlows widgets to your offer page.
Step 1. From the funnel, click the edit icon on your upsell step to open it in Elementor.
Step 2. Search for “offer product” in the widgets panel.
Step 3. Drag in these two widgets:
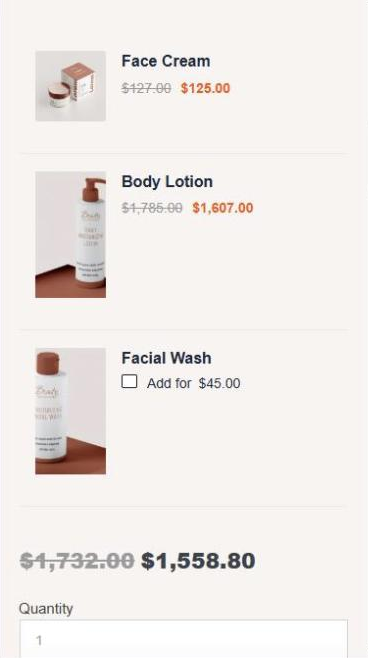
- Offer Product Variation: shows each product in the bundle, with checkboxes for optional products.
- Offer Product Price: shows the bundle price, including your discount, and updates when customers change their selection.
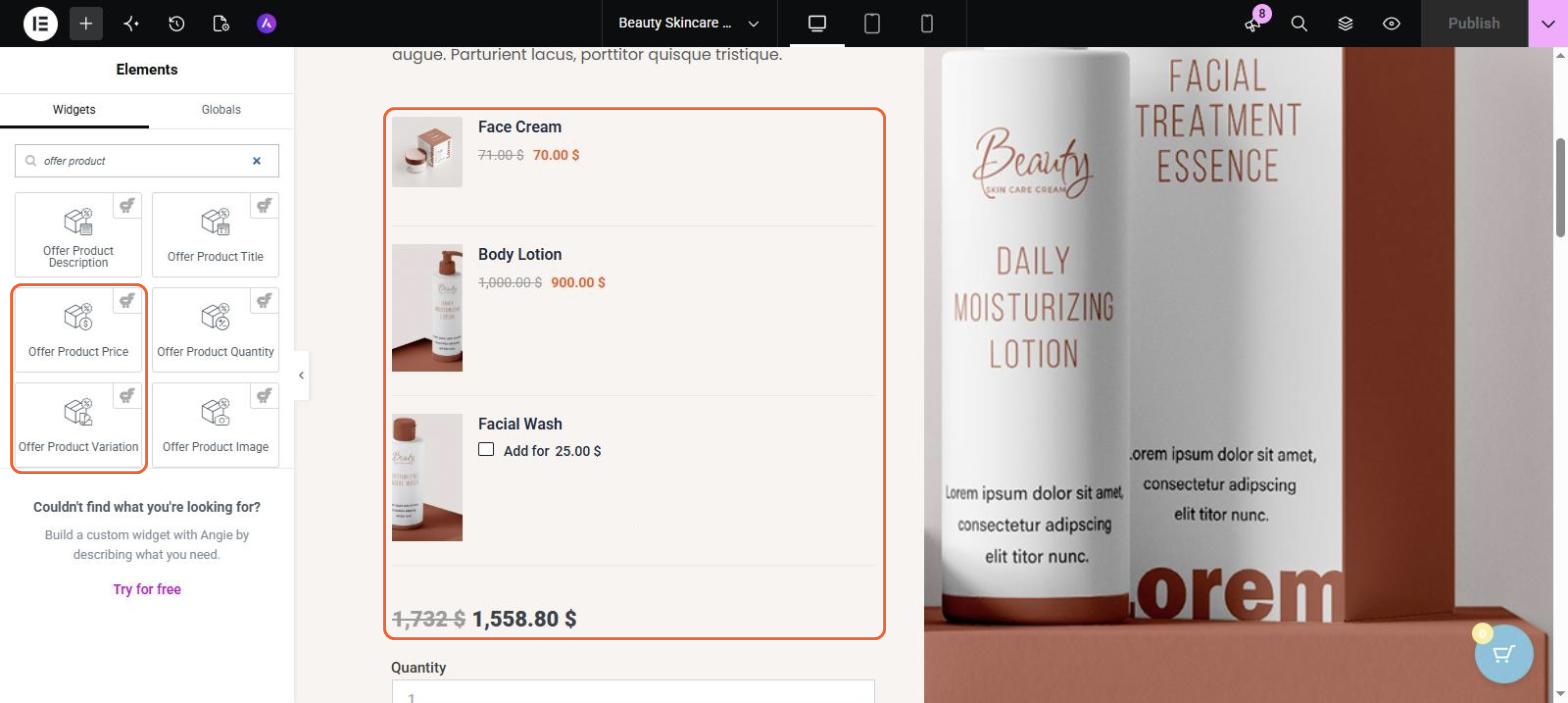
Step 4. Click Publish in Elementor.
If you build your offer pages with a different page builder, add the [cartflows_offer_product_variation] and [cartflows_offer_product_price] shortcodes to the page instead. Place them where you want the bundle products and the price to appear.
The Bundle Offer in Action
After checkout, customers see the bundle on your offer page. Each product is listed with its image and price, and the total price is shown underneath.
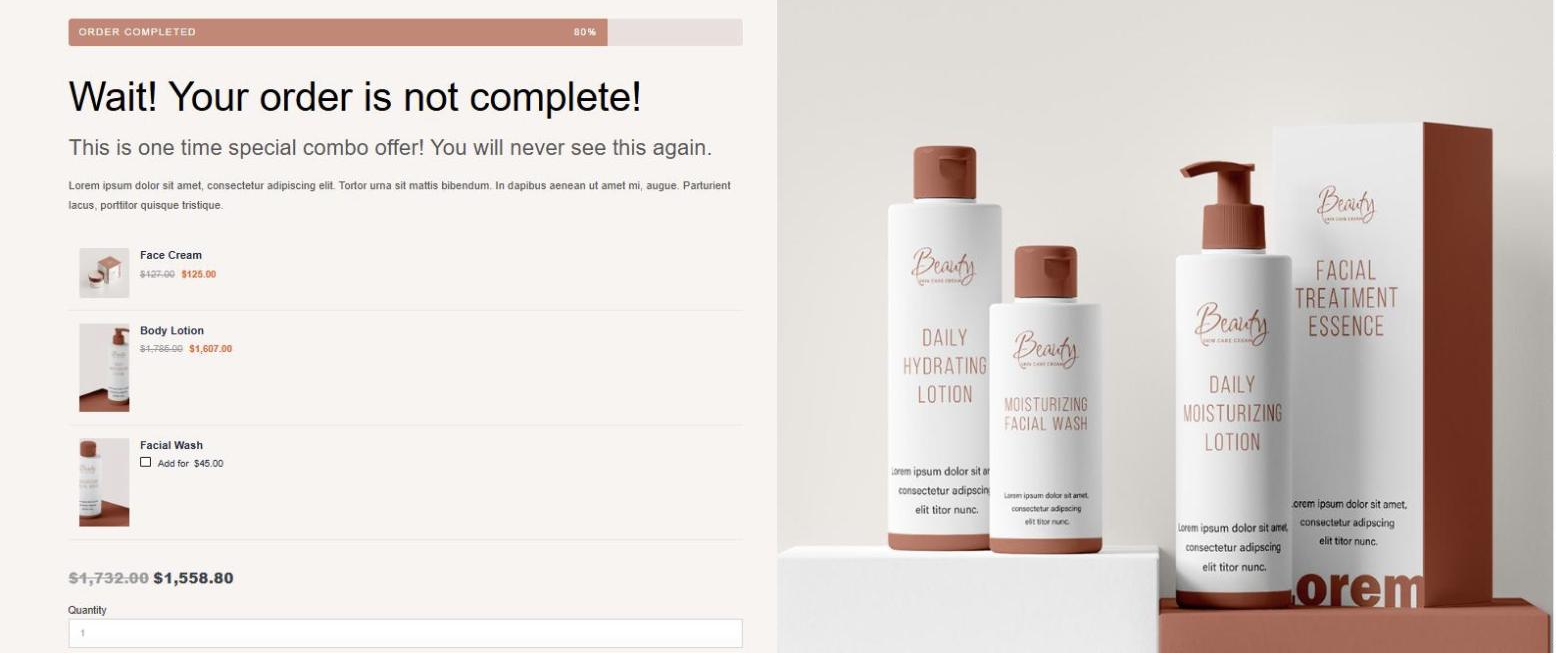
When a customer ticks an optional product, it is added to the bundle and the price updates right away.
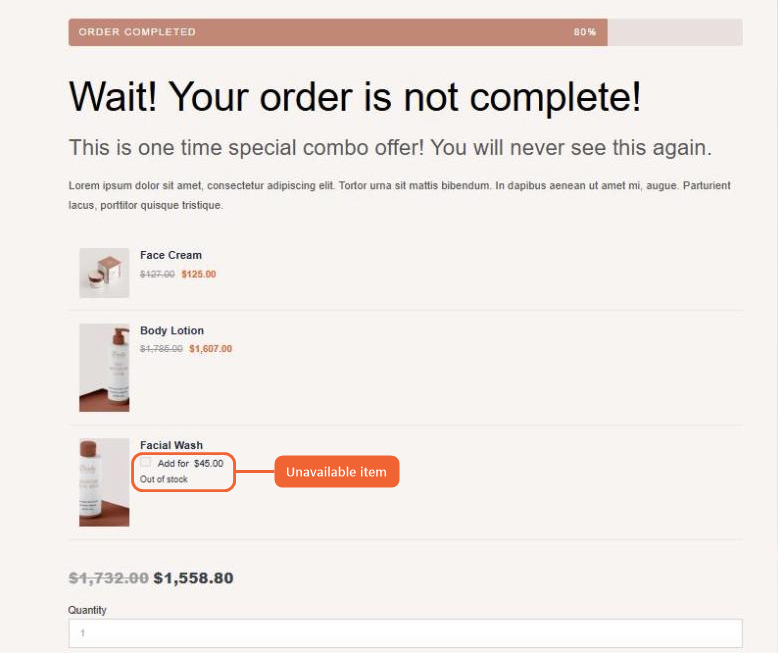
Optional products also follow your stock levels. If one is out of stock, it is shown as Out of stock and its checkbox is turned off, so the customer can still accept the rest of the bundle.
On Mobile Devices
On smaller screens, the bundle products stack neatly, and the price and button stay easy to reach. Customers can tick optional products just as they would on desktop.
How the Bundle Appears in the Order
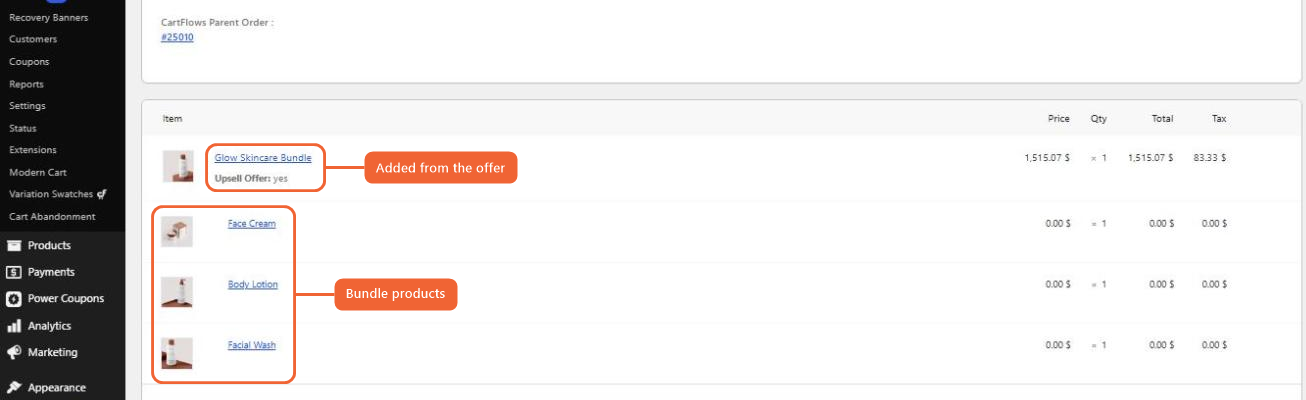
When a customer accepts the offer, the bundle is added as an upsell, with each product listed underneath it. The bundle line is marked Upsell Offer: yes, so you can see at a glance which products came from the offer.
Frequently Asked Questions
We don't respond to the article feedback, we use it to improve our support content.