
- Hiding Fields on the Checkout Page
- Installing WooCommerce
- Using WooCommerce
- Adding Products in WooCommerce
- Using Your Theme's Header & Footer in a Step
- Embedding a Checkout Form on the Checkout Page
- Hiding WooCommerce Pages and Products
- Using Pricing Tables
- Adding an Affiliate Program
- Setting a Funnel as the Homepage
- Dynamic Offers aka Rule Engine
- Instant Layout for Checkout and Thank You Step
- Adding Products from the URL to the Checkout Page
- Deleting Plugin Data During Uninstallation
- Importing Ready-Made Templates for Funnels and Steps
- Importing and Exporting Funnels and Step
- URL Parameters
- Replacing the Main Checkout Order with an Upsell or Downsell
- Rolling back to a Previous Version
- Using the "Order Custom Field" Rule of Dynamic Offers with Custom Field Editor
- Google Address Autocomplete
- Flatsome UX Builder
- ActiveCampaign
- Paypal Reference Transactions
- How PaypPal/Stripe Works
- Enabling Enfold Avia Layout Builder
- Setting Up Authorize.net for Upsell & Downsell
- Supported Payment Gateways
- Setting Quantity and Discount for Products on the Checkout Page
- Adding Custom Payment Gateway Support for One-Click Upsell and Downsell
- Funnel in Test Mode
- Troubleshooting Plugin and Theme Conflicts
- Resolving the "Please Select a Simple, Virtual, and Free Product" Error
- Fixing Endless Loading on the Checkout Page
- Fixing the "We can't seem to find an order for you." Error on the Thank You Page
- Troubleshooting License Activation Issues
- Fixing the "Checkout ID Not Found" Error
- Fixing the "Session Expired" Error Message
- Resolving "Order Does Not Exist" Error on Upsell/Downsell Page
- Fixing the "Sorry, This Product Cannot Be Purchased" Error
- Disabling Auto-fill of Address Fields Based on Zip Code
- Enabling Theme's Scripts & Styles Without Changing Page Template
- Disabling Auto-fill of Checkout Fields
- Allowing Cache Plugins to Cache CartFlows Pages
- Changing the "Choose a Variation" Text
- VAT Field Not Displaying for WooCommerce EU/UK VAT Compliance Plugin
- Enabling the Product Tab on Store Checkout
- Displaying the Order Summary Open on Mobile Devices
- Refreshing the Checkout Page After CartFlows AJAX Calls
- Overview
- Installing Modern Cart Starter
- Installing Modern Cart Pro
- Activating License Key
- Customizing General Settings
- Customizing Cart Tray Labels
- Customizing Cart Icon Settings
- Customizing Cart Tray Styling
- Understanding the Product Recommendations Feature
- Controlling Product Recommendation Source for Empty Cart
- Controlling When the Cart Opens After Adding Products
- Enabling Free Shipping in WooCommerce
- Configuring Upsell and Cross-Sell Products in WooCommerce
- Using a Custom Image for the Floating Cart Icon
- Setting Custom Product Recommendations in the Cart
- Opening the Cart Using a Custom Button or Link
- Floating Icon Styling
- Cart Opening Direction
- Popup Cart Feature
- Using the In-Cart Coupon Field
- Free Shipping Progress Bar
- Enabling AJAX Add to Cart
- Compatibility with Popular Themes and Page Builders
- How to Enable/Disable Modern Cart on Specific Pages
- RTL Language Support in Modern Cart
- How to Show / Hide Product Images in the Cart Tray
- How to Add a Modern Cart Trigger to a WordPress Menu
- How to Display Shipping Costs Inside the Cart Tray
- How to Show Taxes / Tax-Inclusive Prices in the Cart
- Common Issues and Fixes
How to Add a Modern Cart Trigger to a WordPress Menu
Modern Cart lets you turn any menu item, header cart icon, or other clickable element into a cart trigger using its built-in Use Custom Trigger setting. This opens the cart tray right from your navigation menu, with no custom JavaScript required.
Note
This feature is available only in the Modern Cart Pro version.
Method 1 – Custom Menu Item + Use Custom Trigger
Step 1: Add the menu item
1. Go to Appearance > Menus.
2. Open Screen Options (top right) and tick CSS Classes (this field is hidden by default).
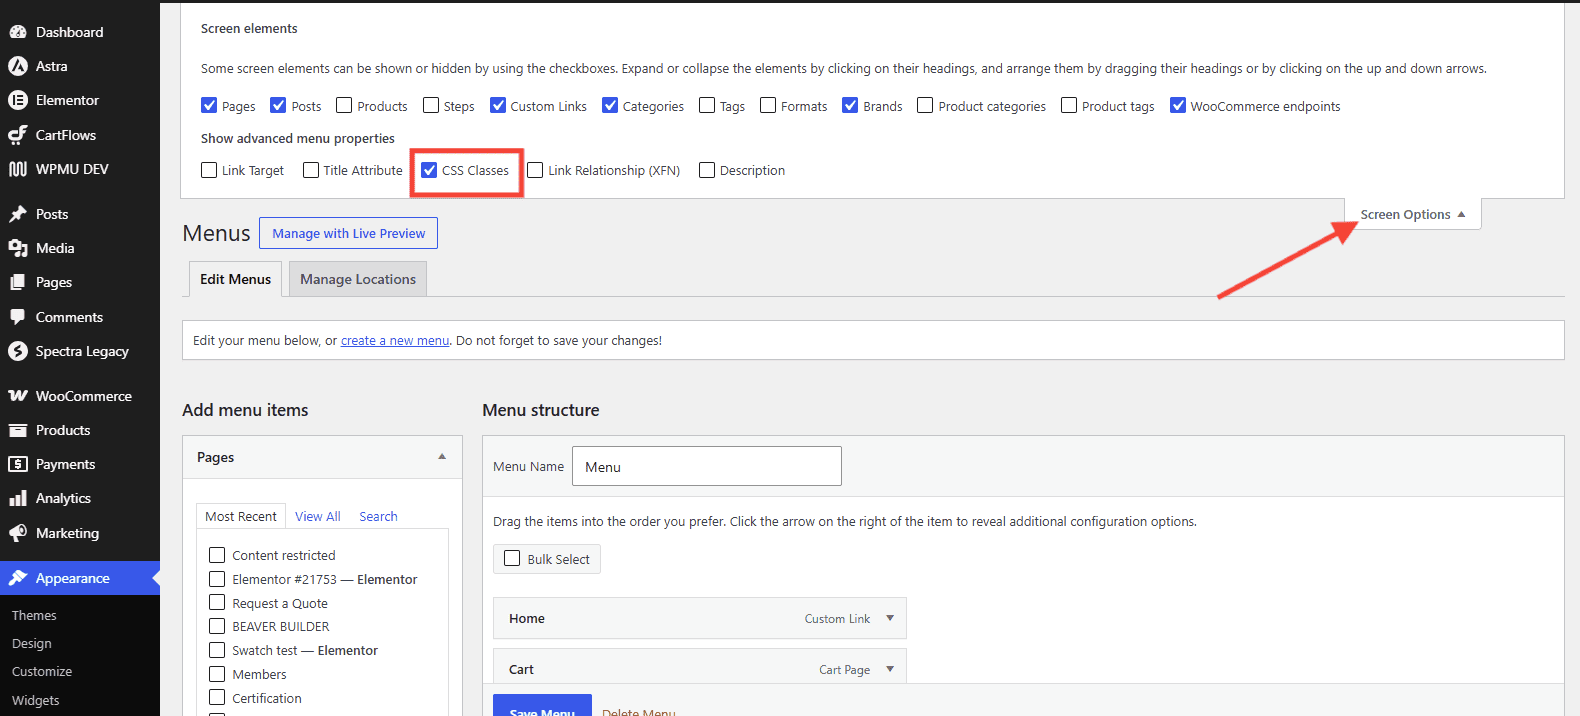
3. Expand the Custom Links section, set the URL to # and the Link Text to Cart (or paste a cart emoji to show an icon).
4. Click Add to Menu.
5. Enter a class in the menu item’s CSS Classes field, e.g. my-cart-trigger.
6. Save the menu.
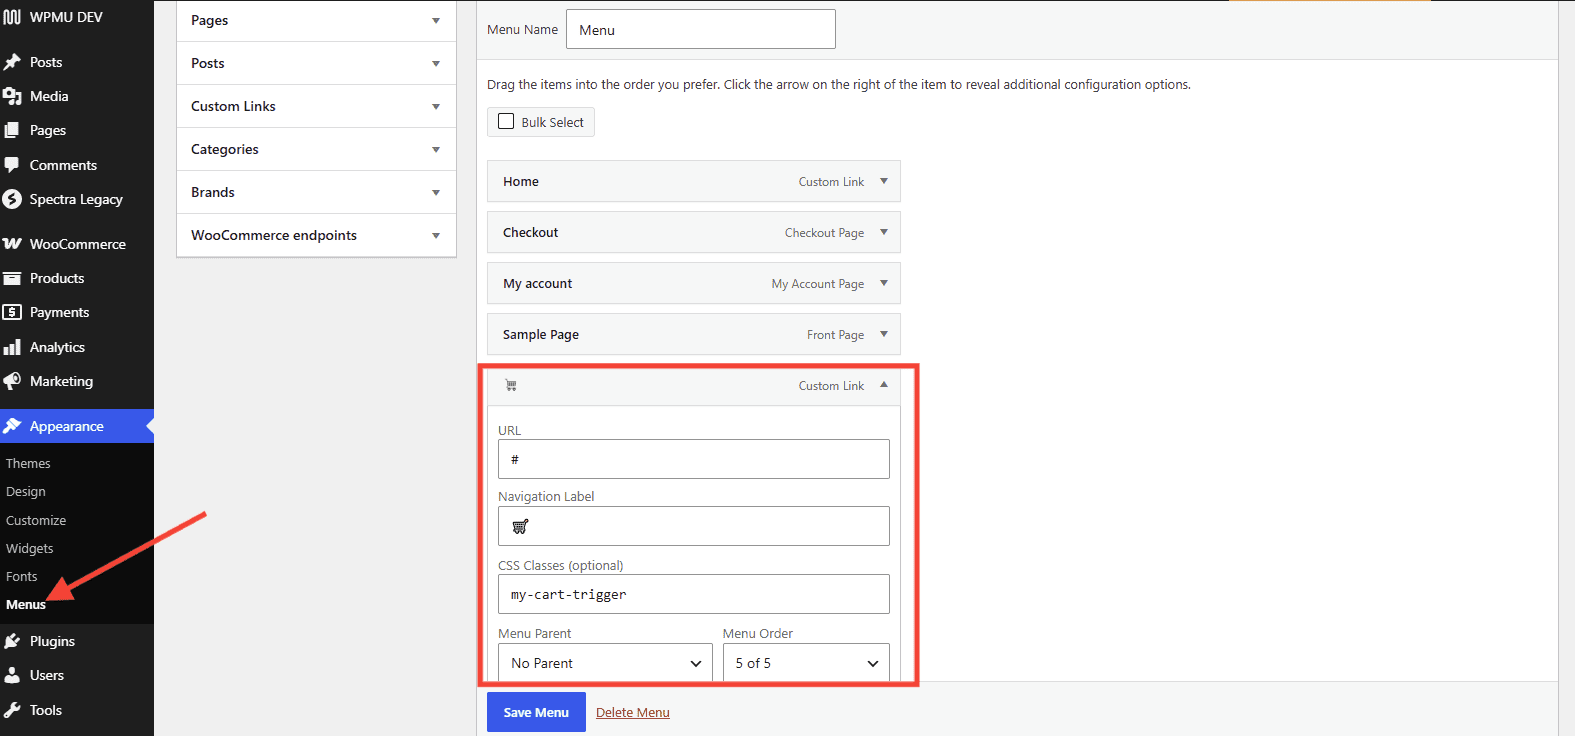
Step 2: Register the trigger in Modern Cart
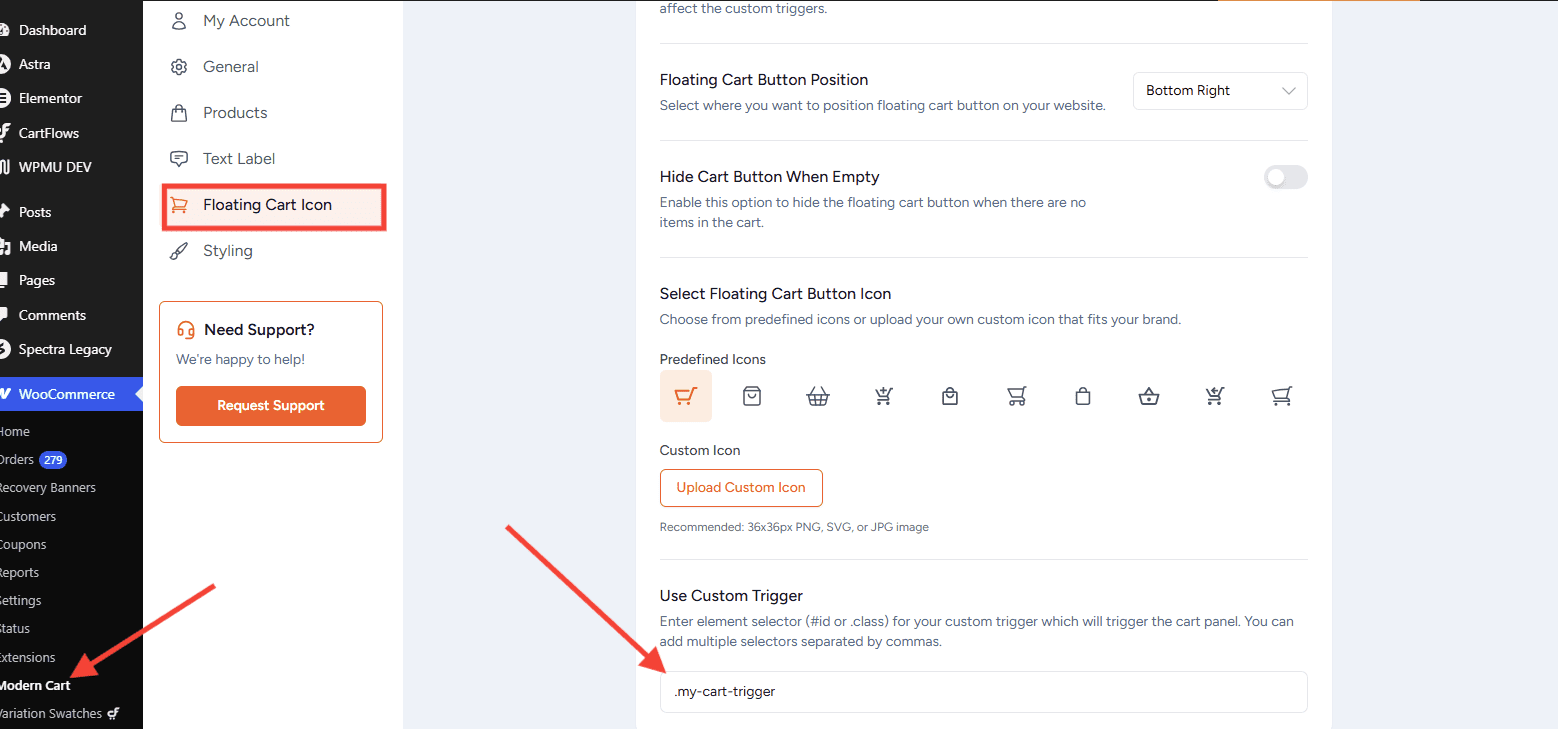
- Go to WooCommerce > Modern Cart > Floating Cart Icon.
- Scroll to Use Custom Trigger and enter your selector:
.my-cart-trigger(you can add multiple, comma-separated, e.g..my-cart-trigger, #my-id). - Save. Clicking the menu item now opens the cart tray.
Method 2 – Cart Icon in a Header Built with a Page Builder or Theme
If your header is built with a page builder (Elementor including Ultimate Addons for Elementor, Bricks, Beaver Builder, Spectra) or your theme’s header builder (Astra, Kadence, etc.), you can use the cart icon there as the trigger:
- Add an Icon, Button, or Cart widget to your header and choose a cart icon.
- In that element’s settings, add a CSS class or ID, usually under Advanced > CSS Classes or CSS ID, e.g.
my-custom-cart. - Go to WooCommerce > Modern Cart > Floating Cart Icon, scroll to Use Custom Trigger, and enter that selector (
.my-custom-cart). - Save. Clicking the header cart icon now opens the cart tray.
Tip: On Astra theme, the theme’s built-in header cart icon opens Modern Cart automatically, with no setup needed.
Notes
- The floating cart launcher is the primary intended trigger. Menu and header triggers use the Use Custom Trigger setting.
- The floating button and custom triggers work independently; hiding the floating button does not disable your custom triggers.
- Always test on both desktop and mobile after adding triggers.
Here is the related Doc on the Custom Trigger feature.
We don't respond to the article feedback, we use it to improve our support content.