
- Hiding Fields on the Checkout Page
- Installing WooCommerce
- Using WooCommerce
- Adding Products in WooCommerce
- Using Your Theme's Header & Footer in a Step
- Embedding a Checkout Form on the Checkout Page
- Hiding WooCommerce Pages and Products
- Using Pricing Tables
- Adding an Affiliate Program
- Setting a Funnel as the Homepage
- Dynamic Offers aka Rule Engine
- Instant Layout for Checkout and Thank You Step
- Adding Products from the URL to the Checkout Page
- Deleting Plugin Data During Uninstallation
- Importing Ready-Made Templates for Funnels and Steps
- Importing and Exporting Funnels and Step
- URL Parameters
- Replacing the Main Checkout Order with an Upsell or Downsell
- Rolling back to a Previous Version
- Using the "Order Custom Field" Rule of Dynamic Offers with Custom Field Editor
- Google Address Autocomplete
- Flatsome UX Builder
- ActiveCampaign
- Paypal Reference Transactions
- How PaypPal/Stripe Works
- Enabling Enfold Avia Layout Builder
- Setting Up Authorize.net for Upsell & Downsell
- Supported Payment Gateways
- Setting Quantity and Discount for Products on the Checkout Page
- Adding Custom Payment Gateway Support for One-Click Upsell and Downsell
- Creating Subscription Products with CartFlows
- Supported Multi-Currency Plugins
- Enabling/Disabling Shipping Fields and Ship to Different Address
- Enabling/Adding Coupons on the Checkout Page
- Displaying Account Creation Fields on the Checkout Page
- Setting Up Square Gateway for Upsell & Downsell
- CartFlows Elementor Widgets
- CartFlows Beaver Builder Modules
- CartFlows Block Editor Blocks
- Importing Divi Templates
- Bricks Builder
- OttoKit
- Connecting Stripe Payment Gateway
- LearnDash
- Facebook Pixel
- TikTok Pixel Tracking
- Google Ads Pixel
- Pinterest Pixel Tracking
- How to Enable Snapchat Pixel Tracking in CartFlows?
- CartFlows Webhooks: Send Funnel Events to Other Apps
- Funnel in Test Mode
- Troubleshooting Plugin and Theme Conflicts
- Resolving the "Please Select a Simple, Virtual, and Free Product" Error
- Fixing Endless Loading on the Checkout Page
- Fixing the "We can't seem to find an order for you." Error on the Thank You Page
- Troubleshooting License Activation Issues
- Fixing the "Checkout ID Not Found" Error
- Fixing the "Session Expired" Error Message
- Resolving "Order Does Not Exist" Error on Upsell/Downsell Page
- Fixing the "Sorry, This Product Cannot Be Purchased" Error
- Disabling Auto-fill of Address Fields Based on Zip Code
- Enabling Theme's Scripts & Styles Without Changing Page Template
- Disabling Auto-fill of Checkout Fields
- Allowing Cache Plugins to Cache CartFlows Pages
- Changing the "Choose a Variation" Text
- VAT Field Not Displaying for WooCommerce EU/UK VAT Compliance Plugin
- Enabling the Product Tab on Store Checkout
- Displaying the Order Summary Open on Mobile Devices
- Refreshing the Checkout Page After CartFlows AJAX Calls
- Overview
- Installing Modern Cart Starter
- Installing Modern Cart Pro
- Activating License Key
- Customizing General Settings
- Customizing Cart Tray Labels
- Customizing Cart Icon Settings
- Customizing Cart Tray Styling
- Understanding the Product Recommendations Feature
- Controlling Product Recommendation Source for Empty Cart
CartFlows Webhooks: Send Funnel Events to Other Apps
CartFlows Webhooks let you send funnel and order events to the other apps you use, such as your CRM, email platform, Zapier, Make or your own system. When a selected event happens in a funnel, for example a new order or an accepted upsell, CartFlows sends the details to a URL you choose.
This guide shows how to create a webhook, which events you can send, and what data each event includes.
How CartFlows Webhooks Work
A webhook is a link between CartFlows and another app. You give CartFlows the app’s webhook URL and pick the events you care about.
- An event happens in one of your funnels, such as a customer placing an order.
- CartFlows sends the event details to your webhook URL.
- Your app receives the details and does the rest, for example adding the customer to a list or creating a deal.
How to Create a Webhook
Before you start, copy the webhook URL from the app you want to send data to. Most automation tools, like Zapier or Make, give you this URL when you create a new webhook trigger.
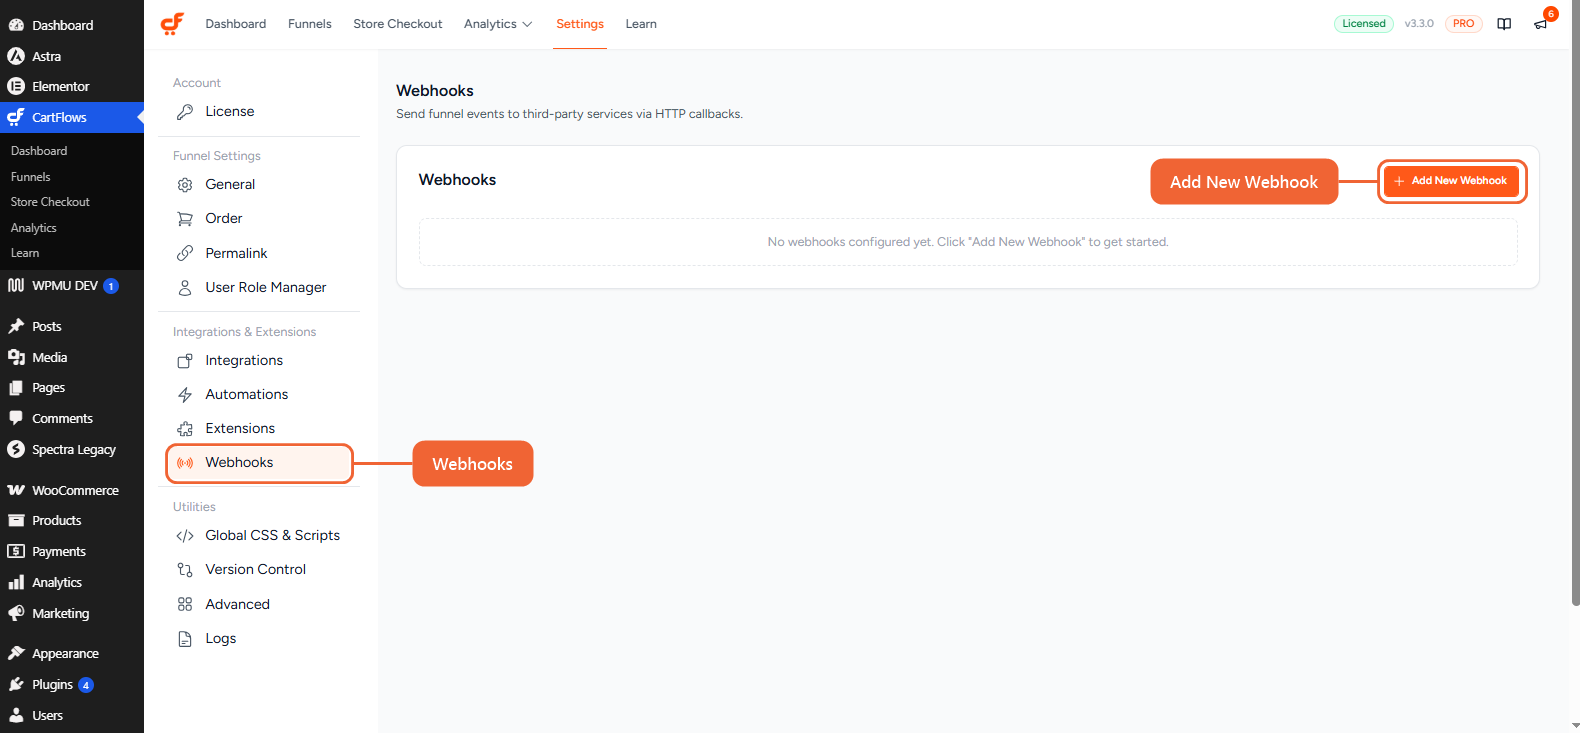
Step 1. Go to CartFlows → Settings and click Webhooks under Integrations & Extensions. Then click Add New Webhook.
Step 2. Enter a Name so you can recognise the webhook later, then paste your app’s URL into Endpoint URL.
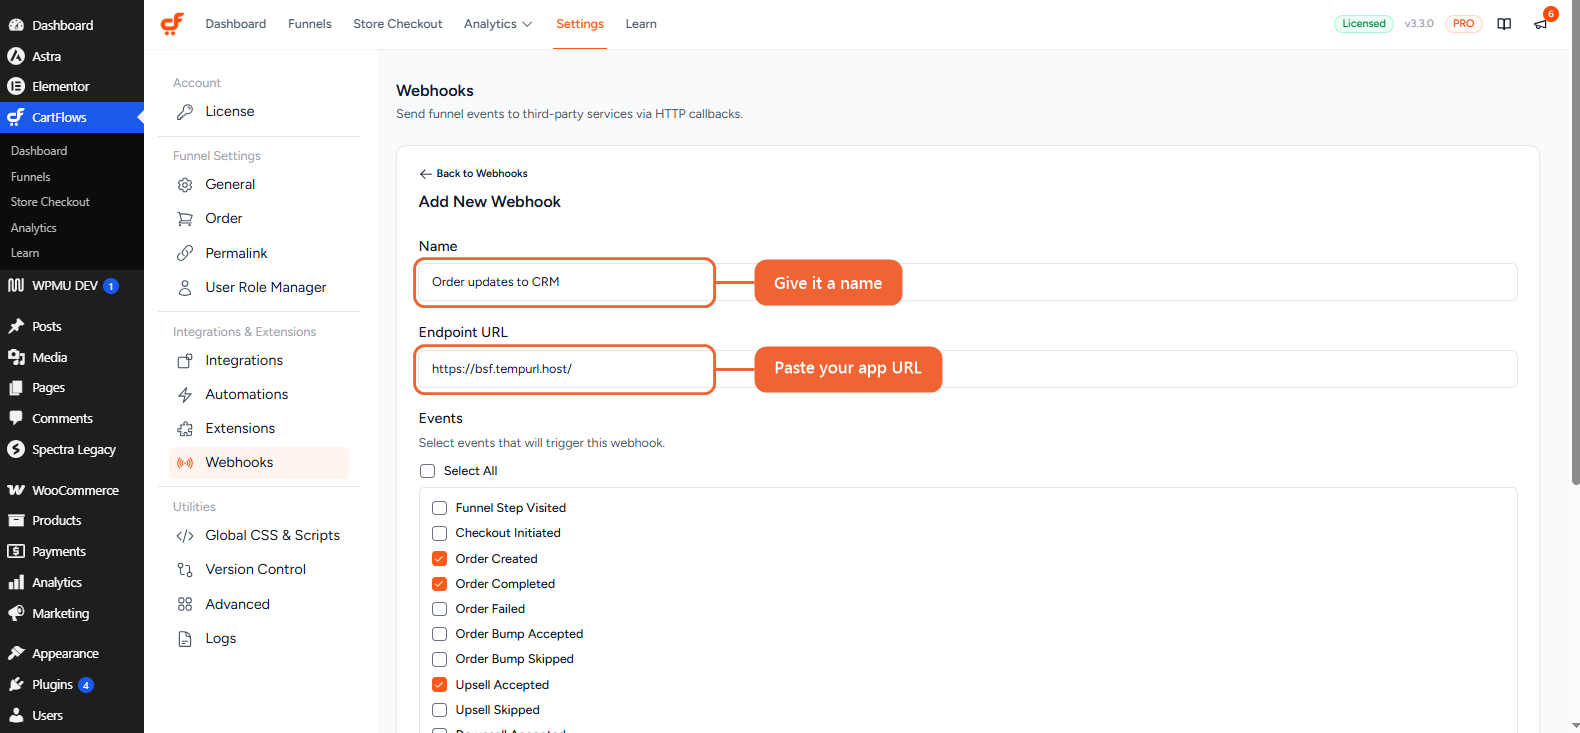
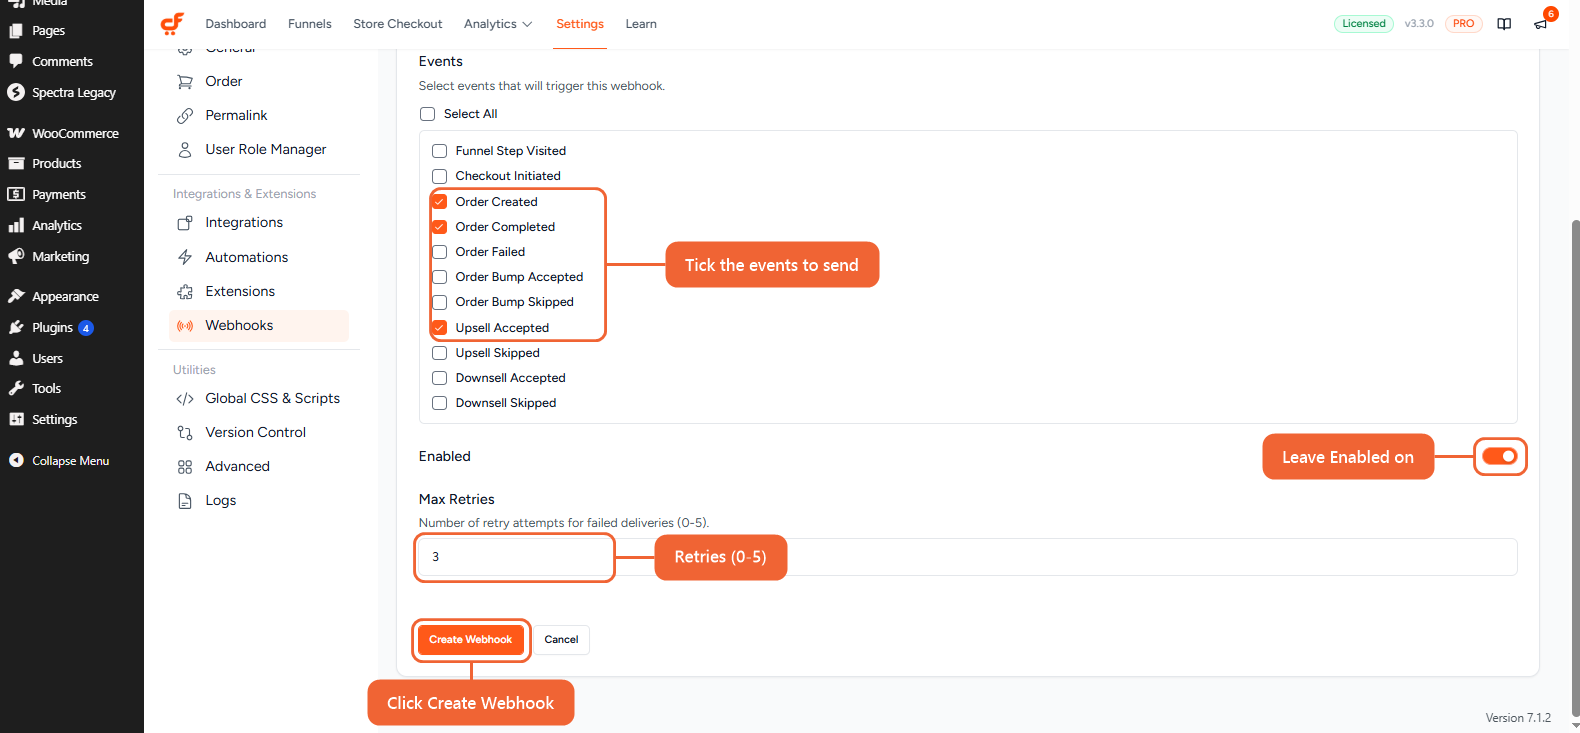
Step 3. Under Events, tick each event you want to send to this URL. Use Select All to send every event.
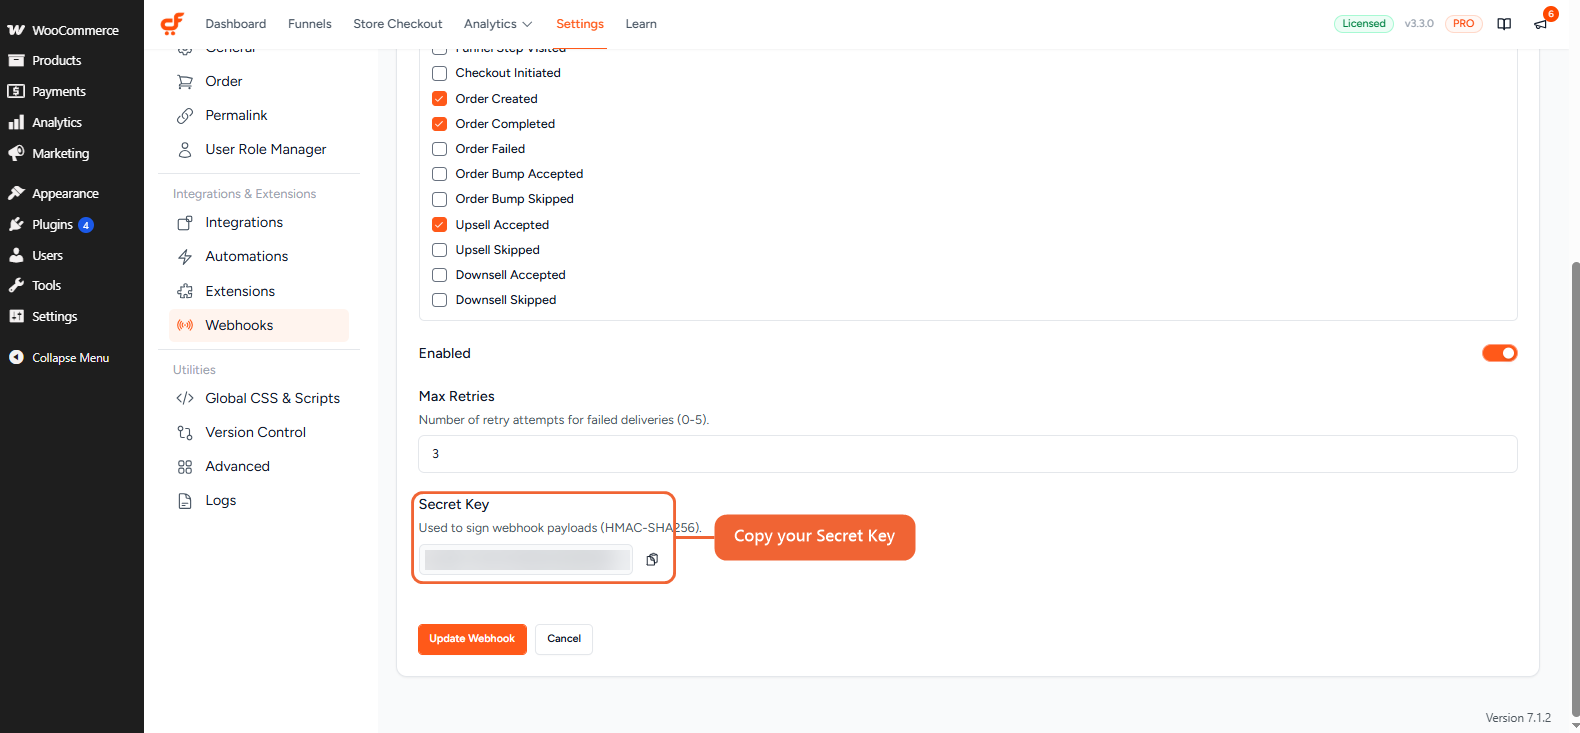
Step 4. Leave Enabled turned on, and use Max Retries to control how many times CartFlows tries to deliver an event if your app doesn’t respond. You can set it from 0 to 5, and it’s 3 by default.
Step 5. Click Create Webhook.
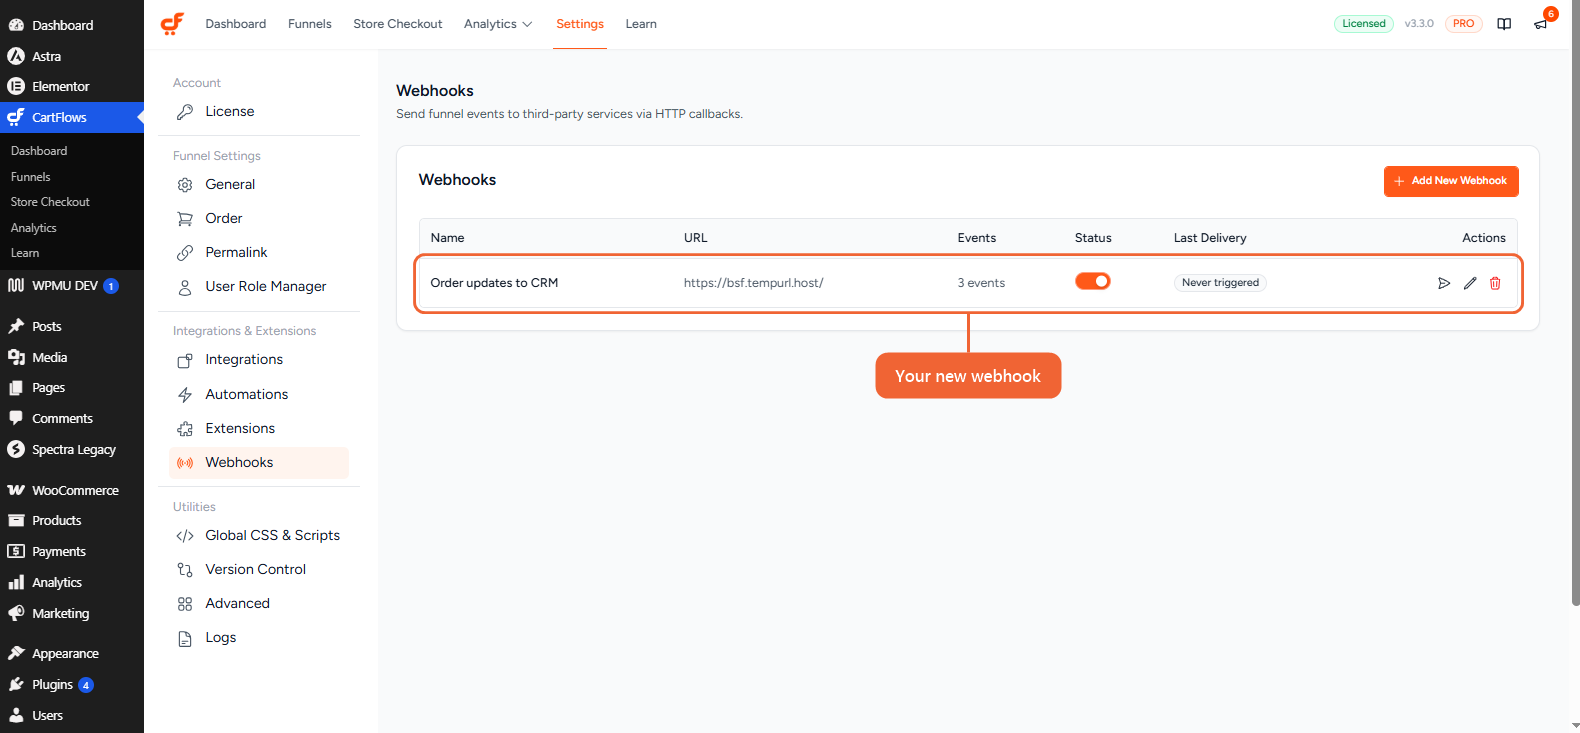
Your webhook now appears in the list, and starts sending the events you picked straight away.
Test Your Webhook
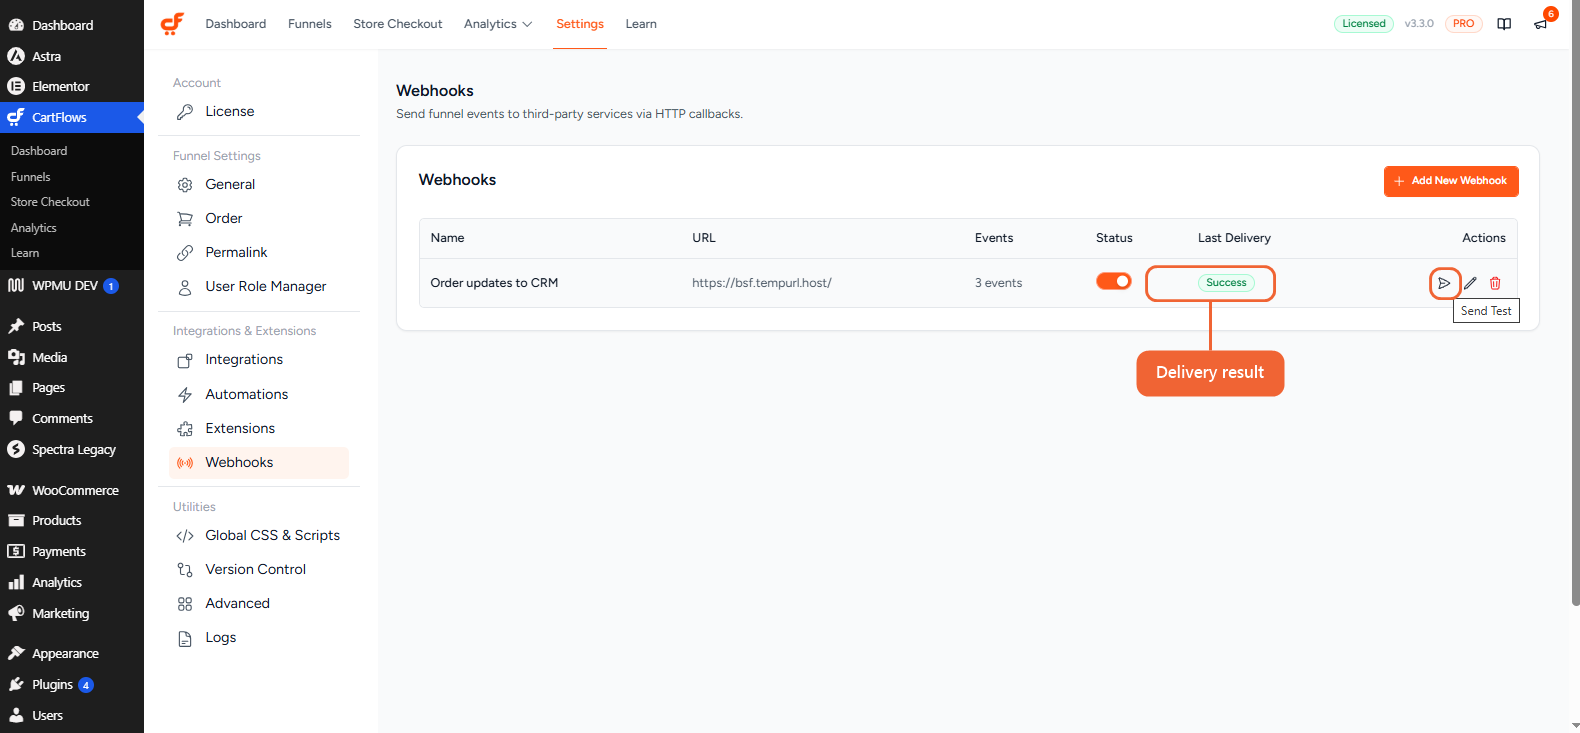
Click the Send Test icon next to your webhook to send a sample message to your URL. After a moment, Last Delivery shows Success if your app received it, or Failed if it didn’t. Hover over Failed to see the reason.
Tip: Send a test right after you create a webhook. Many automation tools need a sample message before you can choose which details to use in your workflow.
Manage Your Webhooks
Each webhook in the list shows its Name, URL, number of Events, a Status toggle and its Last Delivery result.
- Turn off a webhook with the Status toggle to pause it without losing its settings.
- Edit a webhook with the pencil icon to change its name, URL, events, status or retries.
- Delete a webhook with the trash icon. CartFlows asks you to confirm first.
To send different events to different apps, create a separate webhook for each one.
Available Events
Events in CartFlows
- Funnel Step Visited: a visitor opens a step in one of your funnels.
- Checkout Initiated: a visitor opens or updates a funnel checkout, before placing the order.
- Order Created: a customer places an order through a funnel checkout.
- Order Completed: a funnel order’s status changes to Processing or Completed.
- Order Failed: a funnel order’s payment fails.
Extra Events with CartFlows Pro
- Order Bump Accepted: the customer adds an order bump to their order.
- Order Bump Skipped: the customer places the order without adding an order bump offered on that checkout.
- Upsell Accepted and Downsell Accepted: the customer accepts an upsell or downsell offer.
- Upsell Skipped and Downsell Skipped: the customer declines an upsell or downsell offer.
What Data Each Event Sends
Every event includes the event name, the time it happened, and the funnel and step it came from.
- Funnel Step Visited also includes the step type and the step’s URL.
- Checkout Initiated includes the funnel and step only, since no order exists yet.
- Order events (Order Created, Order Completed and Order Failed) include the order number, the customer’s name and email, each product with its quantity and total, and the order total with currency.
- Order bump events include the same order details, plus the order bump product’s name and price.
- Upsell and downsell events include the same order details, plus the offer product’s name.
Verify Webhooks with Your Secret Key (For Developers)
If you’re connecting webhooks to your own system, you can check that each message really came from your store. CartFlows creates a unique Secret Key for every webhook. To find it, edit the webhook and scroll to Secret Key, then click the copy icon.
Each webhook is sent as a POST request with a JSON body and these headers:
X-CartFlows-Webhook-Signature: an HMAC-SHA256 signature of the raw request body, made with your Secret Key.X-CartFlows-Event: the event name, such asorder_created.X-CartFlows-Delivery-ID: a unique ID for each delivery attempt.
To verify a message, create an HMAC-SHA256 hash of the raw body with your Secret Key and compare it with the signature header. Here’s an example of an Order Created message:
{
  "event": "order_created",
  "timestamp": "2026-10-05T14:30:00+00:00",
  "webhook_id": "5f0c2a9e-1b7d-4c3e-9a6f-2d8e4b1c7a90",
  "data": {
    "funnel_id": 123,
    "step_id": 456,
    "order_id": 789,
    "customer": {
      "id": 12,
      "email": "[email protected]",
      "first_name": "Jane",
      "last_name": "Doe"
    },
    "products": [
      { "id": 55, "name": "Starter Kit", "quantity": 1, "total": "49.00" }
    ],
    "totals": { "total": "49.00", "currency": "USD" }
  }
}
The event names sent in the header and body are cartflows_step_visited, checkout_initiated, order_created, order_completed and order_failed. CartFlows Pro adds order_bump_accepted, order_bump_skipped, upsell_accepted, upsell_skipped, downsell_accepted and downsell_skipped. Test messages use the event name test.
Frequently Asked Questions
We don't respond to the article feedback, we use it to improve our support content.