- Hiding Fields on the Checkout Page
- Installing WooCommerce
- Using WooCommerce
- Adding Products in WooCommerce
- Using Your Theme's Header & Footer in a Step
- Embedding a Checkout Form on the CartFlows Checkout Page
- Hiding WooCommerce Pages and Products
- Using Pricing Tables
- Adding an Affiliate Program
- Setting a Funnel as the Homepage
- GDPR Compliance
- Excluding CartFlows Pages from Caching
- Creating Variable Products
- Placing Shortcode in the Right Places
- Displaying a Terms and Conditions Checkbox
- Creating a Marketing Sales Funnel
- How to Enable Facebook Pixel Support in Cartflows?
- Enabling Fusion Page Builder on CartFlows Steps
- Passing Variables as Query Parameters to a URL
- Highlighting a Product on the CartFlows Checkout Page
- Styling the Highlight Product Section
- Collecting User Contact Data and Redirecting to the Checkout Page
- Setting a Default Product in Product Options
- Dynamic Offers aka Rule Engine
- Instant Layout for Checkout and Thank You Step
- Adding Products from the URL to the Checkout Page
- Setting Up A/B Testing for Steps
- Deleting Plugin Data During Uninstallation
- Importing Ready-Made Templates for Funnels and Steps
- Importing and Exporting Funnels and Step
- URL Parameters
- Replacing the Main Checkout Order with an Upsell or Downsell
- Rolling back to a Previous Version
- Google Address Autocomplete
- Flatsome UX Builder
- ActiveCampaign
- Paypal Reference Transactions
- How PaypPal/Stripe Works
- Enabling Enfold Avia Layout Builder
- Setting Up Authorize.net for Upsell & Downsell
- Supported Payment Gateways
- Setting Quantity and Discount for Products on the Checkout Page
- Adding Custom Payment Gateway Support for One-Click Upsell and Downsell
- Funnel in Test Mode
- Troubleshooting Plugin and Theme Conflicts
- Resolving the "Please Select a Simple, Virtual, and Free Product" Error
- Fixing Endless Loading on the Checkout Page
- Fixing the "We can't seem to find an order for you." Error on the Thank You Page
- Troubleshooting License Activation Issues
- Fixing the "Checkout ID Not Found" Error
- Fixing the "Session Expired" Error Message
- Resolving "Order Does Not Exist" Error on Upsell/Downsell Page
- Fixing the "Sorry, This Product Cannot Be Purchased" Error
- Disabling Auto-fill of Address Fields Based on Zip Code
- Enabling Theme's Scripts & Styles Without Changing Page Template
- Disabling Auto-fill of Checkout Fields
- Allowing Cache Plugins to Cache CartFlows Pages
- Changing the "Choose a Variation" Text
- VAT Field Not Displaying for WooCommerce EU/UK VAT Compliance Plugin
- Enabling the Product Tab on Store Checkout
- Displaying the Order Summary Open on Mobile Devices
- Refreshing the Checkout Page After CartFlows AJAX Calls
- Overview
- Installing Modern Cart Starter
- Installing Modern Cart Pro
- Activating License Key
- Customizing General Settings
- Customizing Cart Tray Labels
- Customizing Cart Icon Settings
- Customizing Cart Tray Styling
- Understanding the Product Recommendations Feature
- Controlling Product Recommendation Source for Empty Cart
How to Enable Facebook Pixel Support in Cartflows?
CartFlows provides Native Facebook Pixel Support, let’s see the steps to enable it and how we can test its working.
Pre-requisites –
There are a few Pre-requisites like –
- You need to create a Facebook Ads Account. Haven’t Setup yet? – follow the steps here.
- Next, you need to get the Facebook Pixel ID, follow the steps here
- Copy the Facebook Pixel ID, you will need to paste it in the CartFlows Settings
Steps to Add Facebook Pixel ID in the CartFlows Settings –
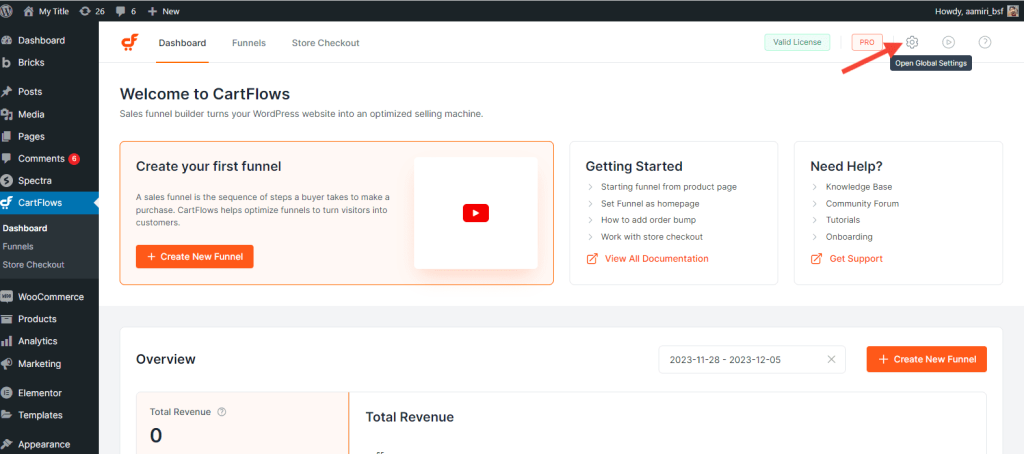
Step 1: From your WordPress dashboard, go to CartFlows > Settings
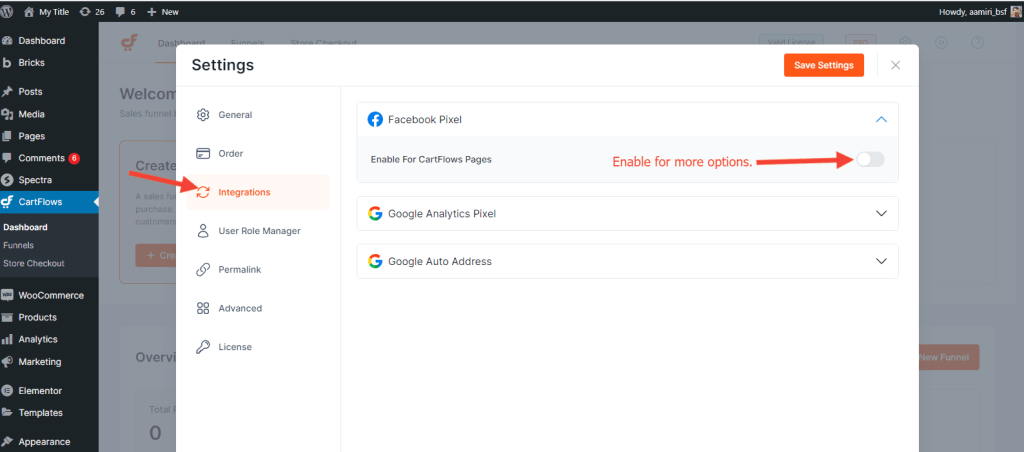
Step 2: Scroll down to the Integrations and enable the option – Enable Facebook Pixel Tracking
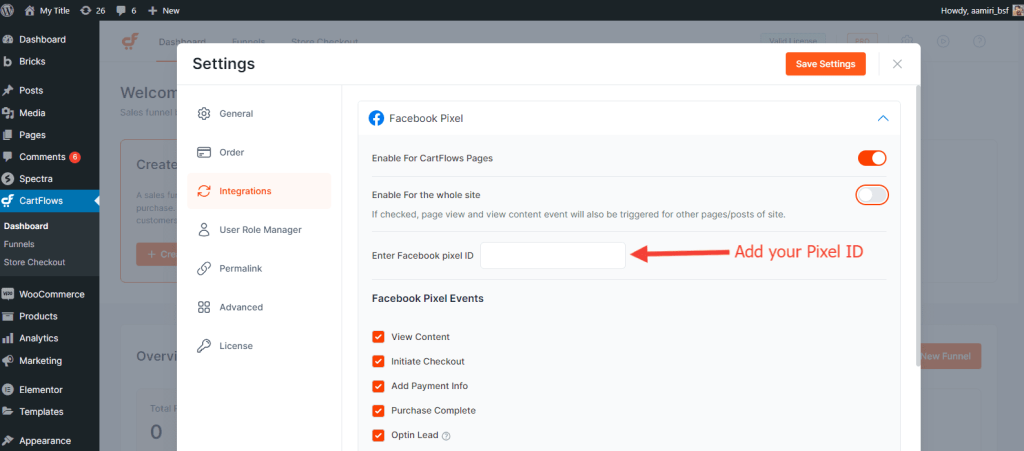
Step 3: Now paste the copied Facebook Pixel ID under Enter Facebook Pixel ID option
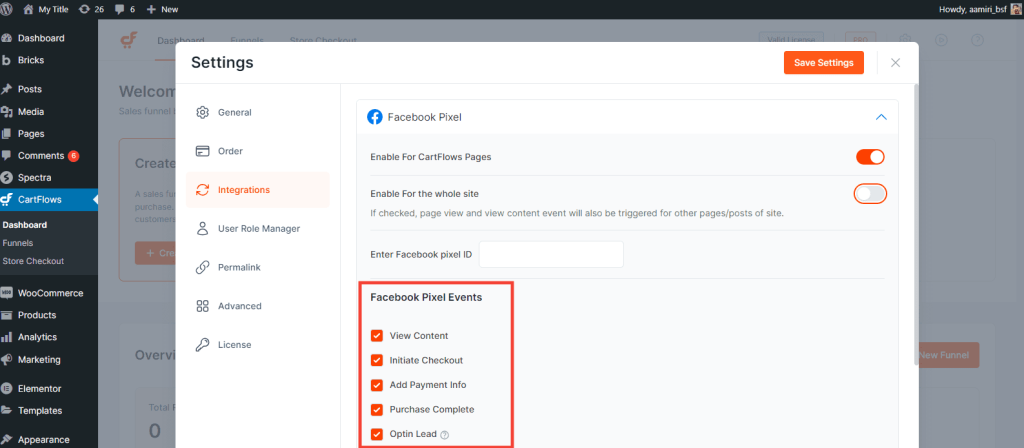
Step 4: You can track the events by enabling the options under Enable Events
Step 5: Just Save the Changes and you have successfully added Facebook Pixel ID for the CartFlows checkout page events.
How to Test or Verify the Working of Facebook Pixel Support?
For testing the working of Facebook Pixel on your Checkout Page with Google Chrome Browser, you will need to have the following Google Extension – Facebook Pixel Helper
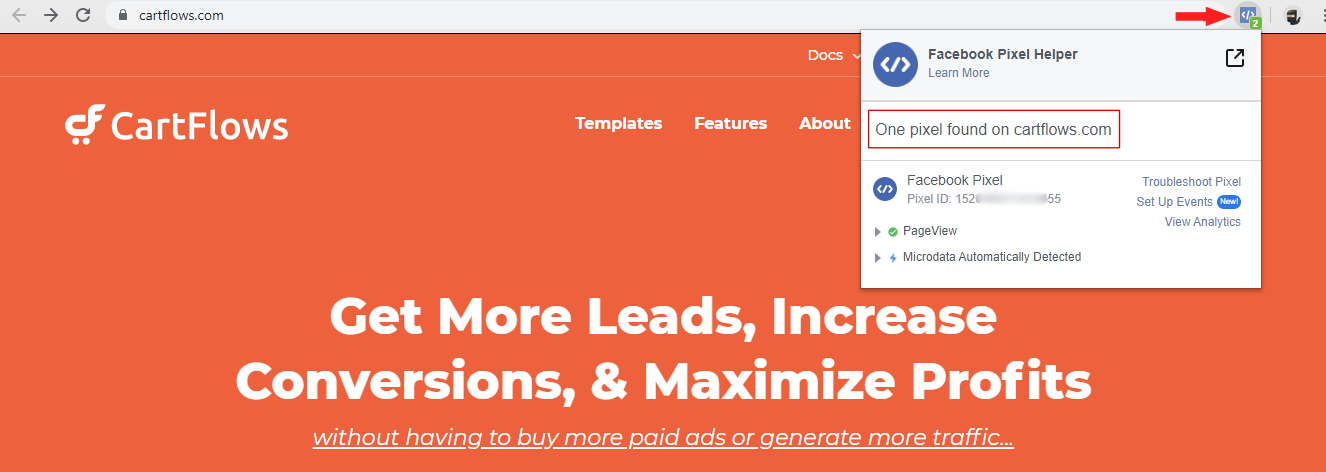
To read more about the Errors or other issues you can refer to the following Pixel Helper article by Facebook.
We don't respond to the article feedback, we use it to improve our support content.