- Hiding Fields on the Checkout Page
- Installing WooCommerce
- Using WooCommerce
- Using Your Theme's Header & Footer in a Step
- Embedding a Checkout Form on the CartFlows Checkout Page
- Hiding WooCommerce Pages and Products
- Using Pricing Tables
- Adding an Affiliate Program
- Setting a Funnel as the Homepage
- GDPR Compliance
- Dynamic Offers aka Rule Engine
- Instant Layout for Checkout and Thank You Step
- Adding Products from the URL to the Checkout Page
- Setting Up A/B Testing for Steps
- Deleting Plugin Data During Uninstallation
- Importing Ready-Made Templates for Funnels and Steps
- Importing and Exporting Funnels and Step
- URL Parameters
- Replacing the Main Checkout Order with an Upsell or Downsell
- Rolling back to a Previous Version
- Google Address Autocomplete
- Flatsome UX Builder
- ActiveCampaign
- Paypal Reference Transactions
- How PaypPal/Stripe Works
- Enabling Enfold Avia Layout Builder
- Setting Up Authorize.net for Upsell & Downsell
- Supported Payment Gateways
- Setting Up A/B Testing with Google Optimize
- Setting Quantity and Discount for Products on the Checkout Page
- Funnel in Test Mode
- Troubleshooting Plugin and Theme Conflicts
- Resolving the "Please Select a Simple, Virtual, and Free Product" Error
- Fixing Endless Loading on the Checkout Page
- Fixing the "We can't seem to find an order for you." Error on the Thank You Page
- Fixing the "Checkout ID Not Found" Error
- Fixing the "Session Expired" Error Message
- Resolving "Order Does Not Exist" Error on Upsell/Downsell Page
- Fixing the "Sorry, This Product Cannot Be Purchased" Error
- Resolving "No Product is Selected" Error
- Disabling Auto-fill of Address Fields Based on Zip Code
- Enabling Theme's Scripts & Styles Without Changing Page Template
- Disabling Auto-fill of Checkout Fields
- Allowing Cache Plugins to Cache CartFlows Pages
- Changing the "Choose a Variation" Text
- VAT Field Not Displaying for WooCommerce EU/UK VAT Compliance Plugin
- Enabling the Product Tab on Store Checkout
- Displaying the Order Summary Open on Mobile Devices
How to Add Multiple Order Bump
In the CartFlows and CartFlows Pro version 1.7.0, we have introduced a new and most awaited feature that is Multiple Order Bump.
If you are a new user, then you can start building the order bump directly from step 1 and if you are an existing customer then follow the below steps to migrate the order bump.
From the CartFlows version 1.7.0, you can add multiple order bumps on one checkout page with multiple order bump styles. We have added a total of 3 new order bump styles.
To enable and start using this feature, you need to update the CartFlows free and CartFlows Pro version to the 1.7.0 or greater version and migrate the older Order Bump to New.
As soon as you update both of the plugins to the 1.7.0 version or greater. You will see the migration notice on the dashboard.

Once you see the migration notice, click on the Migrate Order Bump button and migrate the order bums. After migration, you are ready to use the multiple order bump.
This migration process will be carried out in the background and once it is completed, you will display the success notice.

Let’s see how to use and setup the multiple order bump.
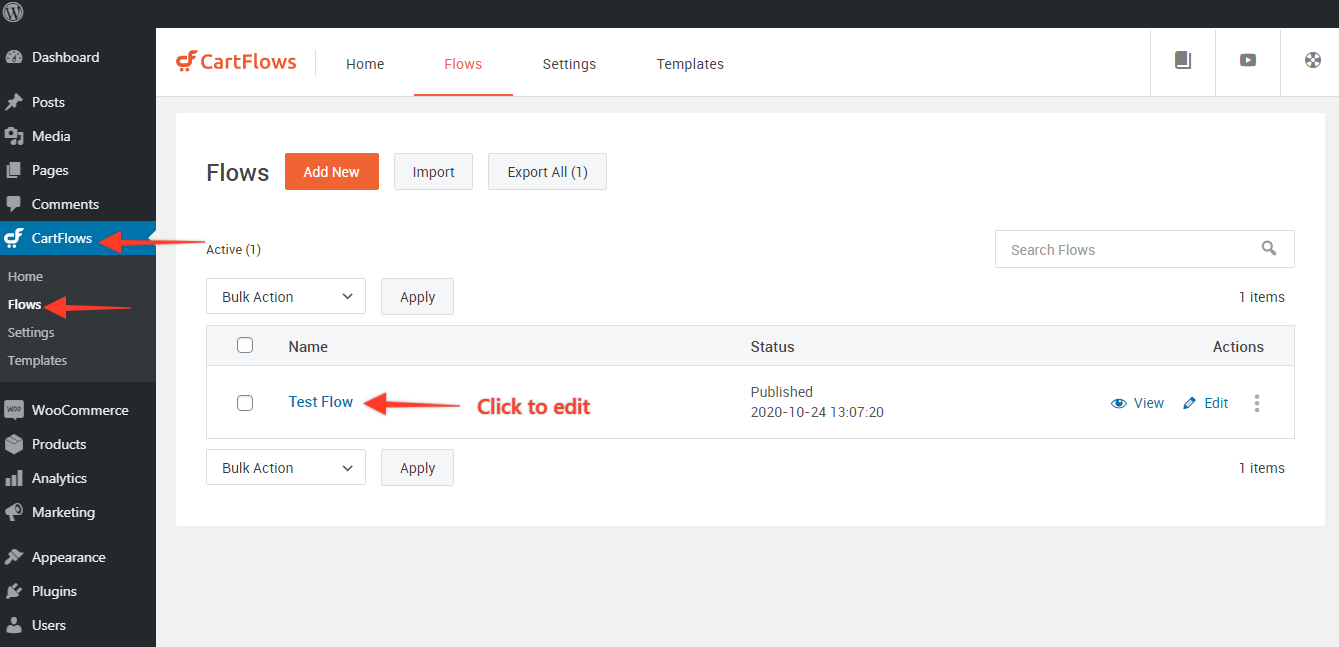
Step 1: Navigate to the CartFlows -> Flows
Step 2: Open your flow in which you want to add/edit/update the order bump.
Step 3: Click the edit button of your Checkout Page.
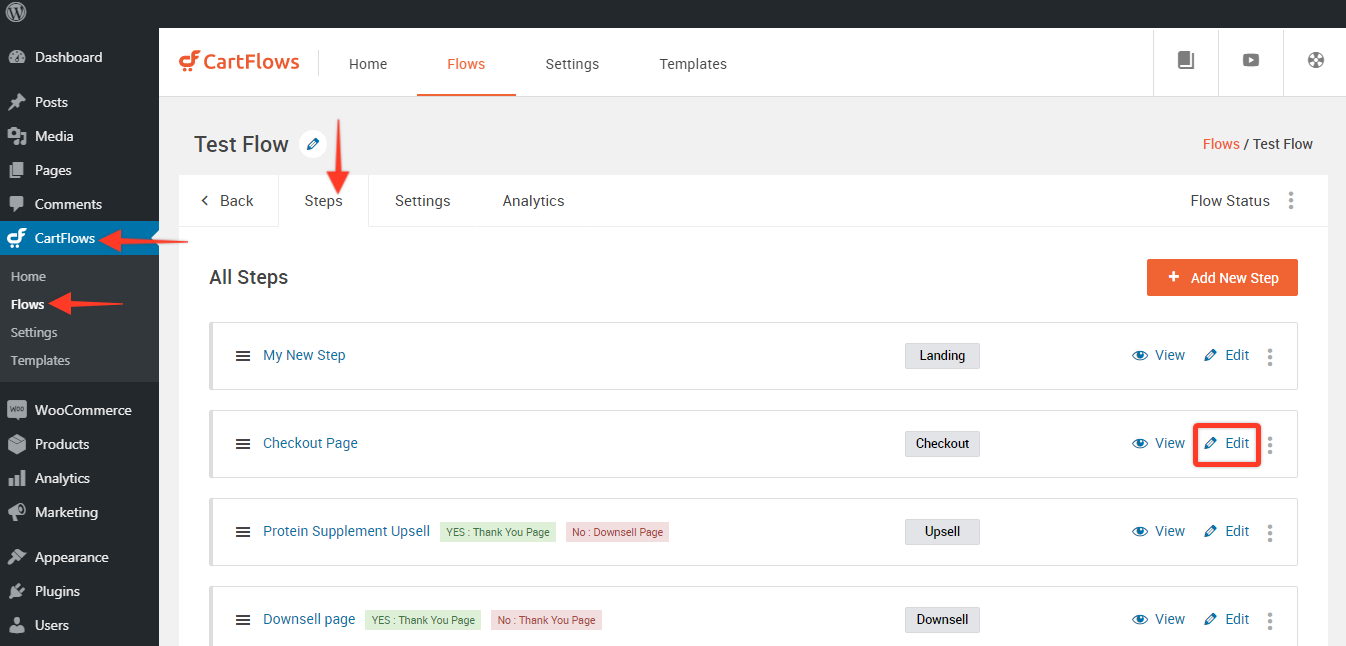
Step 4: Navigate to the Order Bump tab and Click on Add Order Bump button to add multiple order bumps or click on Edit or on the name of order bump to edit the order bump

After Clicking on Add new Order Bump button, a popup will be displayed where you can provide your choice of name to the order bump to identify it letter use.
Step 5: After opening the Order bump you will get 4 Tabs and they are Product, Design, Content, and Settings.
After entering inside the order bump setting, you can change the name of the order bump in the same way you do for the steps.
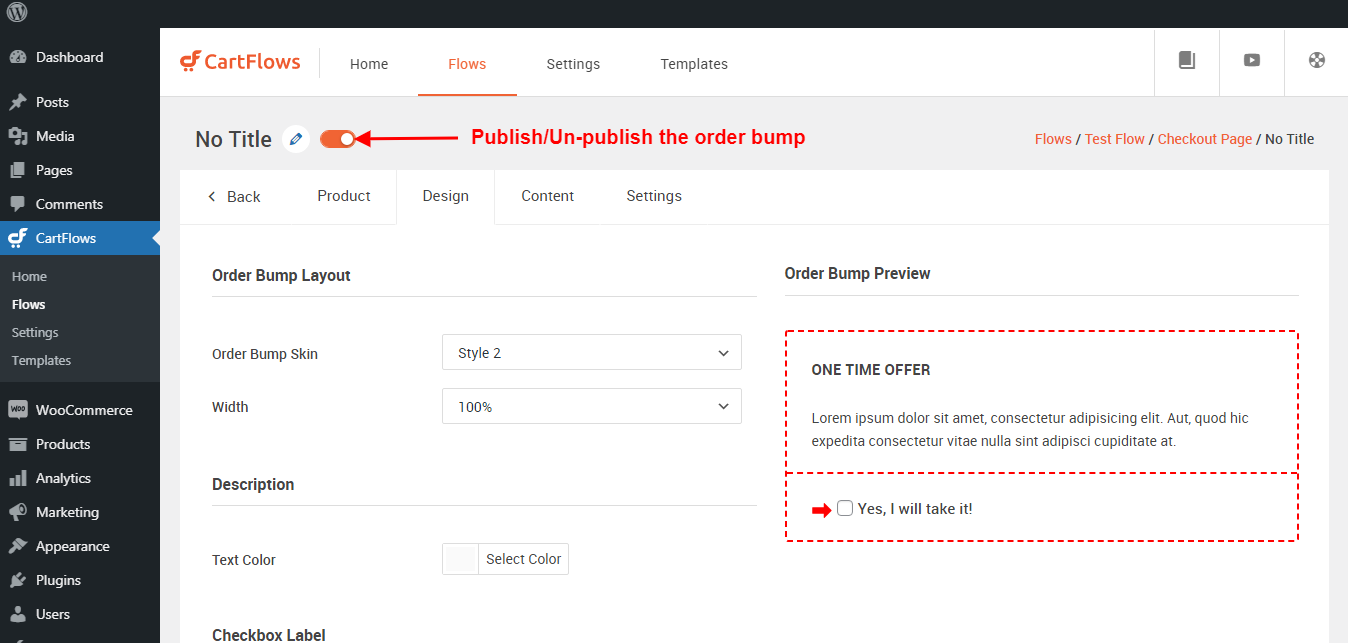
The tabs provided in the order bump are as follows
- Product Tab: Select the product and manage the discounts for that product
- Design Tab : From this tab you can manage the design i:e look and feel of the Order Bump.
- Content Tab: From this tab you can manage the display content of the Order Bump.
- Setting Tab: From this tab you can manage the setting for that particular order bump.
Also, a new improvement is that you can preview the order bump design while designing and updating the content.
Step 6: Once you are done with the changes then it is mandatory to save each tab to save the changes by clicking the save changes button available at the bottom of each tab.
We don't respond to the article feedback, we use it to improve our support content.
