
- Getting Started
- Creating Your First Funnel
- CartFlows Funnel Step Types
- Starting a Funnel from a Product Page
- How to Edit and Customise Funnel Steps
- Using CartFlows with or without Store Checkout
- How to Add /Assign Products to a Checkout Step
- How to Create One-Click Upsell and Downsell Offers
- How to Use Canvas Mode to Visualize Your Sales Funnel
- Switching to CartFlows from FunnelKit or WPFunnels
- Hiding Fields on the Checkout Page
- Installing WooCommerce
- Using WooCommerce
- Adding Products in WooCommerce
- Using Your Theme's Header & Footer in a Step
- Embedding a Checkout Form on the Checkout Page
- Hiding WooCommerce Pages and Products
- Using Pricing Tables
- Adding an Affiliate Program
- Setting a Funnel as the Homepage
- Dynamic Offers aka Rule Engine
- Instant Layout for Checkout and Thank You Step
- Adding Products from the URL to the Checkout Page
- Deleting Plugin Data During Uninstallation
- Importing Ready-Made Templates for Funnels and Steps
- Importing and Exporting Funnels and Step
- URL Parameters
- Replacing the Main Checkout Order with an Upsell or Downsell
- Rolling back to a Previous Version
- Using the "Order Custom Field" Rule of Dynamic Offers with Custom Field Editor
- Adding Order Bumps to WooCommerce Sales Funnel
- Replacing the First Product on Checkout with Order Bump
- Dynamic (Conditional) Order Bumps
- Order Bump AI
- Positions and Styles
- How to Auto-Apply a Coupon When an Order Bump Is Accepted
- How to Add Variable Products to an Order Bump
- How to A/B Test Order Bumps in CartFlows
- Google Address Autocomplete
- Flatsome UX Builder
- ActiveCampaign
- Paypal Reference Transactions
- How PaypPal/Stripe Works
- Enabling Enfold Avia Layout Builder
- Setting Up Authorize.net for Upsell & Downsell
- Supported Payment Gateways
- Setting Quantity and Discount for Products on the Checkout Page
- Adding Custom Payment Gateway Support for One-Click Upsell and Downsell
- Funnel in Test Mode
- Troubleshooting Plugin and Theme Conflicts
- Resolving the "Please Select a Simple, Virtual, and Free Product" Error
- Fixing Endless Loading on the Checkout Page
- Fixing the "We can't seem to find an order for you." Error on the Thank You Page
- Troubleshooting License Activation Issues
- Fixing the "Checkout ID Not Found" Error
- Fixing the "Session Expired" Error Message
- Resolving "Order Does Not Exist" Error on Upsell/Downsell Page
- Fixing the "Sorry, This Product Cannot Be Purchased" Error
- Disabling Auto-fill of Address Fields Based on Zip Code
- Enabling Theme's Scripts & Styles Without Changing Page Template
- Disabling Auto-fill of Checkout Fields
- Allowing Cache Plugins to Cache CartFlows Pages
- Changing the "Choose a Variation" Text
- VAT Field Not Displaying for WooCommerce EU/UK VAT Compliance Plugin
- Enabling the Product Tab on Store Checkout
- Displaying the Order Summary Open on Mobile Devices
- Refreshing the Checkout Page After CartFlows AJAX Calls
- Overview
- Installing Modern Cart Starter
- Installing Modern Cart Pro
- Activating License Key
- Customizing General Settings
- Customizing Cart Tray Labels
- Customizing Cart Icon Settings
- Customizing Cart Tray Styling
- Understanding the Product Recommendations Feature
- Controlling Product Recommendation Source for Empty Cart
- Installing Free Version
- Installing Pro Version
- Activating License Key
- Configuring the Settings
- Enabling Webhooks
- Product Reports
- SMS Integration
- WhatsApp Integration
- Email/Domain Blacklist
- Shortcode Reference for Email Fields
- Filters to Customize Product Table
- Recovery Email Going to Spam
- Cookies/GDPR Compliance
- Emails not Sending
- Orders Not Capturing
- Dynamic Email Rules
- Excluding Products from Coupon
- Rolling Back to a Previous Version
- Setting Up Abandoned Cart Email Sequences
- How Cart Abandonment Tracking Works
- Creating and Customizing Email Templates
- Using Unique Recovery Links / One-Click Cart Recovery
- Adding Coupon Incentives to Recovery Emails
- Setting Up Abandoned Cart Recovery for Guest vs Registered Users
- Analytics & Reporting Overview
- Recovering Unpaid / Failed Orders
- Configuring Abandonment Timeout / Cart Cut-Off Time
- Admin Copy of Recovery Emails (CC/BCC)
- A/B Testing Recovery Emails and Coupons
- Segmenting Abandonment Recovery by Cart Value
- Recovery Email Deliverability Best Practices
- Viewing and Managing the Abandoned Carts
- Unsubscribe / Opt-Out Handling for Recovery Emails
- GDPR / Privacy Compliance
- Testing Cart Abandonment Recovery Emails
- On-Site Reminder Banner
- Pausing or Disabling Cart Abandonment for Specific Products or Categories
- Cart Abandonment Recovery Activity Log
- Cart Abandonment Recovery Capture Popup
- How to Get Notified When Abandoned Cart Products Go Out of Stock
Abandoned Orders Not Capturing
If your Cart Abandonment Recovery for WooCommerce plugin is not capturing abandoned orders, this documentation will guide you through the possible causes and solutions.
Why Abandoned Orders Might Not Be Captured
Cart Abandonment Recovery uses a background task to check your carts and mark them as abandoned. If that task isn’t running, abandoned orders aren’t recorded. The steps below help you make sure it runs on time.
What Is WP-Cron?
WP-Cron is WordPress’s built-in system for scheduling time-based tasks, such as publishing scheduled posts or running automated plugin functions. It acts as a task scheduler that allows WordPress to perform actions at specific intervals.
For more information, refer to this detailed article on WP-Cron.
How the Plugin Checks for Abandoned Carts
The Cart Abandonment Recovery for WooCommerce plugin runs a scheduled background task to detect and mark abandoned carts.
It uses a background task named cartflows_ca_update_order_status_action to check for incomplete orders and mark them as abandoned. It runs on the same interval as your Cart Abandoned Cut-Off Time setting, which is 20 minutes by default.
This task can run through WP-Cron or Action Scheduler. You choose which one under Background Task Scheduler, explained below.
Choose a Background Task Scheduler
Step 1. Go to WooCommerce → Cart Abandonment → Settings → General.
Step 2. In Background Task Scheduler, choose:
- Action Scheduler (recommended): Runs the task through WooCommerce’s job queue. It’s the most reliable option, and you can see every run under Tools → Scheduled Actions.
- WP-Cron (legacy): Uses WordPress’s built-in scheduler, which runs tasks when someone visits your site.
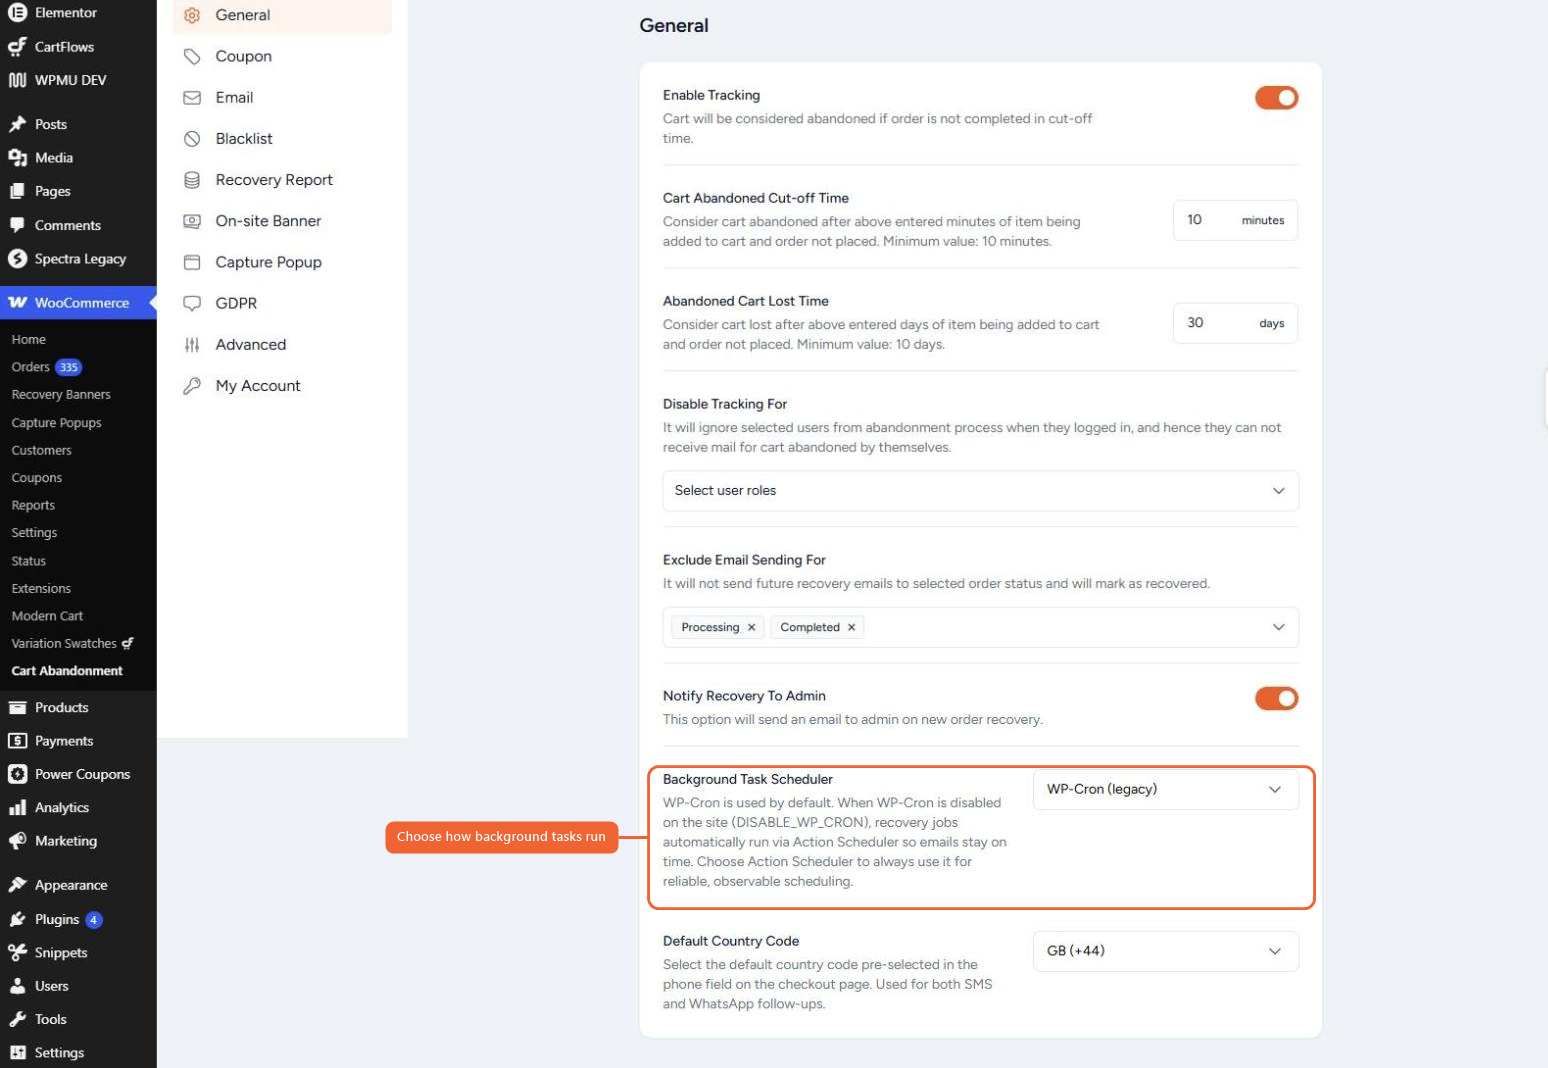
If WP-Cron is turned off on your site, the plugin automatically uses Action Scheduler, so your carts are still checked on time.
How to Enable WP-Cron
If you prefer to keep using WP-Cron (legacy), make sure WP-Cron is turned on. To re-enable WP-Cron, locate the wp-config.php file in your website’s root directory and add the following line right after the define('DB_COLLATE', ''); line:
define('DISABLE_WP_CRON', false);This ensures that WP-Cron is active and can execute the necessary tasks for Cart Abandonment Recovery.
Adding an External Cron Job Using cPanel
If you prefer to use an external cron job instead of WordPress’s built-in scheduler, you can set it up through cPanel. Below are a few helpful resources that explain how to do this:
We don't respond to the article feedback, we use it to improve our support content.