- Hiding Fields on the Checkout Page
- Installing WooCommerce
- Using WooCommerce
- Adding Products in WooCommerce
- Using Your Theme's Header & Footer in a Step
- Embedding a Checkout Form on the CartFlows Checkout Page
- Hiding WooCommerce Pages and Products
- Using Pricing Tables
- Adding an Affiliate Program
- Setting a Funnel as the Homepage
- GDPR Compliance
- Excluding CartFlows Pages from Caching
- Creating Variable Products
- Placing Shortcode in the Right Places
- Displaying a Terms and Conditions Checkbox
- Creating a Marketing Sales Funnel
- How to Enable Facebook Pixel Support in Cartflows?
- Enabling Fusion Page Builder on CartFlows Steps
- Passing Variables as Query Parameters to a URL
- Highlighting a Product on the CartFlows Checkout Page
- Styling the Highlight Product Section
- Collecting User Contact Data and Redirecting to the Checkout Page
- Setting a Default Product in Product Options
- Dynamic Offers aka Rule Engine
- Instant Layout for Checkout and Thank You Step
- Adding Products from the URL to the Checkout Page
- Setting Up A/B Testing for Steps
- Deleting Plugin Data During Uninstallation
- Importing Ready-Made Templates for Funnels and Steps
- Importing and Exporting Funnels and Step
- URL Parameters
- Replacing the Main Checkout Order with an Upsell or Downsell
- Rolling back to a Previous Version
- Google Address Autocomplete
- Flatsome UX Builder
- ActiveCampaign
- Paypal Reference Transactions
- How PaypPal/Stripe Works
- Enabling Enfold Avia Layout Builder
- Setting Up Authorize.net for Upsell & Downsell
- Supported Payment Gateways
- Setting Quantity and Discount for Products on the Checkout Page
- Adding Custom Payment Gateway Support for One-Click Upsell and Downsell
- Funnel in Test Mode
- Troubleshooting Plugin and Theme Conflicts
- Resolving the "Please Select a Simple, Virtual, and Free Product" Error
- Fixing Endless Loading on the Checkout Page
- Fixing the "We can't seem to find an order for you." Error on the Thank You Page
- Troubleshooting License Activation Issues
- Fixing the "Checkout ID Not Found" Error
- Fixing the "Session Expired" Error Message
- Resolving "Order Does Not Exist" Error on Upsell/Downsell Page
- Fixing the "Sorry, This Product Cannot Be Purchased" Error
- Disabling Auto-fill of Address Fields Based on Zip Code
- Enabling Theme's Scripts & Styles Without Changing Page Template
- Disabling Auto-fill of Checkout Fields
- Allowing Cache Plugins to Cache CartFlows Pages
- Changing the "Choose a Variation" Text
- VAT Field Not Displaying for WooCommerce EU/UK VAT Compliance Plugin
- Enabling the Product Tab on Store Checkout
- Displaying the Order Summary Open on Mobile Devices
- Refreshing the Checkout Page After CartFlows AJAX Calls
- Overview
- Installing Modern Cart Starter
- Installing Modern Cart Pro
- Activating License Key
- Customizing General Settings
- Customizing Cart Tray Labels
- Customizing Cart Icon Settings
- Customizing Cart Tray Styling
- Understanding the Product Recommendations Feature
- Controlling Product Recommendation Source for Empty Cart
How to Set Default Product in Product Options
CartFlows lets you offer multiple product options on the checkout page. With this feature, you can also control which product appears selected by default.
This documentation explains two ways to set a default product in the product options:
- From the checkout page settings in the backend
- Using a URL parameter
Method 1: Set Default Product from Checkout Page Settings
Use this method if you want to choose a default product when multiple products are added to the Checkout Step.
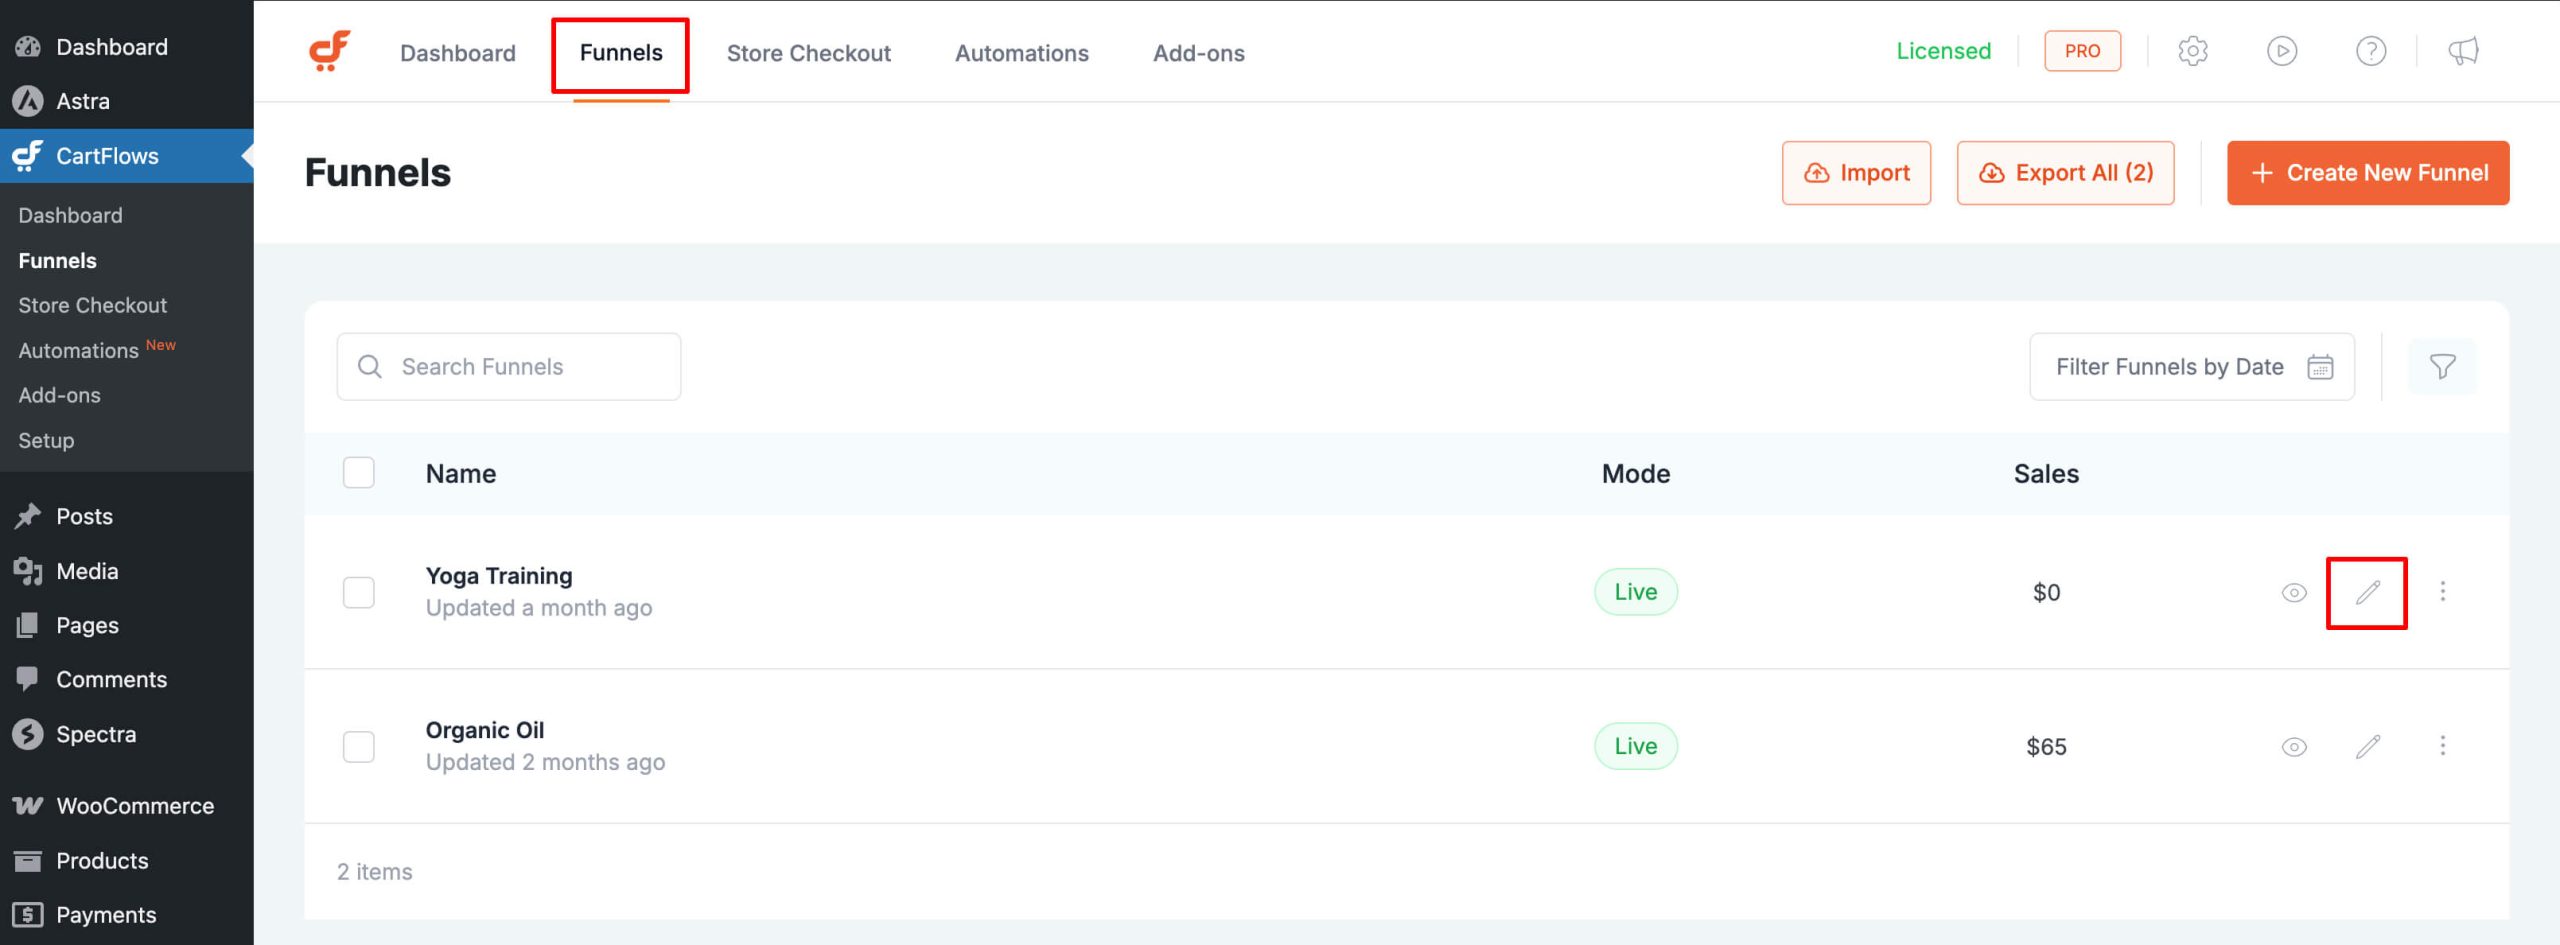
1. Go to CartFlows > Funnels.
2. Open the Funnel where you’d like to apply the setting.

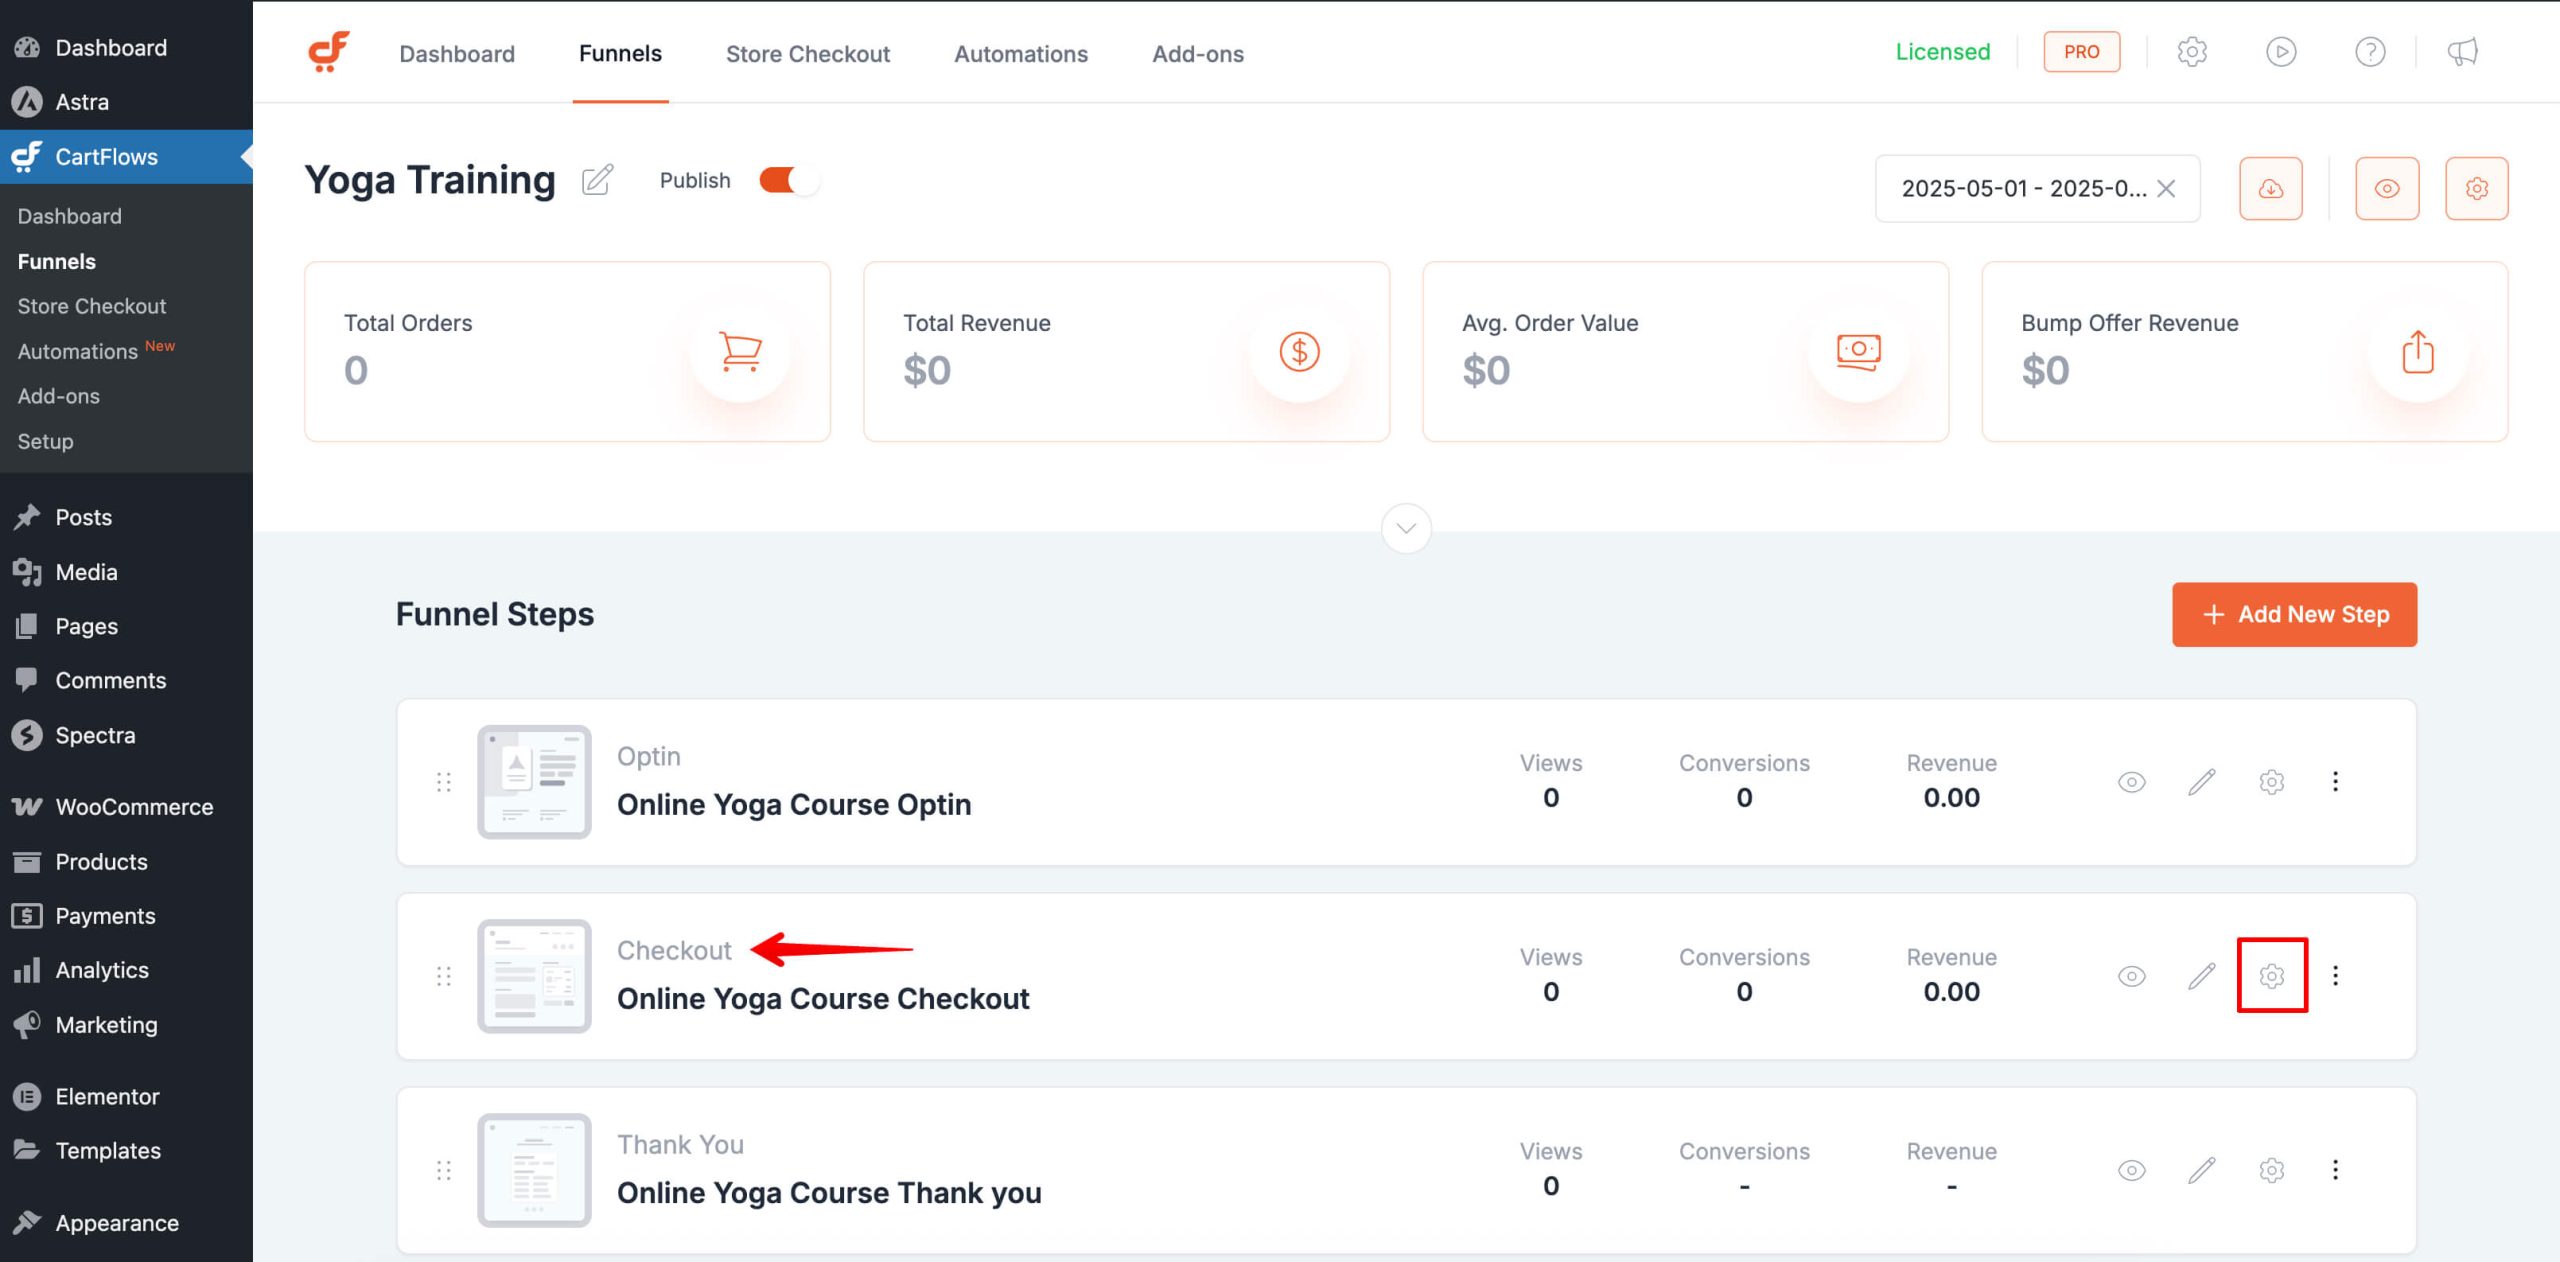
3. Click the Settings icon on the Checkout Step.

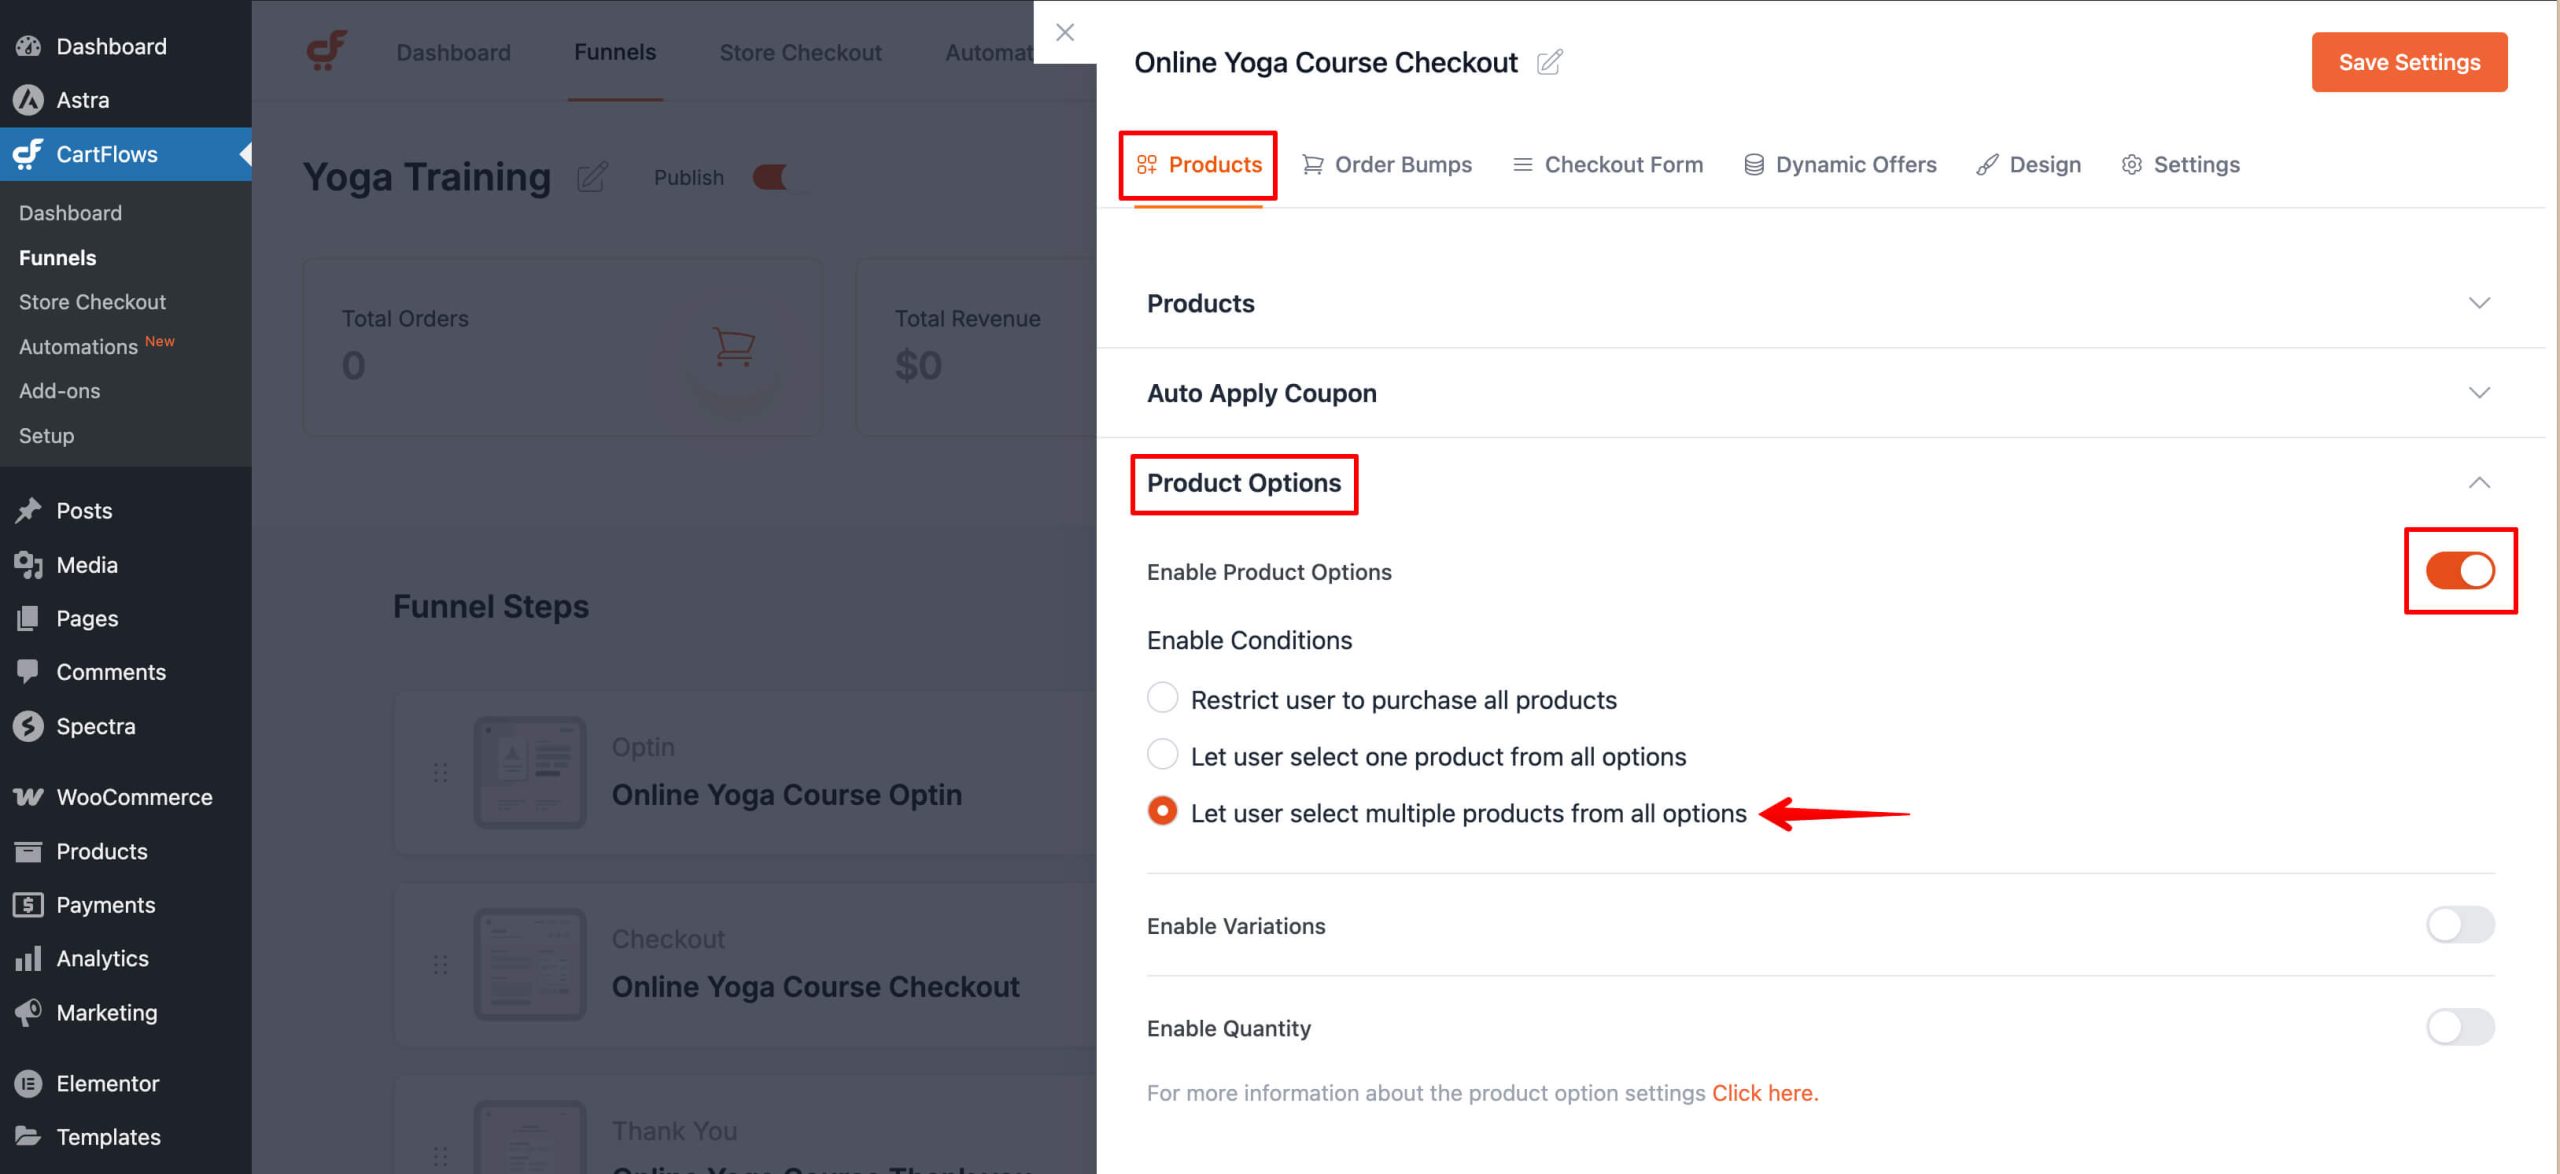
4. Go to the Products Options section under the Products tab.

5. Enable the Product Options and choose “Let user select multiple products from all options” under the Enable Conditions

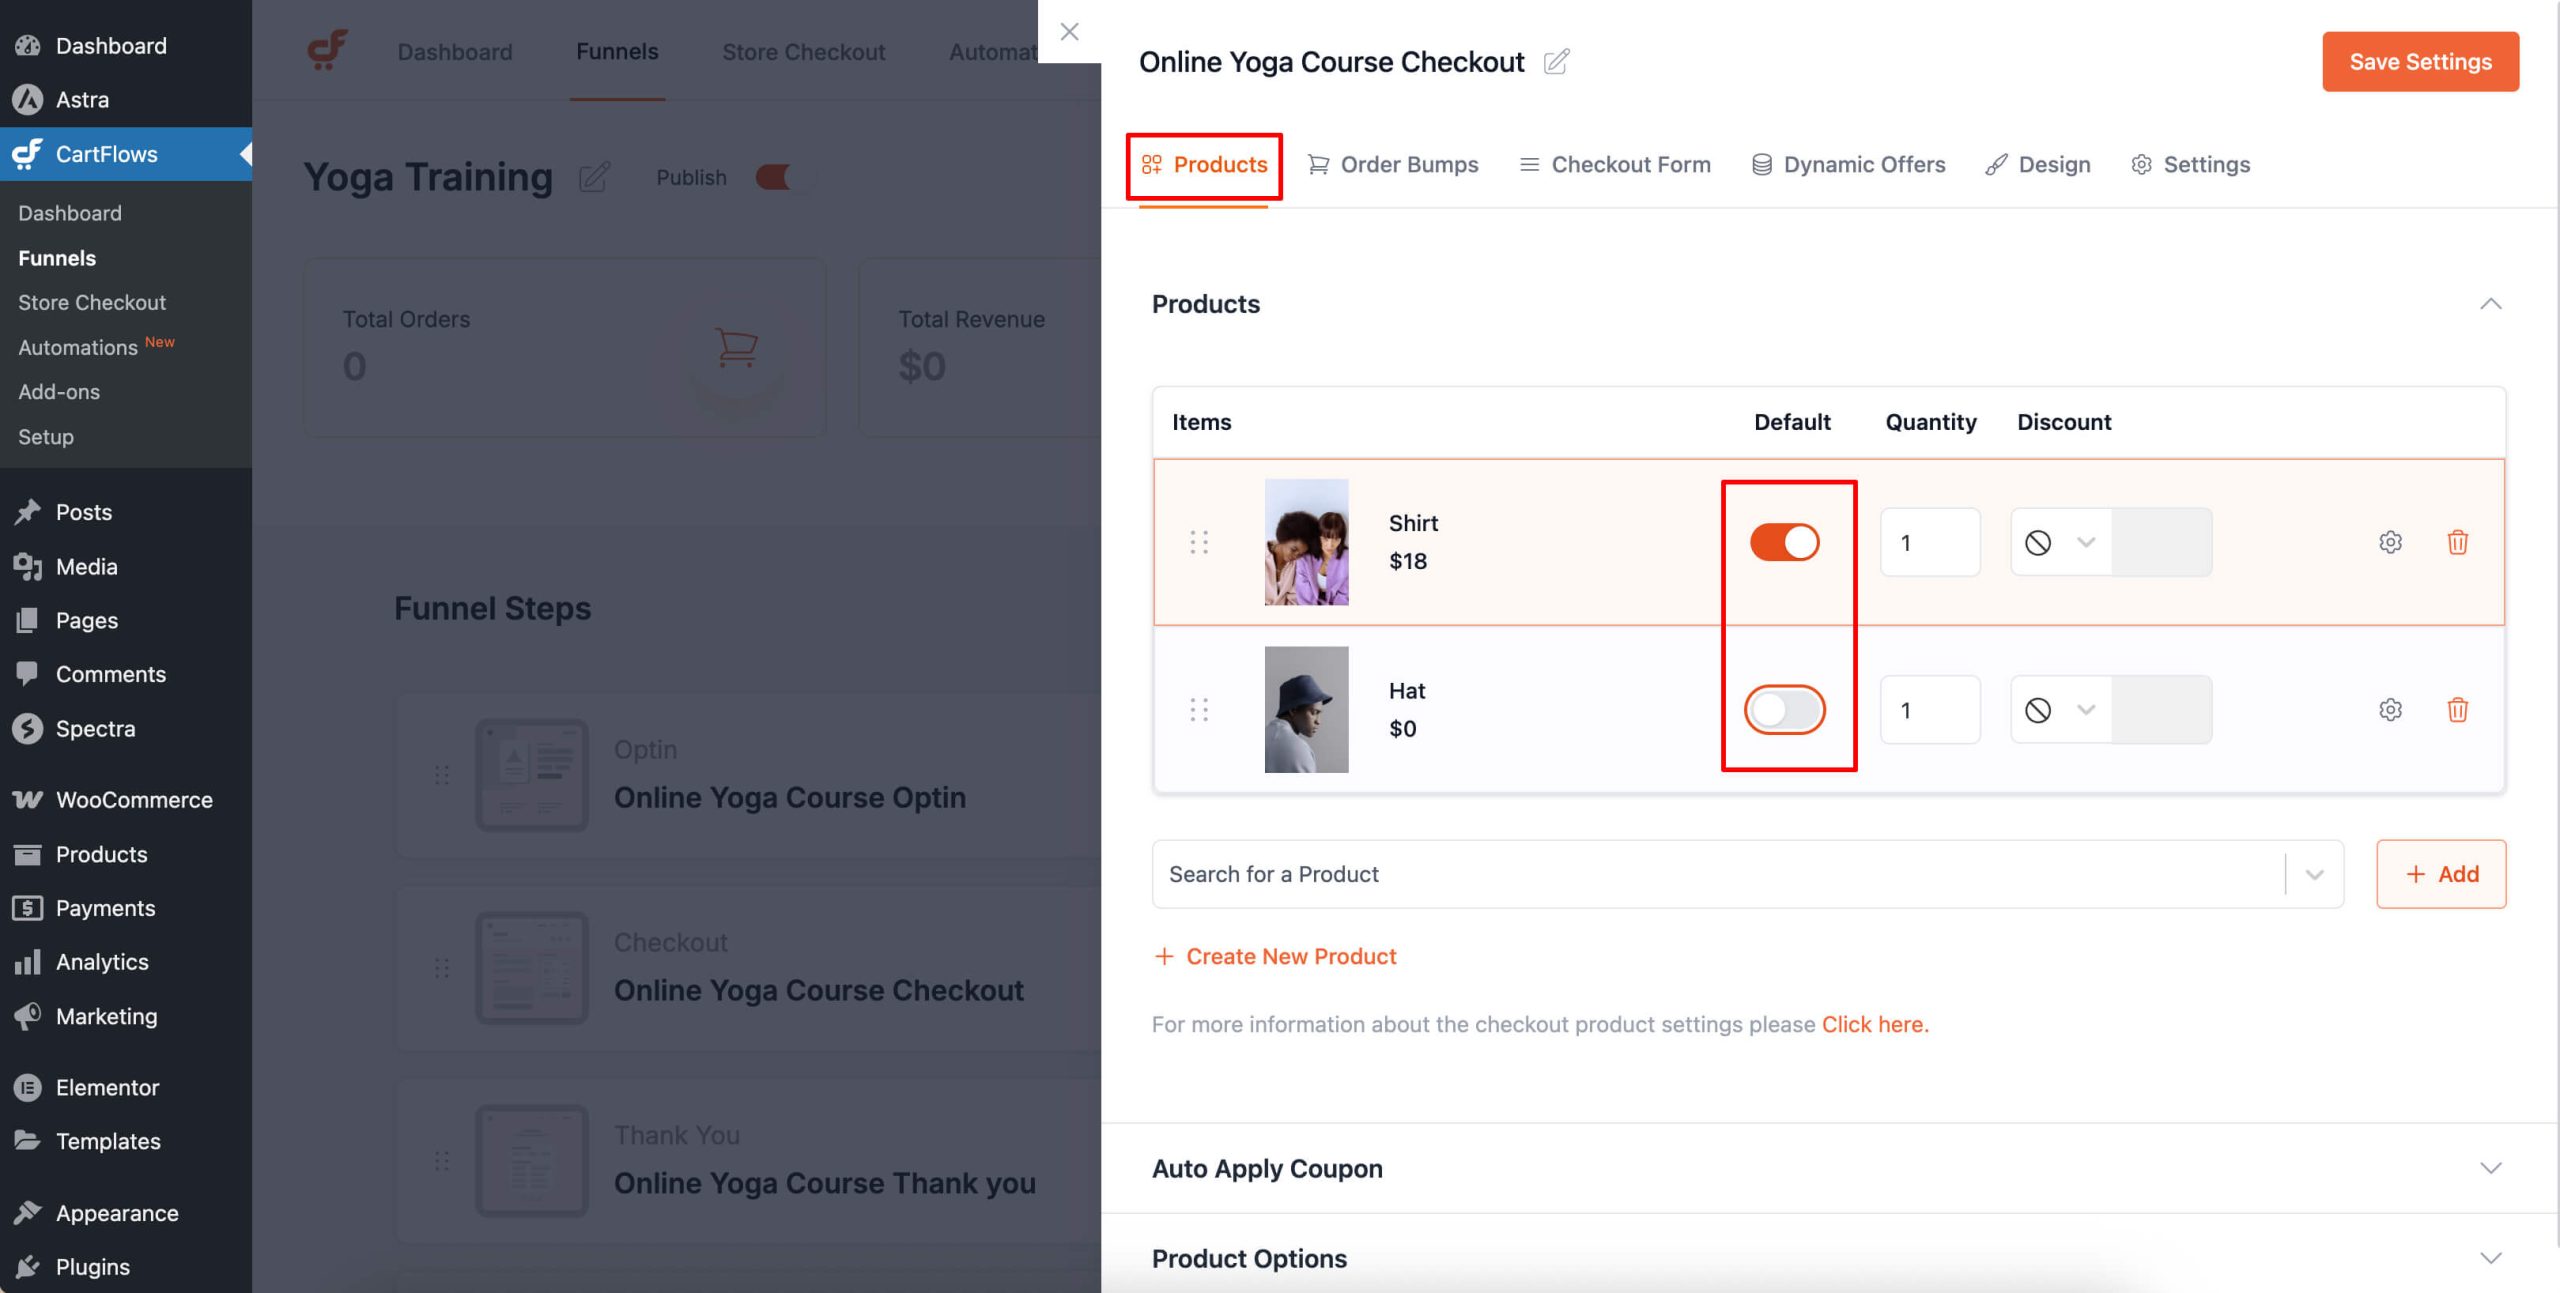
6. Use the toggle or radio buttons next to each product to choose which one should be selected by default.

Click Save Settings, and view the checkout page to see the default product selected.
Method 2: Set Default Product Using URL Parameter
Use this method if you want to control the default selection dynamically through a link, for example, from a landing page or a custom button.To set a default product, add the wcf-default parameter to your checkout page URL.
Format:
yourdomain.com/checkout-page/?wcf-default=1Here, 1 refers to the position of the product (in order) as listed in your product options.
You can link this URL to buttons or anchor tags to direct users to a specific product preselected at checkout.
Frequently Asked Question
We don't respond to the article feedback, we use it to improve our support content.