- Hiding Fields on the Checkout Page
- Installing WooCommerce
- Using WooCommerce
- Adding Products in WooCommerce
- Using Your Theme's Header & Footer in a Step
- Embedding a Checkout Form on the CartFlows Checkout Page
- Hiding WooCommerce Pages and Products
- Using Pricing Tables
- Adding an Affiliate Program
- Setting a Funnel as the Homepage
- Dynamic Offers aka Rule Engine
- Instant Layout for Checkout and Thank You Step
- Adding Products from the URL to the Checkout Page
- Setting Up A/B Testing for Steps
- Deleting Plugin Data During Uninstallation
- Importing Ready-Made Templates for Funnels and Steps
- Importing and Exporting Funnels and Step
- URL Parameters
- Replacing the Main Checkout Order with an Upsell or Downsell
- Rolling back to a Previous Version
- Google Address Autocomplete
- Flatsome UX Builder
- ActiveCampaign
- Paypal Reference Transactions
- How PaypPal/Stripe Works
- Enabling Enfold Avia Layout Builder
- Setting Up Authorize.net for Upsell & Downsell
- Supported Payment Gateways
- Setting Quantity and Discount for Products on the Checkout Page
- Adding Custom Payment Gateway Support for One-Click Upsell and Downsell
- Funnel in Test Mode
- Troubleshooting Plugin and Theme Conflicts
- Resolving the "Please Select a Simple, Virtual, and Free Product" Error
- Fixing Endless Loading on the Checkout Page
- Fixing the "We can't seem to find an order for you." Error on the Thank You Page
- Troubleshooting License Activation Issues
- Fixing the "Checkout ID Not Found" Error
- Fixing the "Session Expired" Error Message
- Resolving "Order Does Not Exist" Error on Upsell/Downsell Page
- Fixing the "Sorry, This Product Cannot Be Purchased" Error
- Resolving "No Product is Selected" Error
- Fixing Order Status Stuck at MainOrderAccepted
- Fixing the "Your Cart is Empty" Error Message
- Fixing "The Following Required Query String Data is Missing: Instance" Error
- Fixing "Page Not Found" on Checkout During Payment
- Fixing Checkout Page Redirection to Homepage
- Why Upsell/Downsell is Not Working or Being Skipped
- Enabling CartFlows Step Post Types for Page Builders
- How to Fix the "Sorry, the Content Area Was Not Found in Your Page" Error in Elementor
- Refreshing / Flushing WordPress Permalinks
- Fixing Request Timeout Errors When Importing Funnel or Step Templates
- Fixing "API Key Already Activated with Same Instance ID" Error
- Viewing CartFlows Logs
- Fixing 5XX Error When Importing Funnel / Step Templates
- Fixing Blank Page Issue when Importing CartFlows Elementor Templates
- Why is Step Editing Disabled When I Try to Edit the CartFlows Checkout or Thank You Page?
- Disabling Auto-fill of Address Fields Based on Zip Code
- Enabling Theme's Scripts & Styles Without Changing Page Template
- Disabling Auto-fill of Checkout Fields
- Allowing Cache Plugins to Cache CartFlows Pages
- Changing the "Choose a Variation" Text
- VAT Field Not Displaying for WooCommerce EU/UK VAT Compliance Plugin
- Enabling the Product Tab on Store Checkout
- Displaying the Order Summary Open on Mobile Devices
- Refreshing the Checkout Page After CartFlows AJAX Calls
- Overview
- Installing Modern Cart Starter
- Installing Modern Cart Pro
- Activating License Key
- Customizing General Settings
- Customizing Cart Tray Labels
- Customizing Cart Icon Settings
- Customizing Cart Tray Styling
- Understanding the Product Recommendations Feature
- Controlling Product Recommendation Source for Empty Cart
How to Fix “Cannot Activate API Key. Key Already Activated with the Same Instance ID” Error
While activating the CartFlows Pro license, you may encounter the following error message:
Cannot Activate API Key. The API Key has already been activated with the same Unique Instance ID sent with this request.
This typically happens when your site setup causes CartFlows to send the same instance ID that was already linked to a previous activation. This documentation explains why this error occurs and how to fix it.
Why This Error Occurs
There are a few common scenarios that may trigger this issue:
1. Site Migration or Cloning
If the website has been migrated or cloned to a new domain or hosting environment, the old instance ID may still be stored. When you activate the license on the new site, it sends the same instance ID — leading to a conflict.
2. Plugin Reinstallation Without Deactivation
If the CartFlows Pro plugin was deleted or removed without first deactivating the license, then re-uploaded, the license system may still associate the instance ID with the original domain.
3. Caching Issues
When caching is enabled (including local, server-side, or browser cache), the instance ID may not be correctly stored. This can cause repeated requests to send the same old instance ID, even if the site has changed.
How to Fix the Issue
Follow these steps to clear the old instance ID and reactivate your CartFlows Pro license:
1. Log in to your account at my.cartflows.com
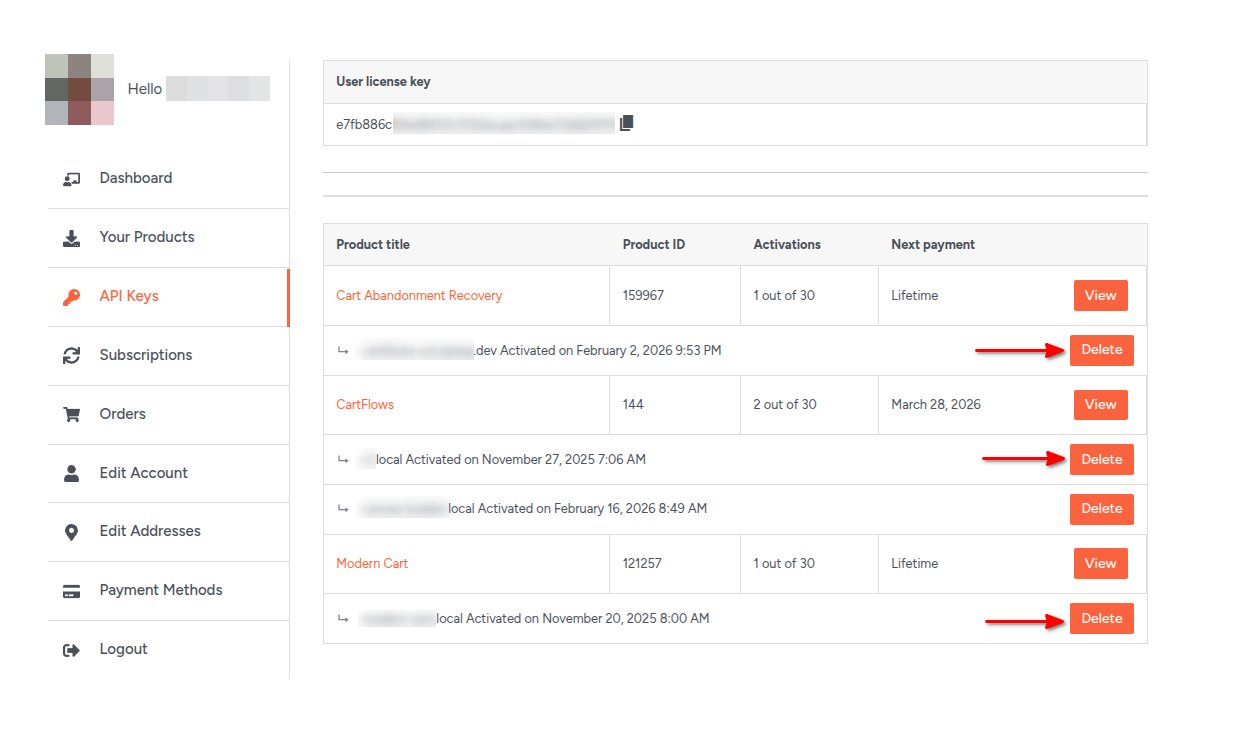
2. Navigate to the API Keys tab
3. Locate the entry for the domain you’re working with
4. Delete that entry

5. Log in to your WordPress admin
6. Clear all site cache, including
- Local cache
- Server-side cache
- Browser cache
7. Go to the Plugins menu
8. Deactivate any cache plugin temporarily
9. Deactivate the CartFlows Pro plugin
10. Reactivate the CartFlows Pro plugin
11. Click the Activate License button
12. Enter your license/API key
13. Click Activate
Note: Always clear all cache and temporarily disable any cache plugins before activating the CartFlows Pro license/API key.
We don't respond to the article feedback, we use it to improve our support content.