- Hiding Fields on the Checkout Page
- Installing WooCommerce
- Using WooCommerce
- Adding Products in WooCommerce
- Using Your Theme's Header & Footer in a Step
- Embedding a Checkout Form on the CartFlows Checkout Page
- Hiding WooCommerce Pages and Products
- Using Pricing Tables
- Adding an Affiliate Program
- Setting a Funnel as the Homepage
- GDPR Compliance
- Excluding CartFlows Pages from Caching
- Creating Variable Products
- Placing Shortcode in the Right Places
- Displaying a Terms and Conditions Checkbox
- Creating a Marketing Sales Funnel
- How to Enable Facebook Pixel Support in Cartflows?
- Enabling Fusion Page Builder on CartFlows Steps
- Passing Variables as Query Parameters to a URL
- Highlighting a Product on the CartFlows Checkout Page
- Styling the Highlight Product Section
- Collecting User Contact Data and Redirecting to the Checkout Page
- Setting a Default Product in Product Options
- Dynamic Offers aka Rule Engine
- Instant Layout for Checkout and Thank You Step
- Adding Products from the URL to the Checkout Page
- Setting Up A/B Testing for Steps
- Deleting Plugin Data During Uninstallation
- Importing Ready-Made Templates for Funnels and Steps
- Importing and Exporting Funnels and Step
- URL Parameters
- Replacing the Main Checkout Order with an Upsell or Downsell
- Rolling back to a Previous Version
- Google Address Autocomplete
- Flatsome UX Builder
- ActiveCampaign
- Paypal Reference Transactions
- How PaypPal/Stripe Works
- Enabling Enfold Avia Layout Builder
- Setting Up Authorize.net for Upsell & Downsell
- Supported Payment Gateways
- Setting Quantity and Discount for Products on the Checkout Page
- Adding Custom Payment Gateway Support for One-Click Upsell and Downsell
- Funnel in Test Mode
- Troubleshooting Plugin and Theme Conflicts
- Resolving the "Please Select a Simple, Virtual, and Free Product" Error
- Fixing Endless Loading on the Checkout Page
- Fixing the "We can't seem to find an order for you." Error on the Thank You Page
- Troubleshooting License Activation Issues
- Fixing the "Checkout ID Not Found" Error
- Fixing the "Session Expired" Error Message
- Resolving "Order Does Not Exist" Error on Upsell/Downsell Page
- Fixing the "Sorry, This Product Cannot Be Purchased" Error
- Disabling Auto-fill of Address Fields Based on Zip Code
- Enabling Theme's Scripts & Styles Without Changing Page Template
- Disabling Auto-fill of Checkout Fields
- Allowing Cache Plugins to Cache CartFlows Pages
- Changing the "Choose a Variation" Text
- VAT Field Not Displaying for WooCommerce EU/UK VAT Compliance Plugin
- Enabling the Product Tab on Store Checkout
- Displaying the Order Summary Open on Mobile Devices
- Refreshing the Checkout Page After CartFlows AJAX Calls
- Overview
- Installing Modern Cart Starter
- Installing Modern Cart Pro
- Activating License Key
- Customizing General Settings
- Customizing Cart Tray Labels
- Customizing Cart Icon Settings
- Customizing Cart Tray Styling
- Understanding the Product Recommendations Feature
- Controlling Product Recommendation Source for Empty Cart
How To Create A Marketing Sales Funnel?
This is the A to Z process of creating a marketing sales funnel for your business.
1. Order Domain Name and Hosting
This is the first step for you to be able to create any website. The domain name is your website address and hosting is where you host your site to be visible on the Internet.
2. WordPress Install and Setup
Once you’re done with purchasing a domain and hosting, you need to install WordPress. Most hosting providers offer a 1-click install solution for setting up WordPress. So, this step should be pretty quick and easy. Another thing that you need to install is the SSL security certificate to change your site from HTTP to HTTPS.
From your WordPress admin dashboard, go to Settings > Permalinks and select Post name. Click on Save Changes.
3. Add Theme and Plugins
From your WordPress admin dashboard, go to Appearance > click Add New. Astra Theme is a free theme and highly recommended with different free website templates that are ready to use. Install your selected theme and Activate.
Add an eCommerce plugin for your website by going to Plugins > Add New. Search for WooCommerce, Install and then Activate. It’s a free eCommerce plugin for WordPress and empowers most eCommerce sites. You’ll be redirected to the Setup Wizard where you can configure your online store details, payment method, and shipping information. Connect your Payment Gateway to your website.
Once you’ve completed setting up WooCommerce, go to the Products menu in your WordPress dashboard. Add New to create a new product that you will add to your sales funnel.
The next plugin that you need to add is a Page Builder plugin. Elementor is the number one page builder with over 3 million websites using it. It’s free and very easy to use. However, Elementor Pro, which is the paid version, has more functionalities that will be very useful for creating a seamless sales funnel. You can, however, install any page builder that you prefer.
Now, you need to install CartFlows, the number one Funnel Builder for WordPress. It has a free version where you can create funnels and customize the WooCommerce checkout page. CartFlows Pro is the paid version where you can have multiple checkout styles, add order bumps, upsells and downsells, configure the fields and add custom fields, and a cart abandonment feature.
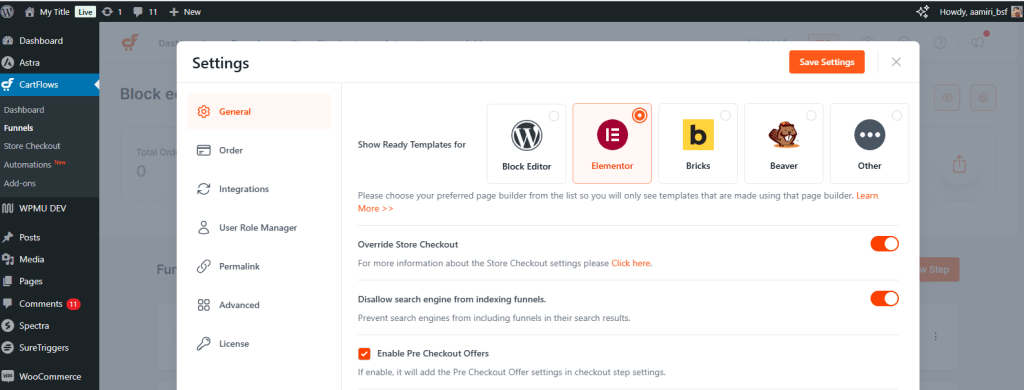
In CartFlows > Settings, under General Settings, select the page builder that you are using. It has defaulted to Elementor but CartFlows is also compatible with Block Editor (Gutenberg), and Beaver Builder. This defines the templates to display that are compatible with your page builder.
4. Create Your Funnel
From your WordPress dashboard, go to CartFlows > Funnels > Create New Funnel.
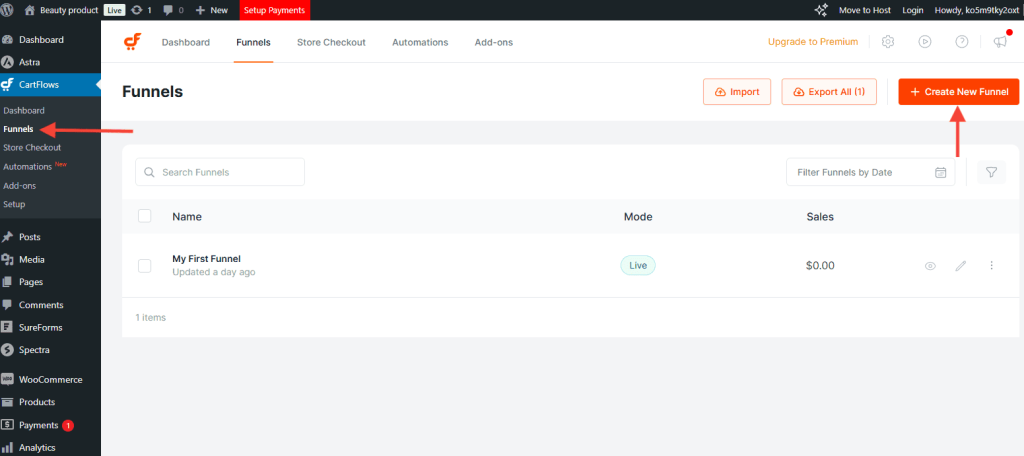
Note that the Import and Export can be used for transferring funnels from one website to another. You would also need to import or export the page templates that you used for your funnels.
There are readily available funnels that you can use if you don’t want to start from scratch. Simply select and click Import. This is going to download and import everything for you, the images and the structure of the funnel.
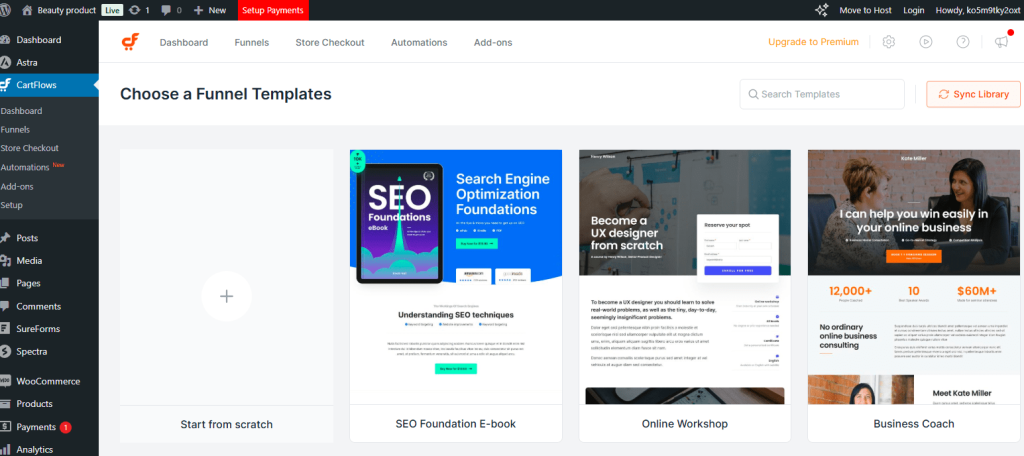
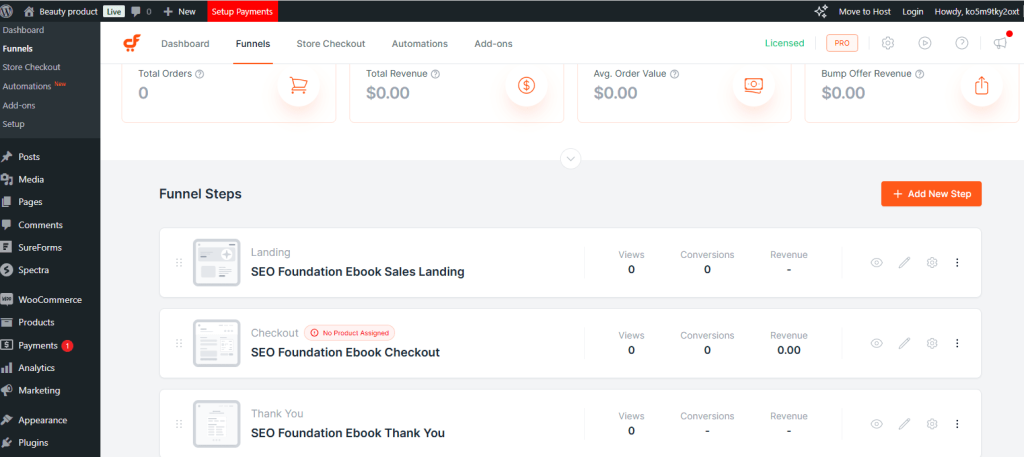
Once everything is downloaded, enter a name for your funnel. Click Update. You’ll find the default steps included in your funnel.
5. Configure Your Checkout Page
Select the Checkout Page step and click Edit. This is where you can add a specific product to your checkout page and customize the page according to your preference.
To learn more about customizing your checkout page, click here.
6. Add Upsell / Downsell
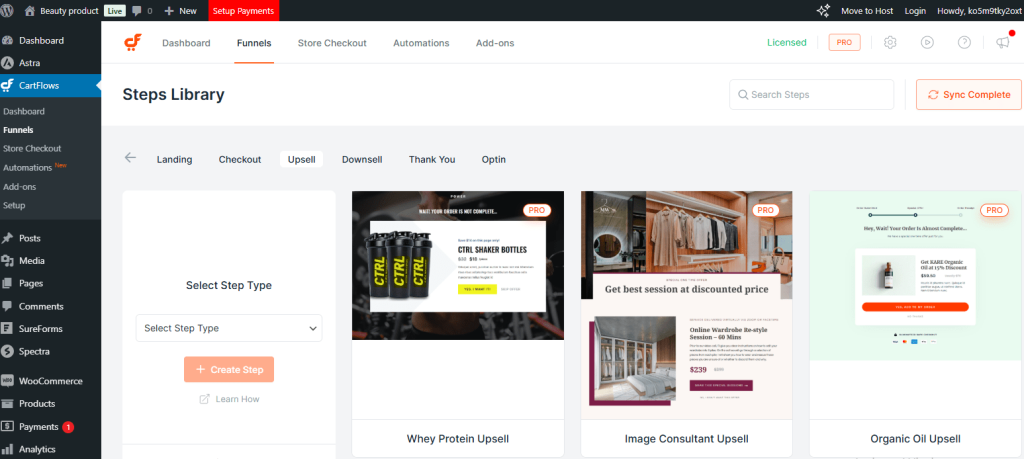
If you decide to add an upsell or a downsell, simply click on Add New Step. You’ll see again the templates popup where you can choose a template for your upsell or downsell.
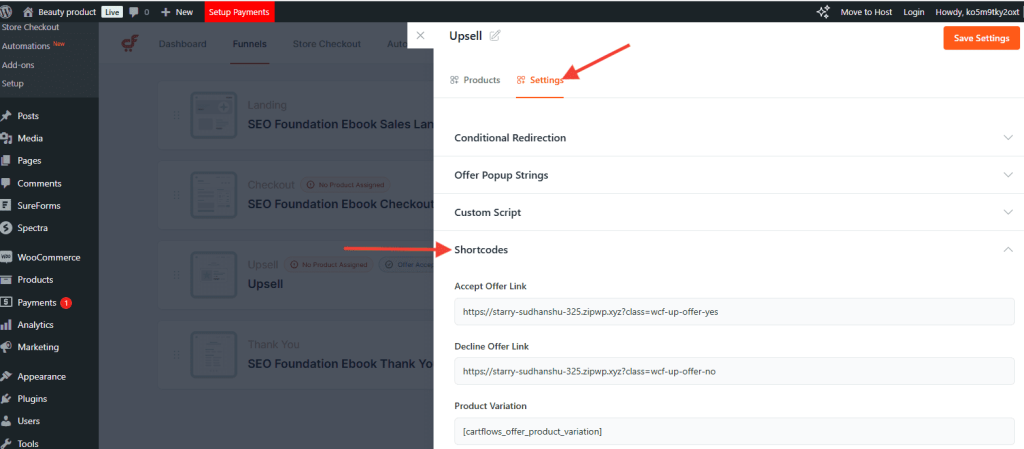
If you add an Upsell or Downsell Step, you’ll find that in the Upsell Settings > Shortcodes, there are two links that correspond to when the customer says yes to your offer and declines your offer. If the customer clicks on the Yes link, he will be automatically charged.
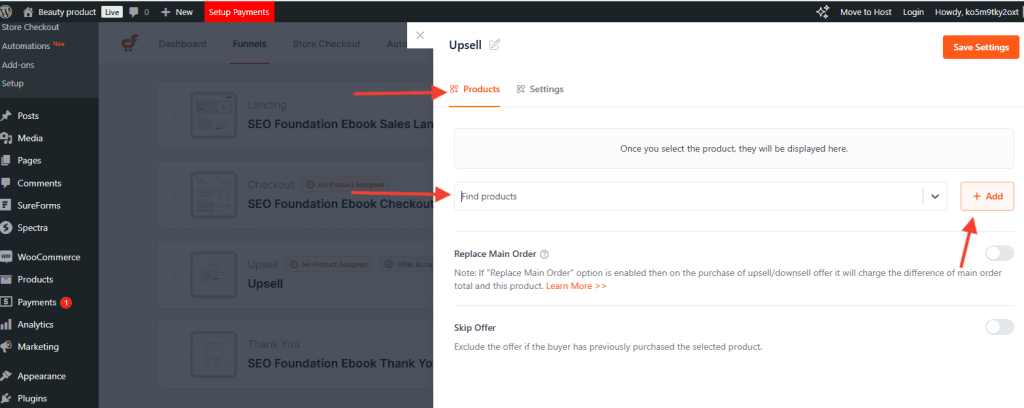
In the Select Product Option, select the product that you’re going to upsell, the quantity, the discount type, and discount value.
Custom Script allows you to add scripts if you want to add bots, custom pixels, or live chat to your page.
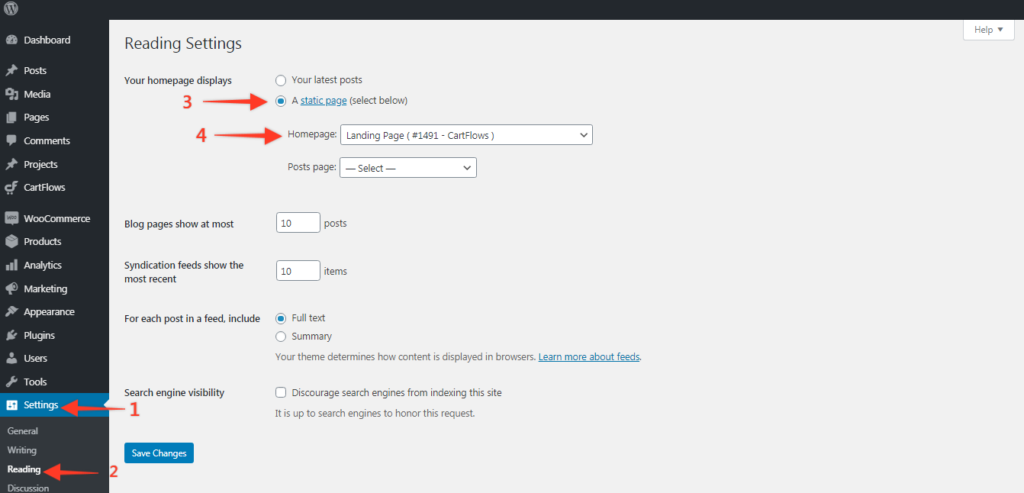
7. Set Your Landing Page as the Homepage
From your WordPress dashboard, go to Settings > Reading. Choose static page and select the landing page you created for your funnel.
8. Test Your Funnel
Go back to CartFlows menu > Funnels, then Edit the funnel settings. On the right-hand side, click on the Enable Test Mode Toggle button under the Funnel Settings. This enables you to test the actual funnel of your funnel. Make sure that you have set up the payment gateway properly.
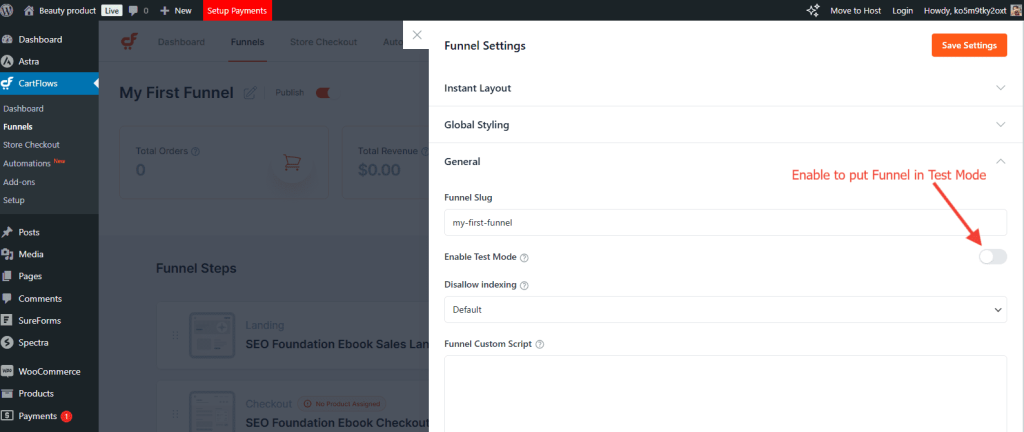
But, if your payment gateway is still in test mode, you can use this test number 4242 4242 4242 4242 ( if you’re using Stripe ) on the checkout page. Click here for more Stripe test numbers that you can use.
Open your site in another browser or in an incognito window and you’ll see the landing page which you set as the homepage. Follow the call to action and you’ll be redirected to the whole flow.
Learn more in this video:
Did you know that?
You can also use CartFlows in a non-eCommerce-related funnel. For instance, you can use it for a lead generation funnel. All you would need in a flow are two steps: 1) the landing page containing a lead generation element, and 2) the thank you page.
We don't respond to the article feedback, we use it to improve our support content.