- Hiding Fields on the Checkout Page
- Installing WooCommerce
- Using WooCommerce
- Using Your Theme's Header & Footer in a Step
- Embedding a Checkout Form on the CartFlows Checkout Page
- Hiding WooCommerce Pages and Products
- Using Pricing Tables
- Adding an Affiliate Program
- Setting a Funnel as the Homepage
- GDPR Compliance
- Dynamic Offers aka Rule Engine
- Instant Layout for Checkout and Thank You Step
- Adding Products from the URL to the Checkout Page
- Setting Up A/B Testing for Steps
- Deleting Plugin Data During Uninstallation
- Importing Ready-Made Templates for Funnels and Steps
- Importing and Exporting Funnels and Step
- URL Parameters
- Replacing the Main Checkout Order with an Upsell or Downsell
- Rolling back to a Previous Version
- Using the "Order Custom Field" Rule of Dynamic Offers with Custom Field Editor
- Optin
- Separate Orders
- Setting Up Pre-Checkout Upsell
- Refund Offer
- Applying a Coupon from the URL
- How Coupons Work in CartFlows?
- Instant Layout for Upsell and Downsell
- Google Address Autocomplete
- Flatsome UX Builder
- ActiveCampaign
- Paypal Reference Transactions
- How PaypPal/Stripe Works
- Enabling Enfold Avia Layout Builder
- Setting Up Authorize.net for Upsell & Downsell
- Supported Payment Gateways
- Setting Up A/B Testing with Google Optimize
- Setting Quantity and Discount for Products on the Checkout Page
- Funnel in Test Mode
- Troubleshooting Plugin and Theme Conflicts
- Resolving the "Please Select a Simple, Virtual, and Free Product" Error
- Fixing Endless Loading on the Checkout Page
- Fixing the "We can't seem to find an order for you." Error on the Thank You Page
- Troubleshooting License Activation Issues
- Fixing the "Checkout ID Not Found" Error
- Fixing the "Session Expired" Error Message
- Resolving "Order Does Not Exist" Error on Upsell/Downsell Page
- Fixing the "Sorry, This Product Cannot Be Purchased" Error
- Disabling Auto-fill of Address Fields Based on Zip Code
- Enabling Theme's Scripts & Styles Without Changing Page Template
- Disabling Auto-fill of Checkout Fields
- Allowing Cache Plugins to Cache CartFlows Pages
- Changing the "Choose a Variation" Text
- VAT Field Not Displaying for WooCommerce EU/UK VAT Compliance Plugin
- Enabling the Product Tab on Store Checkout
- Displaying the Order Summary Open on Mobile Devices
- Refreshing the Checkout Page After CartFlows AJAX Calls
- Overview
- Installing Modern Cart Starter
- Installing Modern Cart Pro
- Activating License Key
- Customizing General Settings
- Customizing Cart Tray Labels
- Customizing Cart Icon Settings
- Customizing Cart Tray Styling
- Understanding the Product Recommendations Feature
- Controlling Product Recommendation Source for Empty Cart
How to Use the “Order Custom Field” Rule of Dynamic Offers with Custom Field Editor
Do you want to display the upsell/downsell offers on the basis of the checkout field values filled by users on the checkout page? Well, you have landed on the correct page.
In the latest version of the CartFlows i:e 1.11.6 & 1.11.5 we have introduced a new dynamic offer rule named Order Custom Field. So you can redirect your users to specific upsell/downsell by comparing the values entered on the checkout page by the users. You can use the default WooCommerce checkout fields as well as custom fields added using the custom field editor or any other third-party plugin.
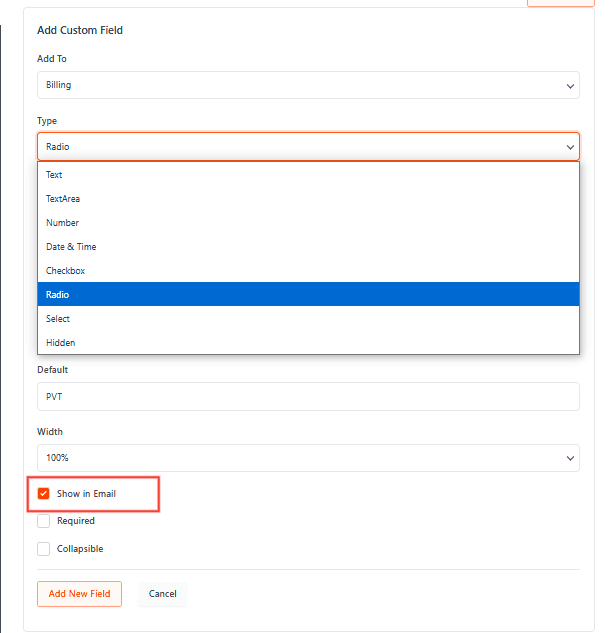
Along with it, we have introduced the Show in email option for the CartFlows checkout field editor. If you want to show custom field details in order emails then just enable it.
So let’s have an example of how to use this new rule. In the below example, we are using the Radio field which is introduced in the same update.
If you are new and don’t know how to add the new custom field on the checkout page, then here is the article which will help you to add a new custom field.
Now, let’s consider you have followed the steps mentioned in the above article to add a new custom field, then below are the steps to add a condition/rule on the checkout page for the newly created custom field.
Step 1: Navigate to the custom field editor and look the custom field for which you want to add a condition.
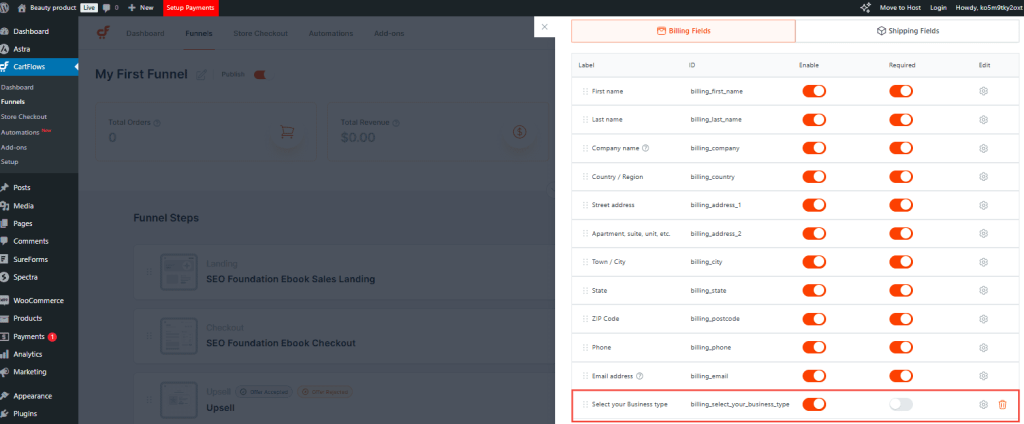
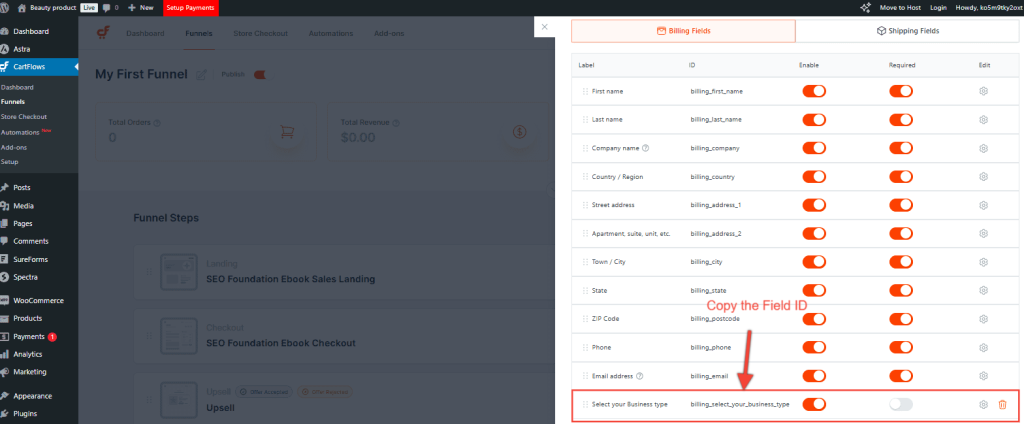
Step 2: After locating the custom field, you will see more options for that field, then copy the field ID.
Step 3: Now, navigate to the Dynamic Offers/Conditions tab on the Checkout page and enable it.
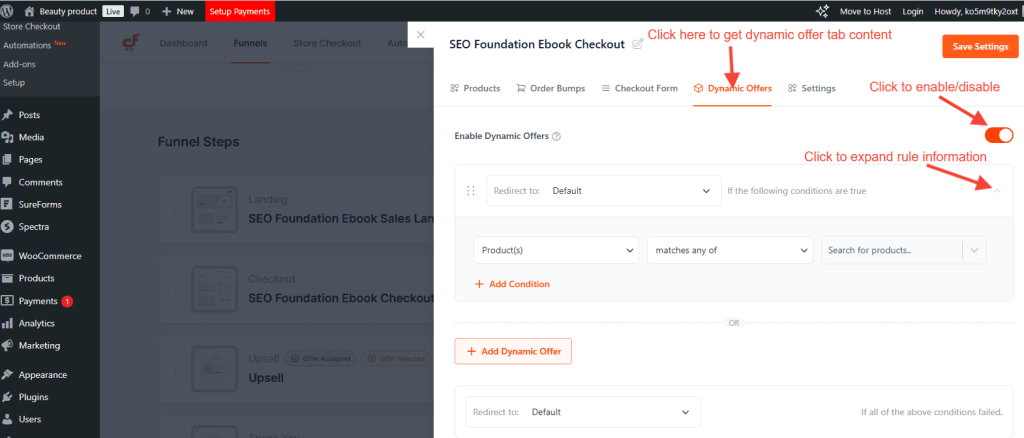
Step 4: Add a rule and select the Order custom field option in the first option.
- Now select the condition
- Then paste the field key in the next field which we have copied in step 2.
- Then add the expected value that will be compared when the order is placed so as to display the offer. Make sure that you add the expected value as it is as you have mentioned in the Options field while creating the custom field.
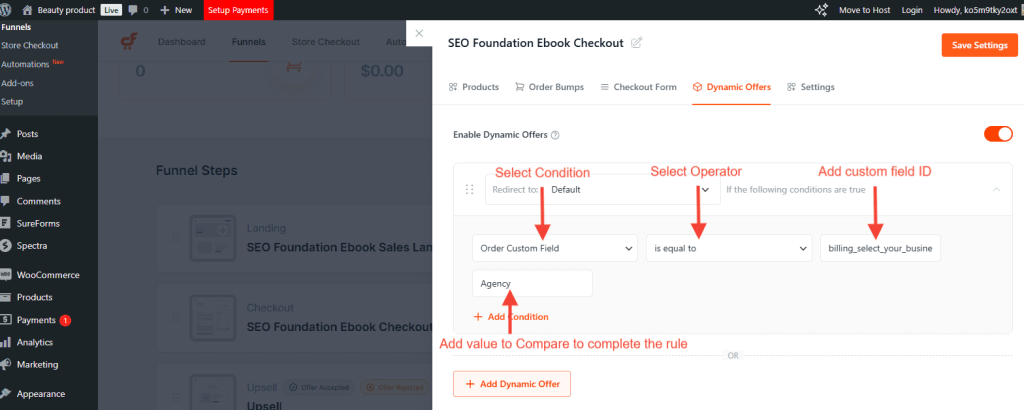
Step 5: Click the save settings button to save the changes. Now your rule is set and ready to use.
We don't respond to the article feedback, we use it to improve our support content.