- Hiding Fields on the Checkout Page
- Installing WooCommerce
- Using WooCommerce
- Using Your Theme's Header & Footer in a Step
- Embedding a Checkout Form on the CartFlows Checkout Page
- Hiding WooCommerce Pages and Products
- Using Pricing Tables
- Adding an Affiliate Program
- Setting a Funnel as the Homepage
- GDPR Compliance
- Dynamic Offers aka Rule Engine
- Instant Layout for Checkout and Thank You Step
- Adding Products from the URL to the Checkout Page
- Setting Up A/B Testing for Steps
- Deleting Plugin Data During Uninstallation
- Importing Ready-Made Templates for Funnels and Steps
- Importing and Exporting Funnels and Step
- URL Parameters
- Replacing the Main Checkout Order with an Upsell or Downsell
- Rolling back to a Previous Version
- Using the "Order Custom Field" Rule of Dynamic Offers with Custom Field Editor
- Optin
- Separate Orders
- Setting Up Pre-Checkout Upsell
- Refund Offer
- Applying a Coupon from the URL
- How Coupons Work in CartFlows?
- Instant Layout for Upsell and Downsell
- Google Address Autocomplete
- Flatsome UX Builder
- ActiveCampaign
- Paypal Reference Transactions
- How PaypPal/Stripe Works
- Enabling Enfold Avia Layout Builder
- Setting Up Authorize.net for Upsell & Downsell
- Supported Payment Gateways
- Setting Up A/B Testing with Google Optimize
- Setting Quantity and Discount for Products on the Checkout Page
- Funnel in Test Mode
- Troubleshooting Plugin and Theme Conflicts
- Resolving the "Please Select a Simple, Virtual, and Free Product" Error
- Fixing Endless Loading on the Checkout Page
- Fixing the "We can't seem to find an order for you." Error on the Thank You Page
- Troubleshooting License Activation Issues
- Fixing the "Checkout ID Not Found" Error
- Fixing the "Session Expired" Error Message
- Resolving "Order Does Not Exist" Error on Upsell/Downsell Page
- Fixing the "Sorry, This Product Cannot Be Purchased" Error
- Disabling Auto-fill of Address Fields Based on Zip Code
- Enabling Theme's Scripts & Styles Without Changing Page Template
- Disabling Auto-fill of Checkout Fields
- Allowing Cache Plugins to Cache CartFlows Pages
- Changing the "Choose a Variation" Text
- VAT Field Not Displaying for WooCommerce EU/UK VAT Compliance Plugin
- Enabling the Product Tab on Store Checkout
- Displaying the Order Summary Open on Mobile Devices
- Refreshing the Checkout Page After CartFlows AJAX Calls
- Overview
- Installing Modern Cart Starter
- Installing Modern Cart Pro
- Activating License Key
- Customizing General Settings
- Customizing Cart Tray Labels
- Customizing Cart Icon Settings
- Customizing Cart Tray Styling
- Understanding the Product Recommendations Feature
- Controlling Product Recommendation Source for Empty Cart
Introducing the “Separate Orders” Feature in CartFlows
CartFlows now includes a powerful new option called Separate Orders, available in CartFlows Pro version 1.5.5 and above. This feature gives you the ability to create individual orders for Upsell and Downsell purchases instead of combining them into a single WooCommerce order.
This can help streamline order management, improve refund handling, and ensure proper email notifications are sent for each order stage.
How It Worked Before
Previously, when a customer purchased a product through a CartFlows funnel (including the Checkout, Upsell, and Downsell steps), all accepted offers were combined into one WooCommerce order. The status of this order was marked as MainOrderAccepted, which could occasionally affect email triggers and product access.
What’s New with Separate Orders
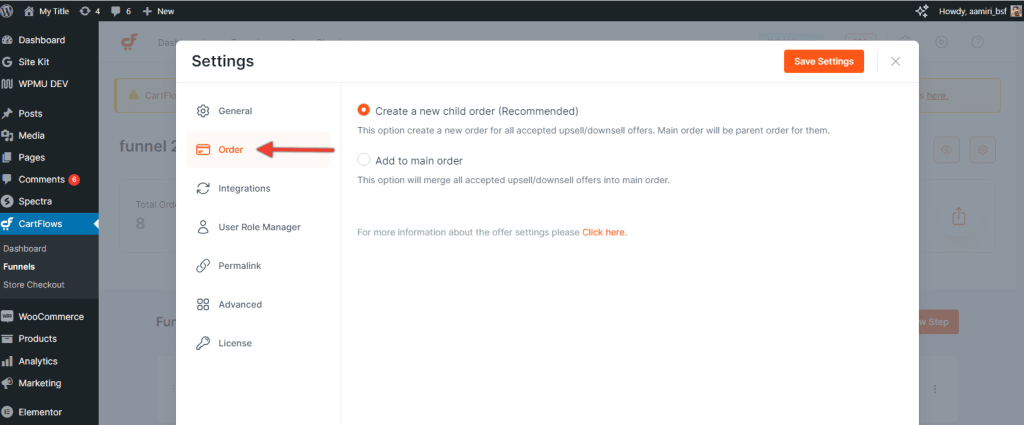
Now, with the Create a new child order option, CartFlows allows separate orders to be generated for each accepted offer.
You’ll find this setting under:
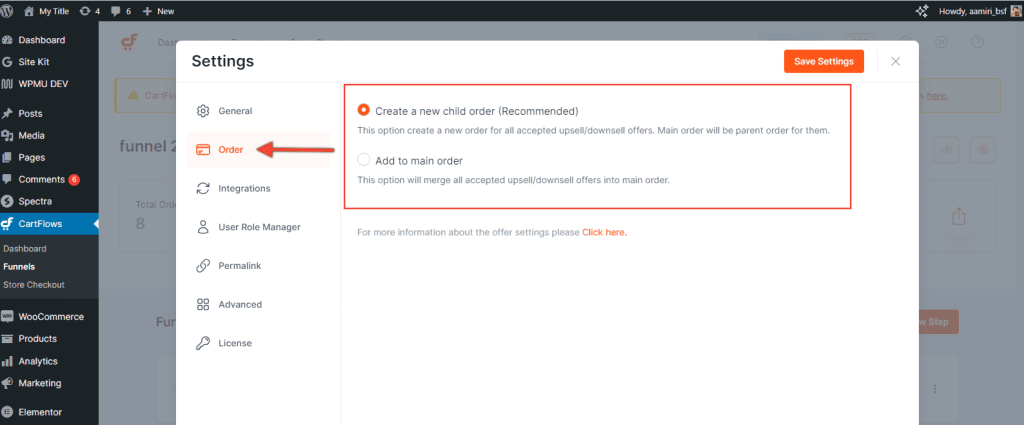
CartFlows → Settings → Order

Here, you’ll see two available options:
- Add to the main order
This is the default behavior, where all accepted Upsell and Downsell products are merged into the original checkout order. - Create a new child order
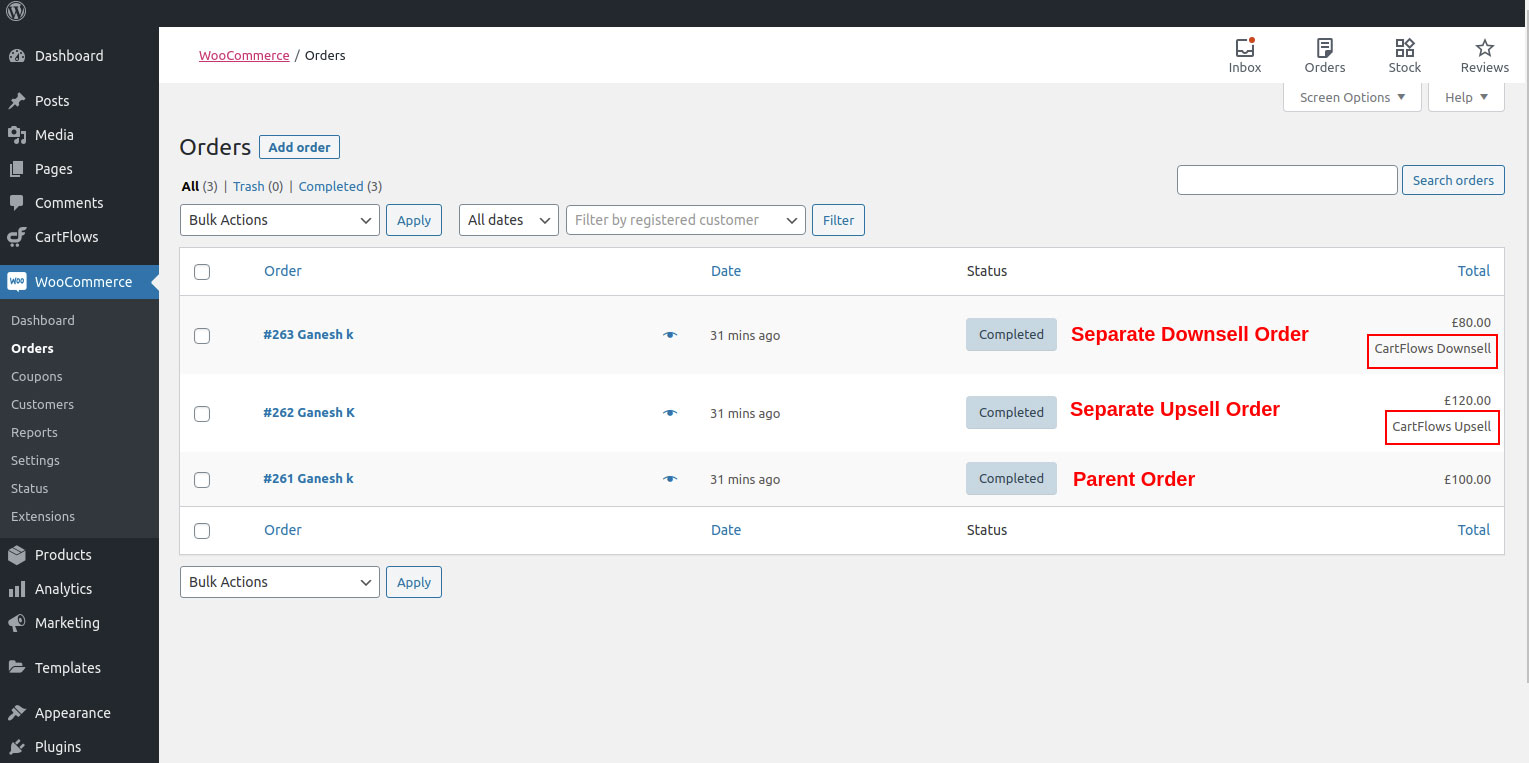
This creates individual orders for each Upsell or Downsell product. The original checkout order becomes the parent order, and each subsequent accepted offer is logged as a separate WooCommerce order.

Where the Orders Appear
Each new child order will be visible in WooCommerce → Orders, making it easy to track, manage, and take action on each order individually.

Why Use Separate Orders?
Enabling this feature can help in several key areas:
- Simplified refunds
Process returns for Upsell or Downsell products without affecting the main order. - Email notifications
WooCommerce will automatically send order-related emails for each child order, ensuring timely communication with your customers. - Improved access for digital products
If you’re selling courses or memberships as upsells, customers will gain access immediately upon purchase since each product has its own completed order. - Better status tracking
Solves the issue where incomplete funnel exits (e.g., closing the browser during an Upsell) previously left the order in an intermediateMainOrderAcceptedstatus.
This feature provides greater flexibility for store owners who want more granular control over how upsell and downsell purchases are handled in WooCommerce. You can now decide whether to keep everything in a single order or split them based on your business needs.
We don't respond to the article feedback, we use it to improve our support content.