- Hiding Fields on the Checkout Page
- Installing WooCommerce
- Using WooCommerce
- Adding Products in WooCommerce
- Using Your Theme's Header & Footer in a Step
- Embedding a Checkout Form on the CartFlows Checkout Page
- Hiding WooCommerce Pages and Products
- Using Pricing Tables
- Adding an Affiliate Program
- Setting a Funnel as the Homepage
- Dynamic Offers aka Rule Engine
- Instant Layout for Checkout and Thank You Step
- Adding Products from the URL to the Checkout Page
- Setting Up A/B Testing for Steps
- Deleting Plugin Data During Uninstallation
- Importing Ready-Made Templates for Funnels and Steps
- Importing and Exporting Funnels and Step
- URL Parameters
- Replacing the Main Checkout Order with an Upsell or Downsell
- Rolling back to a Previous Version
- Using the "Order Custom Field" Rule of Dynamic Offers with Custom Field Editor
- Optin
- Separate Orders
- Setting Up Pre-Checkout Upsell
- Refund Offer
- Applying a Coupon from the URL
- How Coupons Work in CartFlows?
- Instant Layout for Upsell and Downsell
- Google Address Autocomplete
- Flatsome UX Builder
- ActiveCampaign
- Paypal Reference Transactions
- How PaypPal/Stripe Works
- Enabling Enfold Avia Layout Builder
- Setting Up Authorize.net for Upsell & Downsell
- Supported Payment Gateways
- Setting Quantity and Discount for Products on the Checkout Page
- Adding Custom Payment Gateway Support for One-Click Upsell and Downsell
- Funnel in Test Mode
- Troubleshooting Plugin and Theme Conflicts
- Resolving the "Please Select a Simple, Virtual, and Free Product" Error
- Fixing Endless Loading on the Checkout Page
- Fixing the "We can't seem to find an order for you." Error on the Thank You Page
- Troubleshooting License Activation Issues
- Fixing the "Checkout ID Not Found" Error
- Fixing the "Session Expired" Error Message
- Resolving "Order Does Not Exist" Error on Upsell/Downsell Page
- Fixing the "Sorry, This Product Cannot Be Purchased" Error
- Disabling Auto-fill of Address Fields Based on Zip Code
- Enabling Theme's Scripts & Styles Without Changing Page Template
- Disabling Auto-fill of Checkout Fields
- Allowing Cache Plugins to Cache CartFlows Pages
- Changing the "Choose a Variation" Text
- VAT Field Not Displaying for WooCommerce EU/UK VAT Compliance Plugin
- Enabling the Product Tab on Store Checkout
- Displaying the Order Summary Open on Mobile Devices
- Refreshing the Checkout Page After CartFlows AJAX Calls
- Overview
- Installing Modern Cart Starter
- Installing Modern Cart Pro
- Activating License Key
- Customizing General Settings
- Customizing Cart Tray Labels
- Customizing Cart Icon Settings
- Customizing Cart Tray Styling
- Understanding the Product Recommendations Feature
- Controlling Product Recommendation Source for Empty Cart
How to A/B Test the CartFlows Steps?
Well, the most awaited feature is out… Yes, CartFlows Split Testing is here!!!
We are pleased to announce the immediate availability of CartFlows Split Testing which will enable you to increase sales and revenue by conducting simple tests.
Say goodby to expensive monthly fees from other split testing services with our constant effort to make CartFlows the ultimate sales funnel tool, we have carefully crafted the best split testing experience and its included with your CartFlows Pro license.
To start using the CartFlows Split Testing, you need to update CartFlows Core (the free version) and CartFlows Pro to their latest version or above.
Wondering what split testing is and what it can do for you?
Split Testing is a way of testing the two or more web pages against each other to see which version generates more sales or leads. You can split test something as simple as the color of a button, a headline, or more advanced tests such as pricing and bundles. With CartFlows Split Testing you can test anything.
Once your test is set up the website traffic will be split between the different versions. If the website visitor converts to a lead or a sale, it’s counted as a conversion for that version of the web page.
After some time where there has been a good amount of traffic to each version of your web page you can choose a winner, basically the version with the highest conversions.
CartFlows Split Testing helps users by giving the functional and user’s experience comparison between the variations steps that are created. This comparison can be used to study the performance of the pages as well as the user’s feedback left on the page such as which page they have visited the most and from which page more orders or leads are generated.
So that you can get the idea on which content, design, images are mostly liked by the users. This can be used to design the final page to make it look more appealing and to attract more users.
Let’s see how to enable CartFlows Split Testing for CartFlows Steps.
It’s really very easy to set up and enable the Split Testing for the CartFlows steps with a very few steps.
There are only four steps in which you can fully set up the Split testing and they are as follows
- Enable Split Testing for the CartFlows Step
- Create Step/Page variants
- Set the traffic for the variants
- Start Split Testing
Let’s seen them in the sequence
1. Enable Split Testing
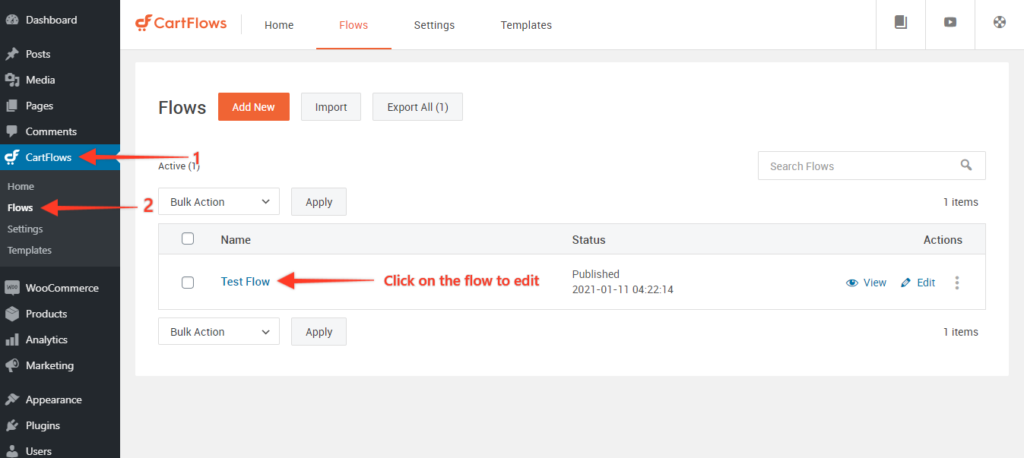
Step 1: Go to CartFlows -> Flows -> your_flow
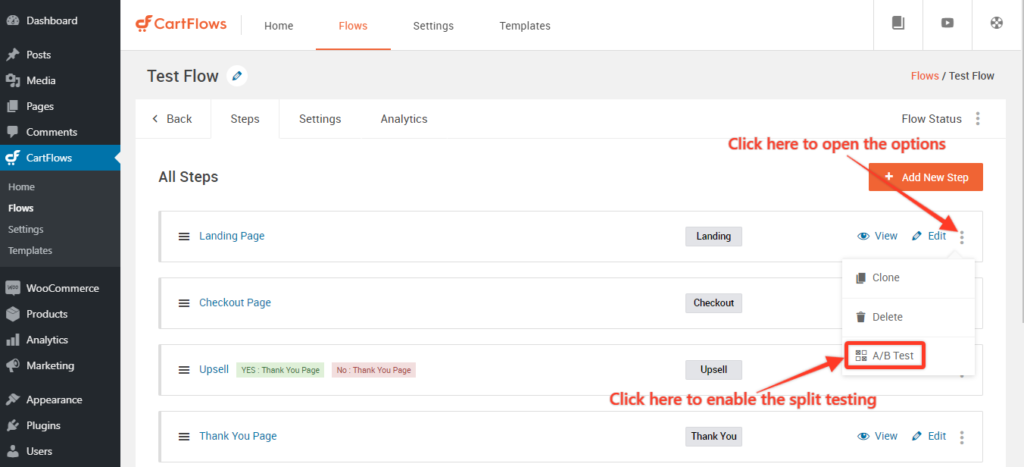
Step 2: Decide for which step you want to enable the Split testing and click on the side menu [ Add Three Dots icon if possible ] and click on the A/B test option
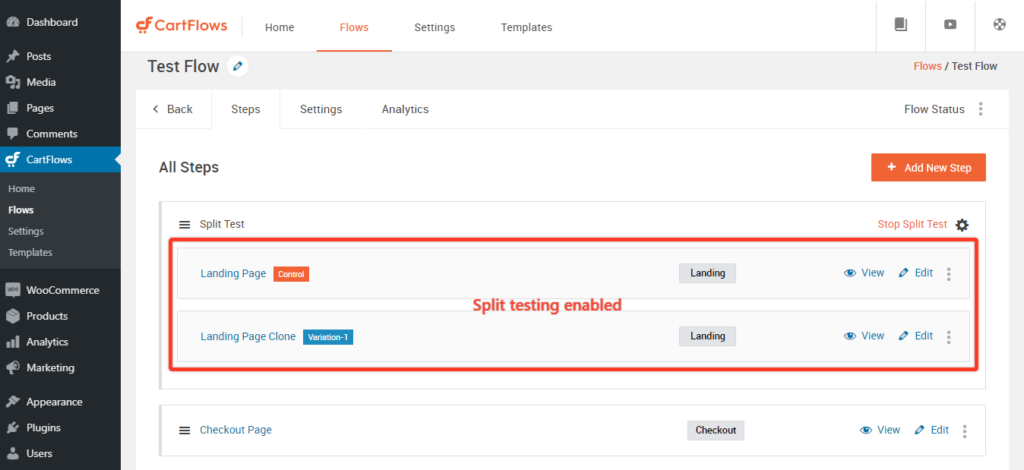
Step 3: Done. The Split Testing is enabled for the selected step.
Step 4: Click Update button to save the flow & setting.
2. Create Step/Page variants
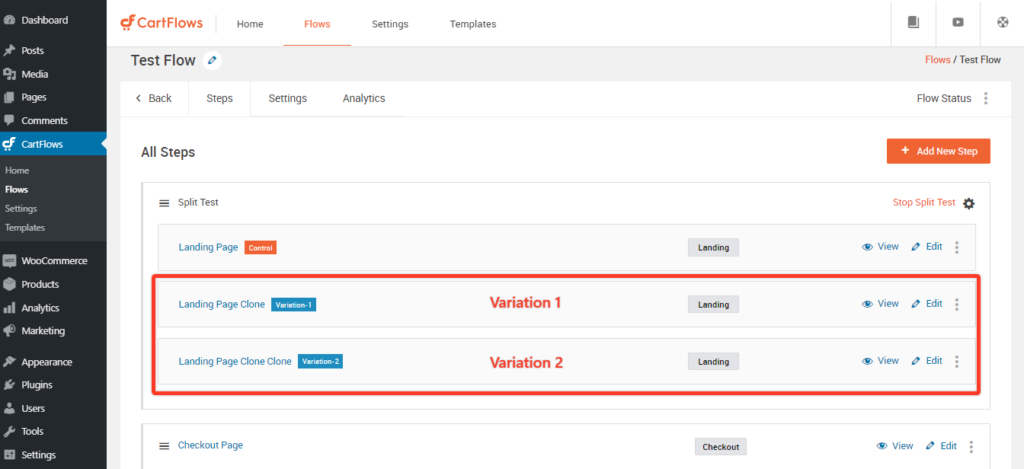
After enabling the split testing you will get the two steps the one is Control Step & second is Variation Step.
To create a variation of the step is also very simple. You just need to clone the existing variation.
Note: You can use this control Step’s URL to share it with the ads on your social media platform or any advertising platform.
Below are the steps to create a new variation for the split testing.
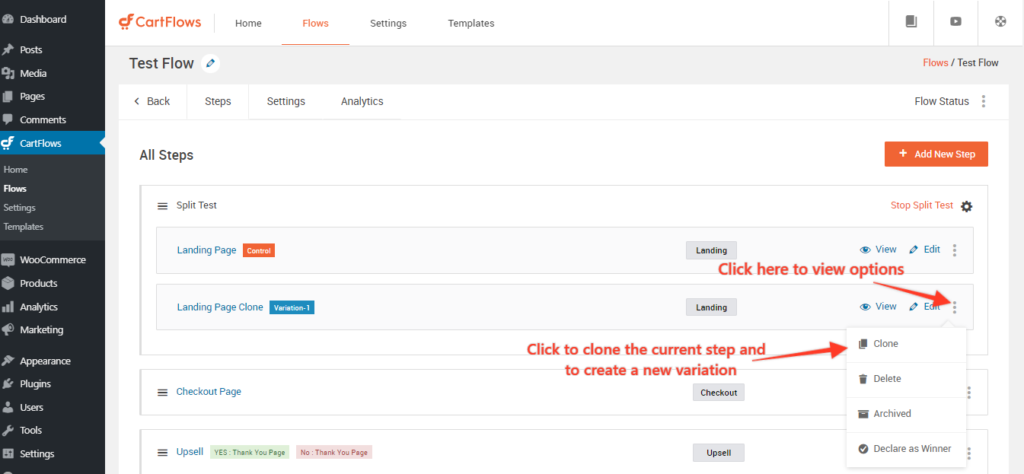
Step 1: Click on the three dots button of the variation step of which you want to create a variation and select the Clone option from the menu.
Step 2: This will automatically create a new variation.
Done. The new step variation is created and you can design each of the step variations as per your need with your favourite page builder tool.
After creating and designing the variations of your split testing pages, you will need to set the traffic for the pages. Basically is a percentage for how much users your want to redirect to a particular page.
Lets see how to setup the Split Testing traffic for the steps.
3. Set the Traffic for the Variants.
Setting up the traffic is as easy as you can find in the CartFlows. Let’s see how?
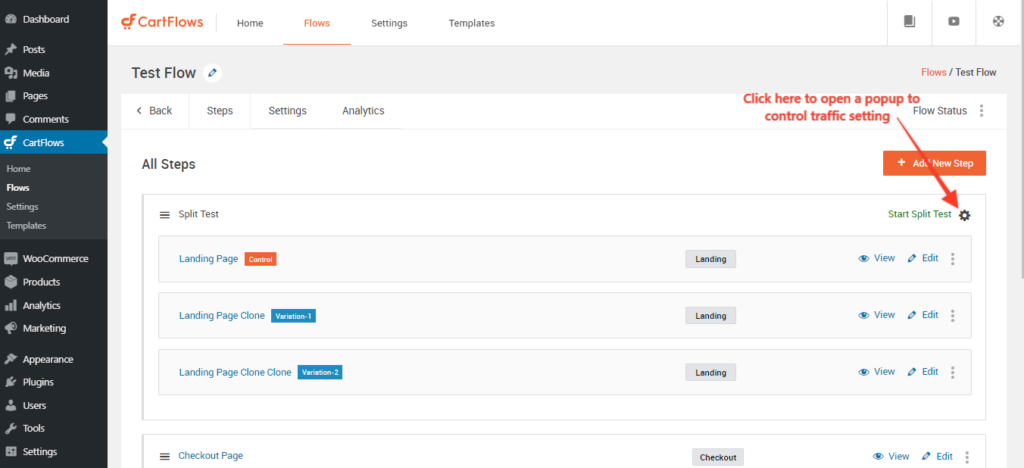
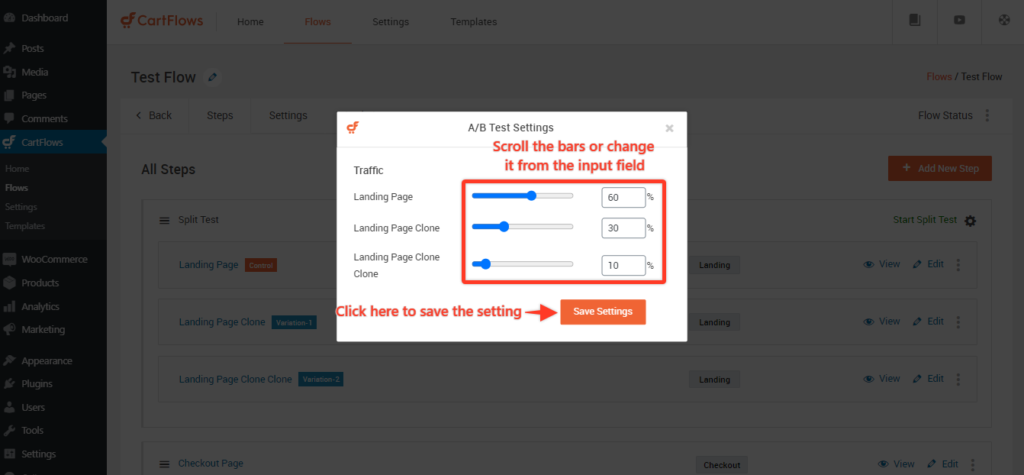
Step 1: Click on the small cog icon ( Add the icon if possible ) to open a setting popup.
Step 2: Adjust the percentage and click the save button.
4. Start the Split Testing
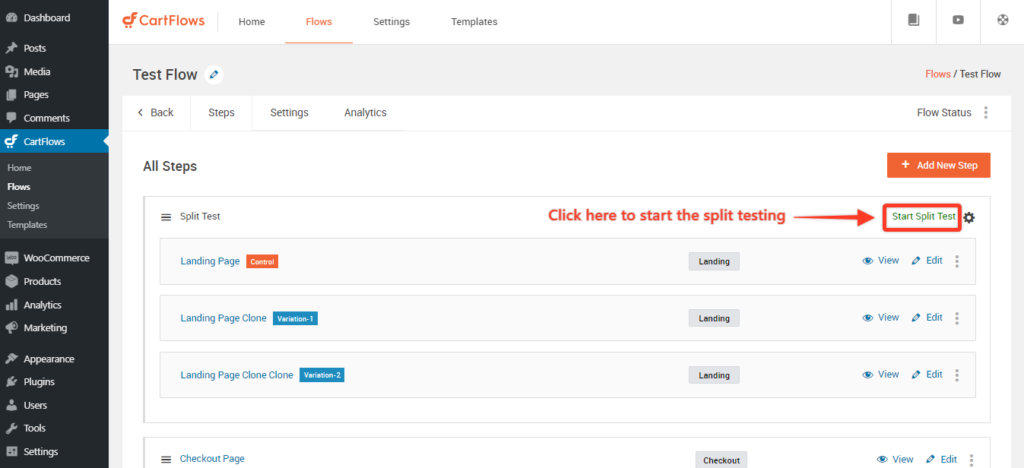
Step 1: Click on the Start Split Testing button to go live with Split Testing.
Some common questions regarding the Split Testing [FAQs]
What is the Control Step?
- The control step is the main step in the split testing. All the data related to the Split testing will be available in the Control step including the visits, A/B variations and it’s setting. It is used to decide which page variation has to be displayed to the user and all the created variations are connected through this control step. You can use this control Step’s URL to share it with the ads on your social media platform or any advertising platform.
What are the Variation Steps?
- The Variation Steps are the steps/pages which will be presented to the user and on which the A/B split testing will be performed. These variation steps are just like normal pages but of CartFlows Step post type’s pages created and put together to do an A/B test.
When does the Delete option will be displayed?
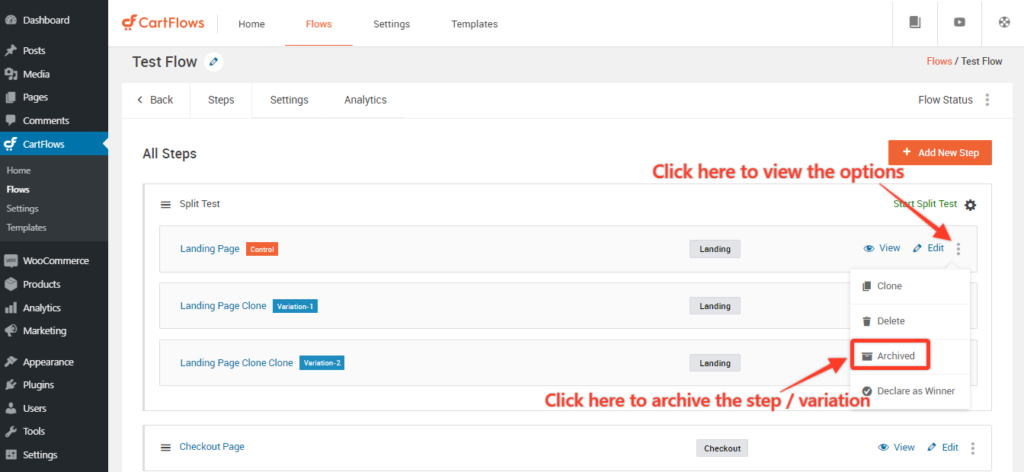
- The delete option is provided to delete the variation or the Control step which you don’t to use to just simply delete it. This option will be displayed only when there are more than two variations created and published.
- The reason behind is that, if you delete the control step then the next immediate variation of the control step will become the next control step and the second variation step will become the first variation step. Same for the variation steps.
What is Archive Option and when will it be displayed?
The Archive option is introduced to create a draft of the variation so that you can use it letter on. This option will be displayed only when there are more than two variation steps created.This archive Option will be displayed in the same menu which will be opened when clicked on the three dots present on the same step which you want to archive.
How many variation steps can be created for one control step?
- You can create as many variation steps as you want for one control step.
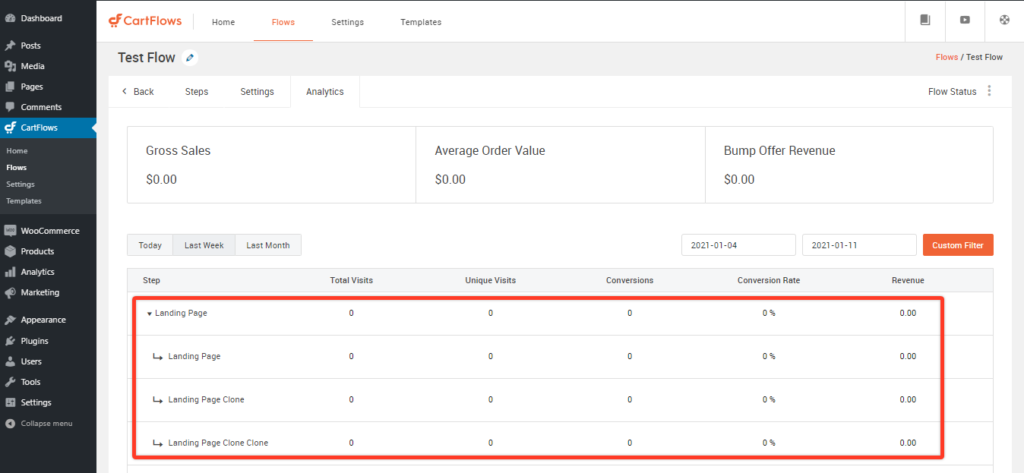
How will Flow Analytics display the Split Testing results?
- If the split testing is enabled and started then the Flow analytics will display the analytics for each of the variations that are active and are currently being used.
- This will display the analytics in the same patterns which was displayed earlier for the rest of the steps.
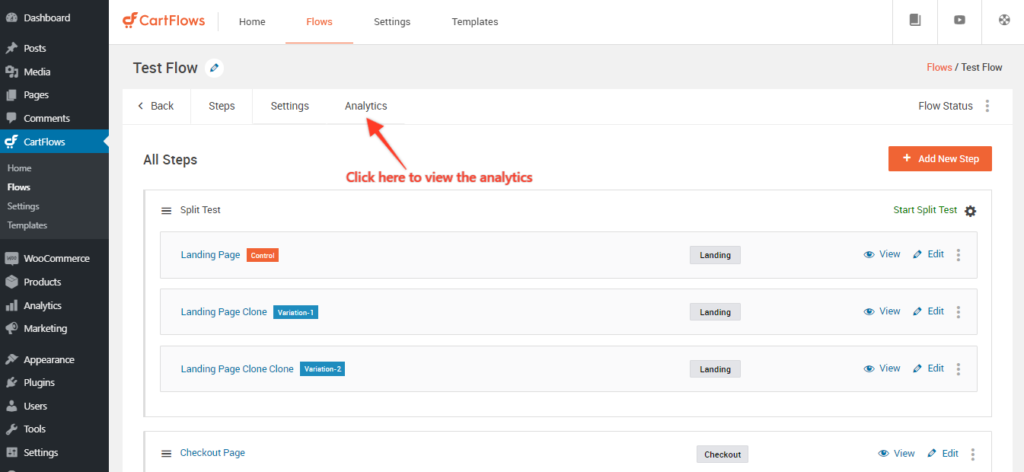
- How to view the Split Testing Analytics:
Step 1 : Click on the View Analytics button to open the Analytics Window.
Step 2: Now, Click on the step name for which you have enabled the split testing
We don't respond to the article feedback, we use it to improve our support content.
