- Hiding Fields on the Checkout Page
- Installing WooCommerce
- Using WooCommerce
- Adding Products in WooCommerce
- Using Your Theme's Header & Footer in a Step
- Embedding a Checkout Form on the CartFlows Checkout Page
- Hiding WooCommerce Pages and Products
- Using Pricing Tables
- Adding an Affiliate Program
- Setting a Funnel as the Homepage
- Dynamic Offers aka Rule Engine
- Instant Layout for Checkout and Thank You Step
- Adding Products from the URL to the Checkout Page
- Setting Up A/B Testing for Steps
- Deleting Plugin Data During Uninstallation
- Importing Ready-Made Templates for Funnels and Steps
- Importing and Exporting Funnels and Step
- URL Parameters
- Replacing the Main Checkout Order with an Upsell or Downsell
- Rolling back to a Previous Version
- Google Address Autocomplete
- Flatsome UX Builder
- ActiveCampaign
- Paypal Reference Transactions
- How PaypPal/Stripe Works
- Enabling Enfold Avia Layout Builder
- Setting Up Authorize.net for Upsell & Downsell
- Supported Payment Gateways
- Setting Quantity and Discount for Products on the Checkout Page
- Adding Custom Payment Gateway Support for One-Click Upsell and Downsell
- Funnel in Test Mode
- Troubleshooting Plugin and Theme Conflicts
- Resolving the "Please Select a Simple, Virtual, and Free Product" Error
- Fixing Endless Loading on the Checkout Page
- Fixing the "We can't seem to find an order for you." Error on the Thank You Page
- Troubleshooting License Activation Issues
- Fixing the "Checkout ID Not Found" Error
- Fixing the "Session Expired" Error Message
- Resolving "Order Does Not Exist" Error on Upsell/Downsell Page
- Fixing the "Sorry, This Product Cannot Be Purchased" Error
- Disabling Auto-fill of Address Fields Based on Zip Code
- Enabling Theme's Scripts & Styles Without Changing Page Template
- Disabling Auto-fill of Checkout Fields
- Allowing Cache Plugins to Cache CartFlows Pages
- Changing the "Choose a Variation" Text
- VAT Field Not Displaying for WooCommerce EU/UK VAT Compliance Plugin
- Enabling the Product Tab on Store Checkout
- Displaying the Order Summary Open on Mobile Devices
- Refreshing the Checkout Page After CartFlows AJAX Calls
- Overview
- Installing Modern Cart Starter
- Installing Modern Cart Pro
- Activating License Key
- Customizing General Settings
- Customizing Cart Tray Labels
- Customizing Cart Icon Settings
- Customizing Cart Tray Styling
- Understanding the Product Recommendations Feature
- Controlling Product Recommendation Source for Empty Cart
How Does CartFlows Work with and without Store Checkout?
CartFlows provides two ways to handle the checkout process, with or without Store Checkout. This documentation explains how each method works and which one is best suited for your store.
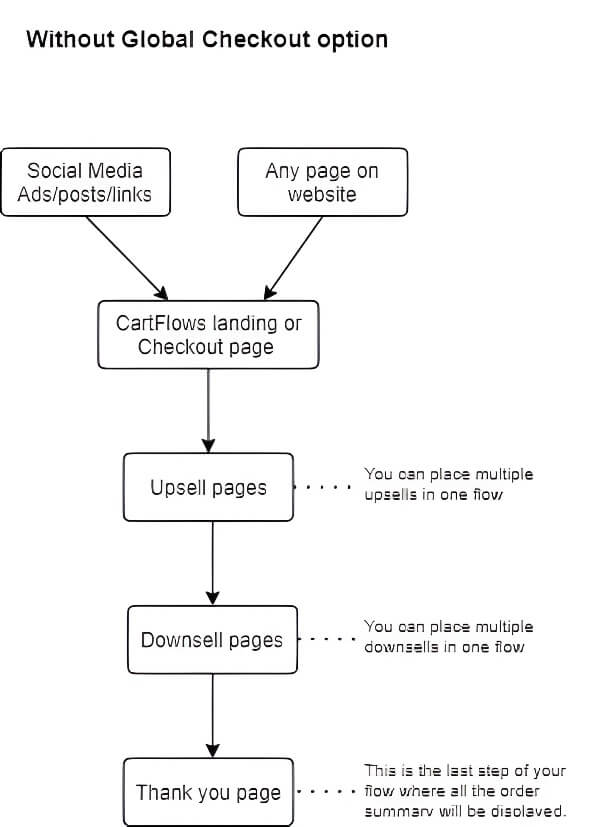
How CartFlows Works without Store Checkout
By default, CartFlows funnels work independently. You can send users directly to a Landing Page or Checkout Page via ads, social media, or your website’s navigation.
Default Funnel Process:
Landing Page > Checkout Page > Upsell Page (Pro) > Downsell Page (Pro) > Thank You Page
You can use this method to:
- Promote individual products via ads and social media.
- Link users directly to a custom Landing Page or Checkout Page.
- Add custom navigation to direct users to specific funnels.

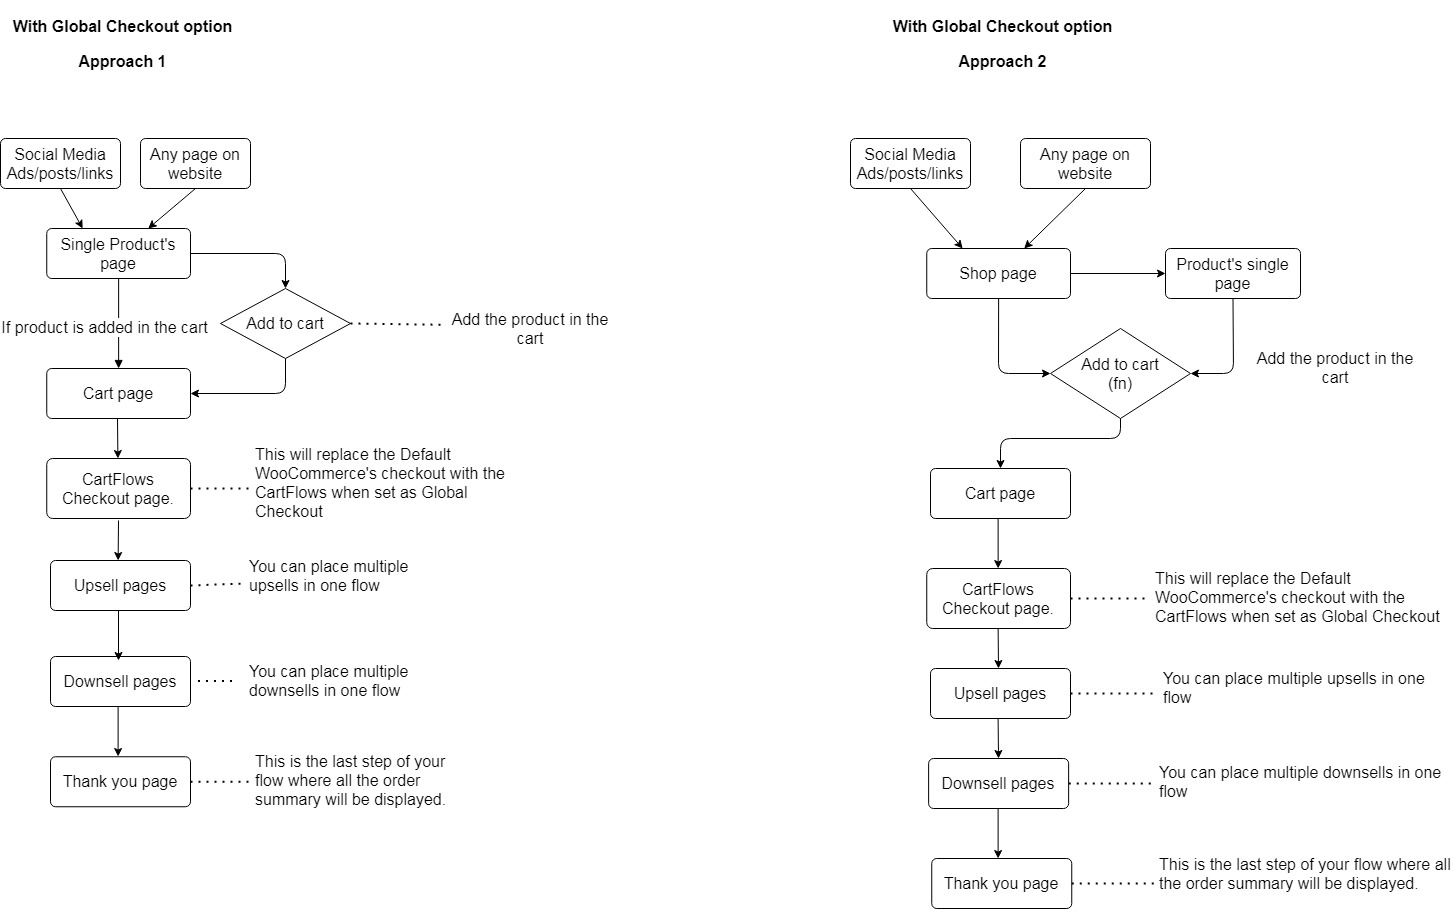
How CartFlows Works with Store Checkout
With Store Checkout, CartFlows replaces WooCommerce’s default Checkout page. This allows you to:
- Send all WooCommerce purchases through a CartFlows Checkout Page.
- Support multiple products without creating a separate funnel for each one.
- Offer upsells and downsells for store-wide products, increasing average order value.
- Use a custom checkout experience across your entire store.
Store Checkout Process:
Shop Page > Cart Page (optional) > CartFlows Checkout Page > Thank You Page
This method is best if you:
- Have a large number of products and want to use a single, optimized checkout page.
- Want to redirect users from any page (product pages, social media, or ads) to a custom CartFlows checkout.

Which One Should You Use?
- Use Store Checkout if you sell multiple products and want a single, optimized checkout.
- Use funnels without Store Checkout if you need a custom sales journey for individual products.
For more details on setting up Store Checkout, see: Store Checkout Documentation
We don't respond to the article feedback, we use it to improve our support content.