- Google Address Autocomplete
- Flatsome UX Builder
- ActiveCampaign
- Paypal Reference Transactions
- How PaypPal/Stripe Works
- Enabling Enfold Avia Layout Builder
- Setting Up Authorize.net for Upsell & Downsell
- Supported Payment Gateways
- Setting Up A/B Testing with Google Optimize
- Setting Quantity and Discount for Products on the Checkout Page
- Using CartFlows with Custom Templates
- Using CartFlows with Beaver Builder
- Hiding Checkout Fields on the Checkout Page
- Global Checkout
- Using WooCommerce
- Installing WooCommerce
- General Settings Overview
- Using Your Theme's Header & Footer in a Step
- Embedding a Checkout Form on the CartFlows Checkout Page
- Hiding WooCommerce Pages and Products
- Dynamic Offers aka Rule Engine
- Instant Layout for Checkout and Thank You Step
- Adding Products from the URL to the Checkout Page
- Setting Up A/B Testing for Steps
- Deleting Plugin Data During Uninstallation
- Importing Ready-Made Templates for Flows and Steps
- Importing and Exporting Funnels and Individual Page Builder Templates
- URL Parameters
- Replacing the Main Checkout Order with an Upsell or Downsell
- Using the "Order Custom Field" Rule of Dynamic Offers with Custom Field Editor
- How to Enable Webhooks in WooCommerce Cart Abandonment Recovery Plugin?
- Shortcode Reference for Email Fields in Cart Abandonment
- Filters to Customize Product Table
- Cart Recovery Emails not Sending [Cart Abandonment]
- Abandoned Orders Not Capturing [Cart Abandonment]
- How to Resolve the Recovery Email Going to Spam?
- Cart Abandonment Cookies/GDPR Compliance
- Setting Up WooCommerce Cart Abandonment Recovery
- Flow In Test Mode
- How to Troubleshoot a Conflict with the Plugin & Theme?
- Resolving the "Please select a Simple, Virtual and Free product" Error
- How to Solve the Never-Ending Loading Issue on the Checkout Page?
- How to Solve the “Order Not Found” Error Message on the Thank You Page?
- How to resolve “Checkout ID not Found” Error message?
- How to Resolve “Session Expired” Error message?
- How to Resolve “Order Does not Exist Error” on Upsell & Downsell Page?
- How to Resolve “Sorry this product cannot be purchased” Error Message?
- How to Resolve “No product is selected…” error message?
- How to Turn Off the Auto-fill of Address Fields on Entering Zip-Code?
- How to Enable the Theme’s Scripts & Styles without Changing the Page Template?
- How to Turn Off the Auto-fill of Checkout Fields?
- How to Allow Cache Plugins to Cache the CartFlows Pages?
- How to Change the “Choose A variation” text?
- VAT Field of WooCommerce EU/UK VAT Compliance (Premium) plugin is not displaying.
- How to enable the product tab on store checkout
- How to show the order summary open on mobile devices
How and Where to Add the Custom JS, CSS & PHP Codes?
In this article, you will get to know on how to add the custom JavaScript, CSS & PHP code on your website to achieve your custom requirements –
Note: We recommend to add the Custom PHP code or any JavaScript related code to the child theme’s functions.php file.
If you have a question about What is Child Theme and how to create it and where to add it. Then the following article will help you on How to Create a WordPress Child theme.
Next, in order to add any custom code to its proper location for proper working, you need to identify among the type of code that you have received.
How to Identify the Javascript code?
- Usually, the Javascript code is always enclosed in the opening & closing of scripts tags. i:e <script></script>. For example https://www.w3schools.com/tags/tag_script.asp
How to identify the CSS code?
- The CSS code is simple to identify as this code does not contain any dynamic variables. Usually, the CSS code is enclosed in the opening & closing of scripts tags. I:e <style></style>. But in most cases, the CSS code is provided without the style tags. Such as .div{ display: none: }. You can refer to this article for more information: https://www.w3schools.com/html/html_css.asp
How to identify the PHP code?
- Usually it is known to the developer who has written the code, but if you are a store owner and don’t know the type of code then either ask your developer or ask the concerned member who has provided the code for the type of the code.
- Usually, the PHP code is enclosed in the PHP script that starts with <?php and ends with ?>. For more information visit: https://www.w3schools.com/php/php_syntax.asp
Below are the steps to add the various steps that will help you to add the below types of code on your website –
Let’s go though all of them with detailed steps:
1. How and where to add the custom javascript code?
There are two ways to add the Custom Javascript code on the CartFlows pages as mentioned below –
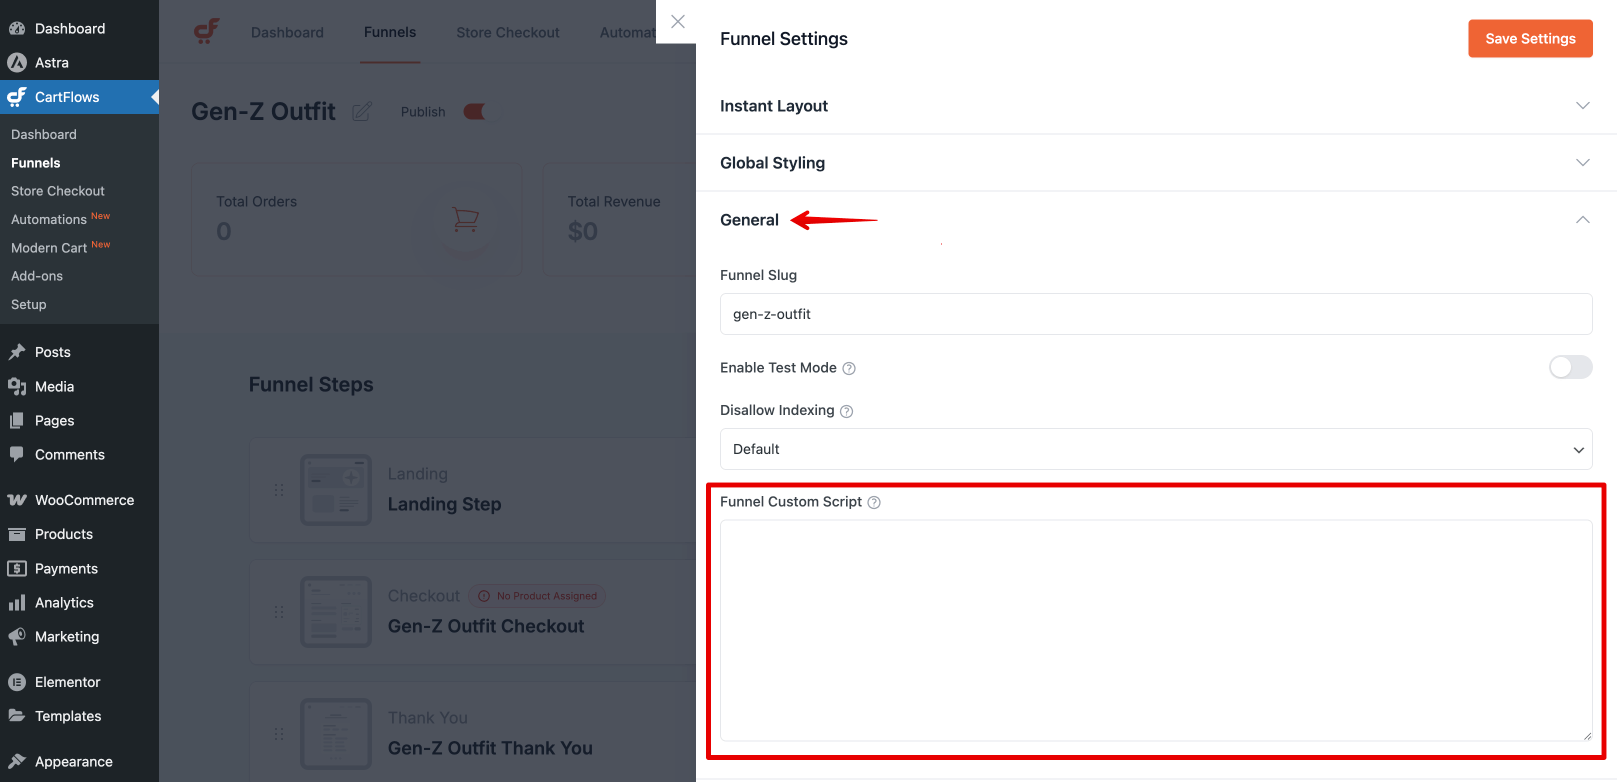
- To add the Custom JavaScript on the CartFlows pages we have provided the Custom Script Tab in the backend setting of each page of the CartFlows. You have to add the created/received custom JS in this field and that will be automatically added on the head section of that CartFlows page only in which you have added the script.
- Now, if you want to add the script to all your website pages at the same time, then this Custom Script Tab will not help. This will need more access to be added on all the pages. This requirement is possible to add the custom script from the PHP code from your child theme’s functions.php.
You can directly add the JS code in the head section of the page using the wp_head action but if you want to add your custom JS file then you need to use the wp_enqueue_script action. This action is used to register and add a new JS fine on the website.
Following are some more information on wp_head & wp_enqueue_script action hooks:
2. How and where to add the custom CSS code?
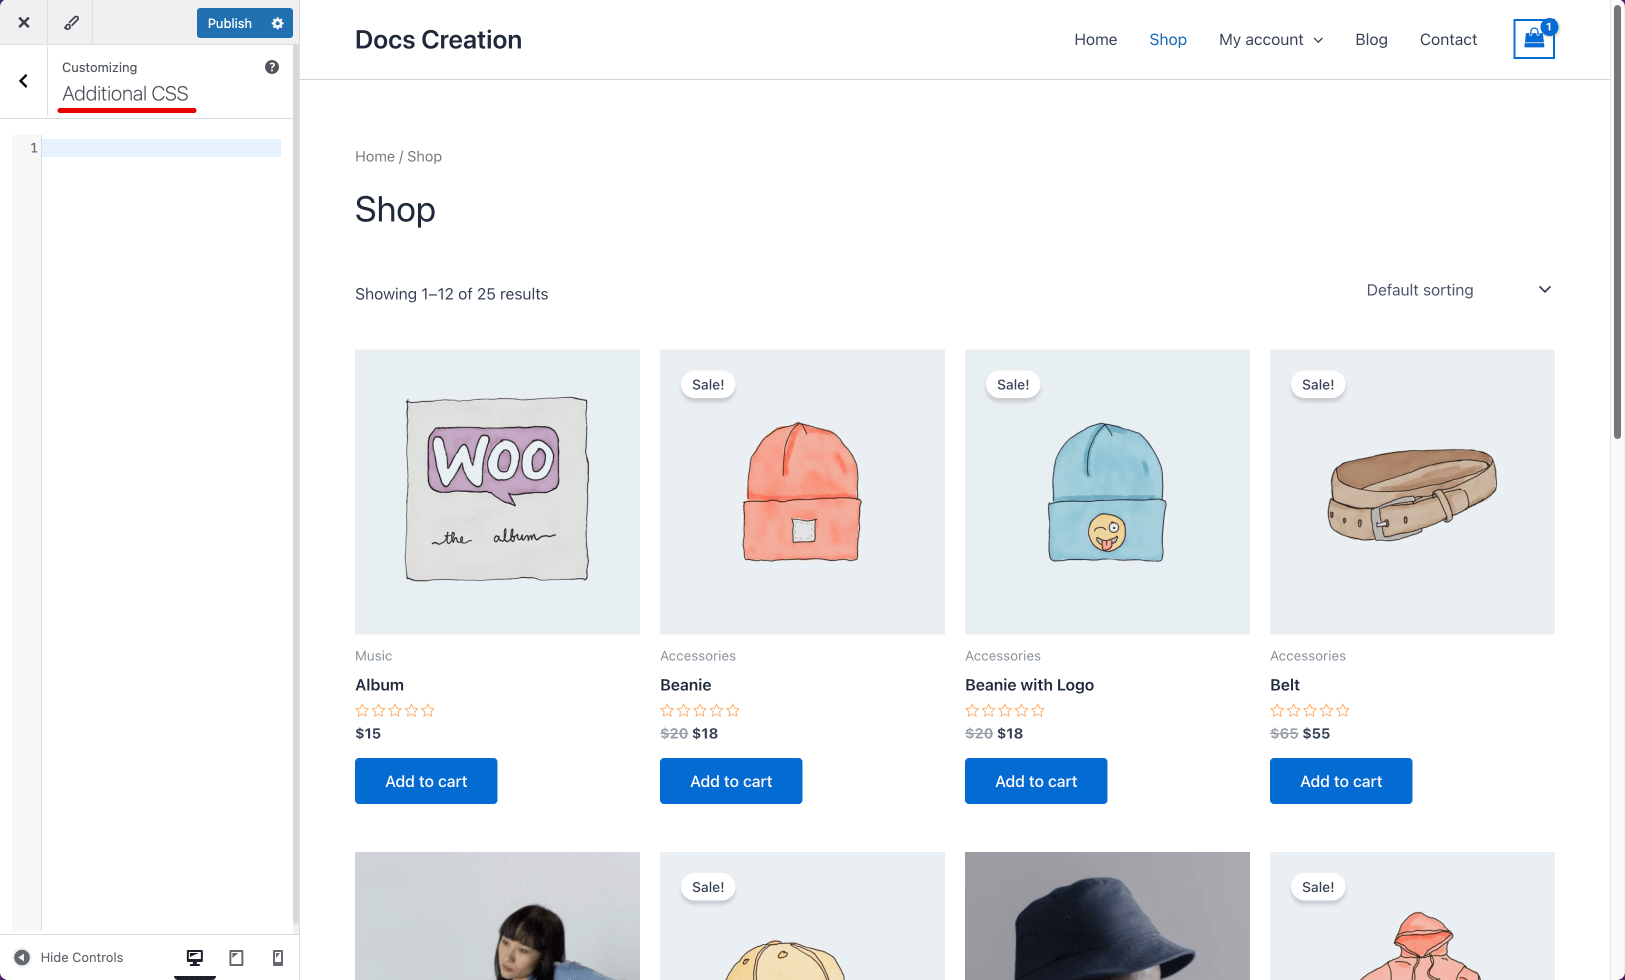
- There are two ways to add the CSS code to your website. The first way is by adding the CSS through your theme’s customizer from the Additional CSS tab section.
The CSS added from this section will be added globally on your website means it will add the CSS on all the pages of your website.
- The second way to add the custom CSS to your website is by creating a child theme and add the CSS code in the child theme’s style.css file. We recommend that if you want to do any customizations then you can do it from the child theme so as to avoid the data loss when you update the parent theme.
3. How to and where to add the custom PHP code.
- The simple way to add the custom PHP code on your website is by using the code snippets plugins. These types of plugin provide great flexibility to non-techie users to add any Custom Code on their website more effectively.
But If you want to add the custom PHP code without using any extra plugin then we suggest to add it by creating a child theme.
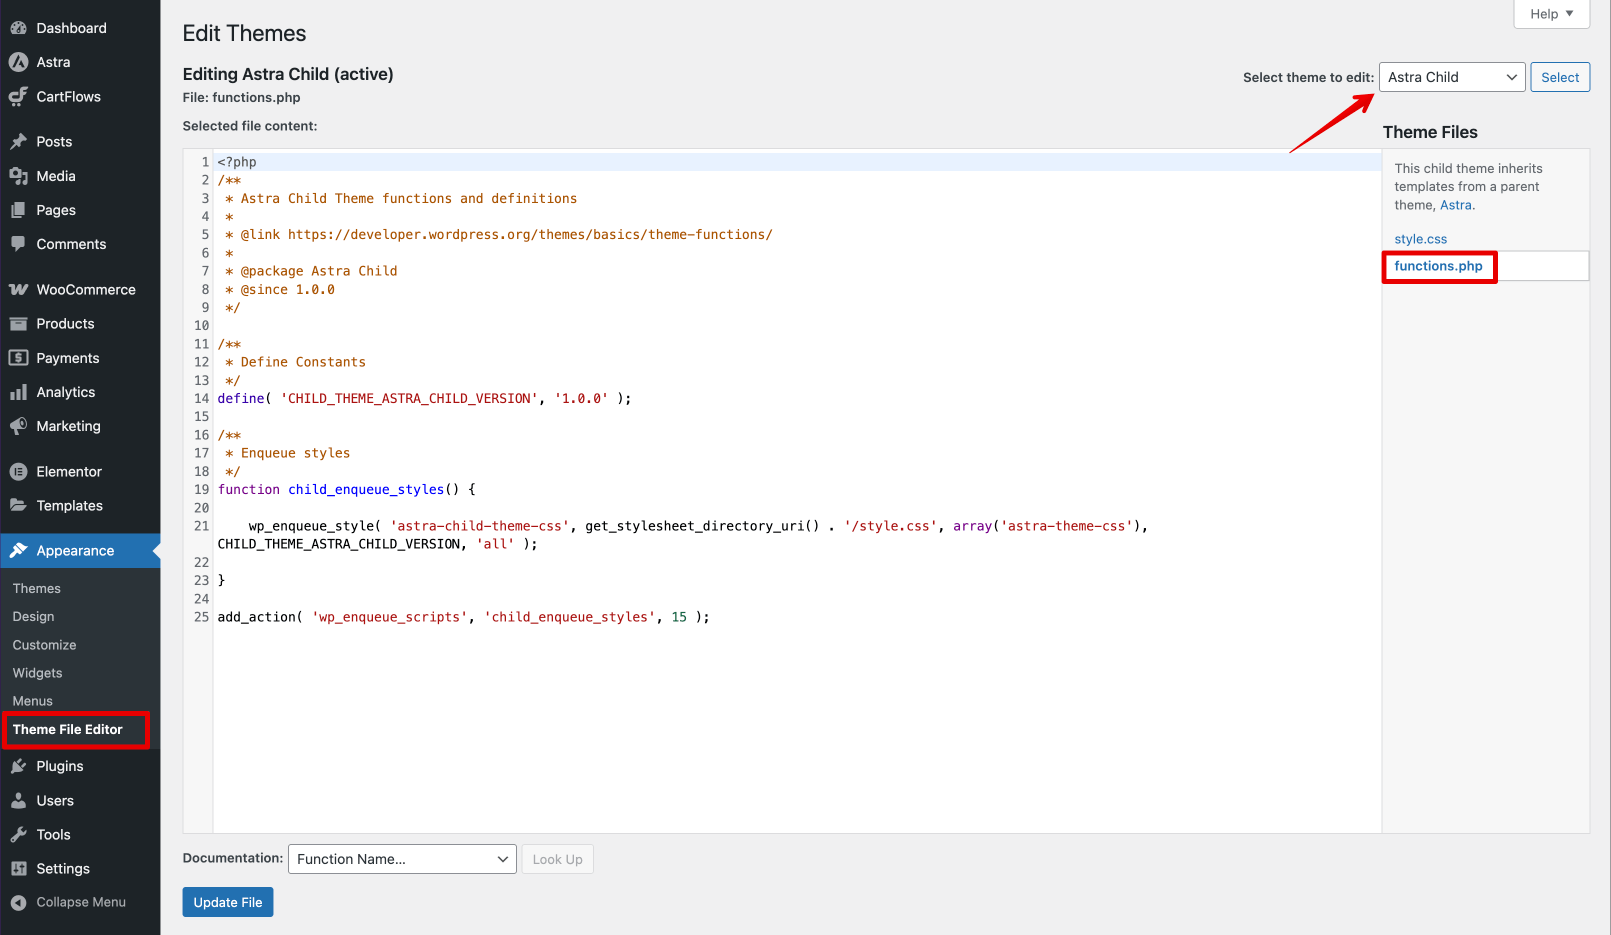
Once the Child Theme is created then it will have the functions.php file and where you have to add your custom PHP code.
All the themes of your website will be located at your_website’s_root_folder/wp-contents/themes/all_your_themes_folders directory. Now, you have to add the created child theme, in the themes directory of your website.
Note: It is recommended adding the Custom Code to the child theme’s functions.php file, in order to avoid any data loss while updating the Parent Theme.
We don't respond to the article feedback, we use it to improve our support content.