- Hiding Fields on the Checkout Page
- Installing WooCommerce
- Using WooCommerce
- Using Your Theme's Header & Footer in a Step
- Embedding a Checkout Form on the CartFlows Checkout Page
- Hiding WooCommerce Pages and Products
- Using Pricing Tables
- Adding an Affiliate Program
- Setting a Funnel as the Homepage
- GDPR Compliance
- Dynamic Offers aka Rule Engine
- Instant Layout for Checkout and Thank You Step
- Adding Products from the URL to the Checkout Page
- Setting Up A/B Testing for Steps
- Deleting Plugin Data During Uninstallation
- Importing Ready-Made Templates for Funnels and Steps
- Importing and Exporting Funnels and Step
- URL Parameters
- Replacing the Main Checkout Order with an Upsell or Downsell
- Rolling back to a Previous Version
- Google Address Autocomplete
- Flatsome UX Builder
- ActiveCampaign
- Paypal Reference Transactions
- How PaypPal/Stripe Works
- Enabling Enfold Avia Layout Builder
- Setting Up Authorize.net for Upsell & Downsell
- Supported Payment Gateways
- Setting Up A/B Testing with Google Optimize
- Setting Quantity and Discount for Products on the Checkout Page
- Adding Custom Payment Gateway Support for One-Click Upsell and Downsell
- Creating Subscription Products with CartFlows
- Supported Multi-Currency Plugins
- Enabling/Disabling Shipping Fields and Ship to Different Address
- Enabling/Adding Coupons on the Checkout Page
- Displaying Account Creation Fields on the Checkout Page
- Setting Up Square Gateway for Upsell & Downsell
- CartFlows Elementor Widgets
- CartFlows Beaver Builder Modules
- CartFlows Block Editor Blocks
- Importing Divi Templates
- Bricks Builder
- OttoKit
- Connecting Stripe Payment Gateway
- LearnDash
- Facebook Pixel
- TikTok Pixel Tracking
- Google Ads Pixel
- Pinterest Pixel Tracking
- How to Enable Snapchat Pixel Tracking in CartFlows?
- Funnel in Test Mode
- Troubleshooting Plugin and Theme Conflicts
- Resolving the "Please Select a Simple, Virtual, and Free Product" Error
- Fixing Endless Loading on the Checkout Page
- Fixing the "We can't seem to find an order for you." Error on the Thank You Page
- Troubleshooting License Activation Issues
- Fixing the "Checkout ID Not Found" Error
- Fixing the "Session Expired" Error Message
- Resolving "Order Does Not Exist" Error on Upsell/Downsell Page
- Fixing the "Sorry, This Product Cannot Be Purchased" Error
- Disabling Auto-fill of Address Fields Based on Zip Code
- Enabling Theme's Scripts & Styles Without Changing Page Template
- Disabling Auto-fill of Checkout Fields
- Allowing Cache Plugins to Cache CartFlows Pages
- Changing the "Choose a Variation" Text
- VAT Field Not Displaying for WooCommerce EU/UK VAT Compliance Plugin
- Enabling the Product Tab on Store Checkout
- Displaying the Order Summary Open on Mobile Devices
- Refreshing the Checkout Page After CartFlows AJAX Calls
- Overview
- Installing Modern Cart Starter
- Installing Modern Cart Pro
- Activating License Key
- Customizing General Settings
- Customizing Cart Tray Labels
- Customizing Cart Icon Settings
- Customizing Cart Tray Styling
- Understanding the Product Recommendations Feature
- Controlling Product Recommendation Source for Empty Cart
How to Use WooCommerce Subscription Products with CartFlows
Subscription products allow you to sell access to a product or service on a recurring basis whether daily, monthly, or yearly. With CartFlows, you can easily include subscription products in your funnels, but the first step is to create them using WooCommerce.
What Are Subscription Products?
Subscription products are items that customers purchase with a recurring payment schedule. Instead of a one-time payment, they are billed automatically at the chosen interval (for example, every month or year) to continue receiving the product or service.
Step 1: Install WooCommerce Subscriptions
To create subscription products, you’ll need the official WooCommerce Subscriptions plugin. You can download it directly from WooCommerce and follow their step-by-step guide here: WooCommerce Subscriptions Documentation.
Step 2: Create a Subscription Product
Once the plugin is installed, you can create a new subscription product in WooCommerce. During setup, define the product name, pricing, billing interval (daily, monthly, yearly, etc.), and other relevant options.
Step 3: Assign Subscription Products in CartFlows
After creating your subscription product, you can assign it to CartFlows checkout or offer pages.
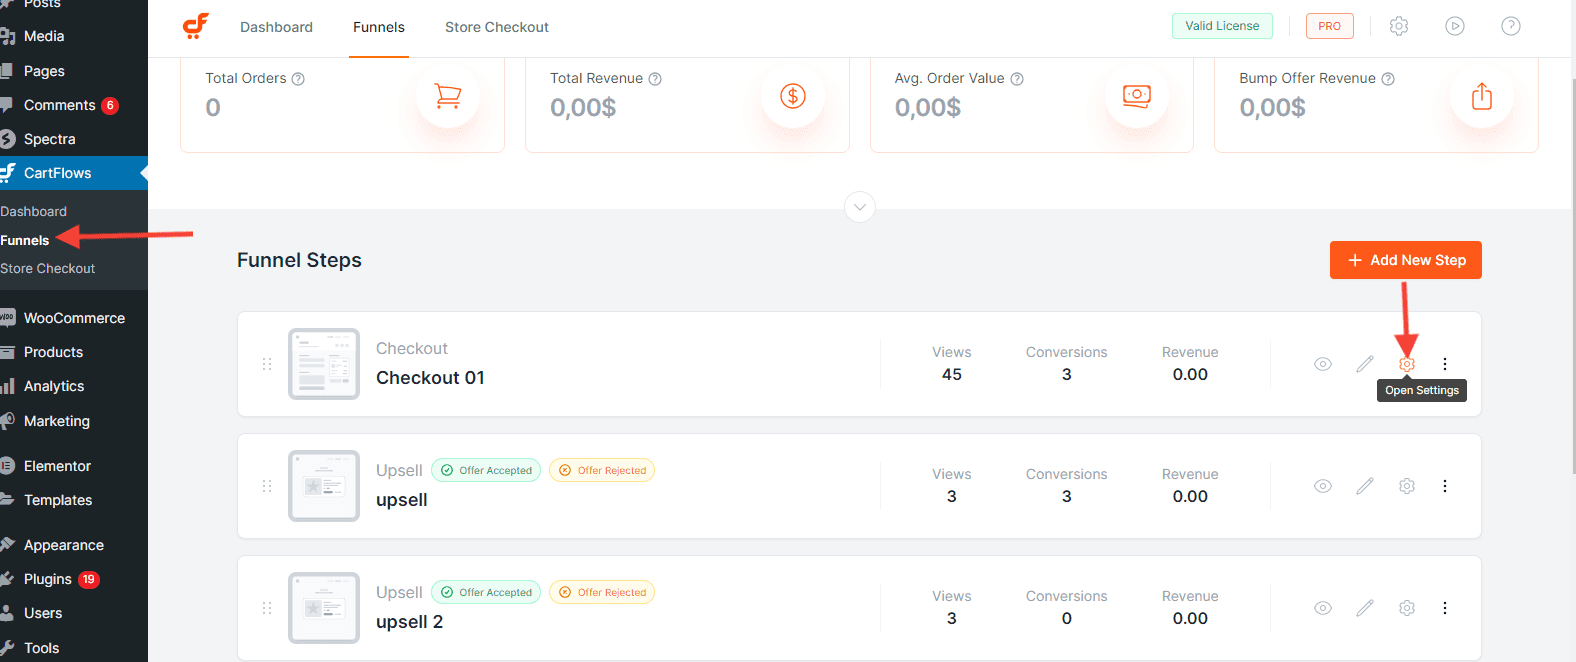
1: Navigate to CartFlows > Funnels > Your Funnel.
2: Open the Checkout, Upsell, or Downsell step where you want to assign the subscription product.

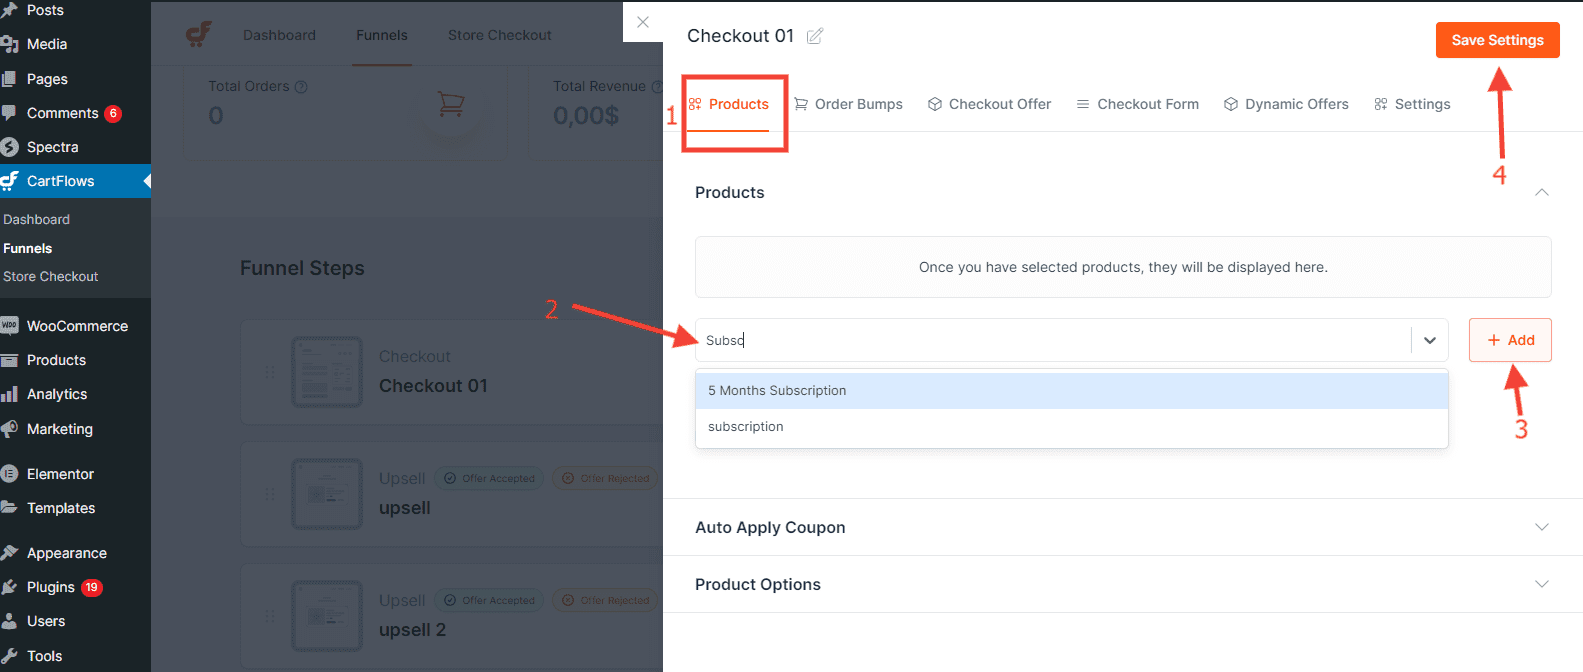
3: Go to the Product tab and search for your subscription product and Add it

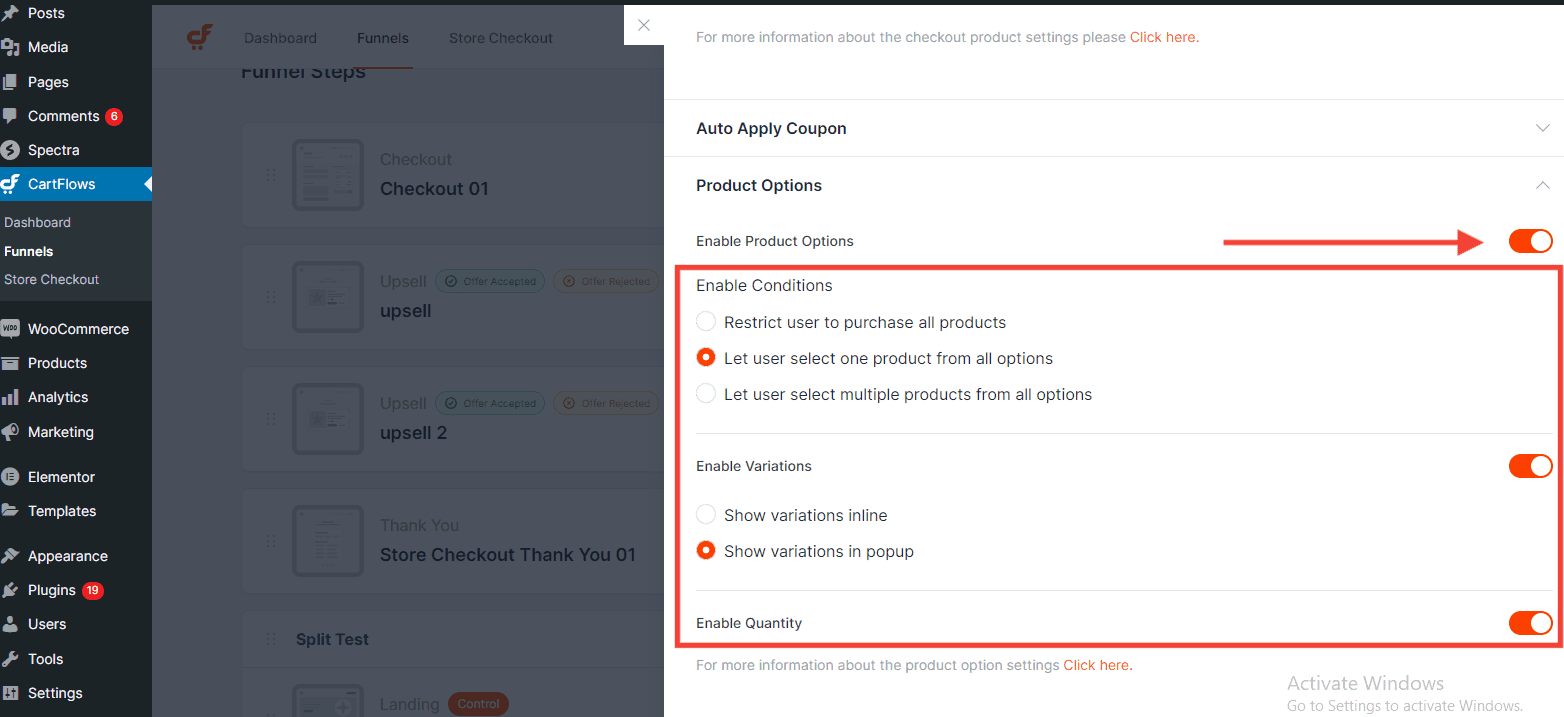
4: If you’re using multiple simple or variable subscription products, enable Product Options.
5: For variable subscription products, enable the Variation Option to display choices on the checkout page.

Note: On Upsell and Downsell pages, use shortcodes to display product variations. Refer to the dedicated shortcodes documentation for details.
6: Click Save Settings to apply changes.
That’s It!
You’ve successfully created and assigned subscription products in CartFlows. Now you can sell subscriptions directly through your funnels, giving your customers a seamless recurring payment experience.
We don't respond to the article feedback, we use it to improve our support content.