





When your WooCommerce checkout is slow, one cause is usually doing most of the damage, and the symptom on your screen tells you which one.
This guide matches seven causes to the check that confirms each, so you fix yours instead of disabling plugins all afternoon. We ran every check on our own test store, and the numbers come from it unless a source is named.
Settle one thing first, though. A checkout that hangs on a spinner is broken rather than slow, so the first section starts by telling the two apart.
- Why Is Your WooCommerce Checkout Slow?
- Is a Slow Checkout Your Store's Problem or Your Host's?
- The Cache Exclusion Rule Your Caching Plugin Needs for Cart and Checkout
- Why Does Your WooCommerce Checkout Spin Forever?
- The Causes Nobody Checks: Order Storage, Background Jobs and Cart Fragments
- How Do You Find the Plugin That Is Slowing Your Checkout?
- Why Do Your Payment Gateway Scripts Load Outside the Checkout?
- Each Fix, the Exact Setting, and How You Measure It
- How to Check the Fix Actually Worked
- Block Checkout or Classic Checkout: Which Is Faster?
- Rebuilding the Checkout Layout Without Adding Weight
- How This Was Tested
- Final Thoughts
- Frequently Asked Questions
Why Is Your WooCommerce Checkout Slow?
Your checkout is slow for one of seven reasons. Before you look at any of them, decide whether it is slow or broken, because the two look alike from outside.
The checkout hangs, or shows a cart nobody filled. That is a fault rather than slowness and it is losing orders right now, so start with the cache exclusion rule and the spinner section further down.
The checkout finishes, but it takes too long. Find the row in the table below that matches what your store is doing now, then work through the sections in the order a page request meets the causes. Several checks use Query Monitor, a free plugin on WordPress.org that shows which plugin is slowing a page.
| What you see | Likely cause | The check that settles it |
|---|---|---|
| Every page on the store is slow, checkout included | Hosting response time | Time to first byte, the wait before the server starts sending the page, on the checkout URL |
| The cart shows items the shopper never added, or the order button fails | Page caching on cart and checkout | The caching plugin’s exclusion list |
| Slow only when the store is busy, or slow with few plugins on a fast host | The database and the jobs running in the background | Query count and page generation time in Query Monitor, before and after |
| Checkout is slow while product pages are quick | Plugin or theme query load | Query Monitor on the checkout page, sorted by duration |
| Checkout carries a built layout with sliders, custom fonts and icon sets | Page builder script weight | CSS and JS request count in the browser Network tab |
| Payment buttons appear on product and cart pages too | Payment gateway scripts | The gateway’s script in the Network tab of a non checkout page |
| The form is long and asks for fields your store never uses | The checkout layout | Field count, plus WooCommerce > Settings > Accounts and Privacy |
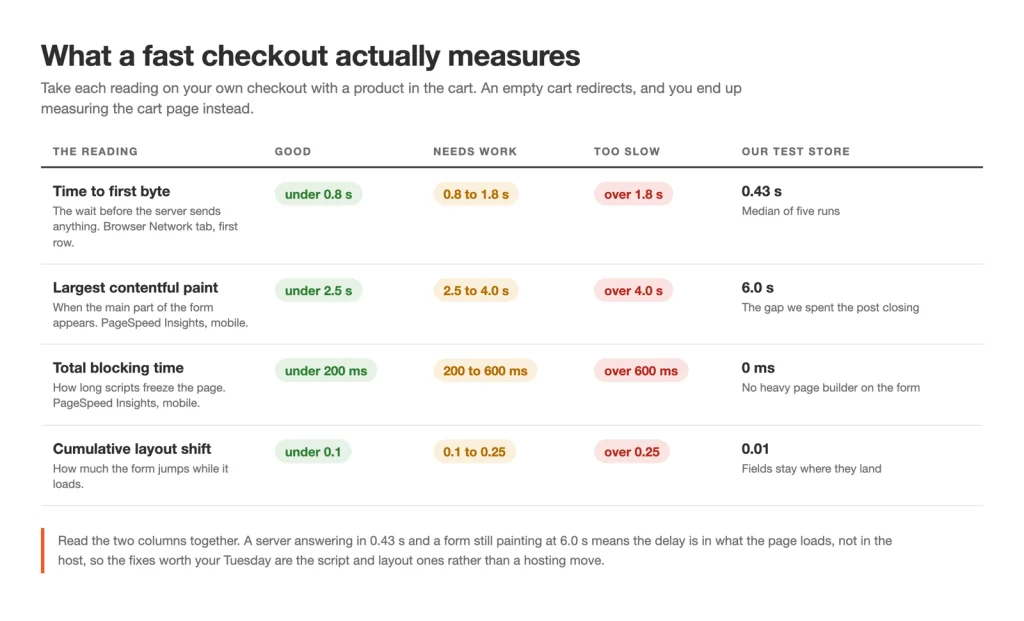
The four readings that decide whether a checkout is slow, and the bands that say which side of each one you are on
If your store is quick at midnight and slow at noon, start with the database and background jobs row, the one most guides leave out. If the checkout loads fast and shoppers still leave, the fix is conversion rather than speed, and our WooCommerce checkout optimization guide covers that side.
Every speed reading in this guide is taken the same way: on the checkout URL itself, logged out, with a product already in the cart, because an empty cart redirects to the cart page and the tool ends up measuring that instead.
On 13 September 2026 the test store returned a median time to first byte of 0.431 seconds across five logged-out loads, with no page cache plugin active. Three days later, on 16 September, the same five loads returned 1.021 seconds with nothing added, removed or changed, and other runs that same day came back under half a second. A single reading only describes a minute on a shared machine, so take yours three times on different days.
Those numbers come from a store running Store Checkout, the screen in our free CartFlows plugin that replaces the WooCommerce checkout page, and whether CartFlows itself slows a store down is measured separately in our CartFlows performance test.
How Do You Improve WooCommerce Checkout Speed on Mobile?
Mobile checkout speed comes down to the same seven causes, and a phone’s slower connection and processor make every one of them worse, so run each check in this guide on the mobile profile too.
On 22 September 2026 the test store’s checkout scored 59 on mobile against 82 on desktop, with Largest Contentful Paint, the moment the main content appears, at 7.8 seconds against 2.6. A page that passes on desktop and fails on a phone points at what the phone has to download and run, not at the server-side. Nine days earlier the same URL scored 73 at 6.0 seconds, so read any single phone run as a weather report, not a verdict.
Further reading – Mobile Checkout Optimization Tips to Increase Revenue
Is a Slow Checkout Your Store’s Problem or Your Host’s?
One reading decides this, and it takes two minutes: time to first byte on your checkout URL, logged out, with a product in the cart. Google recommends a server response time under 800 milliseconds as a good threshold, published on web.dev and checked September 2026.
Comfortably under that line and the work is inside WordPress. Consistently over it, and nothing you change in the front end will fix it. The pair above, 0.431 seconds one day and 1.021 seconds three days later, sat on either side of that line.
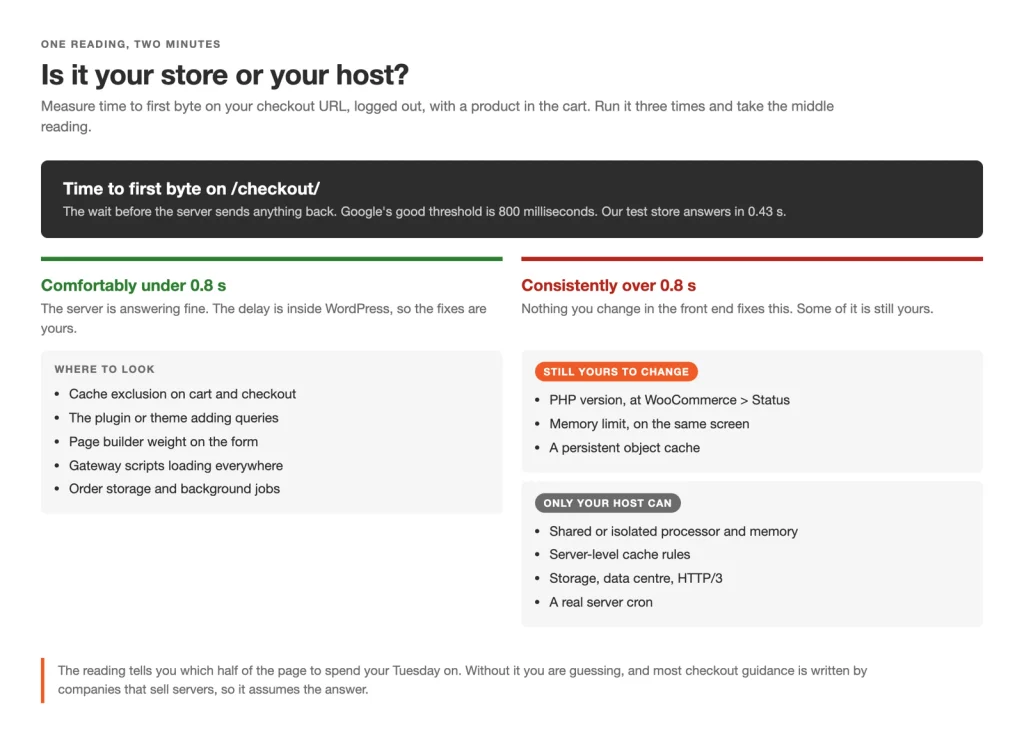
One reading splits a slow checkout into the half you can fix and the half you have to ask your host for
Take this reading yourself before you open a ticket, so you can check the host’s figure against your own. Here’s how, free, in the browser you already have:
- Open the checkout in a private window, with a product already in the cart.
- Press F12 and choose the Network tab.
- Reload the page, then click the first row in the list, which is the page itself.
- Open the Timing panel and read Waiting for server response, which some browsers shorten to Waiting. That figure is your time to first byte, whatever the other numbers on the row say.
- Run it three times and take the middle reading.
Three Things You Can Still Change on the Plan You Have
Three settings can change on most hosting plans, by you or by your host: the PHP version, the memory limit and a persistent object cache. You read the first two on one WooCommerce screen:
- Open WooCommerce > Status and find the Server environment panel, which names the PHP version and the web server.
- Read the PHP version there, then change it in your host’s control panel. WooCommerce’s own recommendations list PHP 8.3 or greater, tested up to 8.4.
- Read the WP Memory Limit row on the same screen. WooCommerce’s troubleshooting guide treats a limit under 64 MB as a cause of a failed checkout request, and its requirements page asks for at least 256 MB.
- Switch on a persistent object cache, which keeps query results in memory between requests, in your host dashboard where the plan offers one.
- Install Redis Object Cache from WordPress.org if the plan has no such switch. It connects your site to Redis, the in-memory store that holds query results between requests.
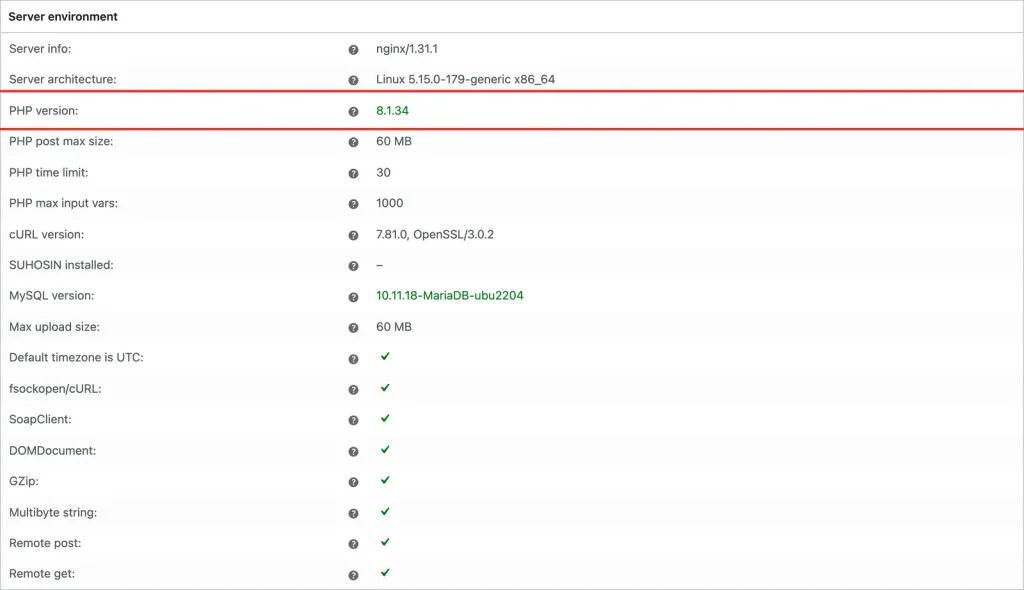
WooCommerce > Status: the Server environment panel. The PHP version row is highlighted, and Server info names the web server
One honest note on the PHP row: our test store runs PHP 8.1.34, below that recommendation, and every measurement here was taken on it.
WordPress’s developer documentation says the default object cache holds data for one request only. A persistent cache keeps queries, session data and cart totals in memory from one request to the next.
What Should You Ask Your Host?
Some of what a server decides, like caching above your plugin or where the data center is, has no screen you can open, so ask for it, all in one ticket:
- Server response time. Ask for the figure on the checkout URL at your busiest hour. A good answer is a number and the window it was measured in.
- PHP version. Ask which version you are on and the newest the plan supports. A good answer is two version numbers.
- Memory limit. Ask what yours is and whether they can raise it. A good answer is a number and a yes or a no, never a policy.
- Caching above WordPress. Ask whether it excludes the cart, checkout and my account pages. A good answer quotes the rule itself.
- A real cron. Ask whether they run one and will point it at wp-cron.php if you turn off WP-Cron, the way WordPress runs its own scheduled tasks. A good answer is a schedule.
If an answer carries a number, a version or a screen, it is configuration you can change on the plan you have. An answer about the shape of the plan is different, because shared hosting pools processor and memory across many sites.
You can test for that by taking the same reading at a quiet hour and at your busiest. If the quiet reading sits inside the threshold and the busy one lands well outside it, other sites on the same machine are taking the resources your checkout needs.
While you wait on the host, one cause is entirely yours, and it breaks a checkout rather than slowing it.
The Cache Exclusion Rule Your Caching Plugin Needs for Cart and Checkout
You can settle this one today, whatever your host says. Page caching serves one saved copy of a page to every visitor, so a cached checkout can show a cart the shopper never filled, or refuse an order that was ready to go.
The refusal comes from the security token, a one-time code WooCommerce hides in the checkout form to prove the form came from your store moments ago. A cached page hands every shopper the copy made at cache time, and the checkout rejects a code that old.
WooCommerce’s own guide to configuring caching, checked September 2026, says to exclude the cart, checkout and my account pages. It also notes that many caching plugins already exclude them automatically, so your job is to confirm the exclusion rather than type it in blind. On the two caching plugins we installed on our test store to check, the setting lives here:
| Caching plugin | Where the exclusion lives | What goes in the field |
|---|---|---|
| LiteSpeed Cache | LiteSpeed Cache > Cache > Excludes > Do Not Cache URIs | The cart, checkout and my account paths, one per line |
| W3 Total Cache | Performance > Page Cache > Advanced > Never cache the following pages | The same three paths, one per line |
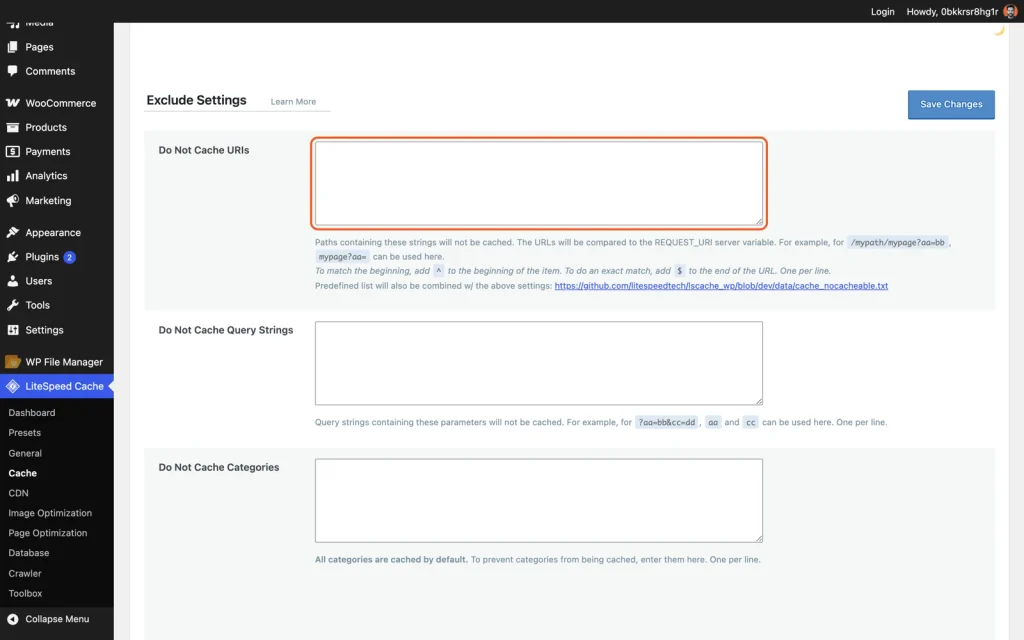
LiteSpeed Cache > Cache > Excludes: Do Not Cache URIs takes the cart, checkout and my account paths
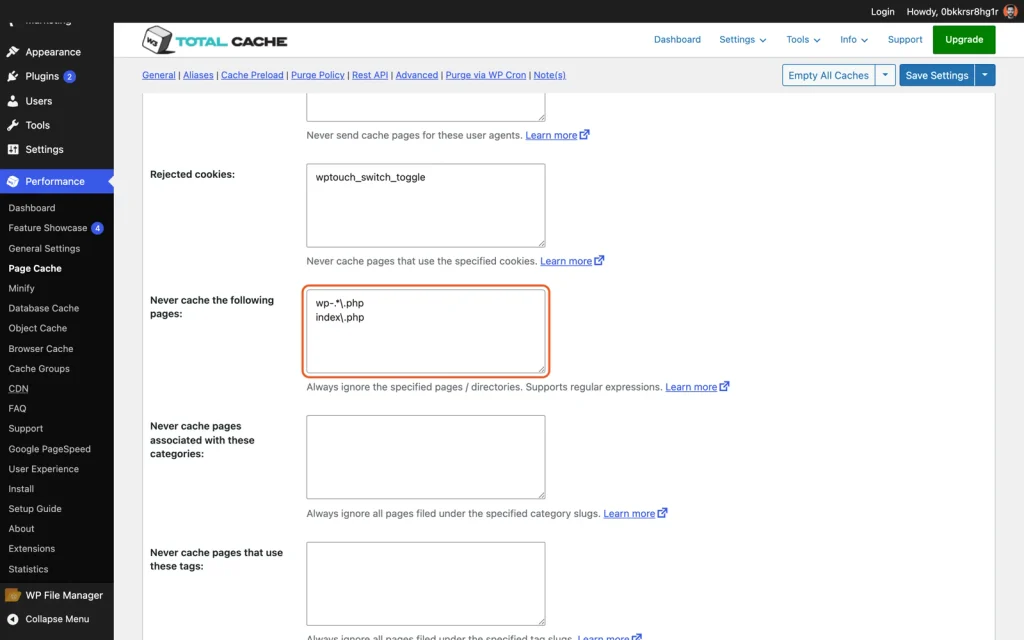
Performance > Page Cache > Advanced: the Never Cache The Following Pages field where checkout, cart and my-account belong
Any other caching plugin, WP Rocket included, carries the same setting under a different name, so look through its cache or advanced settings for a list called exclusions, exceptions or never cache.
Work through the check in order. Skipping a step tends to leave one path still uncached, which is what the two window test catches. Here’s how:
- Open WooCommerce > Settings > Advanced and read the pages assigned to Cart, Checkout and My account. Renamed pages have paths that no default exclusion rule matches, which is the most common reason an automatic exclusion misses.
- Open the exclusion screen for your plugin, using the path in the table above. You are looking at a plain text field, one URL per line, not a toggle.
- Enter the three paths and save, exactly as step one gave them, then check that the field lists all three.
- Clear the cache, then run the two window test. Add a product to the cart in a private window and load the checkout. Load it again in a second private window with an empty cart. The second window should show an empty cart, never the first one’s items.
- Repeat the check at the CDN. A CDN in front of the site caches pages too, and a plugin exclusion does not reach it, so add the same three paths to its bypass rules.
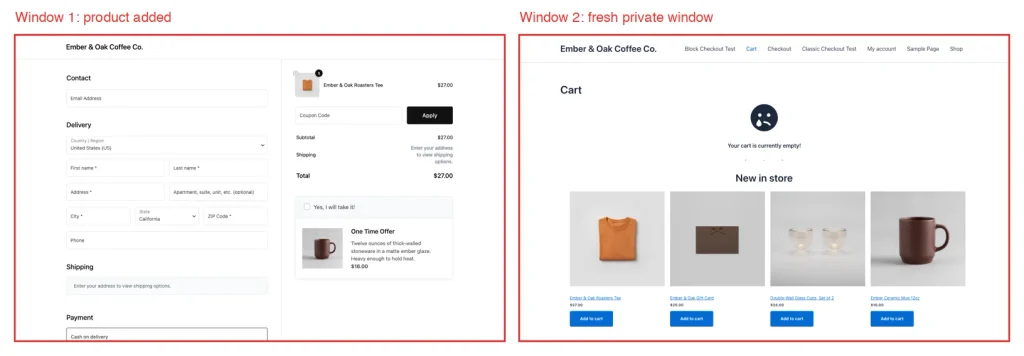
The two window test passing on the test store: window 1 holds the product, window 2 lands on an empty cart, so no cached checkout is being served
What we saw when we switched one on. W3 Total Cache writes a time stamp on each copy it serves. On the test store that stamp stayed the same on the shop page and changed on every checkout load, which showed the plugin had already excluded the checkout by itself.
One plugin did nothing at all. WP Fastest Cache, the free version, saved its settings and never cached a single page, because it serves cached copies through rewrite rules and writes those for Apache. This host answers with nginx, which ignores an Apache rule file, and nothing warned us.
Read which web server you are on at WooCommerce > Status, where the Server environment panel names it. A caching plugin can look installed and be doing nothing.
Why Does Your WooCommerce Checkout Spin Forever?
You click place order, the spinner keeps turning, and no error or confirmation arrives. That is not slowness, it is a failed AJAX request, and it turns into cart abandonment at the very last click.
AJAX is the background message your checkout sends the server when the button is pressed, and the spinner turns while the page waits for the answer. A spinner that never stops means the answer is taking too long, or came back in a form the page could not read.
WooCommerce’s official troubleshooting guide for an endless loading spinner on checkout, checked September 2026, narrows it to five causes, and it sends store owners to WooCommerce > Status first to clear any error listed there. Work through the five in this order:
- Compare the WordPress Address and the Site Address. Open Settings > General and read the two fields side by side. They must match on protocol and on hostname, including the presence or absence of www. A request sent to one hostname and answered by another fails the browser’s origin check, so the checkout script never receives the response.
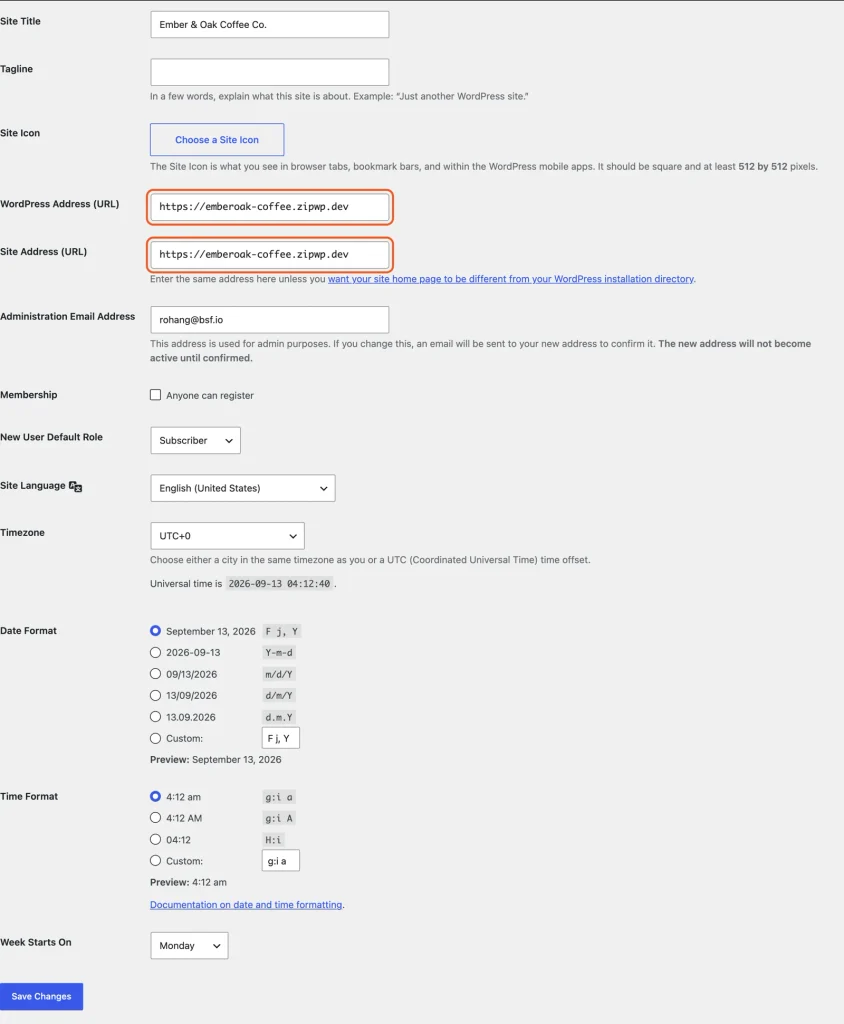
Settings > General: the WordPress Address and Site Address pair must match
- Read the browser console for a JavaScript conflict. Open the checkout, press F12, open the Console tab, then try to place an order. A red error naming a file inside a plugin or theme folder names the guilty extension, and if no error appears at all, this cause is cleared.
- Read the reply to your order request. Open the checkout, press F12 and choose the Network tab. Keep the tab open, place the order again, then click the new row with
checkoutin its name and open Response, which shows exactly what came back. - Defer the emails WooCommerce sends while the order is being placed. On a slow store, sending them inside the checkout request holds up the AJAX response the spinner is waiting for. The checkbox that fixes it sits in the next section.
- Read the memory limit at WooCommerce > Status. Find the WP Memory Limit row. WooCommerce’s troubleshooting guide names a limit under 64 MB as a cause, because an AJAX request that runs out of memory fails quietly and leaves the spinner turning.
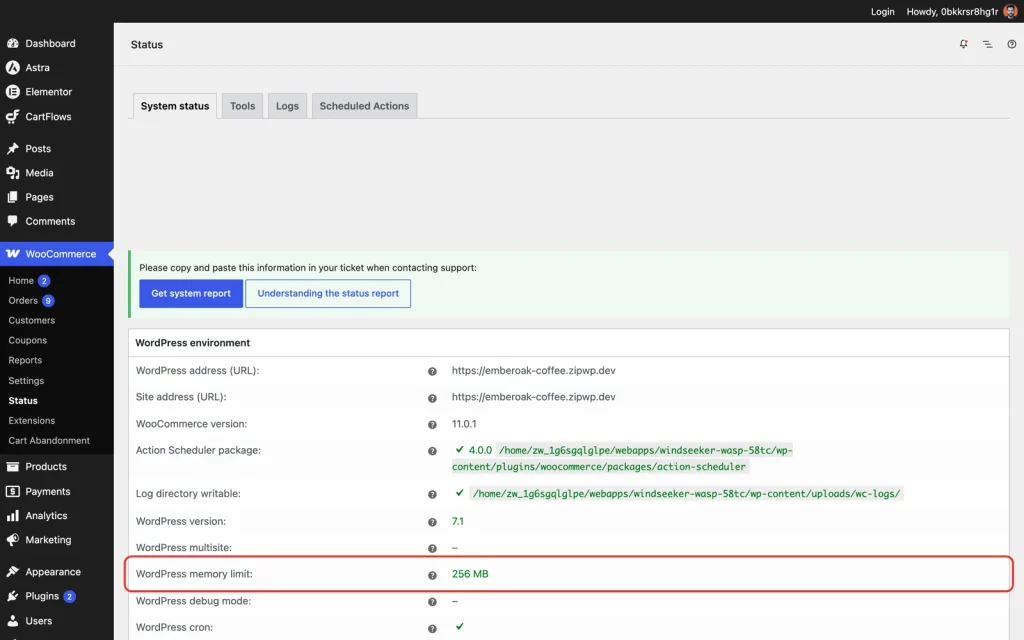
WooCommerce > Status: the WP Memory Limit row, the fifth check in the list
The reply you read in step three comes in three shapes, and each points at a different fault. If it is a dense line of text in curly brackets, the reply is normal and your fault is somewhere else. If it is page markup, something was printed onto the page ahead of the answer, usually by a PHP error, a redirect or a caching extension. If it is just -1, the security token was rejected. That is the cached token from the section above, so clear the site and server caches first.
If clearing the caches changes nothing, or the reply is page markup, hand it to a developer or your host with the checkout URL and a screenshot of that Response.
To see what a request that never arrives looks like, we blocked the order request in the browser, and WooCommerce showed an error notice rather than spinning.
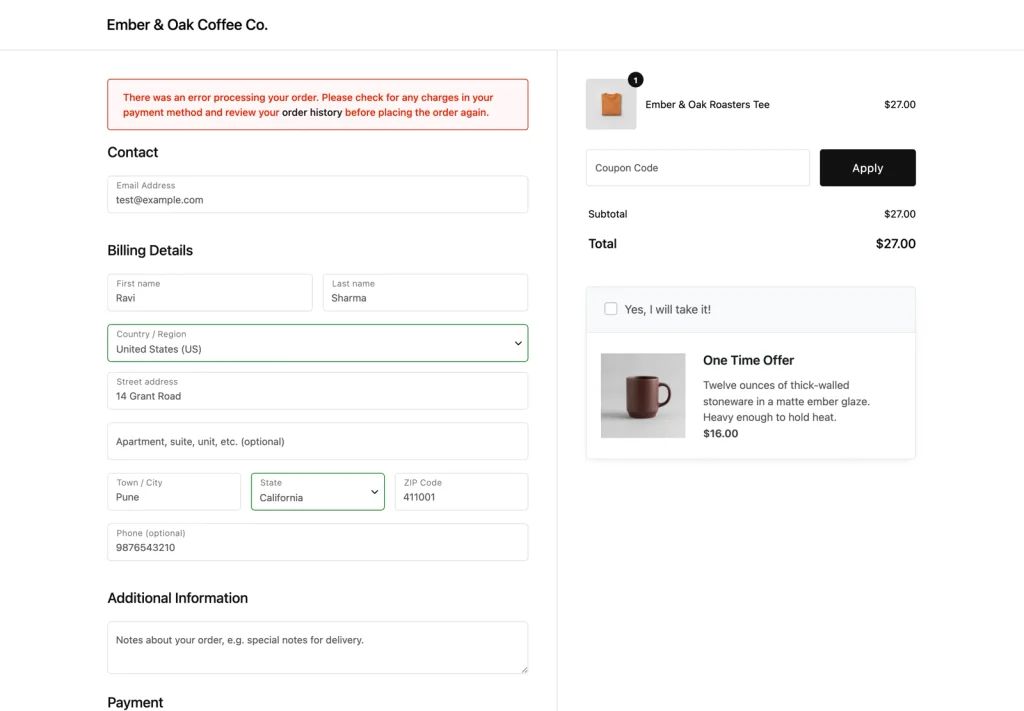
The checkout after its order request was blocked in the browser. A request that never reaches the server shows this notice rather than an endless spinner
So an endless spinner means the request did reach the server, and the reply is either too slow or in the wrong shape.
A blank checkout is a different fault again, and costs nothing to rule out. Open the page in the editor and confirm the Checkout block or shortcode is still on it, then check that WooCommerce > Settings > Advanced points at that page.
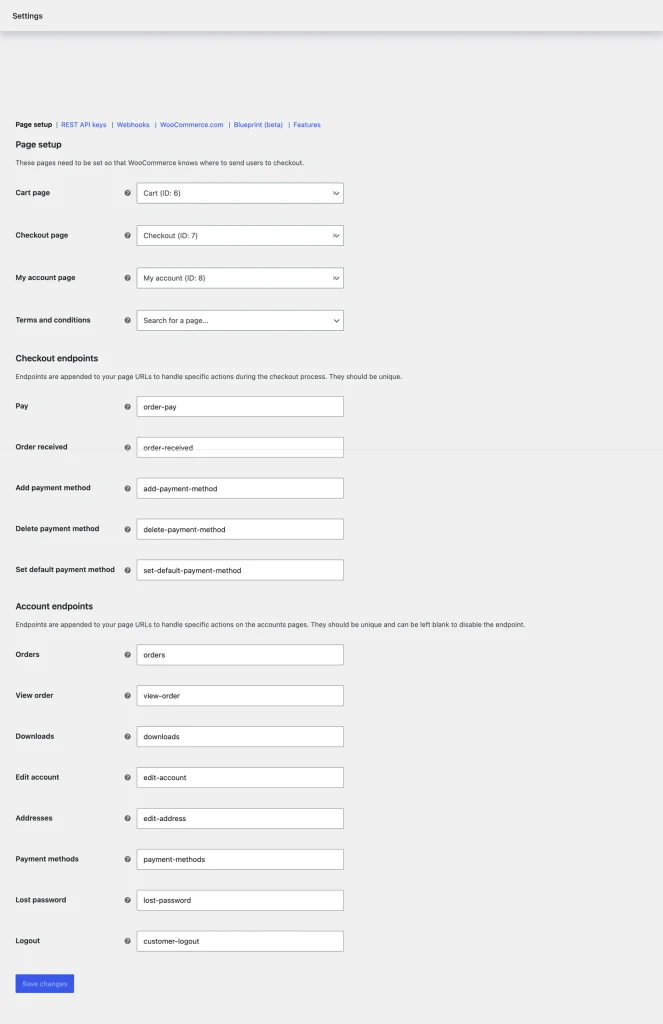
WooCommerce > Settings > Advanced shows the real cart and checkout URLs to exclude from the cache
Verify with a real test order after each step rather than at the end. A spinner that resolves into an order confirmation is the proof that counts.
The Causes Nobody Checks: Order Storage, Background Jobs and Cart Fragments
The table’s database and background jobs row covers four separate causes that live underneath the checkout, where no plugins screen shows them: orders written to the shared posts tables, scheduled tasks firing on shopper visits, emails sent inside the order request, and a mini cart call on every page. Together they explain the store that is fine at midnight and slow at noon.
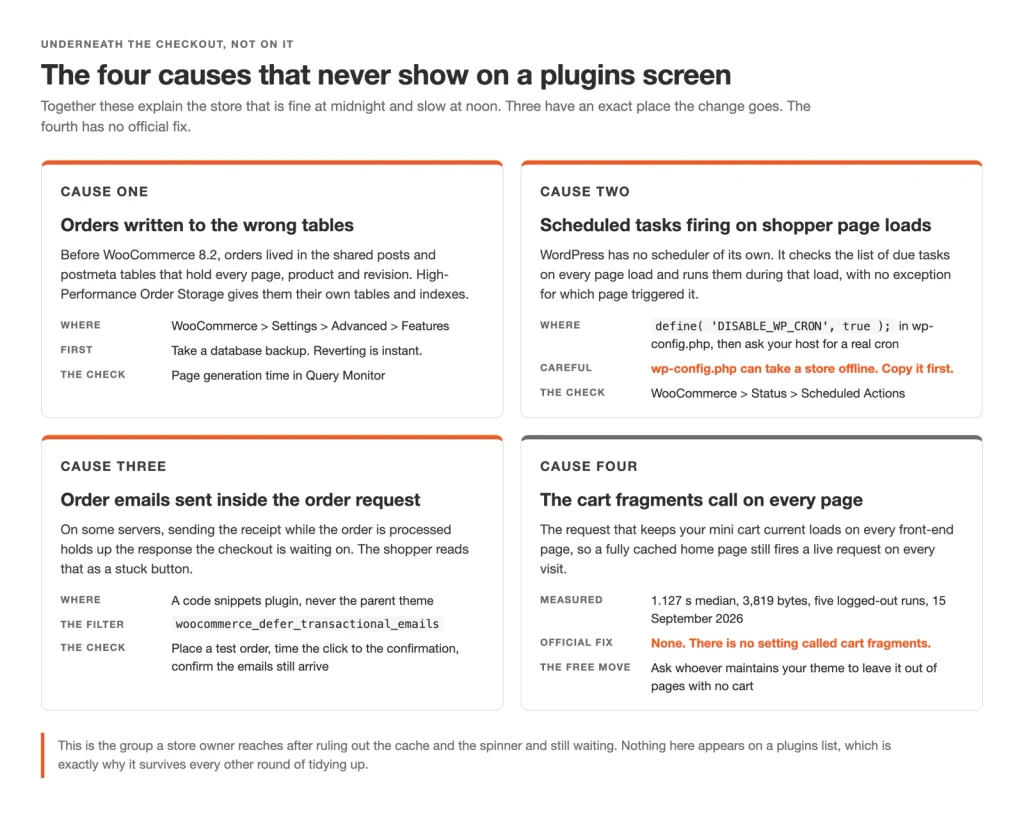
The four causes that sit underneath the checkout rather than on it, with where each change goes
High-Performance Order Storage
High-Performance Order Storage, which WooCommerce shortens to HPOS, decides where your orders are written.
Before WooCommerce 8.2, order data lived only in the shared posts and postmeta tables that hold every page and product on the site.
HPOS gives orders their own dedicated tables and indexes. WooCommerce’s documentation says that means fewer read and write operations, and fewer busy tables as order volume grows. Here’s how to switch it on:
- Take a database backup first, even though WooCommerce documents switching back to the old posts storage as instant if anything breaks.
- Open WooCommerce > Settings > Advanced > Features.
- Clear any warning the screen shows first. WooCommerce only lets you switch storage when the posts and orders tables are in sync, and offers a Sync orders now link when they are not. It also disables the switch while an active extension is not compatible.
- Choose High-performance order storage (recommended) under Order data storage, then save.
- Record page generation time and query count on your own checkout, before and after.

WooCommerce > Settings > Advanced > Features: Order data storage, with High-performance order storage selected
Our test store already runs WooCommerce 11.0.1 with HPOS on, confirmed at WooCommerce > Status, so we hold no before and after for this row.
WP-Cron Firing on Shopper Page Loads
WordPress runs its own scheduled tasks without a scheduler. Its developer documentation says WP-Cron checks the list of scheduled tasks on every page load and runs any that are due during that same load.
What follows is our reading rather than anything WordPress says about checkout: if any visit can start the queue, the busiest hour of your day has the most chances to fire it, and a shopper on the checkout can end up paying for it in waiting time.
The fix comes in two halves, one for your host and one for you:
- Send your host this line for wp-config.php, WordPress’s main settings file:
define( 'DISABLE_WP_CRON', true );. That file saved wrong takes the whole store offline, so let the host add it. - Ask in the same ticket for a real cron job that calls wp-cron.php on a schedule, which is question five above.
- Open WooCommerce > Status > Scheduled Actions and read the pending and failed counts. Action Scheduler is the background job queue WooCommerce runs its own work on, and its documentation says WP-Cron triggers it by default, so a backed-up cron holds up those jobs too.

WooCommerce > Status > Scheduled Actions: the counts that say whether the queue is keeping up
Transactional Emails Sent Inside the Order Request
On a slow server, sending order emails inside the checkout request holds up the reply the shopper is waiting for. WooCommerce can send them after the order instead.
On WooCommerce 11.0.1 that is a checkbox, not code. Here’s how:
- Open WooCommerce > Settings > Advanced > Features.
- Tick Deferred emails, which reads “Send transactional emails asynchronously via Action Scheduler instead of during the current request”, then save.
- Place a real test order and time the gap between the click and the confirmation.
- Confirm the emails still arrive. A change that speeds the checkout up and stops the receipt is no fix.

WooCommerce > Settings > Advanced > Features: Deferred emails does in one checkbox what the documented filter does in code
On an older WooCommerce without that checkbox, the documented filter add_filter( 'woocommerce_defer_transactional_emails', '__return_true' ); does the same job. Add it through a snippets plugin such as Code Snippets, never a theme file.
Deferred emails run as Action Scheduler jobs after the order completes, so the cron question above decides how fast that queue runs. Fix the two in one sitting.
The Cart Fragments Call
Cart fragments is the request that keeps your mini cart current, and the script behind it loads on every front-end page, not only on the cart and checkout, so even a fully cached home page still fires a live request.
On the test store, the request at /?wc-ajax=get_refreshed_fragments answered in a median of 1.127 seconds across five logged-out runs on 15 September 2026, returning 3,819 bytes.
That call is WooCommerce’s own, not a checkout plugin’s, so it says nothing about whichever tool builds your form.
WooCommerce publishes no official fix and has no setting called cart fragments, so treat anything presented as the official remedy with care. What you can check is whether your store needs the call at all:
- Open a product page in a private window with the Network tab showing.
- Add that product to the cart without leaving the page, and watch the cart icon in your header.
- Read the result. If the number changes on the spot, the fragments call is doing visible work. If the count only moves after you load another page, or there is no count at all, every visit pays for something nobody sees.
- Filter the Network tab for
get_refreshed_fragmentsand read the time on your own store.
Where nothing in your header depends on it, switch the cart icon off in the header options. Where something does, ask your theme’s support desk whether the script can be left off pages that carry no cart.
Why Is WooCommerce Add to Cart Slow?
Add to cart is slow for two reasons: the button reloads the whole page, or the cart fragments call above runs on every page. There is no official fix for the second, but the first is a single free checkbox in WooCommerce, which decides whether a click on a shop or category page reloads the whole page or adds the product in the background.
With it on, the button sends one small request and the shopper stays where they are. With it off, every click on a product grid buys a full page request for work the browser had already done. Here’s how to check it:
- Open WooCommerce > Settings > Products.
- Find the Add to cart behaviour section on that screen.
- Tick Enable AJAX add to cart buttons on archives, so shop and category pages add products without a reload.
- Leave Redirect to the cart page after successful addition unticked, unless your store wants shoppers sent there.
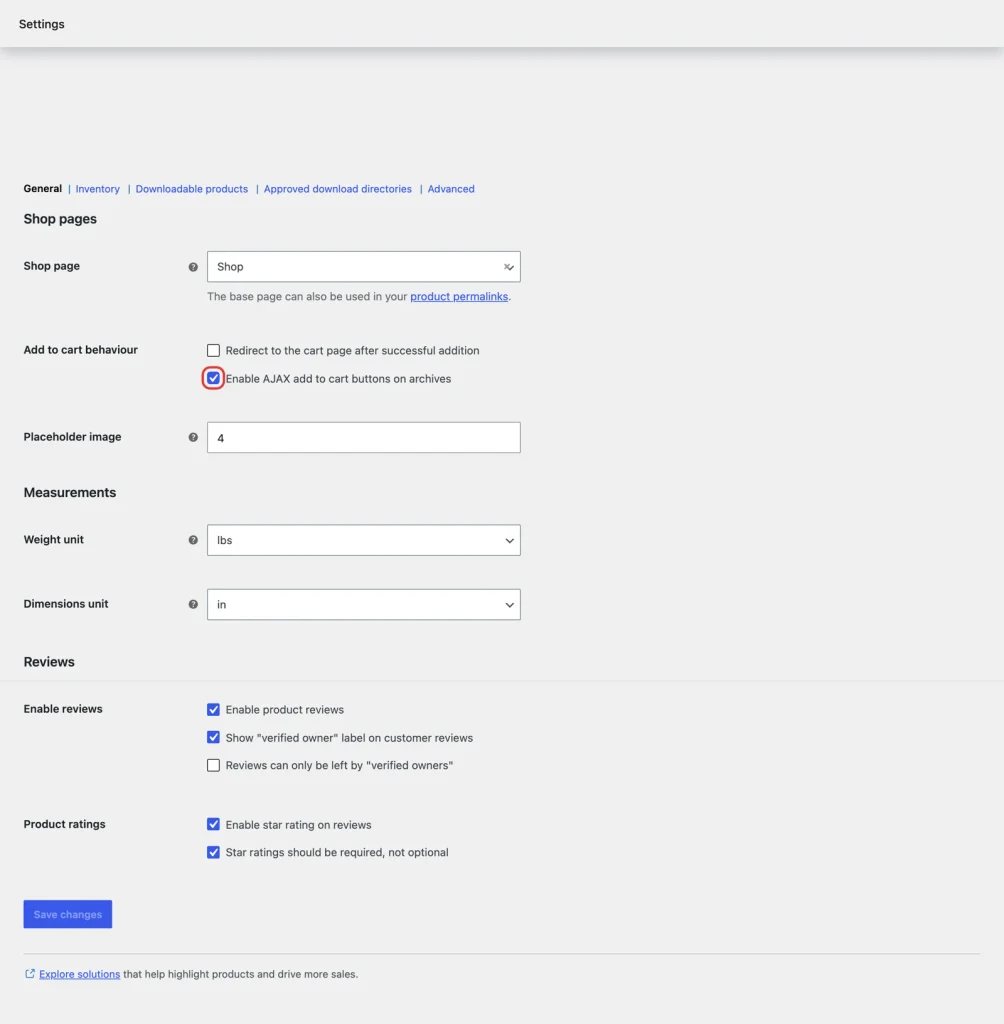
WooCommerce > Settings > Products: the AJAX add to cart setting, one free checkbox
The Tables That Grow Quietly
Three kinds of leftover data pile up in the database over time, and none of them is dramatic on its own or costs anything to clear.
WooCommerce > Status > Tools carries two buttons worth running on a schedule. Clear WooCommerce Transients removes temporary shop and product data, and Clear Expired Transients removes expired WordPress transient data. Neither touches a live order.
WordPress also keeps every post revision in the posts table unless a cap is set in wp-config.php, so put that cap in the same host ticket as the cron line.
The next place to look is the code your store loads because somebody installed it, and Query Monitor can name it.
How Do You Find the Plugin That Is Slowing Your Checkout?
The extension slowing your checkout has a name, and Query Monitor gives it to you without deactivating anything.
Your plugin count is not the problem on its own, because total query time per component decides it: thirty small extensions making two queries each can cost less than one extension running a hundred. Here’s how to find the one that matters:
- Install Query Monitor, add a product to the cart, and open the checkout as an administrator. Its report renders only for an administrator, so these readings compare one change against another rather than tell you what a shopper waits.
- Read the four figures it adds to the admin bar: page generation time, peak memory, query count and total query time.
- Open Queries, then Queries by Component, which groups query time by plugin, theme and core. You finish with a suspect that has a name rather than a hunch.
- Read the Scripts and Styles panel for what the browser downloads. Anything with no job on a checkout is a candidate for conditional loading, which Asset CleanUp, a plugin on WordPress.org, does from a settings screen instead of in code.
- Confirm the suspect on a staging copy before you touch the live store. Deactivate it there, load the checkout again, and record the same four figures.
- Repeat the test for the theme by switching staging to a default block theme. Whichever change moves the figures most is your culprit, and anything that moves nothing goes back on.
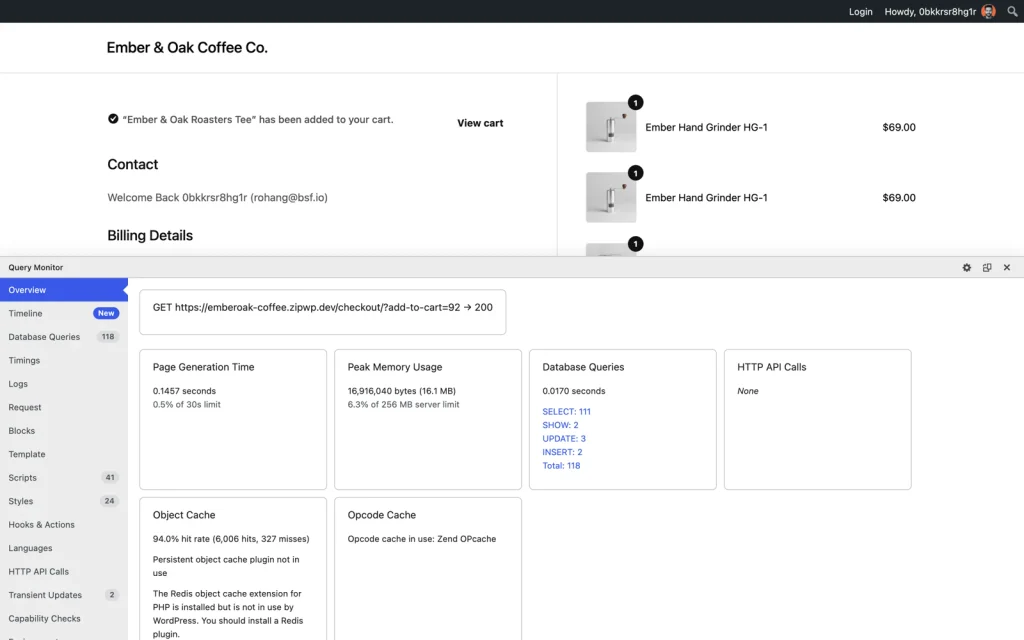
Query Monitor > Overview on the checkout with one product in the cart: 0.15 s generation, 16 MB peak memory, 118 queries
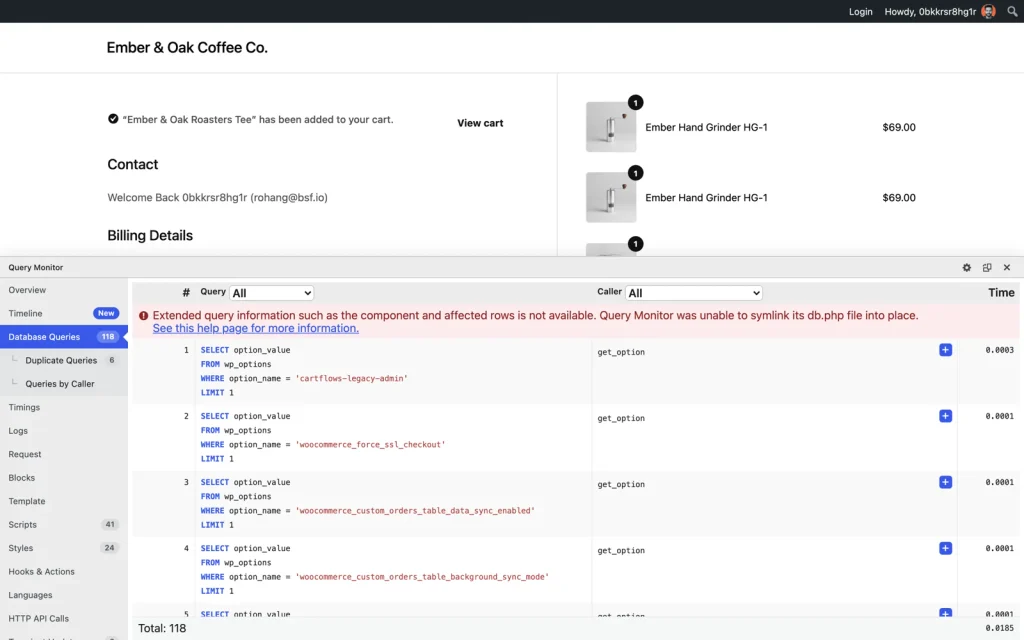
Query Monitor > Database Queries on the checkout with one product in the cart. The red notice means the host blocked Query Monitor’s own database file, so the Component column is missing and Queries by Caller is the fallback
If the Component column is missing, the red notice above tells you why. Query Monitor installs a small database file inside your site to label each query, and some hosts block it, so sort Queries by Caller instead, which still names the code making the calls.
The Component column tends to name recommendation plugins, translation layers, image compressors and review widgets. None of them is a bad plugin; each is simply doing its work on the one page that has no time for it.
Those 118 queries are a floor, not a target, since the test store is close to the least work a checkout can do. Query Monitor publishes no threshold, so the reading that decides anything is your own before and after.
On 16 September 2026 we ran one before and after of our own. We measured the test store’s checkout with CartFlows and its paid add-on, CartFlows Pro, deactivated, between two readings with both switched on. Server response time did not move: a median 0.466 seconds with them off, against 0.490 and 0.472 with them on.
What did change was the page the browser downloaded: 163,257 bytes with Store Checkout on and 356,975 without it, because the default checkout page arrives wearing the site’s header and footer. Switching the plugins off moved one reading and left the other alone, which is why you record both.
Checkout plugins get blamed first, and sometimes fairly. CartFlows is our own product, and the sibling post on whether CartFlows slows your site down answers that with its own measurements.
Where the column points at an extension you can replace rather than repair, our roundup of the best WooCommerce checkout plugins covers the alternatives.
Plugins are one half of what the browser downloads on the checkout and images are the other, so export each picture at the width the page shows it and save it as WebP. Read the total transferred at the foot of the Network tab’s request list, before a bulk compression run and after.
Payment gateway scripts are easy to miss, because they load wherever the gateway’s own settings place its buttons, not on pages you chose.
Why Do Your Payment Gateway Scripts Load Outside the Checkout?
Gateway scripts load outside the checkout when the gateway’s express checkout buttons are placed on product or cart pages. The script loads wherever a button is switched on.
Open WooCommerce > Settings > Payments, open your gateway, and look for an express checkout or button placement section. If there is no such section, or every placement is already unticked, skip ahead to the fix table in the next section.
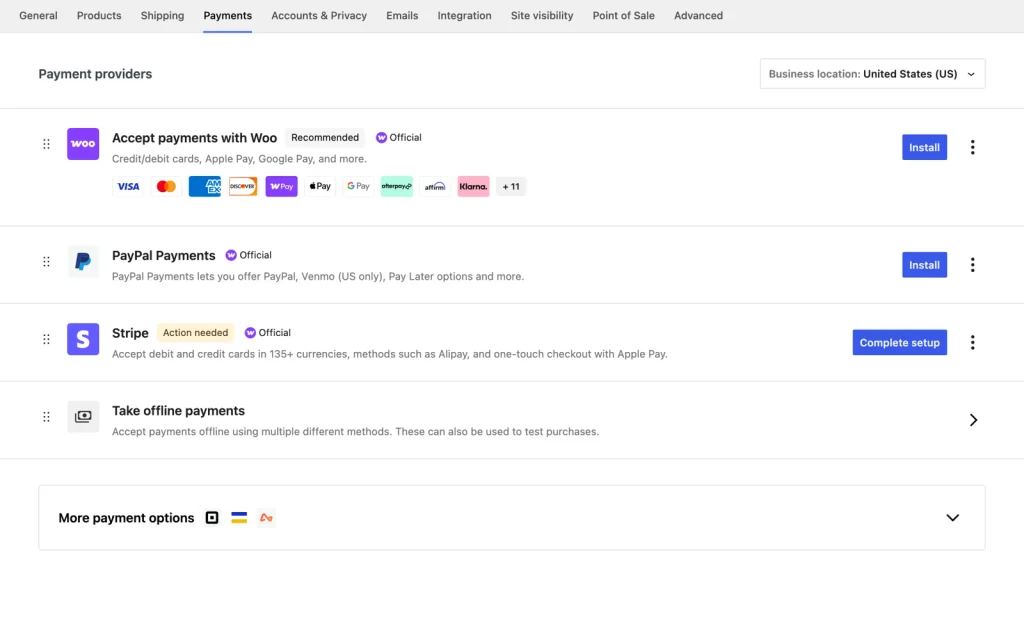
WooCommerce > Settings > Payments with no gateway installed yet, so every provider still shows an Install button. Once one is installed, its row opens the placement settings
The WooCommerce Stripe express checkout documentation, checked September 2026, offers those buttons as product page and cart page placements.
Express Checkout is a WooCommerce and gateway feature, not something a checkout plugin owns, which is why the setting lives in the gateway.
We have no measurement of that cost on our own store, but the third-party-web dataset has one: it attributes script time across roughly four million mobile pages in HTTP Archive’s monthly Lighthouse crawl. In that dataset, dated July 2024, Stripe’s scripts averaged 1,782 milliseconds of main thread execution, the browser’s single queue for running scripts, across the 366,853 pages carrying them, and PayPal’s averaged 1,089 milliseconds across 151,706 pages.
Those figures show the shape of the cost, not your number. To find out whether your gateway loads where it should not, run this check:
- List the pages where the gateway script loads. Open your best seller in a private window with the Network tab showing, reload, then type your gateway’s name into the filter box. Check the home page, a category page and a blog post too, so you know the scope rather than guessing it.
- Untick the placements you do not sell through. In WooCommerce > Settings > Payments, open the gateway and find the express checkout section. This costs nothing and removes the scripts at the source.
- Re-measure, then place a real test order. Confirm the gateway files are gone from the product page, then run one full purchase to confirm checkout still pays.
WooCommerce > Settings > Payments once a gateway is installed: it gets its own row, and that row is what opens the placement settings named in step two
No gateway was active during any speed reading here, so we hold no before and after of our own; we installed the free WooCommerce Stripe Gateway on 17 September 2026 only to take the screenshot above.
If you restrict the gateway scripts with a rule, cover the checkout and the order pay page, plus the cart if you keep express buttons there. A rule covering the checkout alone breaks a payment link sent to a customer, so test that path.
Further reading – WooCommerce Payment Gateway Optimization Guide
Each Fix, the Exact Setting, and How You Measure It
The table below lists every fix in the order to do them, which is the order a page request meets them, with the exact setting and the check you run yourself. Its third column, the one most guides leave out, says who can make the change.
| Fix | Where you change it | You or your host | How you measure the saving |
|---|---|---|---|
| Cache exclusion for cart and checkout | The caching plugin’s exclusion field, then the CDN | You | The two window test, then time to first byte |
| Persistent object caching | Host dashboard, or a Redis drop-in on the server | Both | Total query time in Query Monitor |
| Current PHP version | Host control panel, PHP settings | Both | Time to first byte on the checkout URL |
| High-Performance Order Storage | WooCommerce > Settings > Advanced > Features | You | Page generation time in Query Monitor |
| WP-Cron replaced by a server cron | wp-config.php, then a request to your host | Both | Page generation time at your busiest hour |
| Deferred transactional emails | WooCommerce > Settings > Advanced > Features, Deferred emails | You | The gap between the order click and the confirmation |
| Cart fragments narrowed | Your theme or header, or the mini cart itself | You | The fragments request in the Network tab |
| Database cleanup, transients and revisions | WooCommerce > Status > Tools, plus a revision limit | You | Query count and page generation time |
| Plugin or theme query load narrowed | The plugin’s own page restrictions, or Asset CleanUp | You | Total query time by component in Query Monitor |
| Compressed checkout images | The compressor’s bulk optimize screen | You | Total page weight in the Network tab |
| Gateway scripts restricted | Gateway settings, under WooCommerce > Settings > Payments | You | Request count on a non checkout page |
| Lighter theme on the checkout | Appearance > Themes, switched on staging first | You | Page generation time and page weight together |
| Page builder script weight removed | The checkout page itself, rebuilt without the builder | You | CSS and JS request count in the Network tab |
| Shorter checkout layout | WooCommerce > Settings > Accounts and Privacy, then the Checkout block | You | Field count, then page weight in the Network tab |
That table is this page’s single action list, and its rows are not independent, so work down it in order, because measuring an image or script change before the server settles gives you a reading that shifts underneath you.
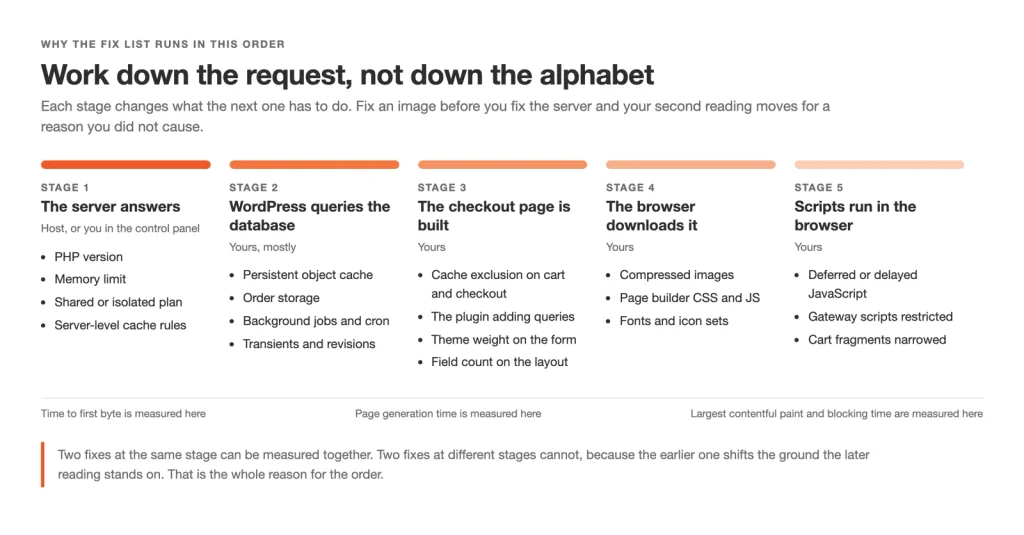
The fixes placed on the request stage they affect, which is why the action table runs in this order
If you only have an afternoon, do the first three. The cache exclusion takes about ten minutes, the PHP version and memory limit cost one host ticket, and a persistent object cache takes another ten minutes where the host offers one.
Two things are missing from the table on purpose. There is no after number of ours for the plugin rows, because the test store has no slow plugin to remove and we will not invent one. The table also leaves out deferring or delaying JavaScript, the setting a caching plugin offers under file optimization, because it can break the checkout form rather than speed it up.
How to Check the Fix Actually Worked
Measure the checkout URL twice, once logged out with a product in the cart and once on a phone. Compare each result against Google’s thresholds and your own before number.
If nothing moved, the cause you fixed was not yours. Here’s how to run the check without measuring the wrong page:
- Measure the checkout URL in Google PageSpeed Insights, not the home page. GTmetrix and WebPageTest take the same URL if you prefer them. A store can score well on a cached home page while the checkout, which cannot be cached, tells a different story.
- Add a product during the same page load. Load a URL shaped like
https://yourstore.com/checkout/?add-to-cart=123, swapping in your own domain and the product ID, the number in the post= part of the URL when you open that product to edit it. A plain checkout URL with nothing in the cart fails silently: WooCommerce redirects it to the cart, and the report still says “checkout”. - Confirm the PageSpeed filmstrip shows the checkout form before you trust any number.
- Log out first, every run, because a logged-out visit is what a shopper gets, and an administrator’s run adds the admin bar and its queries.
- Run mobile as its own measurement. Record the mobile score and load time as a separate pair rather than an average.
- Read the score and Largest Contentful Paint against a threshold, not a feeling. A better score with a flat Largest Contentful Paint means the shopper waits the same. Write each result beside the setting that produced it.
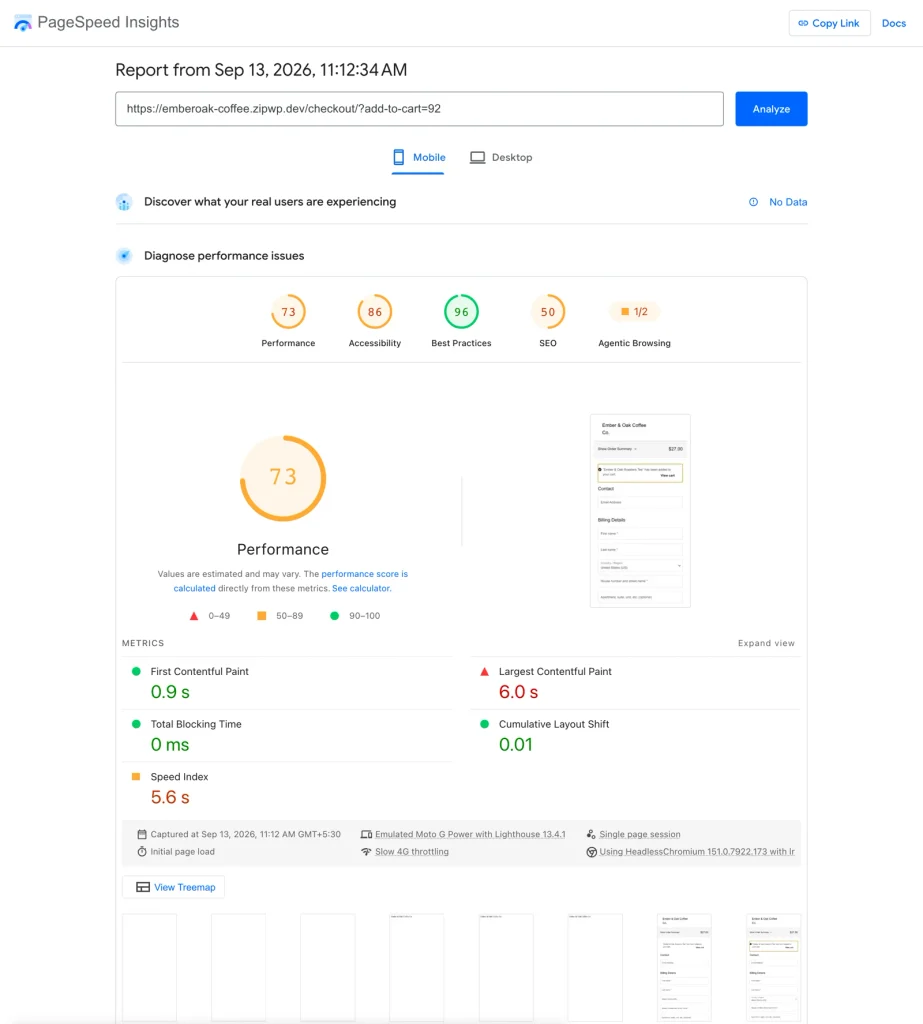
PageSpeed Insights on the checkout URL with a product added during the load, from the 13 September 2026 run that scored 73. The filmstrip shows the checkout form rendering rather than the cart
Here is the same store, measured both ways in one run on 22 September 2026. Lighthouse is the testing engine inside PageSpeed Insights.
| What was requested | What Lighthouse actually measured | Mobile performance | Mobile LCP |
|---|---|---|---|
| Checkout URL, empty cart | The cart page, after WooCommerce’s redirect | 72 | 3.9 s |
| Checkout URL with an add-to-cart parameter | The checkout form itself | 59 | 7.8 s |
Read the second column, not the score: the empty cart run looks like the better result, but it is describing a page no buyer is standing on.
A flattering number from the wrong URL is worse than an ugly one from the right URL. Nobody goes looking for the cause of a good score.
Google publishes these user experience thresholds on web.dev, in its Core Web Vitals reference and its guidance on server response time, both checked September 2026, and measures them at the 75th percentile of visits rather than on your best single run.
| Metric | Good threshold |
|---|---|
| Largest Contentful Paint | Within 2.5 seconds |
| Interaction to Next Paint | Within 200 milliseconds |
| Cumulative Layout Shift | Below 0.1 |
| Time to First Byte, the server response time | Under 800 milliseconds |
Keep it fast. Re-run both measurements once a quarter on the same tool, and after every plugin, theme or core update. Caching plugin updates deserve their own check, because they reset optimization settings more often than store owners expect.
A faster checkout only earns its keep if more orders come out of it, and speed is only one cause of cart abandonment among several. Count orders in one fixed window before the work and after, against checkout page views, then compare the two ecommerce conversion rates.
Block Checkout or Classic Checkout: Which Is Faster?
Neither rendering wins on speed by design, and the measured pair below traded one reading for another.
Block checkout ships its own JavaScript and CSS, while classic checkout leans on your theme and on whatever page builder you used, so the size of the bill depends on what you have installed rather than on the checkout type.
We built the pair on our test store: one bare page holding only the Checkout block, the other only the classic [woocommerce_checkout] shortcode. Both ran on the same store with the same plugins and product, and each was measured once through PageSpeed Insights.
TBT in the table is Total Blocking Time: how long the main thread, the single queue a browser uses to run scripts and draw the page, was too busy to answer a tap.
| Rendering | Mobile performance | Mobile LCP | Mobile TBT | Desktop performance |
|---|---|---|---|---|
| Block checkout | 82 | 2.6 s | 230 ms | 89 |
| Classic checkout | 78 | 5.4 s | 0 ms | 84 |
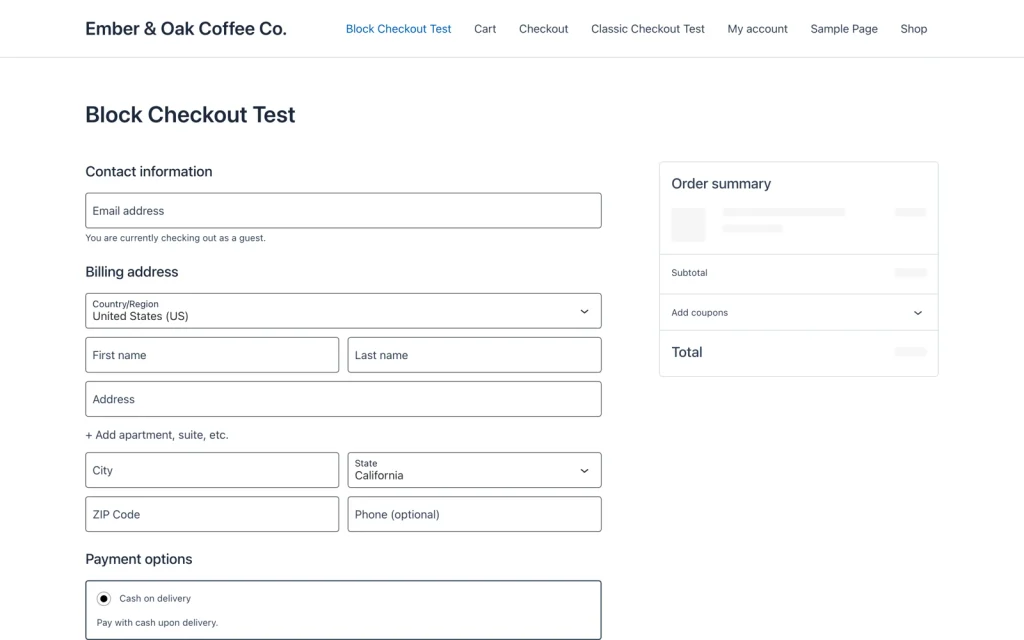
The WooCommerce Checkout block on a bare page of the test store, one product added during the load
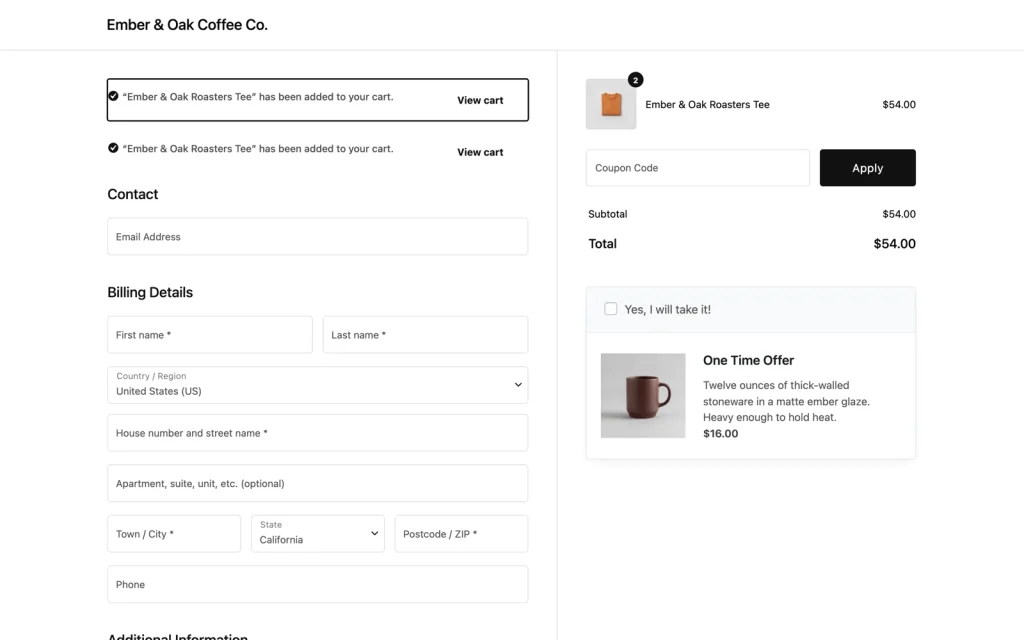
The classic shortcode checkout on a bare page of the same store, same host, same plugins, same product
Block checkout painted its main content sooner, while classic checkout left the main thread freer, hence its 0 ms TBT against 230 ms. That is one store and one run each, lab data only, so read it as an example rather than a rule.
Neither test page carried a CartFlows checkout, so the pair says nothing about CartFlows and page speed either way.
To find out which you run, open the page set as Checkout at WooCommerce > Settings > Advanced and look at it in the editor: a single block named Checkout means block checkout, the text [woocommerce_checkout] means classic, and builder rows mean your page builder owns the page.
If you run a block theme that supports the Cart and Checkout blocks, and no builder owns your checkout, stay on block checkout. If you run a classic theme, or the checkout was built in a page builder, stay on classic and cut the weight there instead.
Further reading – How to Customize the WooCommerce Checkout Page (7 Easy Ways)
Rebuilding the Checkout Layout Without Adding Weight
Fewer fields is a layout change rather than a speed setting, and you can make it for free. Most stores ask for two or three fields nobody in the business ever reads, and each one adds friction at the last step. Here’s how to cut the unnecessary fields:
- Enable guest checkout first. Under WooCommerce > Settings > Accounts and Privacy you can let people check out without an account, no code involved. That tab carries no control for hiding fields, so that work happens in the next step.
- Hide the fields you do not need in the Checkout block. Open the page set as Checkout at WooCommerce > Settings > Advanced, then click the Checkout block in the editor. The sidebar gives the company name, apartment or suite, and phone fields a setting each: required, optional or hidden. The order note is its own block beside them.
- Or reorder and hide them in the free CartFlows plugin. Its Store Checkout replaces the checkout page, and the Field Editor there lets you change labels and widths, hide fields and drag them into a new order. The same screen offers the one and two column Modern Checkout layouts.
- Cut the typing in the fields you keep. Enable Google Address Autocomplete, a toggle in the free CartFlows plugin, suggests the full location from the first few characters and fills the fields in. It sits at CartFlows > Store Checkout > Checkout Form > Form Settings.
- Leave the page builder out of it, then measure. A checkout built in a page builder loads the builder’s whole library of CSS and JavaScript on your most important page. Rebuild the page without it, then re-read the score and Largest Contentful Paint in the same window with the same cart.
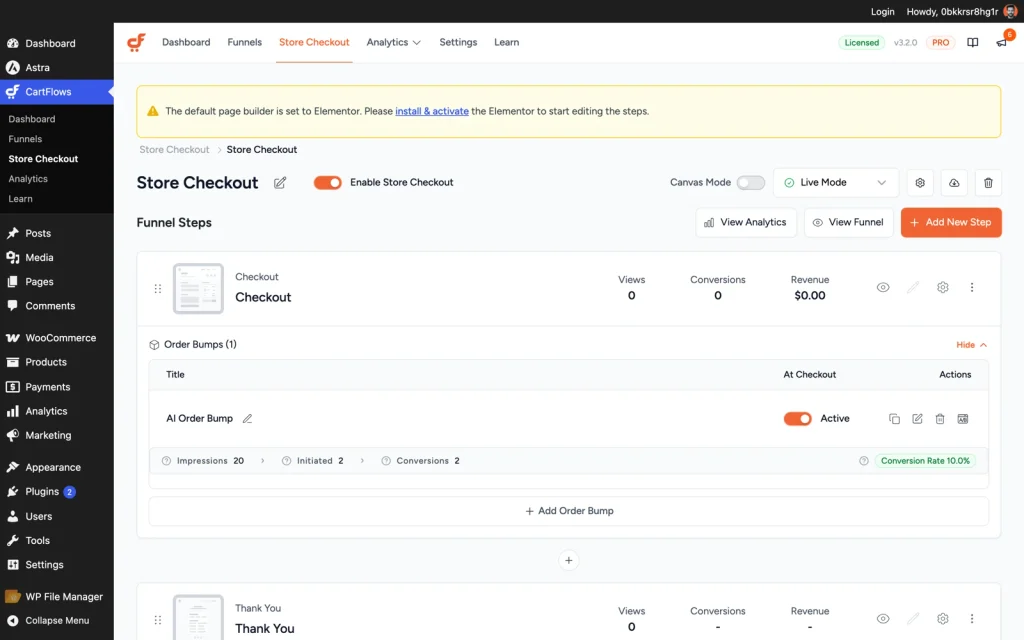
CartFlows Store Checkout replaces the WooCommerce checkout page
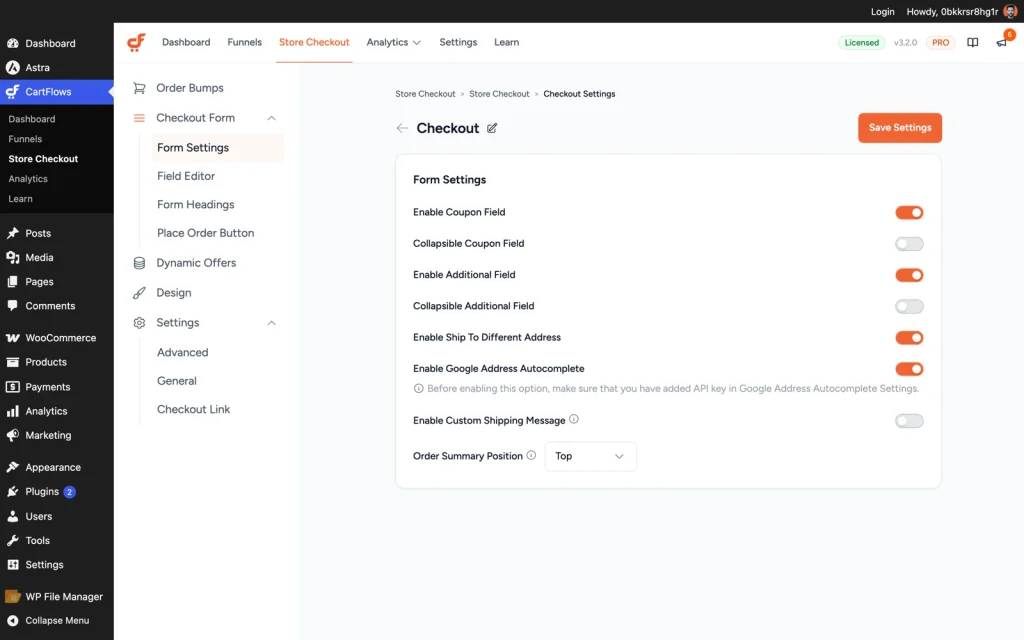
CartFlows > Store Checkout > Checkout Form > Form Settings: the form toggles, including Google Address Autocomplete and the note about its API key
Autocomplete needs a Google Maps Platform API key before it does anything, added under CartFlows > Settings > Integrations, and Google activates that key only once you enter billing details. Until the key is in, the switch reads as on while the shopper still types every line.
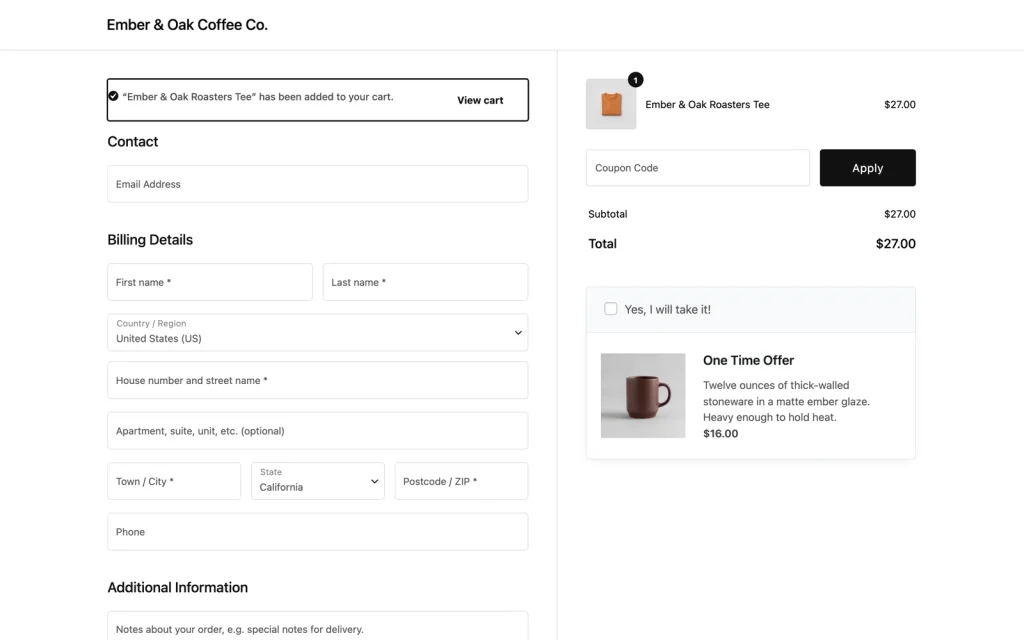
The test store checkout a first-time visitor sees, one product in the cart, before any speed changes
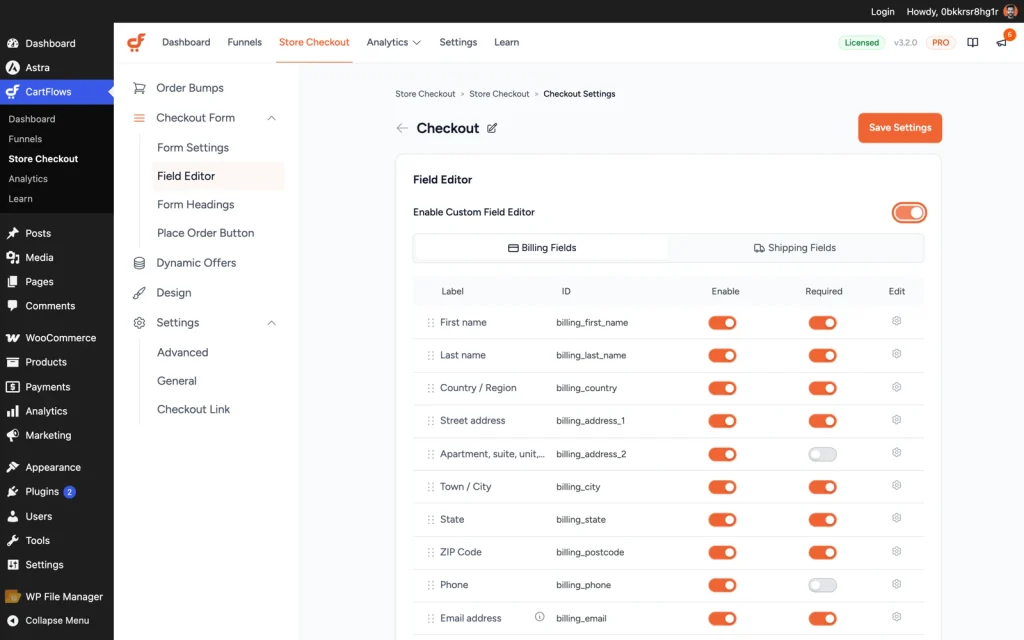
CartFlows > Store Checkout > Checkout Form > Field Editor: drag to reorder, toggle visibility, set widths (free plugin; not saved on the test store)
CartFlows is our own product, one of several checkout tools that do this layout job without a builder library. The free plugin edits the fields WooCommerce ships, and CartFlows Pro adds new custom checkout fields and a multistep checkout.
Making the checkout process faster to complete, with a one-page checkout, fewer steps and express payments, is a different job from making the page load faster, and our checkout optimization guide covers it.
Further reading – How to Create a WooCommerce One Page Checkout (2026)
How This Was Tested
The test store ran WordPress 7.1, WooCommerce 11.0.1, PHP 8.1.34 and Astra 4.13.6, with CartFlows 3.2.0 and CartFlows Pro 3.2.0 (Store Checkout on) and Query Monitor 4.0.7 active throughout, except for the 16 September before and after, when CartFlows and CartFlows Pro were switched off.
Measured on a ZipWP hosted test store, logged out, with one product in the cart. Readings came from a fixed connection with no page cache plugin active outside the caching test itself, and screenshots were taken at a 1440 by 900 viewport.
PageSpeed Insights runs used Lighthouse 13.4.1 emulating a Moto G Power on a slow 4G connection, one page load per run. The store carries no Chrome UX Report field data, so every PageSpeed figure here is lab data.
Time to first byte and Query Monitor figures were taken between 13 and 17 September 2026. The PageSpeed figures were re-run on 22 September 2026, and both dates are shown where they differ.
Last tested 22 September 2026. Author: Rohan Gadekar, Growth Lead, CartFlows.
Final Thoughts
A slow checkout rarely feels solvable, because most of the advice treats every WooCommerce store as the same store.
Yours probably has one cause doing most of the damage, and the difference between guessing and knowing is one check on one screen.
Work in the order this guide uses, change one thing, and write the number down.
Start on the first row of the fix table, the cache exclusion for cart and checkout. It is free, yours alone to change, and a wrong setting there loses orders outright rather than seconds.