



Some customers arrive at your store already knowing exactly what they want, but WooCommerce’s standard checkout process still sends them through the cart page before they can complete their purchase.
You’ll see a lot of guides recommending WooCommerce’s “Redirect to the cart page after successful addition” setting for skipping the cart. We tested it ourselves and checked the source code to confirm: it doesn’t actually skip the cart. It just sends shoppers straight to the cart after they add a product.
There are a few ways to set up true WooCommerce direct checkout: using a setting, a direct checkout link, a code snippet, or a plugin. We’ll walk through all four, including the trade-offs of each, how to skip the cart without hurting your order value, and when it actually makes more sense to keep the cart.
First, let’s clear up what direct checkout actually means, and the two WooCommerce features it’s often confused with.
- What is direct checkout?
- Is direct checkout right for your store?
- Method 1: Two WooCommerce settings (no code)
- Method 2: A direct checkout link
- Method 3: Redirect Add to Cart to checkout with a snippet
- Method 4: A Buy Now popup with CartFlows Instant Checkout
- Instant Checkout or a checkout funnel? Start from the campaign goal
- Other direct checkout plugins
- Test your direct checkout
- Skip the cart for the buyers who've decided
- FAQ
What is direct checkout?
Direct checkout simply means taking a customer from the product page straight to checkout, without sending them through the cart first. You’ll also see it referred to as quick checkout, one-click checkout, or a Buy Now button.
With WooCommerce’s standard checkout, a customer views a product, clicks Add to Cart, reviews their cart, clicks Proceed to Checkout, and then pays. Direct checkout cuts out the cart page, taking them straight to checkout after they click Buy Now.
Two other features are often confused with direct checkout, but they solve different problems:
| Term | What it does | Where it happens |
| Direct checkout | Skips the cart page | Product page → checkout |
| One-page checkout | Puts product selection and checkout on the same page | One page |
| Express checkout | Apple Pay, Google Pay and similar wallet buttons that fill in payment details | Provided by your payment gateway |
Express checkout makes the payment process faster. Direct checkout, like CartFlows Instant Checkout, removes the cart page from the journey altogether. They solve different problems, but they work well together, you don’t have to choose one over the other.
Direct checkout is just one way to improve a WooCommerce checkout. If you’re looking at the bigger picture, our WooCommerce checkout optimization guide covers the other ways to make the checkout faster and easier for customers.
Is direct checkout right for your store?
Use direct checkout when customers already know what they want. Keep the cart when they’re still building and reviewing their basket.
The cart page is useful when someone is browsing several products, adding multiple items, and wants to review everything before paying. But if a customer clicks an ad for one specific product and is ready to buy, the cart can feel like an unnecessary extra step, just one more page between deciding and paying.
Those screens cost sales, and a long checkout is one reason people abandon their carts. Baymard Institute’s average across 50 studies puts cart abandonment at 70.22% (Baymard, September 2025). In its survey of shoppers who quit, roughly one in five blamed a checkout that was too long or complicated.
The cost of extra steps is even higher with paid traffic. When you pay for an ad that sends someone to a specific product, they’ve already shown intent, they clicked because they’re interested in that product. Every extra screen between that click and the payment gives them another chance to get distracted, compare prices, or decide to come back later. And you’ve already paid to get them there.
| Your store | Skip the cart? | Method that fits |
| One hero product or a small catalog | Yes | Instant Checkout (Method 4), a link (Method 2), or the two settings (Method 1) |
| Digital downloads and online courses | Yes | A link from the sales page, or Instant Checkout |
| Paid ads or social posts pointing at product pages | Yes | Instant Checkout |
| Reorders of a consumable (coffee, supplements) | Yes | A link in the reorder email |
| Products sold with add-ons (a grinder with the coffee) | Yes, if the add-ons are offered on the product page | Instant Checkout |
| Large catalog where shoppers browse and compare | Only for decided buyers: keep Add to Cart and add Buy Now beside it | Instant Checkout |
| Orders that need cart-level options | No | — |
What the shopper loses without the cart page
Skipping the cart removes everything that lives on it:
- Room to edit. Customers change quantities or remove an item before checkout.
- Cart messaging. A free-shipping progress bar, for example, if a plugin adds one to your cart.
- Cart-page recommendations. WooCommerce can show related products under “You may be interested in…” on the cart page. Skip the cart, and shoppers won’t see these recommendations.
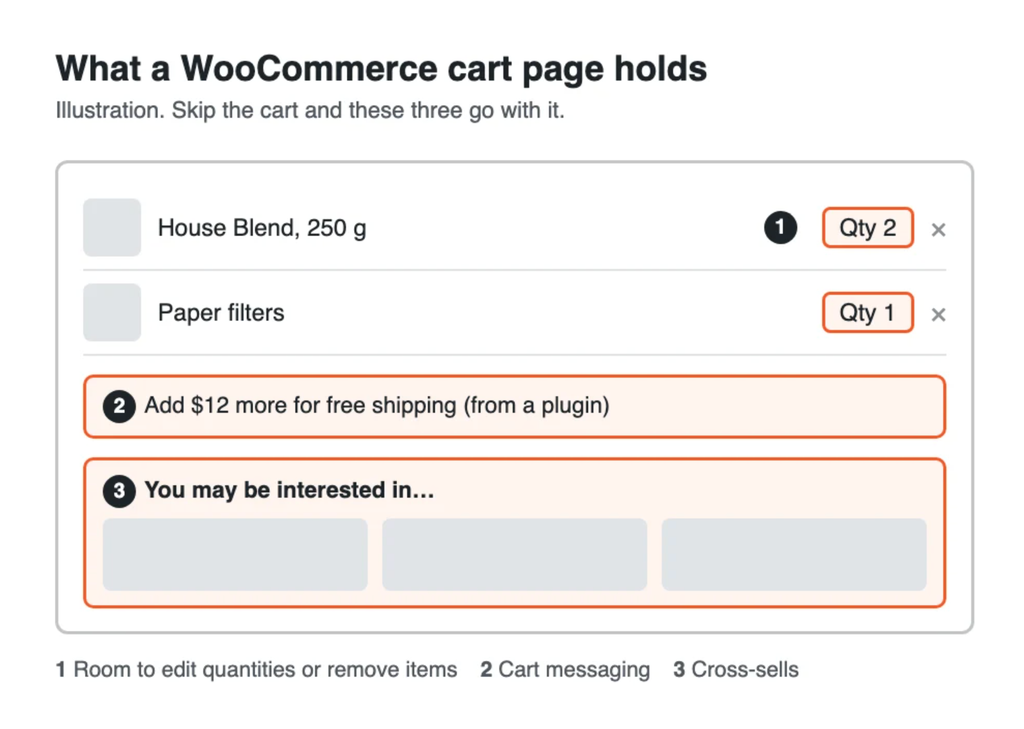
An illustration, not a screenshot. The free-shipping bar comes from a plugin, not WooCommerce itself.
That’s why a fast checkout can lower the average order. Shopify’s help centre, for example, says its own accelerated checkout buttons “can only be used to buy a single variant of a product” (Shopify Help Center). Our guide to making a WooCommerce checkout like Shopify compares the two platforms in more depth.
The fix isn’t to keep the cart but to let customers add the extras while they’re still looking at the product, and to show a one-click add-on (an order bump) in checkout. Method 4 does both.
Which method fits depends on how your customers buy:
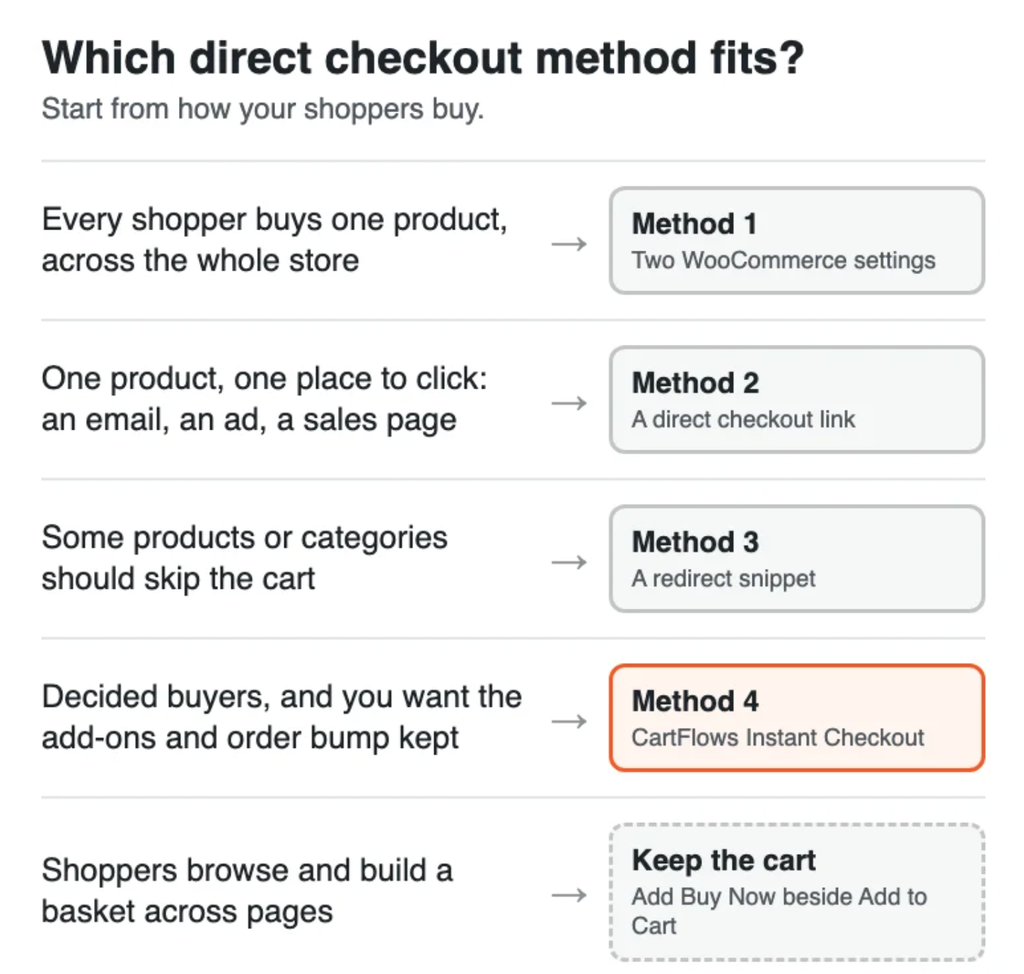
Start from how your customers buy, and the method follows.
Method 1: Two WooCommerce settings (no code)
WooCommerce can send customers to checkout with two settings (one on its own isn’t enough), but only by removing the cart page for everyone.
The “Add to cart behaviour” checkbox in WooCommerce → Settings → Products → General, “Redirect to the cart page after successful addition”, only ever sends people to the cart. We read the WooCommerce source to be sure (the trunk branch, 23 September 2026). When the box is ticked, WooCommerce sends the shopper to wc_get_cart_url(), the cart page.
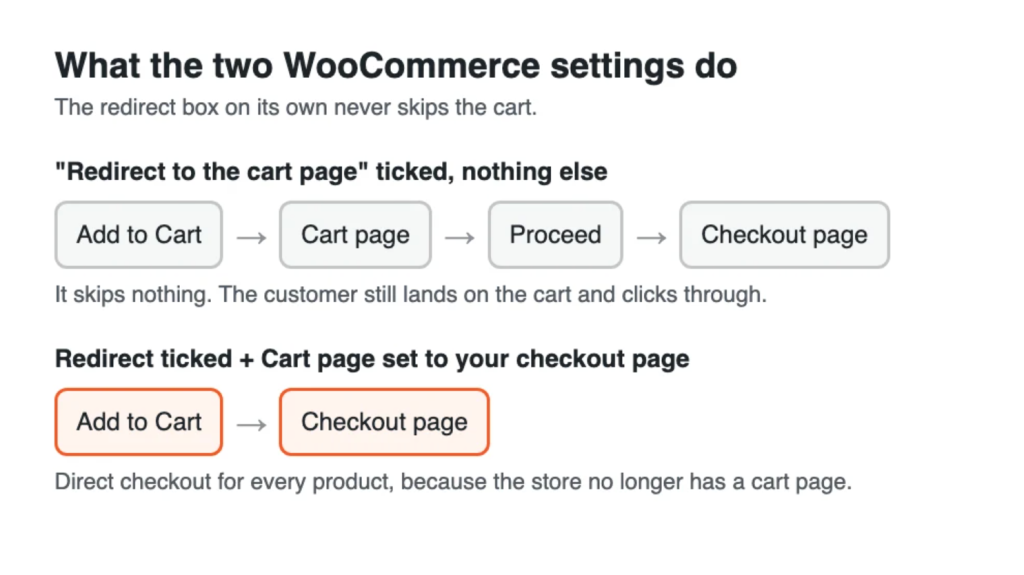
The redirect checkbox alone still sends shoppers to the cart. To actually skip the cart, you need the second setting: change the cart page itself to point to your checkout page.
The second setting changes what the cart page is:
- In WooCommerce → Settings → Products → General, tick Redirect to the cart page after successful addition.
- Go to WooCommerce → Settings → Advanced → Page setup and set Cart page to your checkout page.
- Save, then add a product to the cart as a customer would, and you land on checkout.
WooCommerce allows the two to be on the same page. Its template code skips the usual “empty cart, back to the cart page” redirect when the cart and checkout pages match, so there’s no loop. The redirect setting covers the Add to Cart buttons on your shop and category pages too.
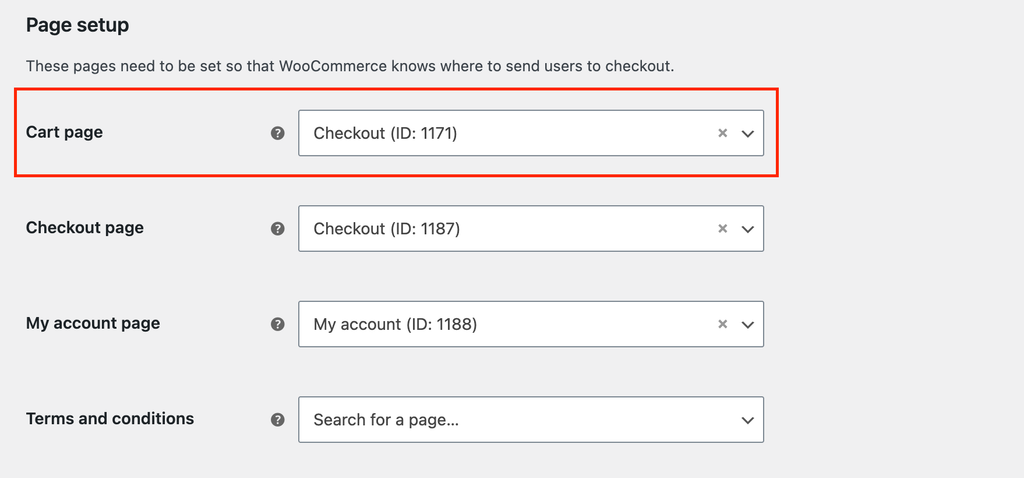
What it costs: your store has no cart page. Every Add to Cart goes straight to checkout, so a customer who wants three products has to go back and forth to checkout to build the order. To undo it, set the Cart page back to your cart and untick the redirect.
Best for: stores that sell one product, or where nobody buys two things at once.
For anything more targeted, WooCommerce gives you an add-to-cart URL (Method 2) and a filter, woocommerce_add_to_cart_redirect (Method 3).
Method 2: A direct checkout link
A direct checkout link adds a product to the cart and opens checkout in one click. You need no plugin and no code.
The format is your checkout URL plus ?add-to-cart= and the product ID:
https://yourstore.com/checkout/?add-to-cart=123
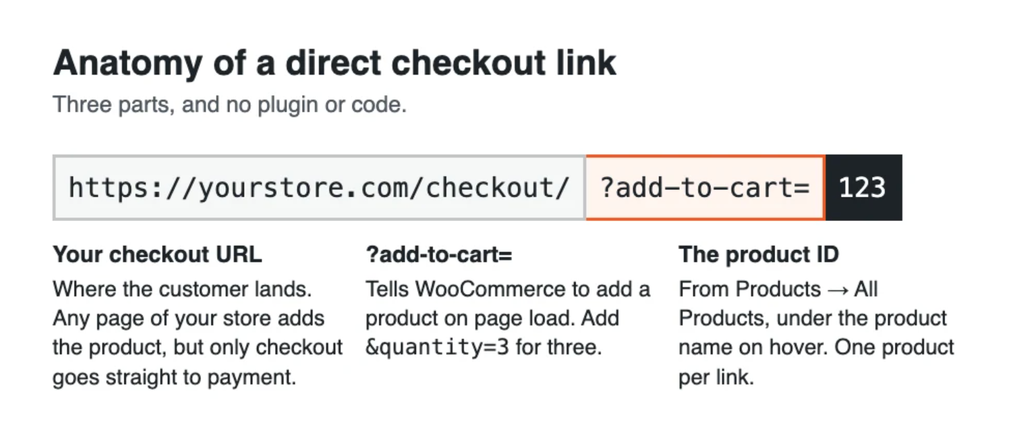
Swap in your own checkout URL and product ID.
Find the WooCommerce product ID in Products → All Products: hover over the product name, and the ID shows under it.
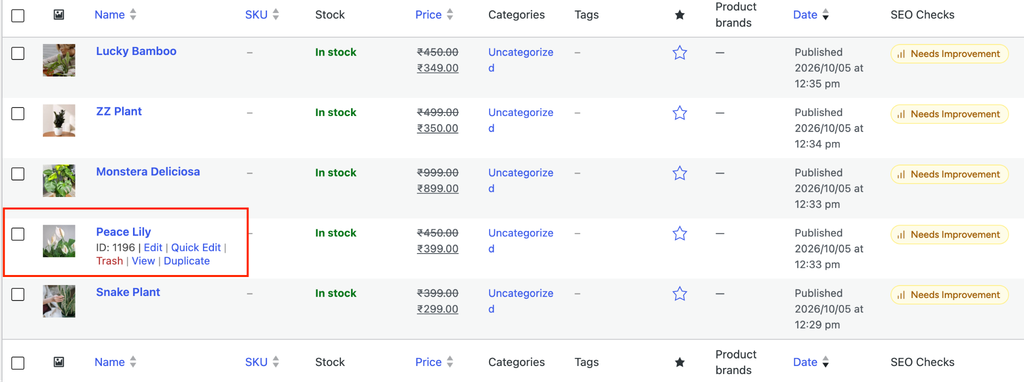
Use the link on a button on a sales page, an email, a social bio or an ad. The ?add-to-cart= part works on any URL of your store, because WooCommerce handles it on every page load, but only a checkout URL takes the customer straight to payment.
How the direct checkout link behaves, tested
We tested these links on our demo store on September 23, 2026. That store has no variable product, so the last row comes from the WooCommerce source instead.
| Link | What happens |
| /checkout/?add-to-cart=123 | Adds one, opens checkout |
| /checkout/?add-to-cart=123&quantity=3 | Adds three |
| The same link clicked twice | The quantity becomes 2. No second line is added |
| /checkout/?add-to-cart=123,456 | Adds nothing, and shows no error |
| ?add-to-cart= with a variable product’s main ID | Adds nothing. WooCommerce shows “Please choose product options” |
Two of these catch store owners out:
- The double-click problem. If a customer clicks the same checkout link twice, say from an email and then again from a second tab, the product quantity increases to two. For courses or other products that should only be purchased once, enable Sold individually under the product’s Inventory settings. This prevents the cart from containing more than one unit.
- The comma list. One link can’t add two different products, and a comma-separated list adds nothing without showing an error. For a bundle, use a grouped product or a plugin that builds the basket.
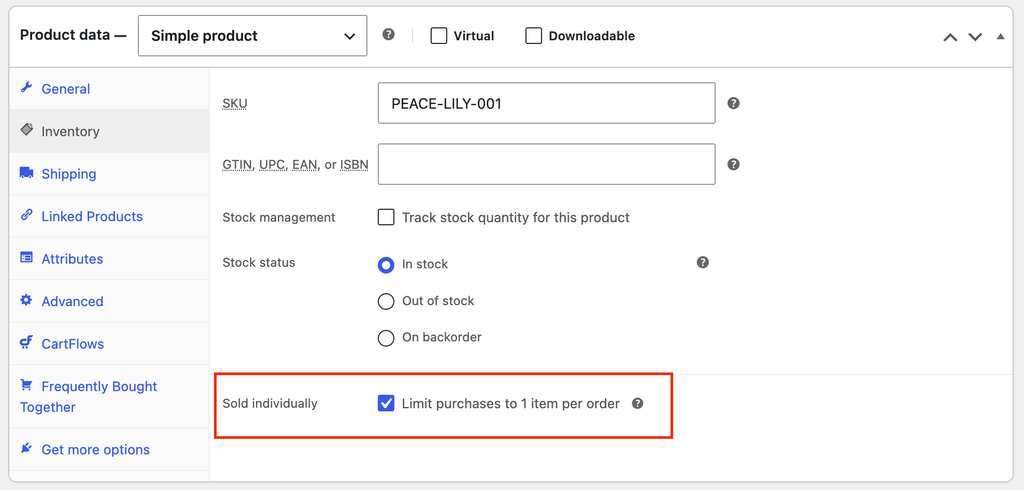
The link also stays in the address bar. A customer who reloads the checkout page adds the product again, so for single-purchase items the Sold individually setting matters here too.
A direct checkout link for a variable product
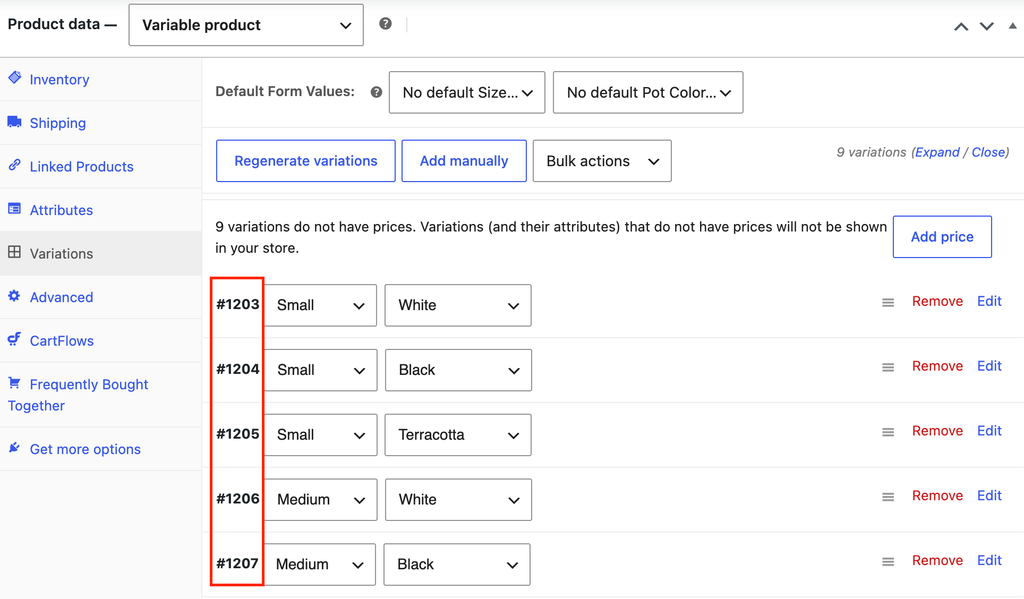
A variable product needs the variation ID and its attributes in the link:
https://yourstore.com/checkout/?add-to-cart=123&variation_id=456&attribute_pa_size=large
In that link:
- 123 is the main product’s ID.
- 456 is the variation’s ID, which you’ll find on the product’s Variations tab.
- The last part, attribute_pa_size=large, is the attribute’s slug with attribute_ in front, then the option’s slug (lowercase, with hyphens for spaces, so “250 g” becomes 250-g). For a custom attribute set on the product rather than a global one, leave out the pa_.
Best for: one product, one place to click from. It leaves the rest of your store as it is.
Method 3: Redirect Add to Cart to checkout with a snippet
A snippet can make the standard Add to Cart button send shoppers straight to checkout instead. You can apply it to every product or limit it to specific products or categories.
Add the snippet using a Code Snippets plugin, or place it in your child theme’s functions.php file. Using a child theme keeps the code safe from being overwritten when you update your main theme.
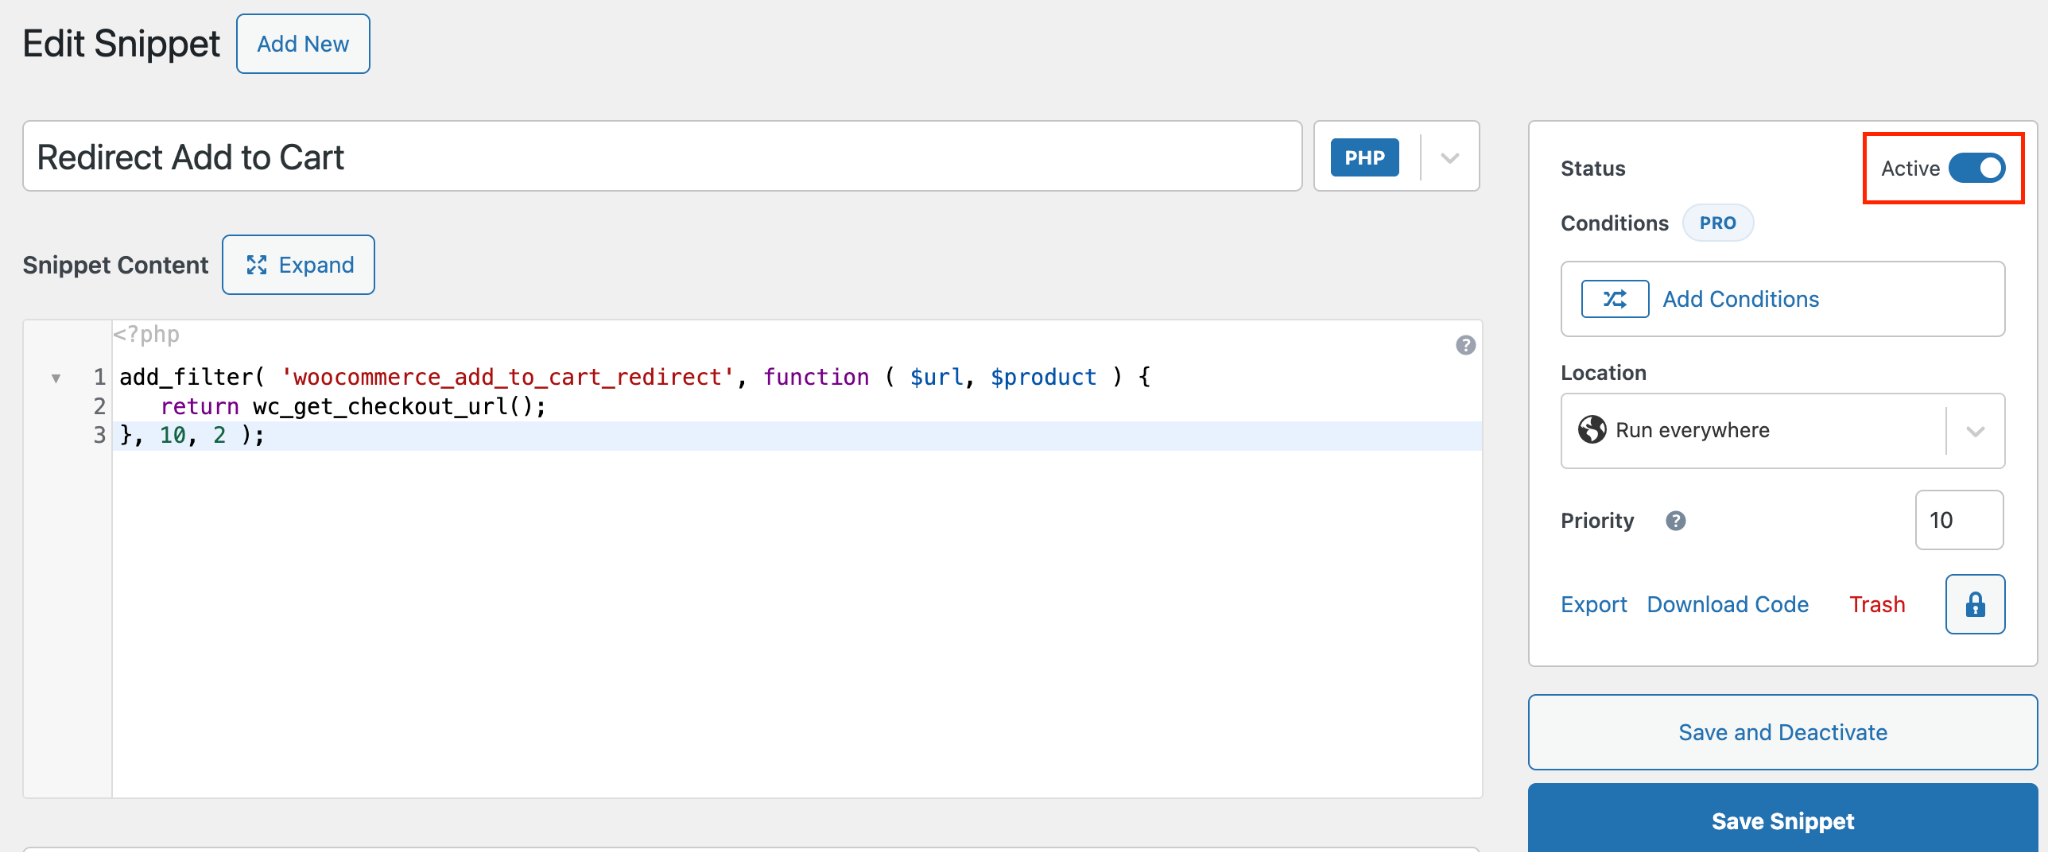
Every product:
add_filter( 'woocommerce_add_to_cart_redirect', function ( $url, $product ) {
   return wc_get_checkout_url();
}, 10, 2 );
One product, or one category:
add_filter( 'woocommerce_add_to_cart_redirect', function ( $url, $product ) {
   if ( ! $product ) {
       return $url;
   }
   if ( 123 === $product->get_id() || has_term( 'courses', 'product_cat', $product->get_id() ) ) {
       return wc_get_checkout_url();
   }
   return $url;
}, 10, 2 );
The filter passes the product being added to the snippet, which lets you target specific products or categories. Replace `123` with your product ID and `courses` with your category slug.
Rename the buttons to match: the first filter changes the button on individual product pages, while the second changes the buttons on shop and category pages.
add_filter( 'woocommerce_product_single_add_to_cart_text', function () {
   return 'Buy now';
} );
add_filter( 'woocommerce_product_add_to_cart_text', function ( $text, $product ) {
   return $product->is_type( 'simple' ) ? 'Buy now' : $text;
}, 10, 2 );
The second filter only renames buttons for simple products because variable products still require customers to choose their options first. To undo this setup, simply remove the snippets.
The shop-page catch
On shop and category pages, WooCommerce normally uses AJAX Add to Cart buttons. These add the product to the cart without reloading the page. They’re enabled by default, but they don’t run through the filter used by the snippet, so the redirect won’t work on these buttons automatically.
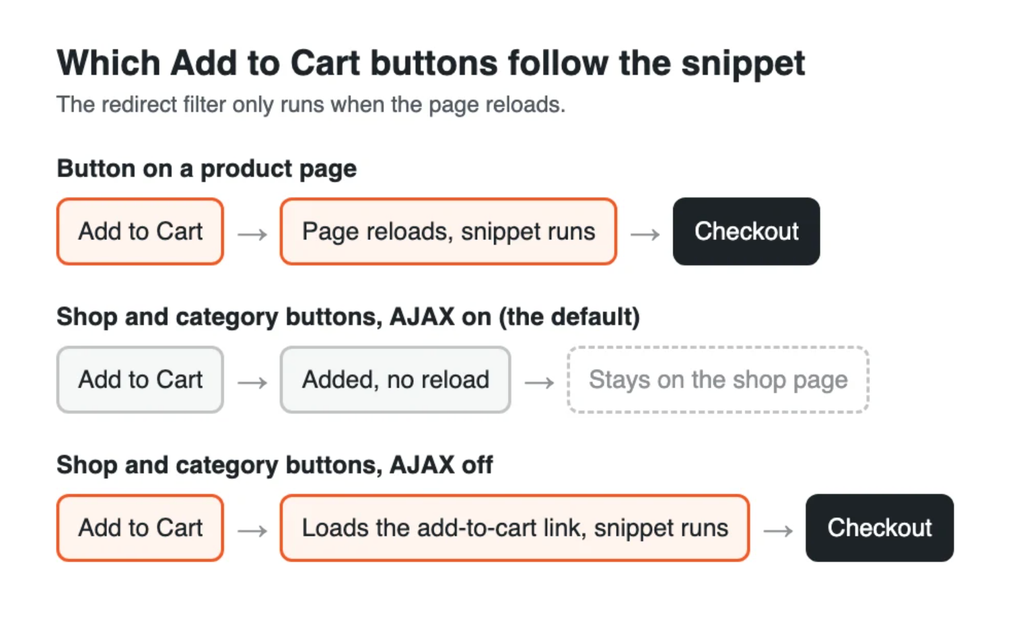
Only buttons that reload the page run the snippet.
If you want them to go to checkout too:
- Untick Enable AJAX add to cart buttons on archives in WooCommerce → Settings → Products → General, and save.
- Click Add to Cart on a shop page. The button now loads the add-to-cart link, and the snippet sends it on to checkout.

The first setting only redirects shoppers to the cart, not checkout. The second setting is enabled by default and makes the shop-page Add to Cart buttons bypass the snippet.
Best for: Stores that sell a single type of product and want every Add to Cart button to work like Buy Now. Keep in mind that the all-products version sends every shopper straight to checkout, so customers who prefer to browse and add multiple products lose the usual cart flow. The targeted version is more flexible: it redirects only the products or categories you choose and leaves the rest of your store unchanged.
Method 4: A Buy Now popup with CartFlows Instant Checkout
CartFlows is a WordPress plugin that replaces WooCommerce’s default checkout with one you customize without code, and its Instant Checkout feature adds a Buy Now button beside Add to Cart. Clicking it opens the checkout form in a popup over the product page, so the customer never leaves the page and never sees the cart.
WooCommerce’s default buying journey takes shoppers through three pages—product → cart → checkout, with a click and a page load between each step. With Instant Checkout, the customer who arrives from your ad clicks Buy Now and pays in a popup without leaving the page. It’s built for customers who arrive already decided, from an ad, a social post, an email or a reorder.
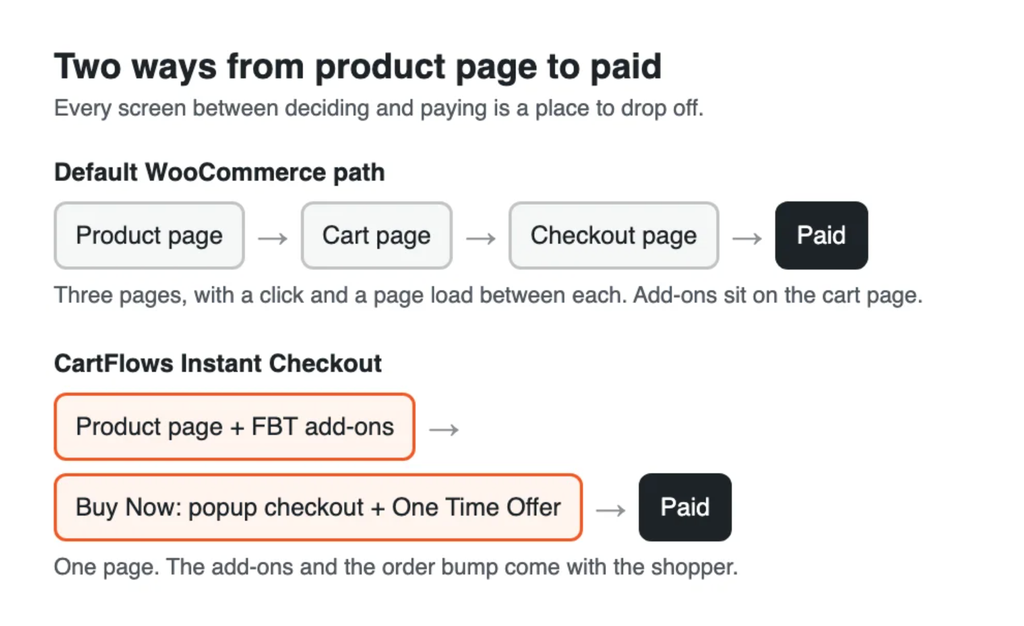
The default path takes three pages. Instant Checkout keeps the customer on one, and the add-ons and the order bump come with them.
It keeps two things that the other methods lose:
- The basket. Products the customer ticks in the Frequently Bought Together box (CartFlows’ box of companion products on the product page) go into the same order. If one of the selected extras is out of stock, the available products are still added, and the shopper is told which item couldn’t be added.
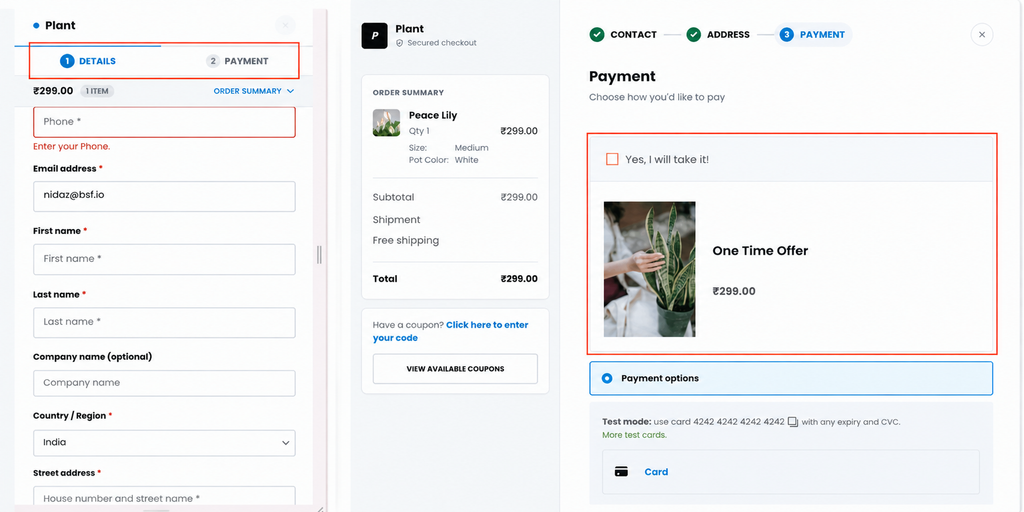
- The offer. An order bump is a one-click add-on offered at checkout. The one you’ve set up on your checkout appears inside the popup as a One Time Offer, and all its conditions still apply (cart value, products, categories, coupons, shipping method and country), so you don’t set it up a second time.
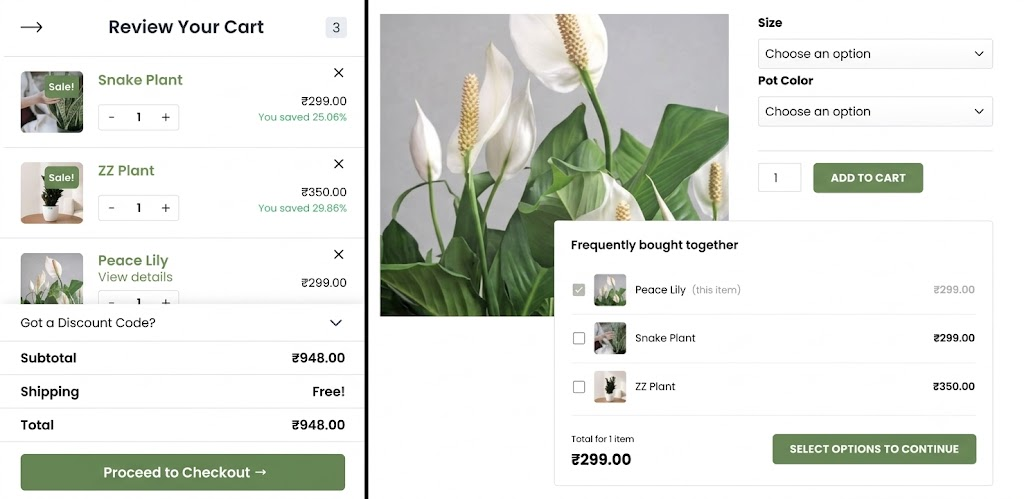
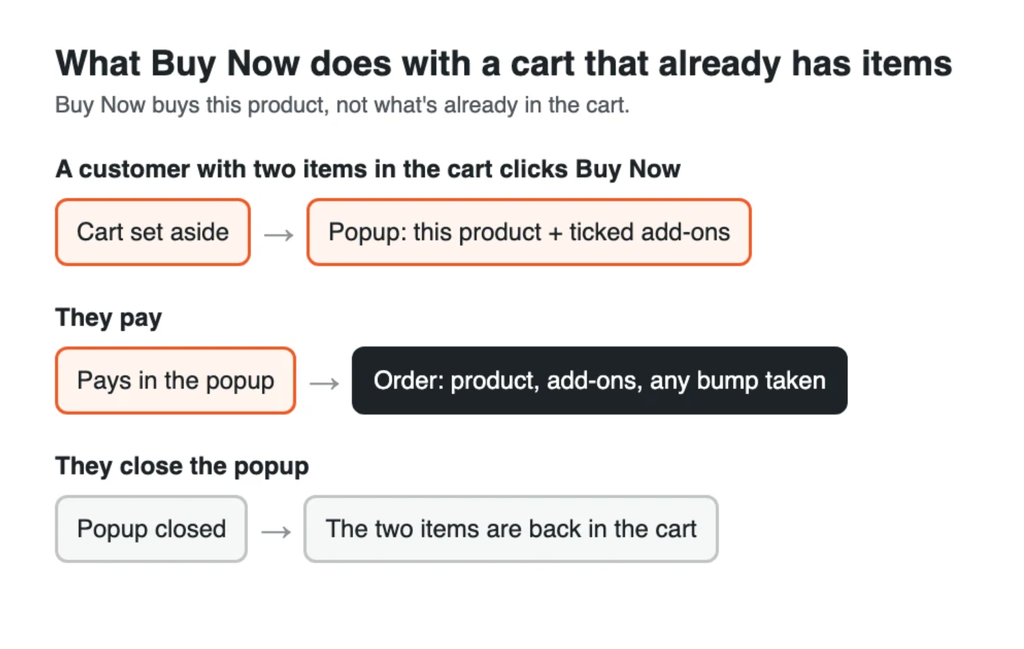
Add to Cart stays on the page, so customers who want to keep browsing still can. Buy Now buys this product and whatever add-ons they ticked. It sets aside anything already in their cart, and if they close the popup without paying, that cart comes back.
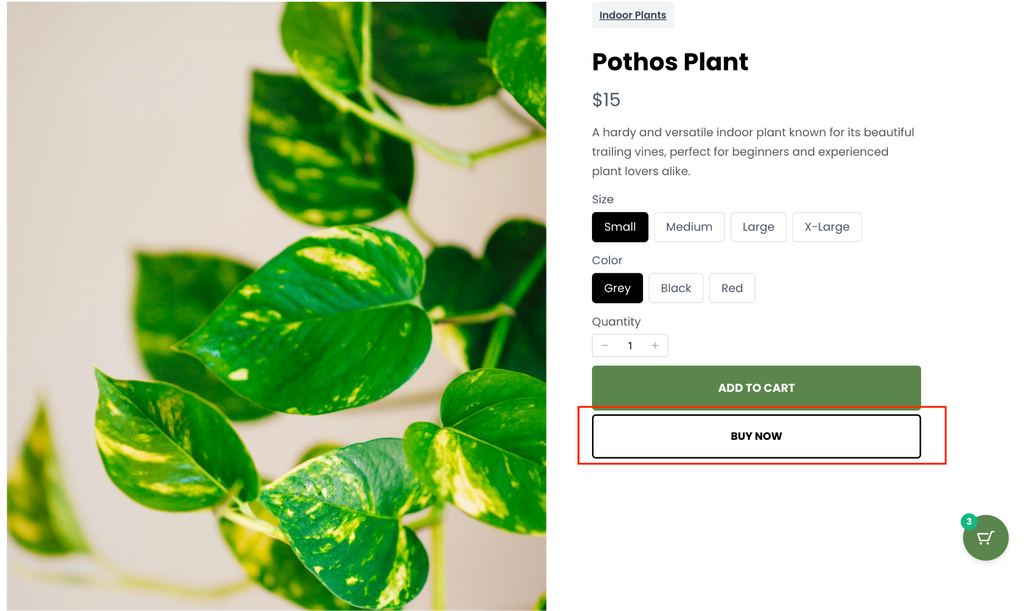
It works with physical products, digital products and courses, simple and variable products. Customers can pay by card inside the popup, or with the Apple Pay and Google Pay buttons your payment gateway already shows at checkout.
Two Instant Checkout layouts
| | Two Pane | QuickBuy |
| Shape | Wide popup, two columns | Narrow, single column |
| Steps | Three: contact, address, payment | Two: your details, then payment |
| Beside or above the form | Order summary with line items, totals and a coupon field | A compact line item, a coupon field and a progress bar |
Two Pane is the default. QuickBuy’s narrower layout is the one to try if most of your buyers are mobile shoppers, and our mobile checkout optimization guide covers the rest of the mobile checkout experience.
How to set up Instant Checkout
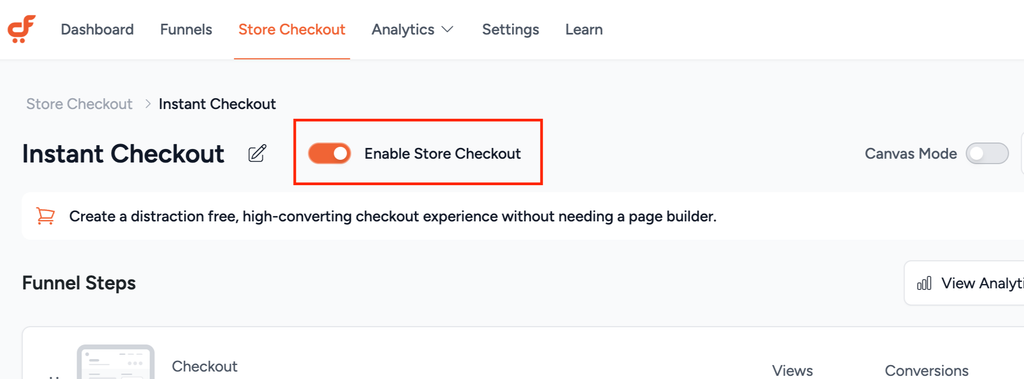
Instant Checkout runs on Store Checkout, which is how CartFlows swaps your store’s checkout page for its own Modern Checkout. Store Checkout comes with the free CartFlows plugin, and Instant Checkout needs CartFlows Pro. With both installed:
- In WordPress, go to CartFlows → Store Checkout and switch Store Checkout on.
- Click Funnel Settings, the gear icon at the top right.
- Open the Instant Checkout tab and turn on Enable Instant Checkout. It’s off by default.
- Pick Two Pane or QuickBuy as the layout.
- Set the Button Text (for example, “Buy Now”), upload a logo for the popup, and set its colors.
- Click Save Settings, then reload a product page to see the button.
The same Funnel Settings screen has an Instant Layout option, which is a different, older feature: a checkout page layout, not the Buy Now popup.
Two optional extras let the popup carry add-ons:
- Add an order bump: Set one up on the Store Checkout’s checkout step. You can learn more about how CartFlows order bumps work here: CartFlows Order Bumps.
- To let customers tick extras before Buy Now, add a Frequently Bought Together box to the product and pick its products, which the free CartFlows plugin lets you do. Auto Suggest needs CartFlows Pro and a one-time connection to your CartFlows account, and it proposes companions for you to approve, based on the products themselves and what your customers buy together.
Best for: stores where the order size matters as much as the speed. Get CartFlows Pro to turn on Instant Checkout.
Instant Checkout or a checkout funnel? Start from the campaign goal
Instant Checkout and a classic checkout funnel both skip the cart, but they’re built for different goals. Decide what the campaign has to achieve first, then pick the checkout.
Instant Checkout gets a customer paying in one popup without leaving the page they’re on. A checkout funnel is a sequence of pages you build yourself, such as a sales page, a checkout, then offers after payment and a thank-you page. Each step is a place to sell, test or collect something.
| Campaign goal | Use | Why |
| Convert ad or social traffic to one product, fast | Instant Checkout | The shopper stays on the product page, and Buy Now opens checkout in a popup |
| Sell an offer that needs a story first (a launch, a course, a bundle) | Checkout funnel | A sales page does the persuading, then links straight to that funnel’s checkout |
| Raise order value with offers after payment | Checkout funnel | One-click upsells and downsells run as funnel steps after checkout |
| Find out which checkout converts better | Checkout funnel | A/B split testing works on any funnel step |
| Collect leads before selling | Checkout funnel | A lead generation funnel captures the email first |
| Let decided buyers pay fast across a browsing store | Instant Checkout on Store Checkout | Add to Cart stays for browsers, and Buy Now sits beside it |
You don’t have to pick one for the whole store. Instant Checkout runs on your store-wide checkout, and funnels run on their own pages, so a store can offer Buy Now everywhere and still run a funnel for a launch campaign. One-click upsells, A/B split testing and lead generation funnels are CartFlows Pro features.
Other direct checkout plugins
Several plugins add direct checkout to a WooCommerce store, CartFlows Instant Checkout among them, and they differ in where checkout opens and what comes with it. For checkout plugins in general, see our roundup of the best WooCommerce checkout plugins.
| Plugin | Where checkout opens | Order bump in that flow | Variable products |
| Direct Checkout for WooCommerce (QuadLayers) | Checkout page (the Buy Now button is in the paid version) | Not stated | Yes |
| WooCommerce Fast Cart (Barn2) | Popup or side cart with checkout inside, with product recommendations in the popup | Not stated | Sends shoppers to choose options first |
| FunnelKit (Funnel Builder, and the free FunnelKit Cart) | Its own checkout page, through a direct checkout link. FunnelKit Cart is a side cart that then goes to the checkout page | Yes, on Funnel Builder’s paid plan, on the checkout page | Not stated for checkout |
| Instant Checkout for WooCommerce (WPExperts, unrelated to CartFlows) | Side cart or centered popup | Not stated | Yes |
| CartFlows Instant Checkout | Popup on the product page | Yes, as a One Time Offer with its conditions | Yes |
Every row except the CartFlows row is based on information published on the vendor’s own website, checked on September 23, 2026. “Not stated” means the vendor’s page doesn’t mention the feature, it doesn’t necessarily mean the feature is unavailable. If a feature is important to you, check with the vendor before ruling out a product.
If you only need to skip the cart, most direct checkout plugins in this table will do it. If you want the order bump, with its conditions, inside a popup checkout on the product page, that’s what CartFlows Instant Checkout is built for. We didn’t find another product that explicitly claims to offer this same combination.
Test your direct checkout
Run through the buying process as a customer would: log out of your store and test it in a private or incognito window.
- [ ] From a product page, the direct checkout button or link goes to checkout (or opens the popup) with the right product and quantity.
- [ ] A variable product asks for its options first, or the direct checkout link carries the variation.
- [ ] Your shop and category page buttons do what you expect (see the shop-page catch in Method 3).
- [ ] Clicking twice doesn’t leave a customer with two of a single-purchase item, like a course.
- [ ] The order bump shows, and your payment buttons, including any wallets, appear.
- [ ] If you use a cart abandonment plugin, it still records checkouts that start from the link or the popup.
- [ ] A test order completes and the thank-you page loads.
Skip the cart for the buyers who’ve decided
WooCommerce direct checkout works best for shoppers who already know what they want. The two settings work well for a store-wide setup, a direct link is useful when you want to send shoppers straight to checkout for a specific product, and a snippet can turn selected or all Add to Cart buttons into Buy Now.
With CartFlows Instant Checkout, you can keep Add to Cart for shoppers who want to browse while giving ready-to-buy customers a faster popup checkout, with room for add-ons and offers.
Choose the method that fits how your customers shop, test it from their perspective, and compare your orders and conversion rate before and after the change. If you want to try a faster product-to-checkout flow, take a look at CartFlows Instant Checkout.