CartFlows and Bricks Builder are a perfect match.
They integrate seamlessly and help you create and customize high-converting sales funnels with ease.
If your WooCommerce site is powered by Bricks, CartFlows can elevate your eCommerce game. Together, they let you craft funnels that don’t just look amazing but also deliver real results.
Whether you’re an entrepreneur, marketer, or small business owner, this dynamic duo is the ultimate solution for boosting conversions and skyrocketing sales effortlessly.
In this guide, we’ll explore their standout features, show you how they work together flawlessly, and walk you through getting started step by step.
Grab a coffee, and let’s explore the ultimate toolkit for turning a WooCommerce store into a sales powerhouse!
CartFlows and Bricks – A Winning Combination
The CartFlows and Bricks Builder integration offers unmatched design freedom, blazing-fast WooCommerce performance and tons of features.
Here are some standout features this duo brings to the table:
| CartFlows | Bricks |
|---|---|
| Native WordPress integration | Lightning-fast performance |
| Pre-built funnel templates | Full-site editor |
| Automation with OttoKit | Dynamic content rendering |
| Dynamic revenue-boost | Built-in display conditions |
| Integration with social platforms | WooCommerce store-builder |
| Instant checkout option | Responsive design |
| A/B testing and analytics | 110+ customizable elements |
Key Features of the CartFlows and Bricks Integration
Combine them, and you’ve got powerful tools for crafting high-converting sales funnels with ease.
Here’s what you can achieve:
- Custom funnel design: Take full control of sales funnels – from opt-ins and checkouts to upsells and thank-you pages.
- Widgets built for funnels: Create stunning opt-in forms, dynamic checkouts, and interactive upsell/downsell buttons.
- Dynamic content for personalization: Make every step feel personal and relevant by adding tailored messages and call to action buttons with dynamic content.
- Pre-built funnel layouts: Save time with pre-made layouts optimized for upsells and downsells, or tweak them in Bricks Builder to match your brand.
- Seamless workflow: No more jumping between tools. Bricks integrates perfectly with CartFlows, letting you design and manage funnels in one place.
With these features, your funnels won’t just look amazing—they’ll deliver the results you’ve been dreaming of.
Manage CartFlows Sales Funnel With Bricks
Setting up CartFlows and Bricks Builder is a breeze. The two tools work together seamlessly, but you also need WooCommerce for the magic to happen.
If you already have WordPress up and running, you’re halfway there. The rest is super easy!
If you’re starting from scratch? No worries – check out this helpful video that guides you through every step.
Ready to dive in? Let’s start by installing Bricks Builder!
Install Bricks Builder
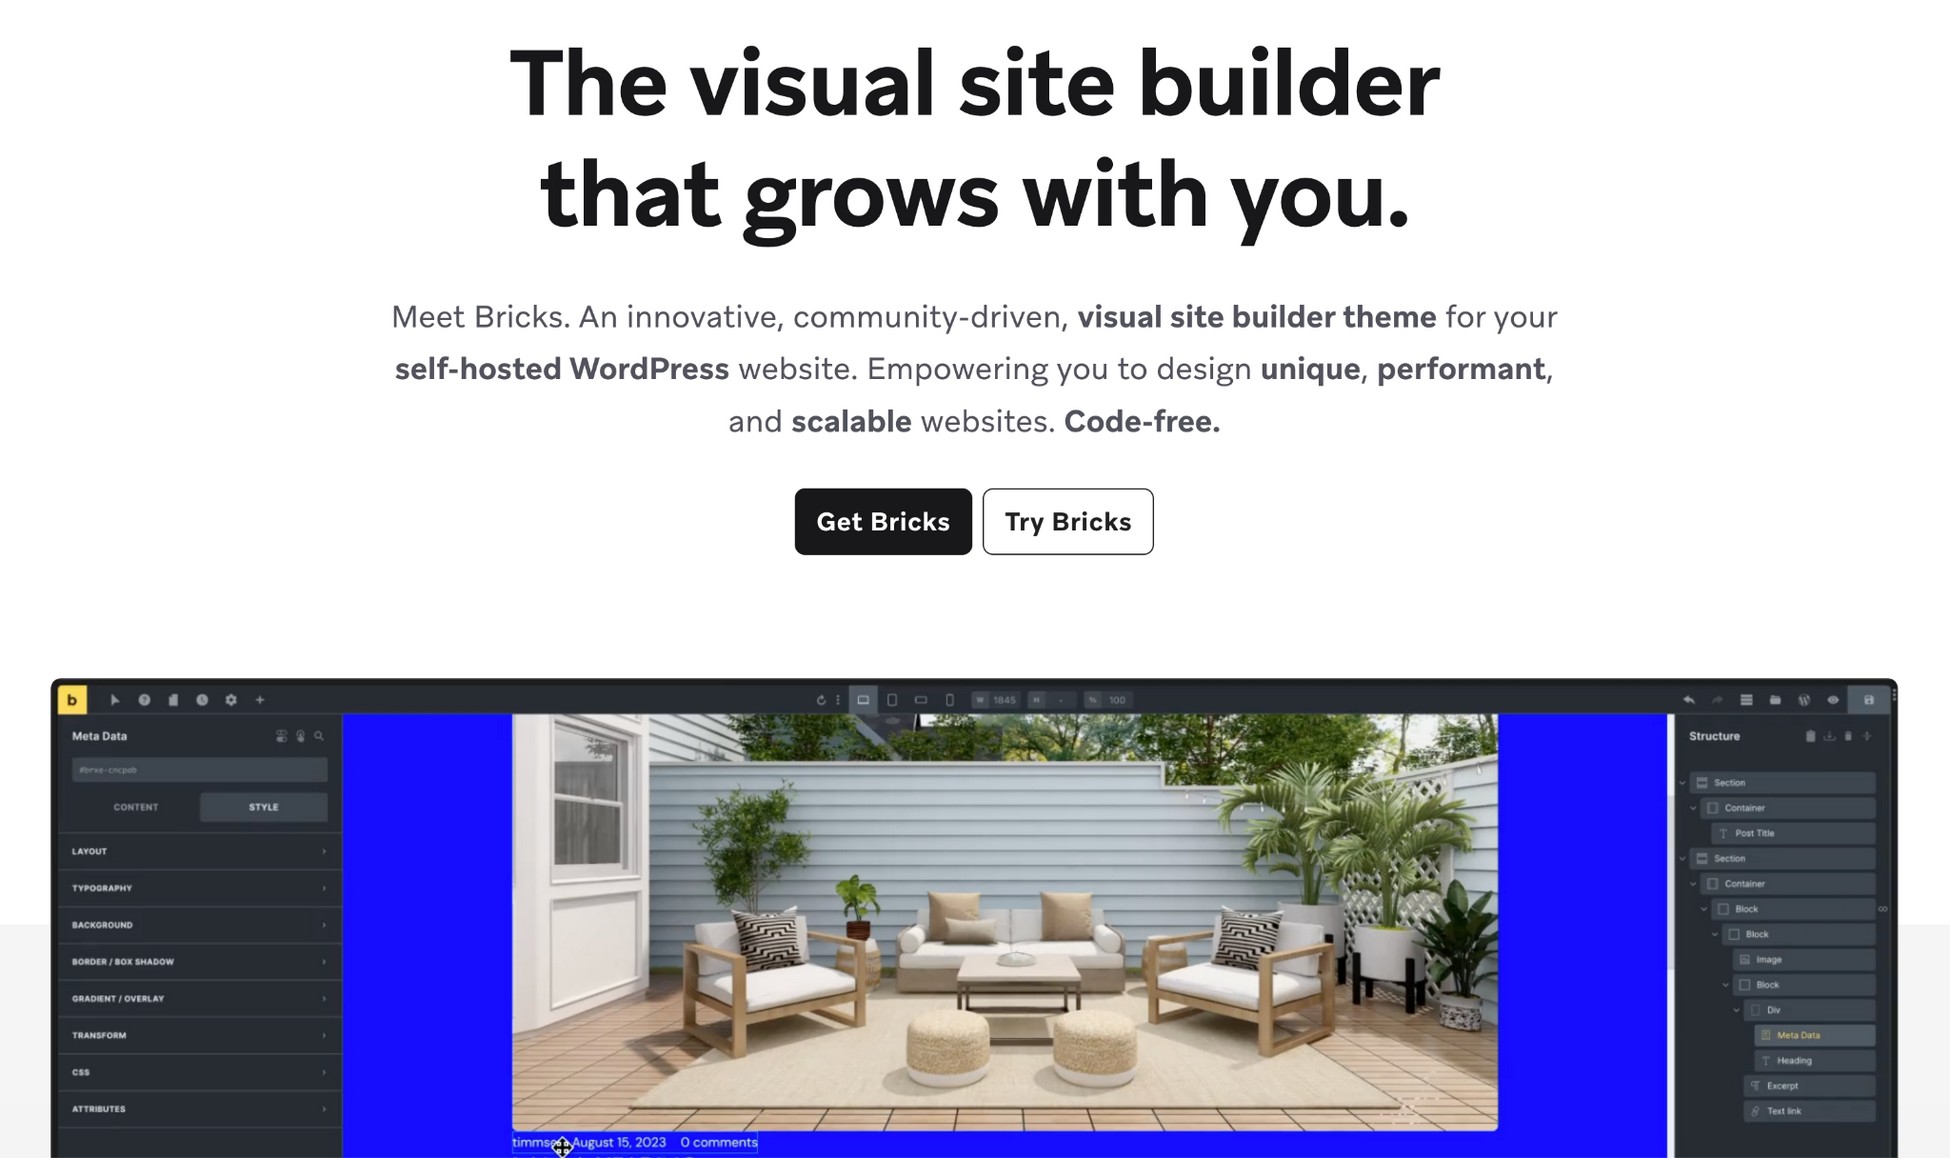
Bricks is a premium visual website builder and WordPress theme that makes building stunning websites super simple.
Here’s how you can set it up:
- First, purchase Bricks from the official website.
- Download the Bricks file (.zip format) to your computer.
- In your WordPress dashboard, go to Appearance > Themes, click Add New Theme, and upload the .zip file.
- Install and activate the theme just like any other WordPress theme.
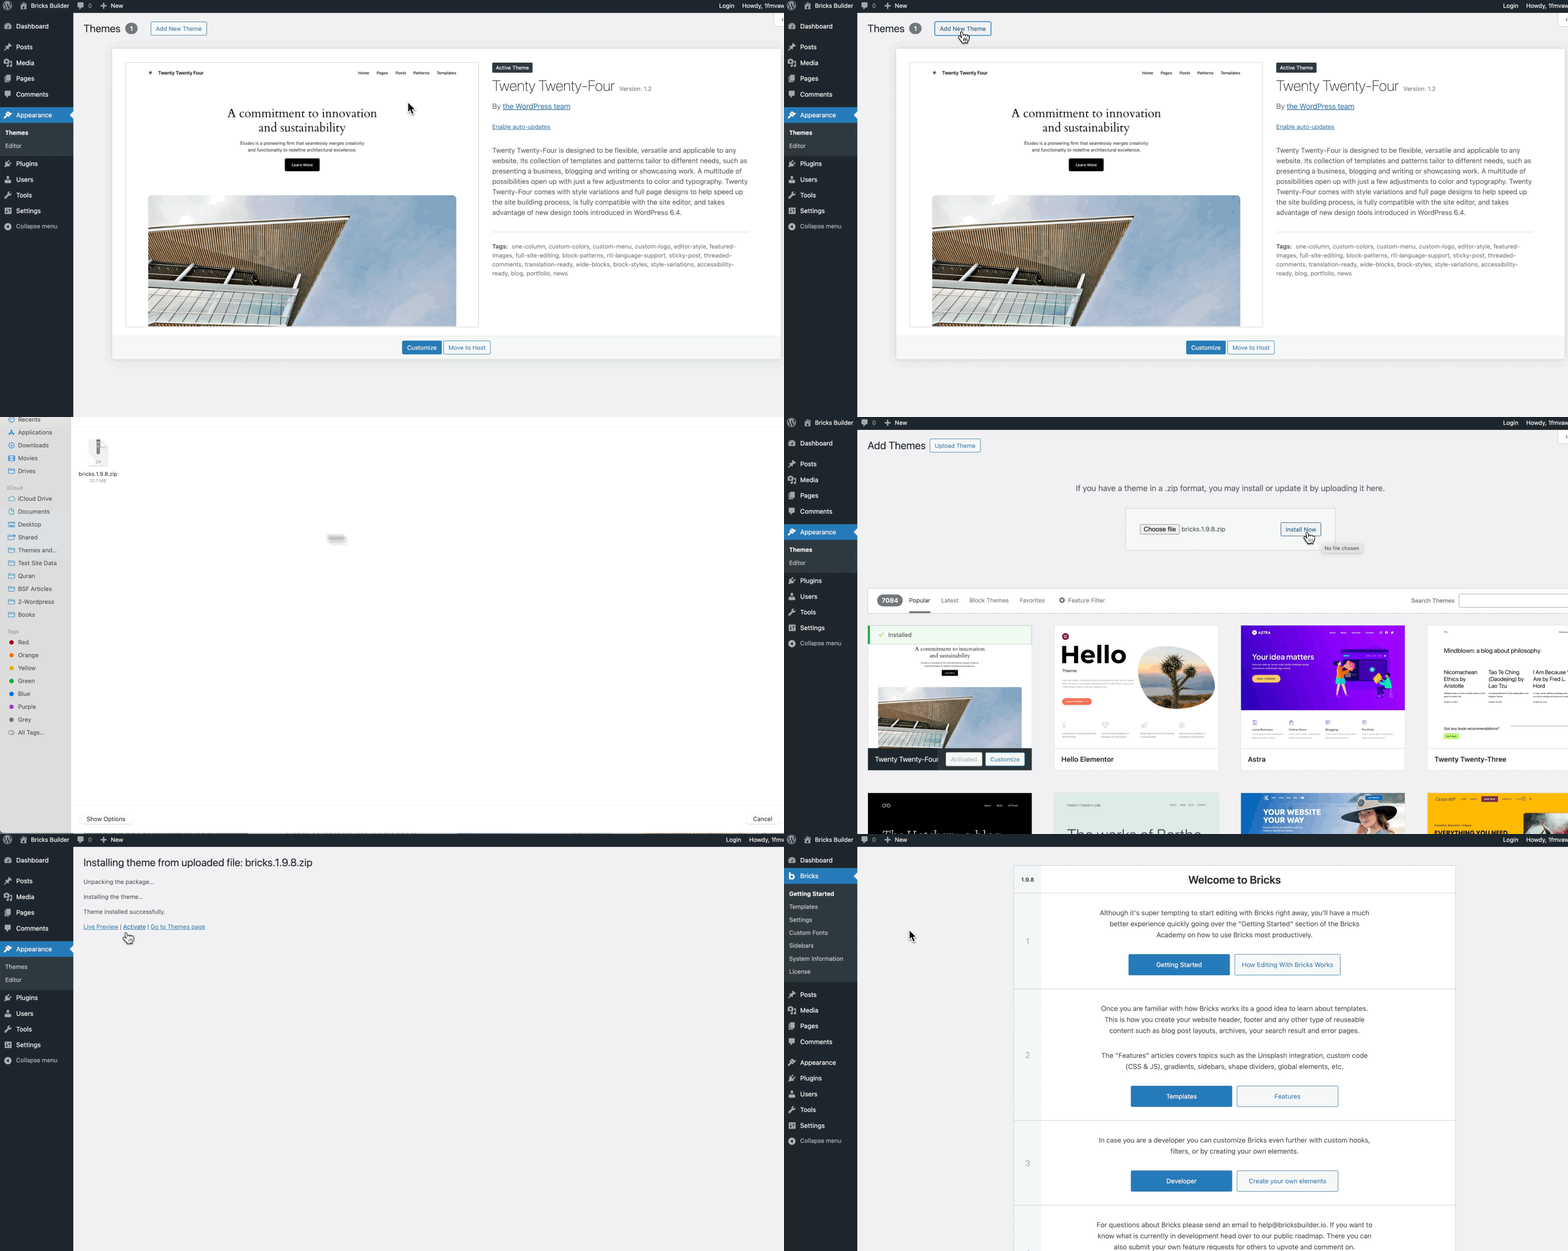
Don’t forget to activate your copy! Enter your license key under Bricks > License in your WordPress admin.
And that’s it – your Bricks Builder is ready to go!
Now, let’s add CartFlows to your site and turn it into a sales powerhouse.
Set Up CartFlows
CartFlows is your go-to sales funnel plugin that can set up your entire eCommerce site in no time.
Ready to get started? We’ll guide you through it step by step.
You can start with the free version of CartFlows, available directly on WordPress.
For more advanced features and an ultimate toolkit, you can upgrade to CartFlows Pro.
Since we’re unlocking the full potential of CartFlows and Bricks integration, we’ll be working with CartFlows Pro in this guide.
Let’s install the free version of CartFlows:
- Head over to your WordPress dashboard.
- Go to Plugins > Add New.
- Search for “CartFlows”, and click Install and Activate when the options appear.
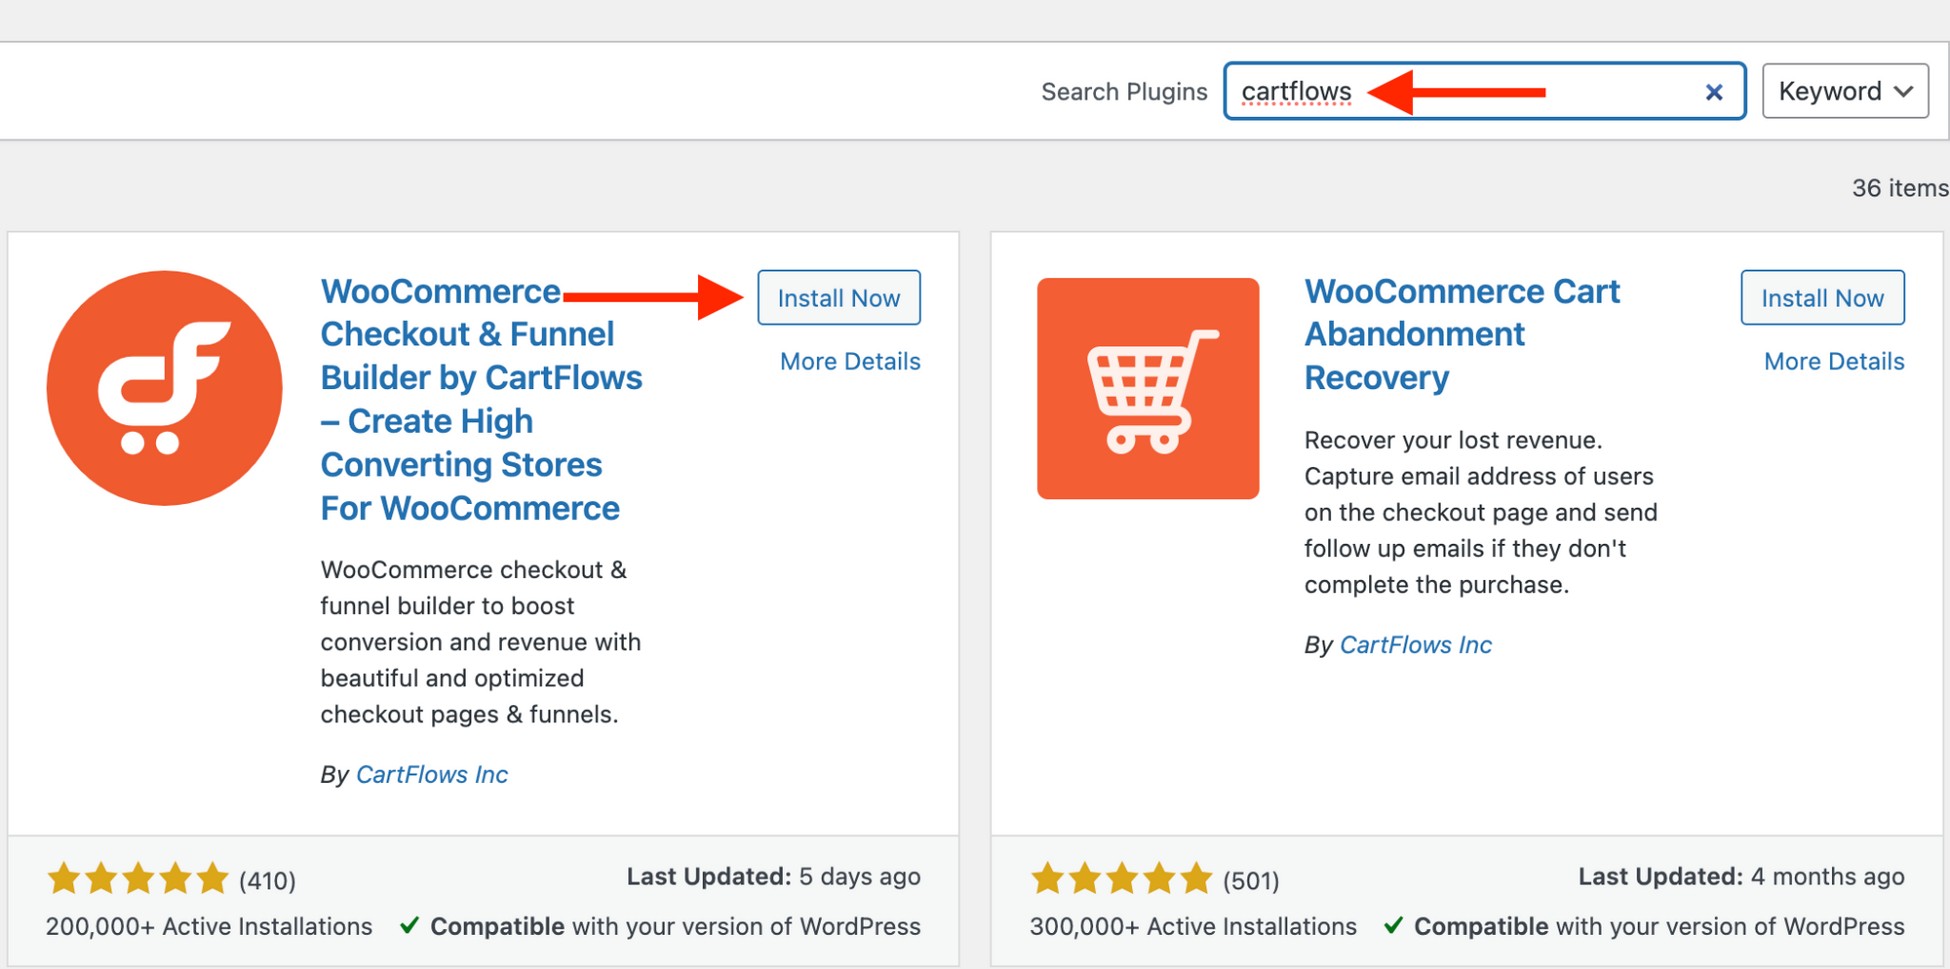
Once activated, the CartFlows setup wizard will guide you through the process. It’s quick, intuitive, and gets everything up and running in minutes.
Here’s what to do:
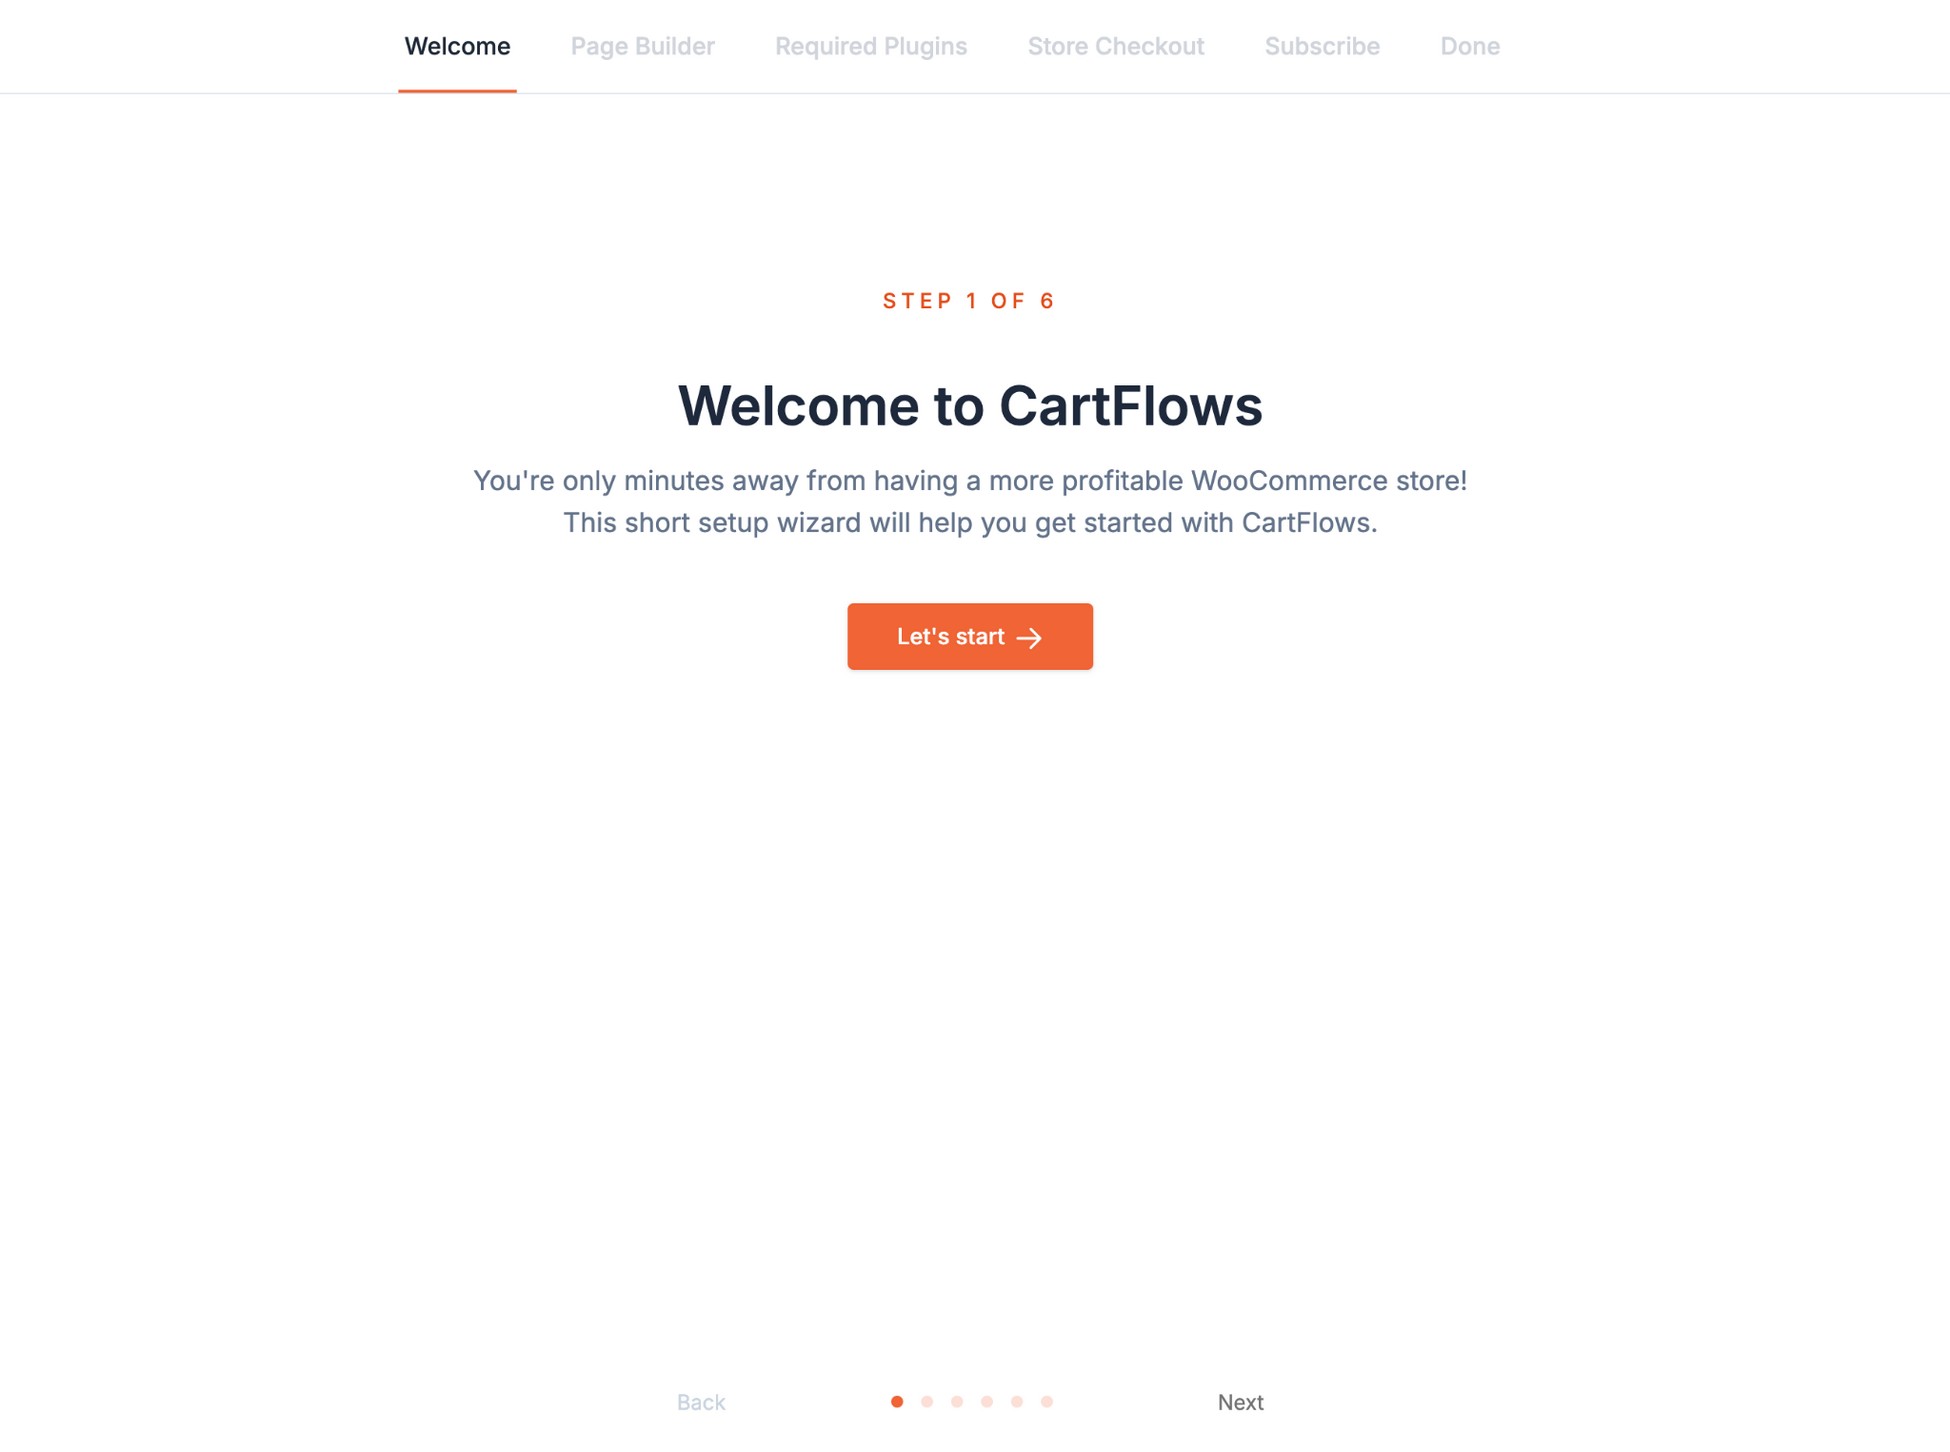
- Click the Let’s Start button to begin the wizard.
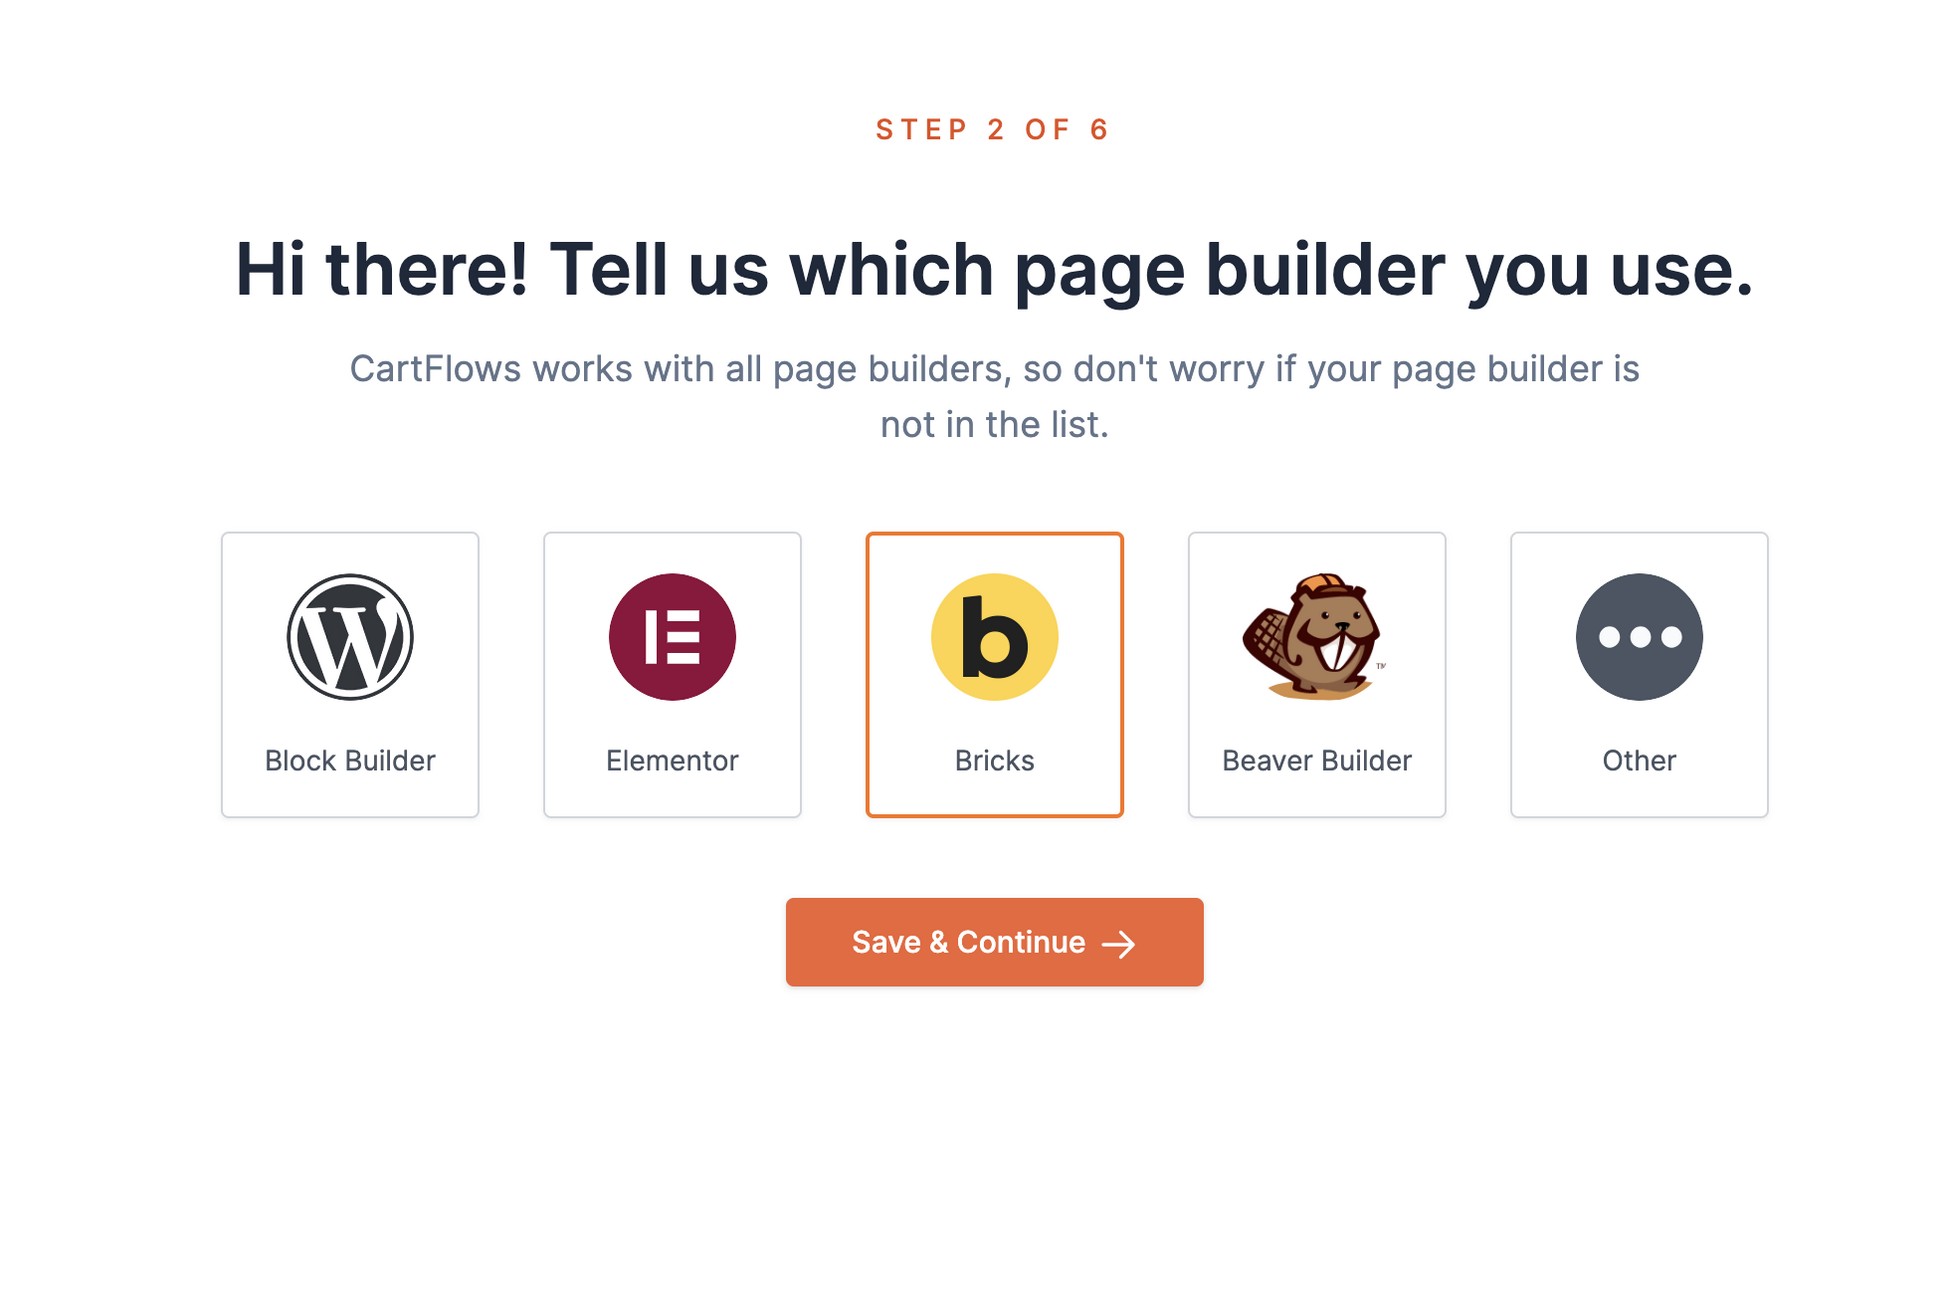
- Select Bricks as your builder and hit Save & Continue.
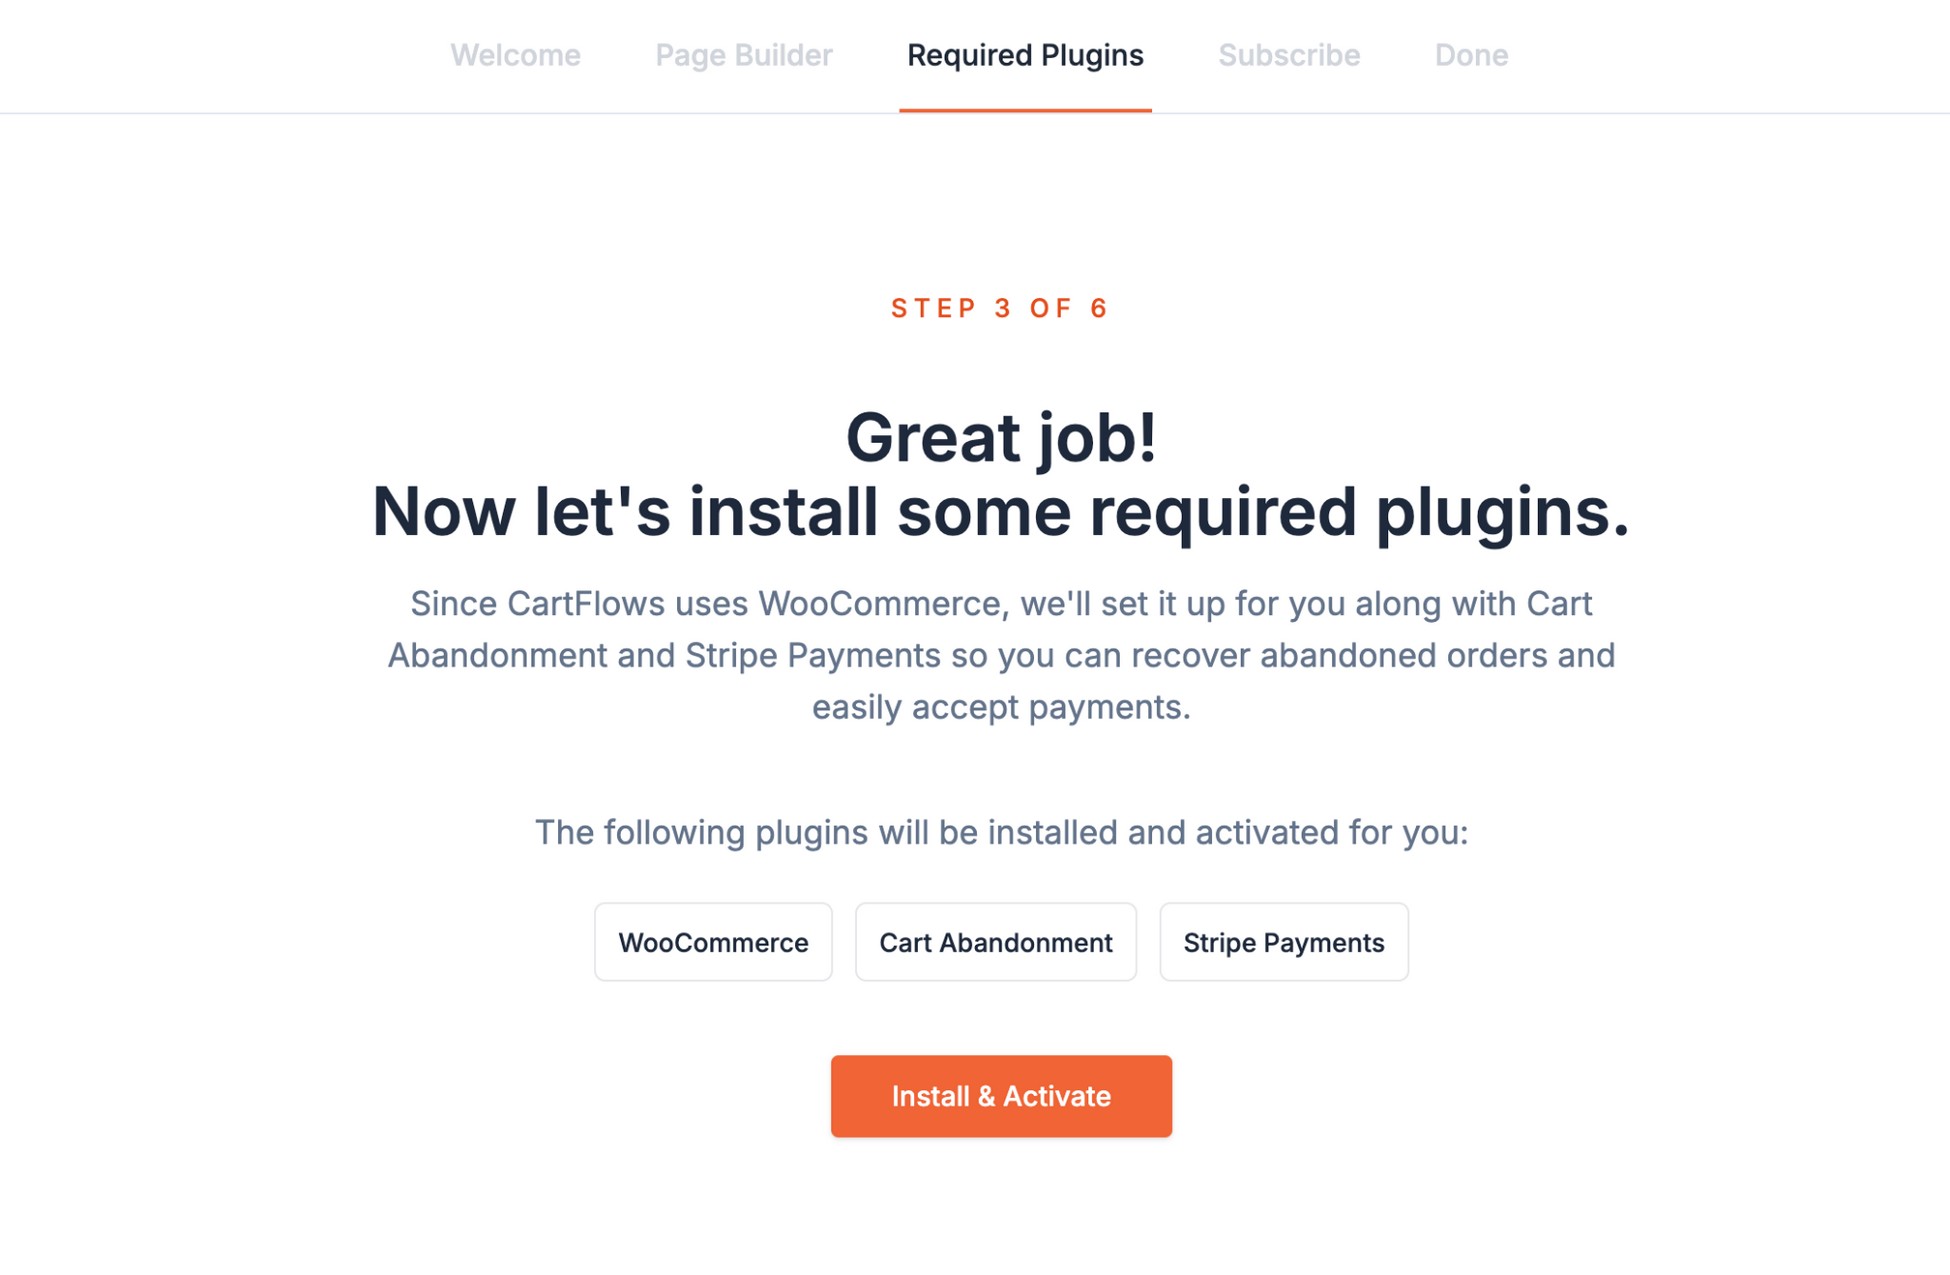
- The wizard will prompt you to install three must-have plugins:
- WooCommerce (mandatory for CartFlows)
- Cart Abandonment (great for recovering lost sales)
- Stripe Payments (a must for smooth payment management)
Click Install & Activate to set these up in one go.
- Add your name and email address. Trust us, this step is worth it – you’ll get valuable tips and updates sent straight to your inbox.
Once done, click Save & Continue to finish the process.
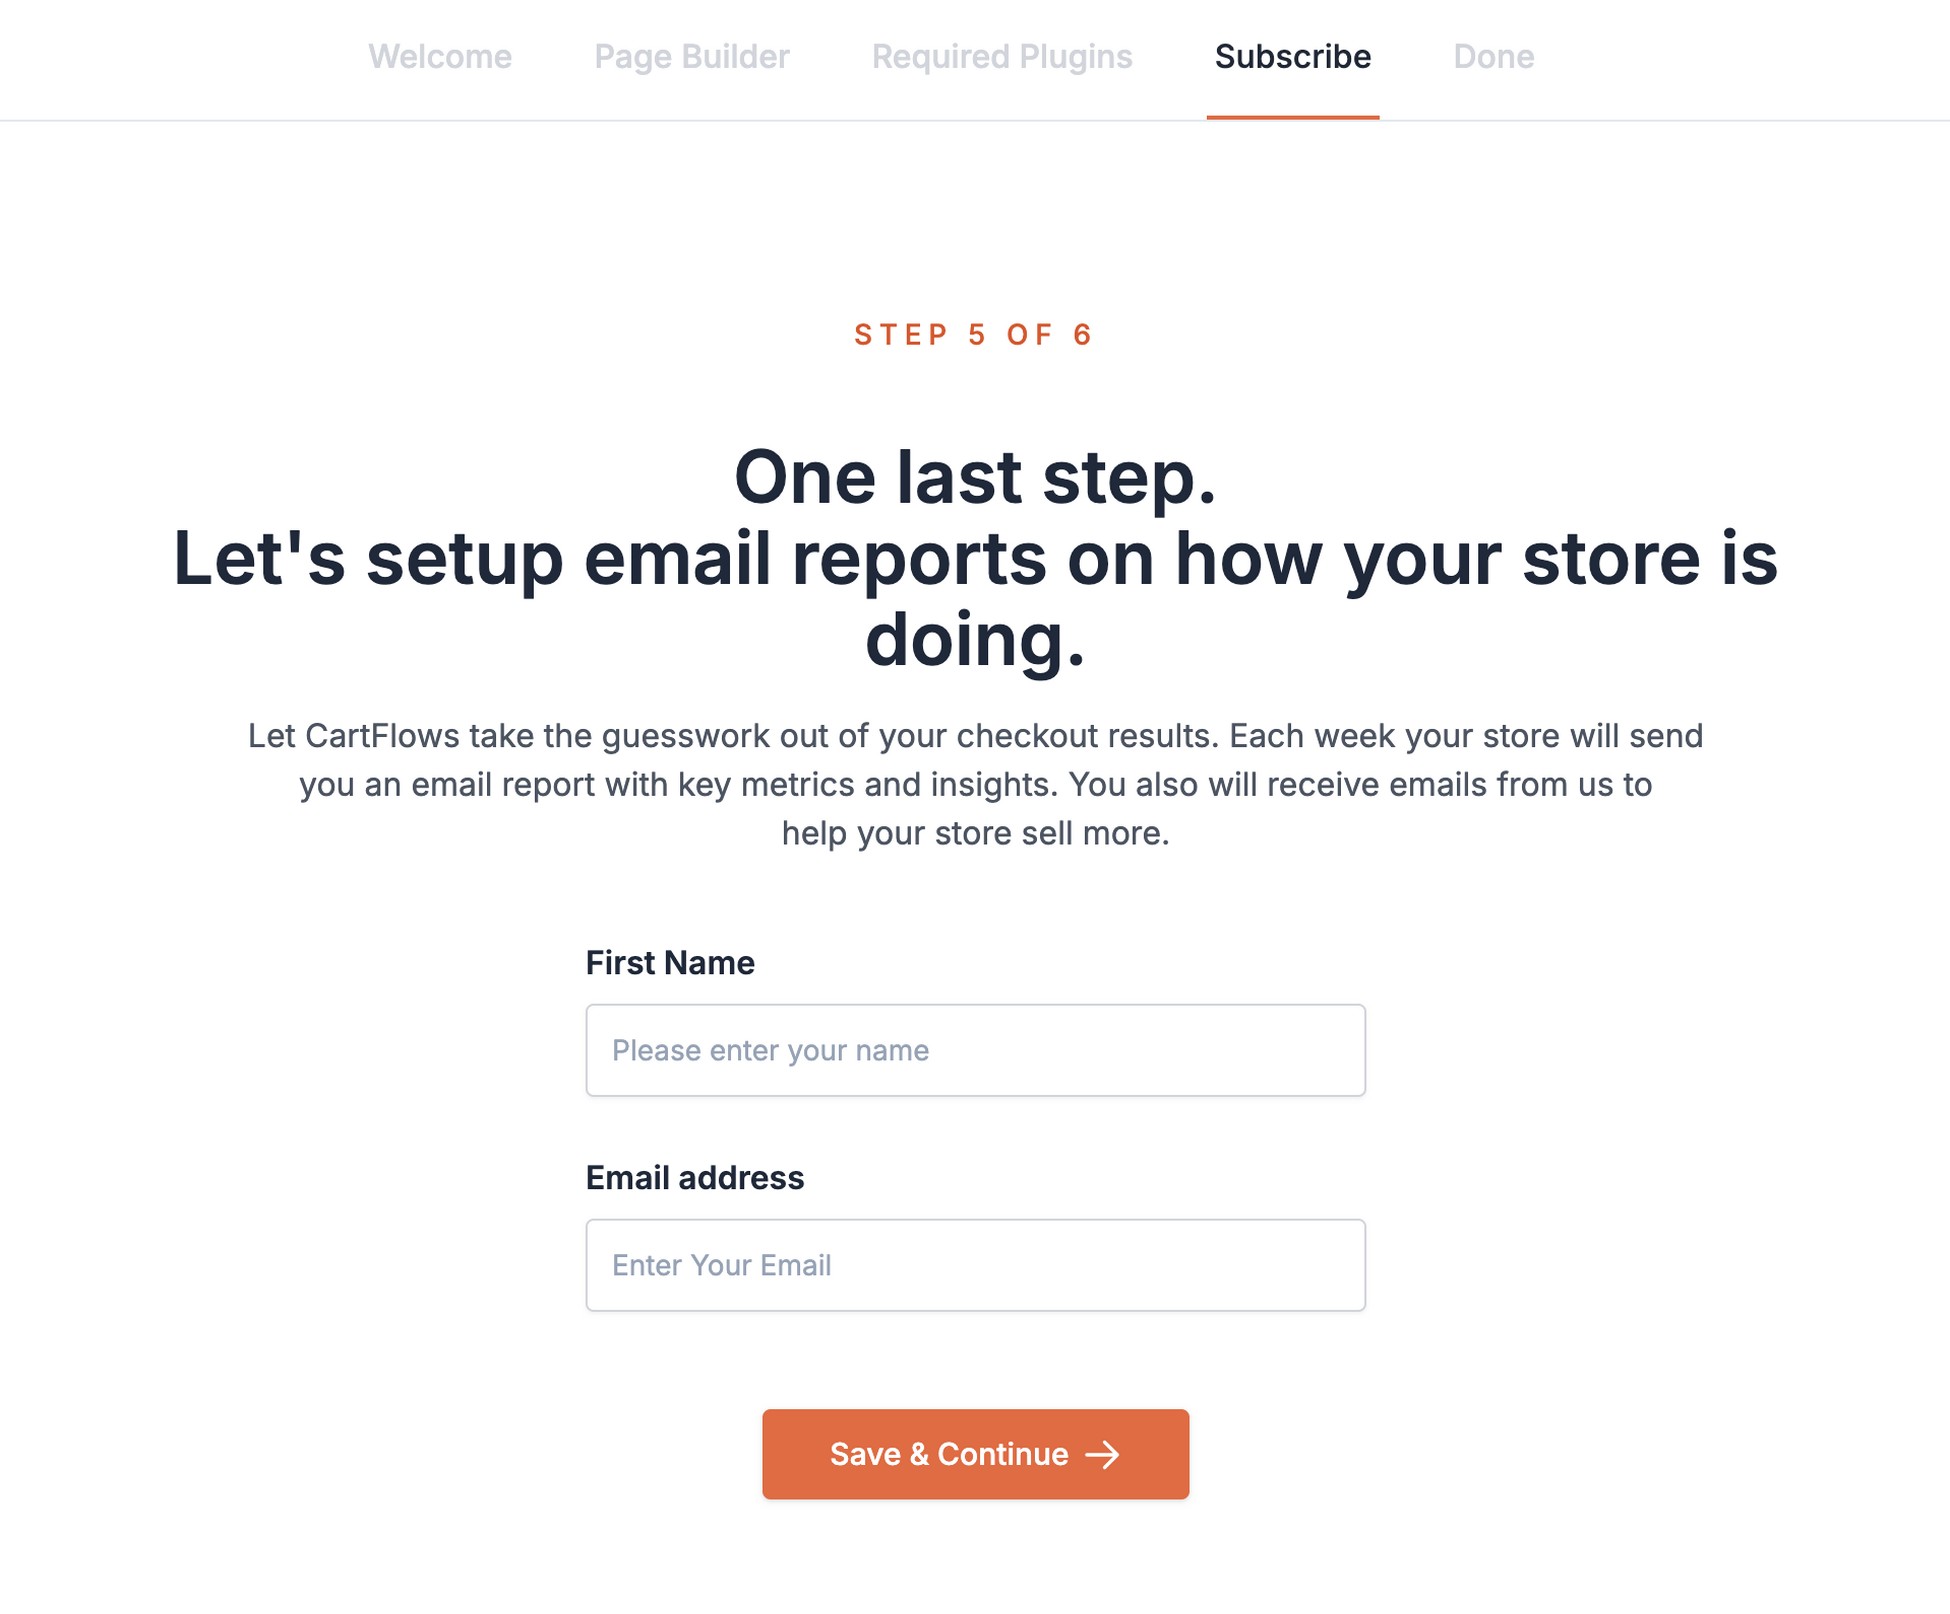
Pro Tip: If you skipped the wizard, don’t worry. You can install the required plugins later from the CartFlows Dashboard.
If you missed the helpful video at the end of the setup wizard, you can watch it anytime here:
Before Creating Your Sales Funnel
Before you jump into building your sales funnels, there are two essential steps:
- 1. Set your store location: WooCommerce should prompt you to set your store’s location when you access its menu. If it doesn’t, head over to WooCommerce > Settings > General and enter the location.
- 2. Connect Stripe for payments: If you installed the Stripe for WooCommerce plugin during the CartFlows setup, you’ll see a Connect Stripe Account notification in your WordPress dashboard. Follow the steps to either log in with an existing Stripe account or create a new one. This will ensure customers can pay.

Pro Tip: Want to boost your revenue by offering multiple payment methods? Check out this tutorial for expert tips on making payments easier for your customers.
Now that the groundwork is done, it’s time for creating high-converting sales funnels with Bricks and CartFlows.
Create a Sales Funnel With CartFlows
Creating a sales funnel with CartFlows is super easy. Before we dive in, let’s take a moment to get familiar with the interface.
The CartFlows dashboard is designed with simplicity in mind and features five key sections:
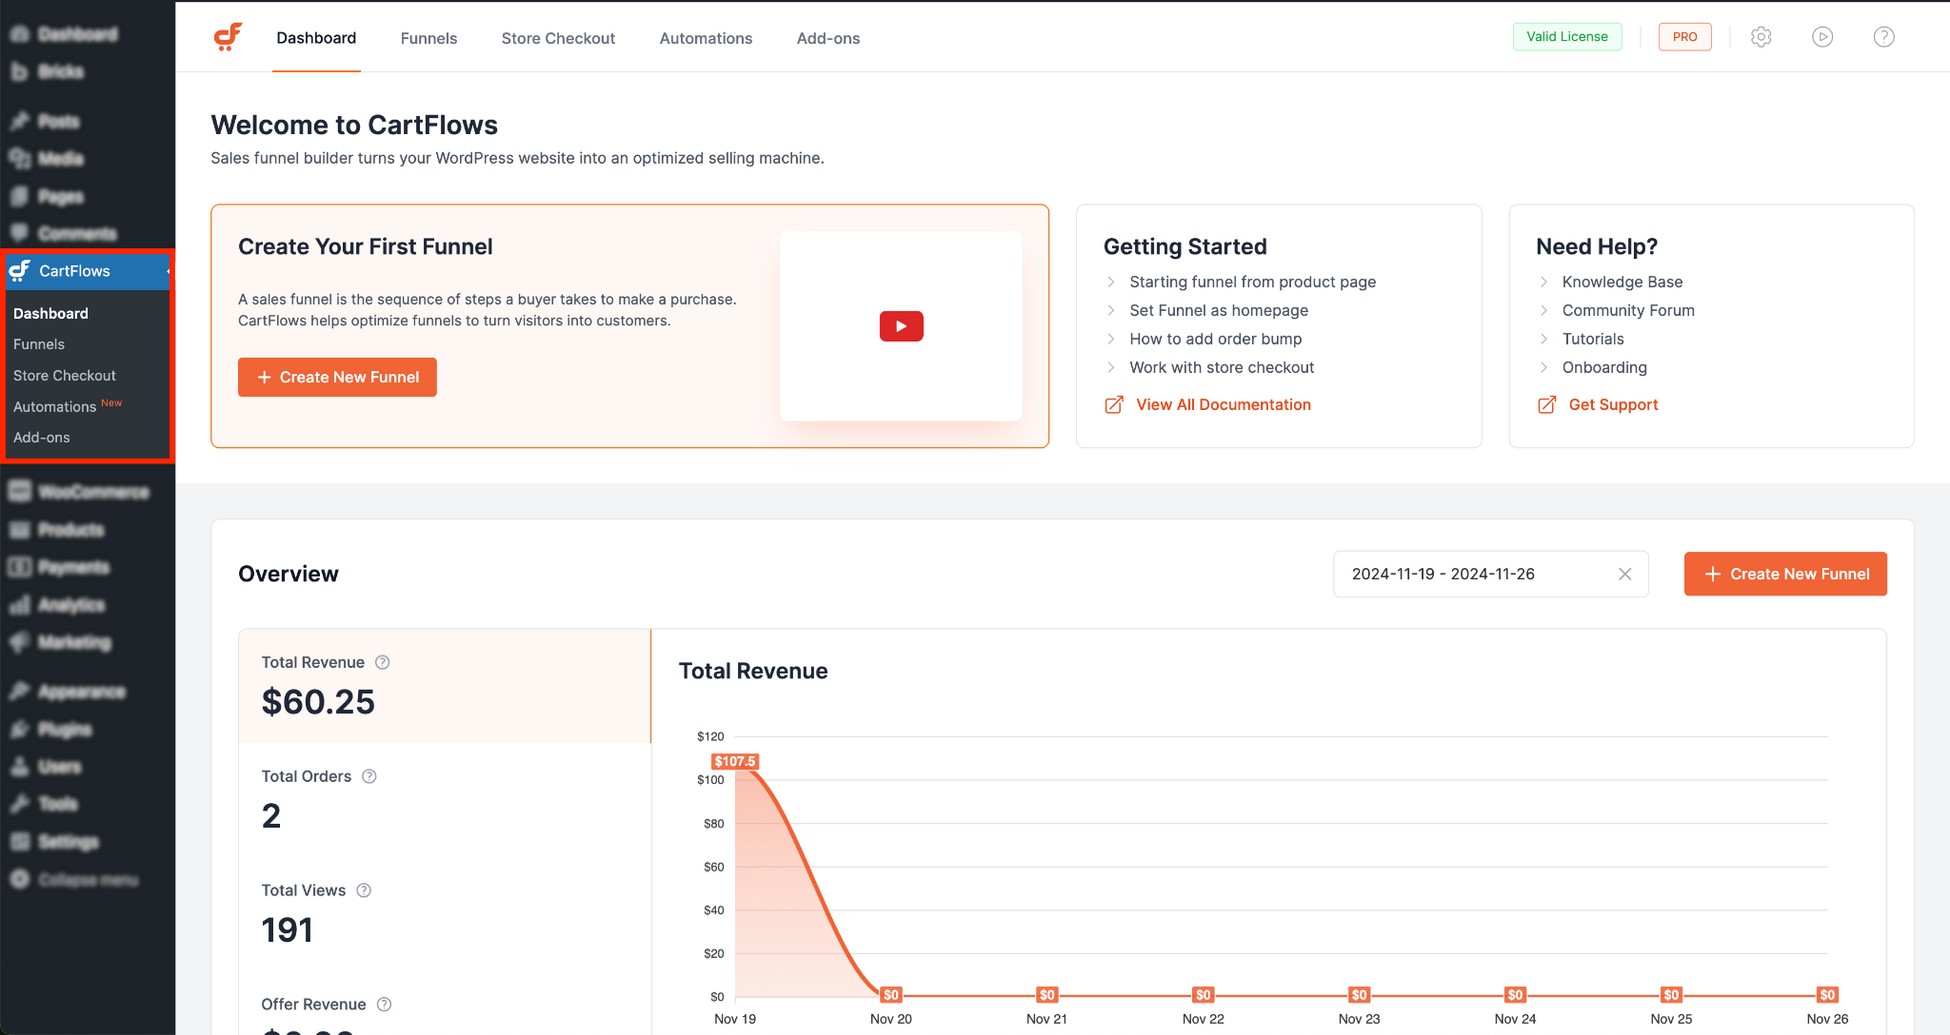
- Dashboard: Get a quick snapshot of your sales funnel performance and access handy shortcuts.
- Funnels: The heart of the action! Create and manage custom sales funnels right here.
- Store Checkout: Replace and customize WooCommerce’s default checkout with a funnel-driven experience.
- Automations: Seamlessly connect CartFlows and WooCommerce with external tools using OttoKit.
- Addons: Unlock additional features to supercharge your WooCommerce store.
Let’s create your test sales funnel
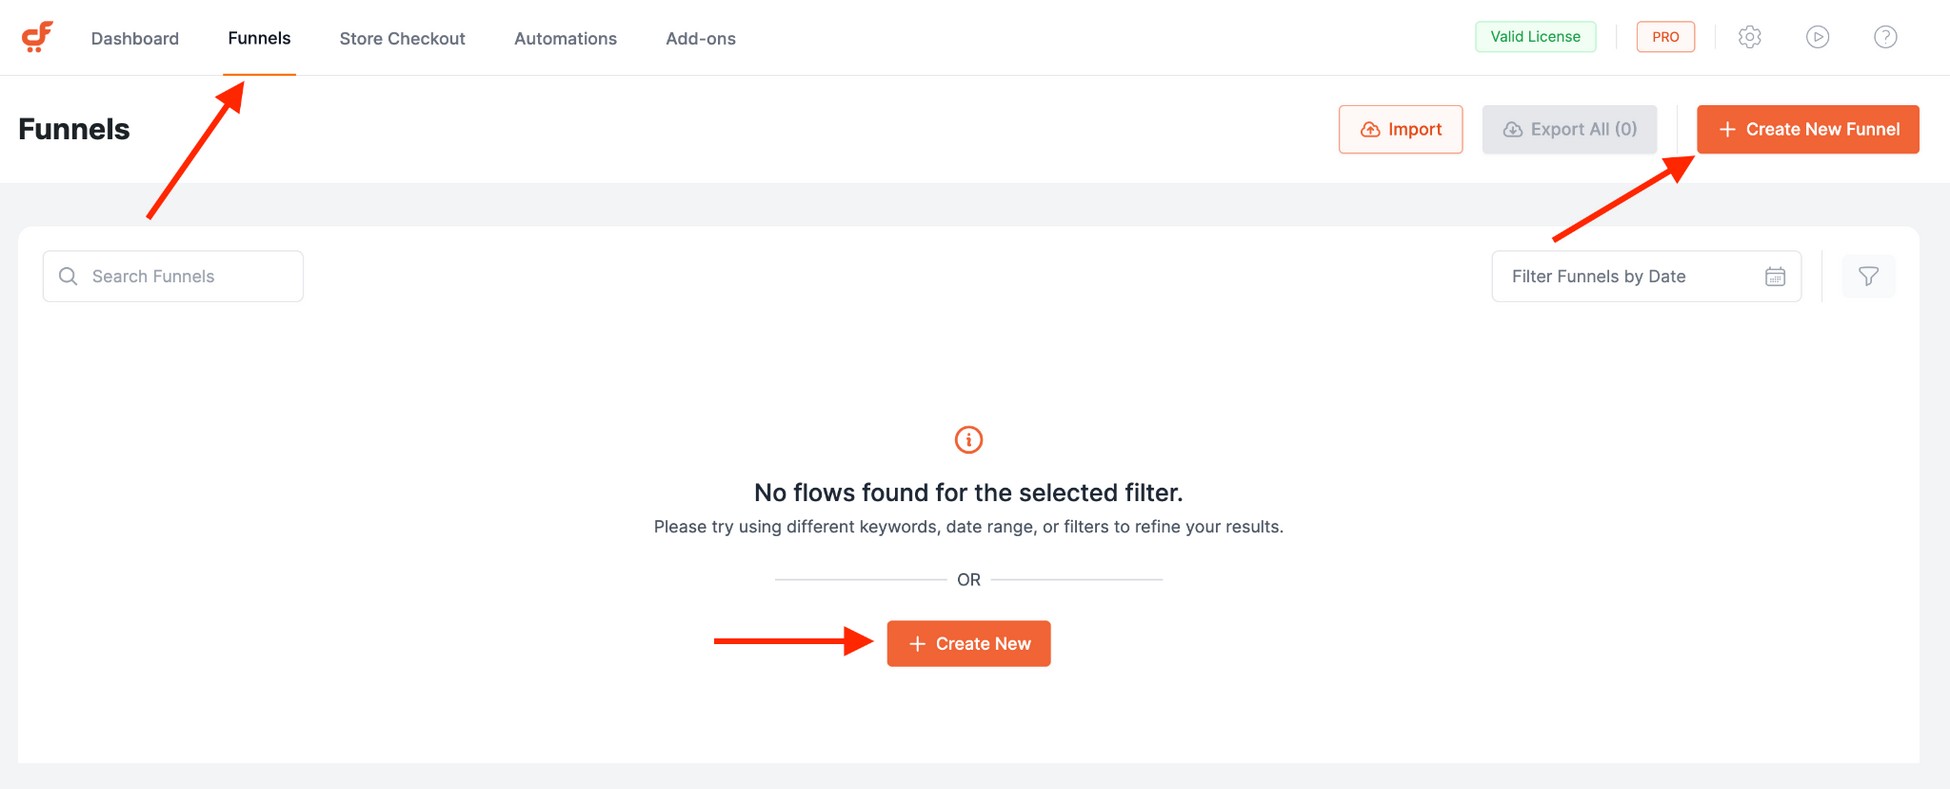
Go to CartFlows > Funnels and click the + Create New Funnel button.
Next, add the products you’d like to feature in your funnel.
Once your funnel is set up, it’s time to tailor the flow to suit your business needs.
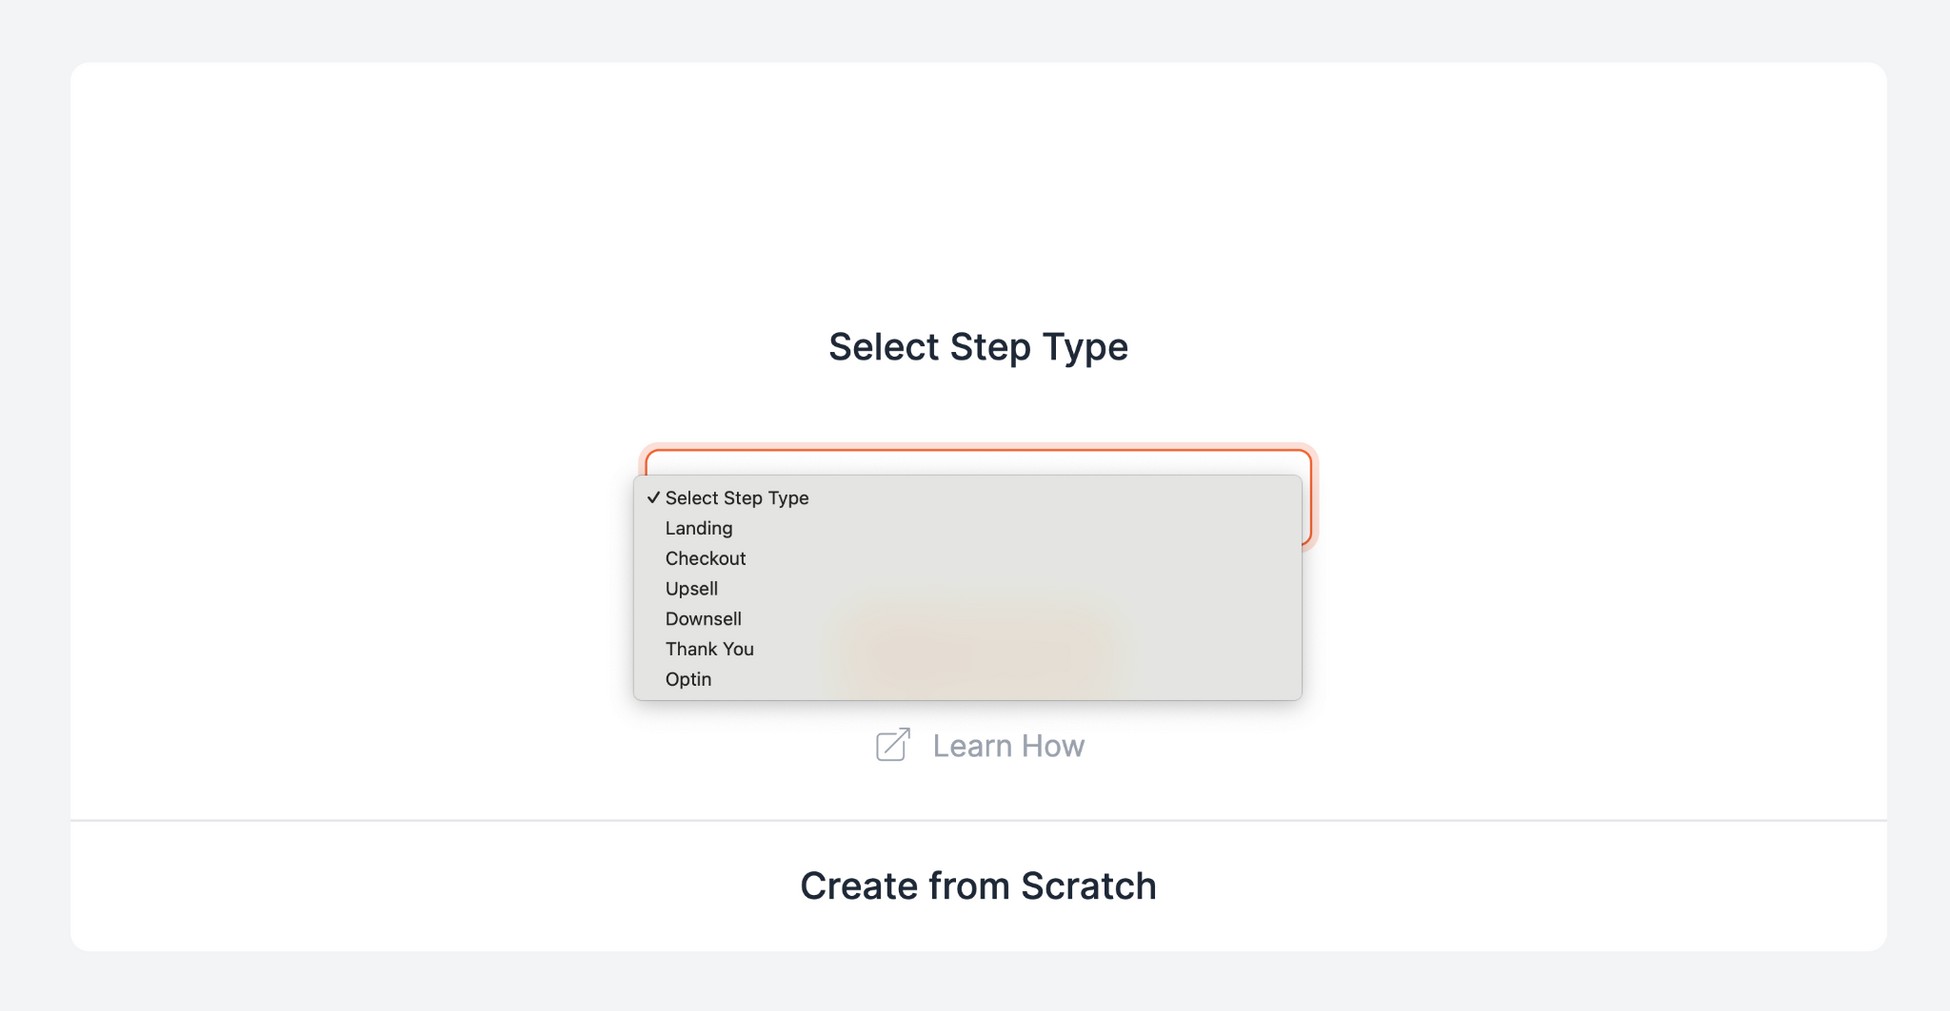
You can easily add multiple steps like upsells, downsells, opt-ins, or custom checkout pages.
Rearranging the flow is a breeze with simple drag and drop functionality.
When you create a new funnel, CartFlows automatically sets up three default steps:
- Sales Landing
- Checkout
- Thank You
But that’s just the beginning. You can add as many steps as you like.
Click + Add New Step, then choose the step type you need from the options.
Since this tutorial is all about showcasing the magic of CartFlows and Bricks Builder together, we’ll focus on steps that highlight their integration.
Customize a Sales Funnel
Using CartFlows with Bricks Builder unlocks endless customization possibilities for sales funnels.
Let’s walk through how to get started.
Dynamic Content
With the Dynamic Content Tag feature in Bricks, you can link any button or text to seamlessly load the next step in your funnel.
Let’s set it up.
Open your sales funnel and locate the Sales Landing Page step.
Click the Edit icon to open the page in the Bricks editor.

For our test landing page, we added a few simple elements: an image, a heading, and a button.
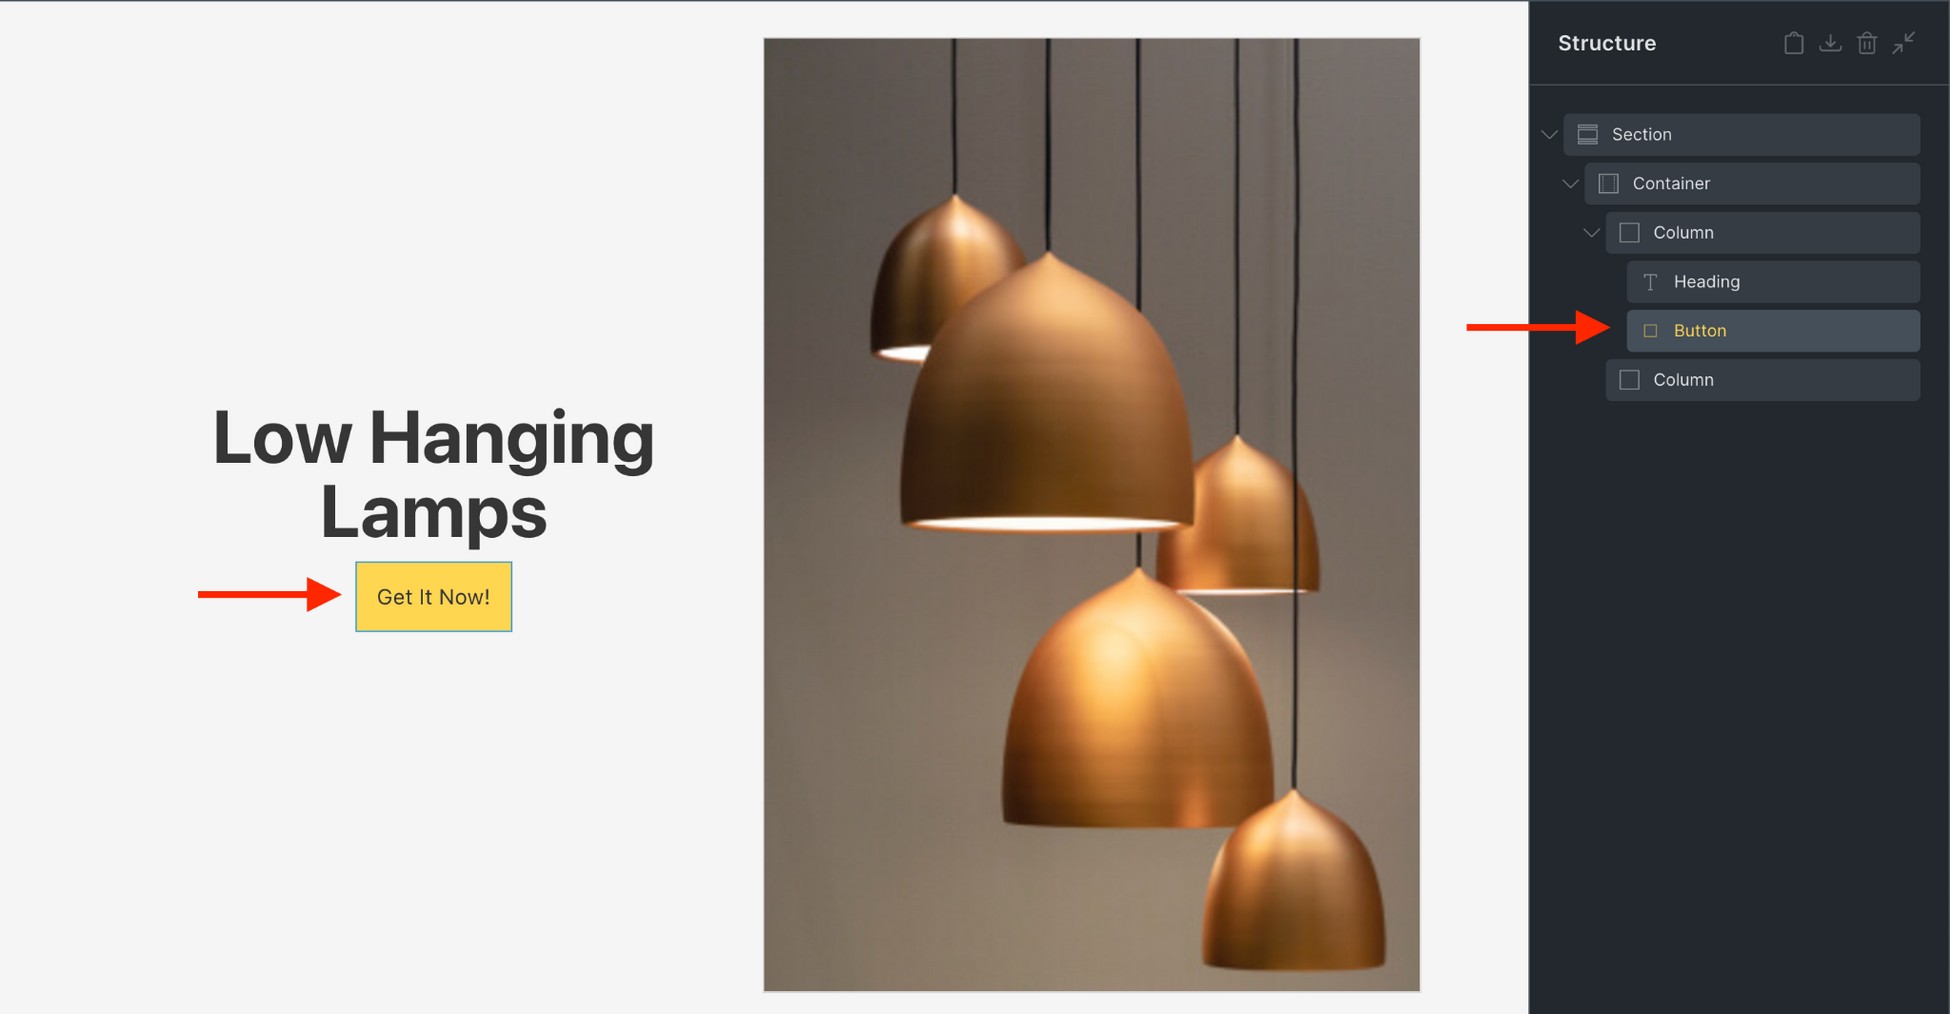
Now, follow these steps to make your button dynamic:
- Select the button element and go to the Content tab in the settings panel on the left.
- From the Link Type dropdown, choose Dynamic Data.
- In the field below, select Next Step as the tag.
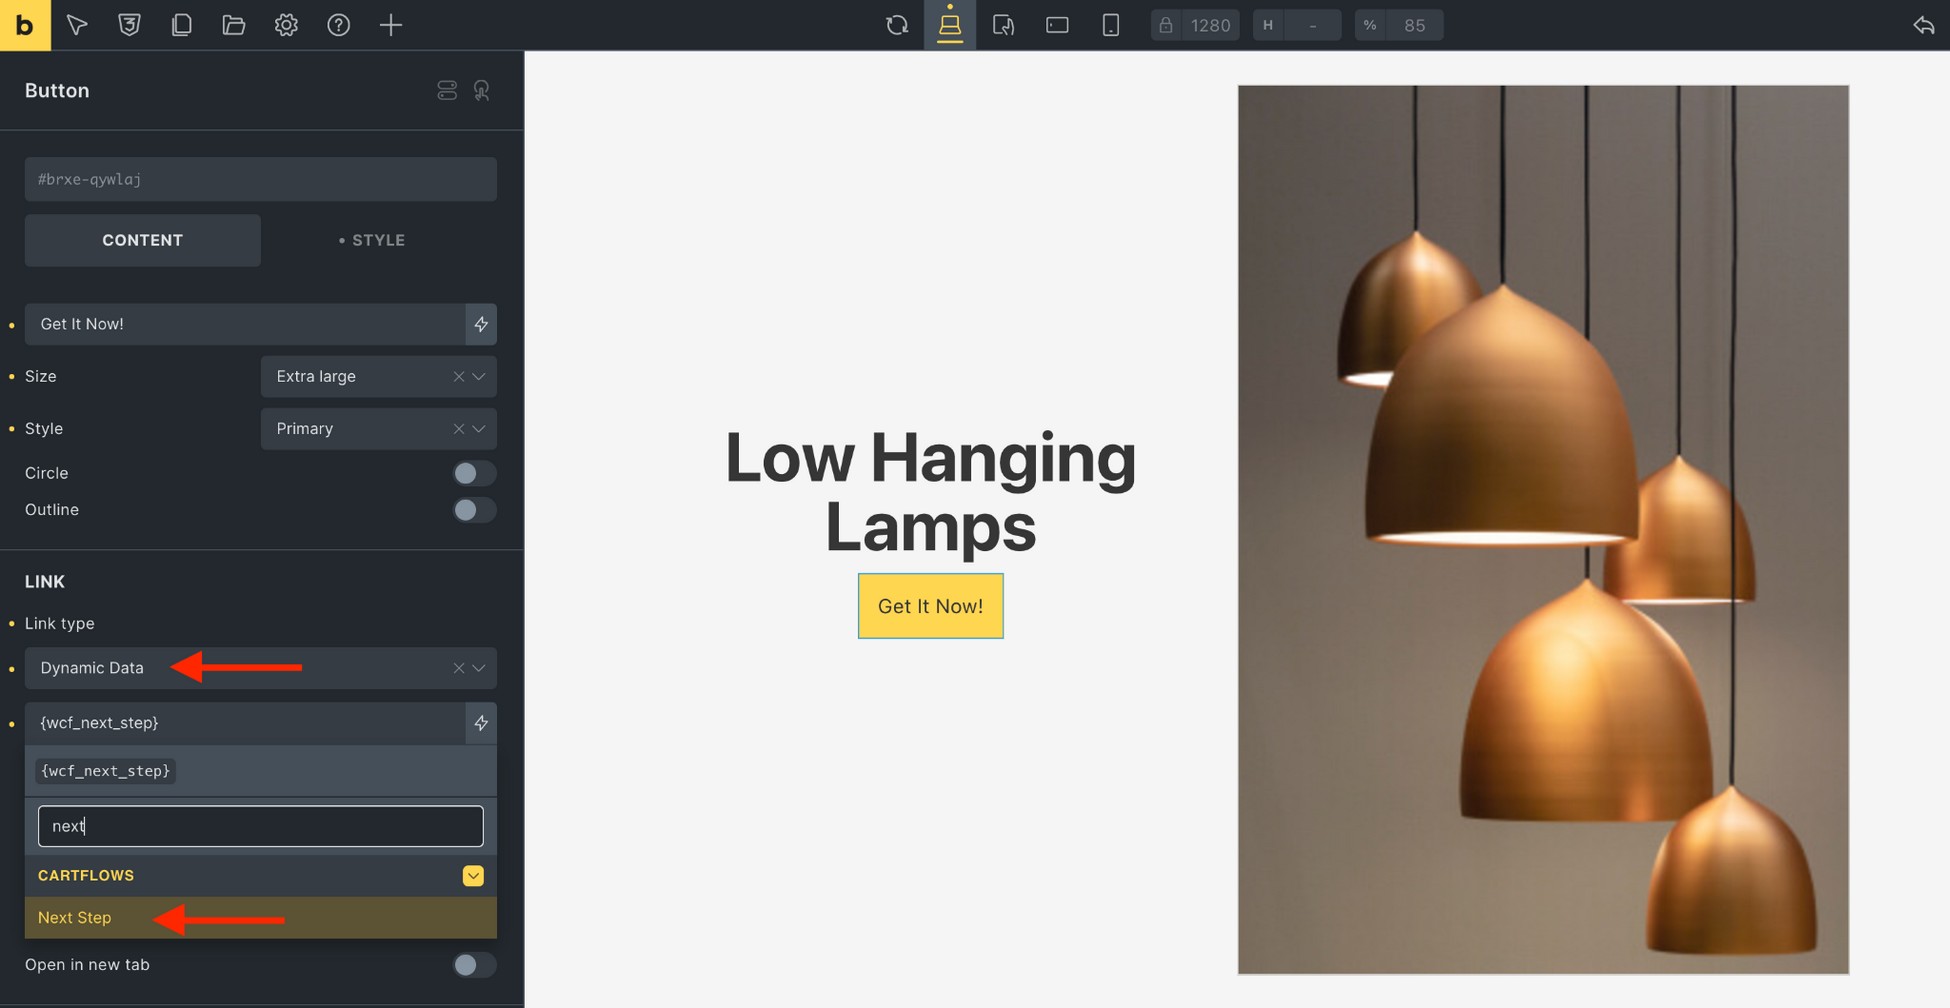
- Save your changes.
Now, when someone clicks the button, it will take them to the next step in your funnel.
Test it out on the front end to see the magic in action.
Pro Tip: Save time by using Bricks’ premade templates. Customize them to match your branding and goals – it’s quick, easy, and looks great!
Checkout Form
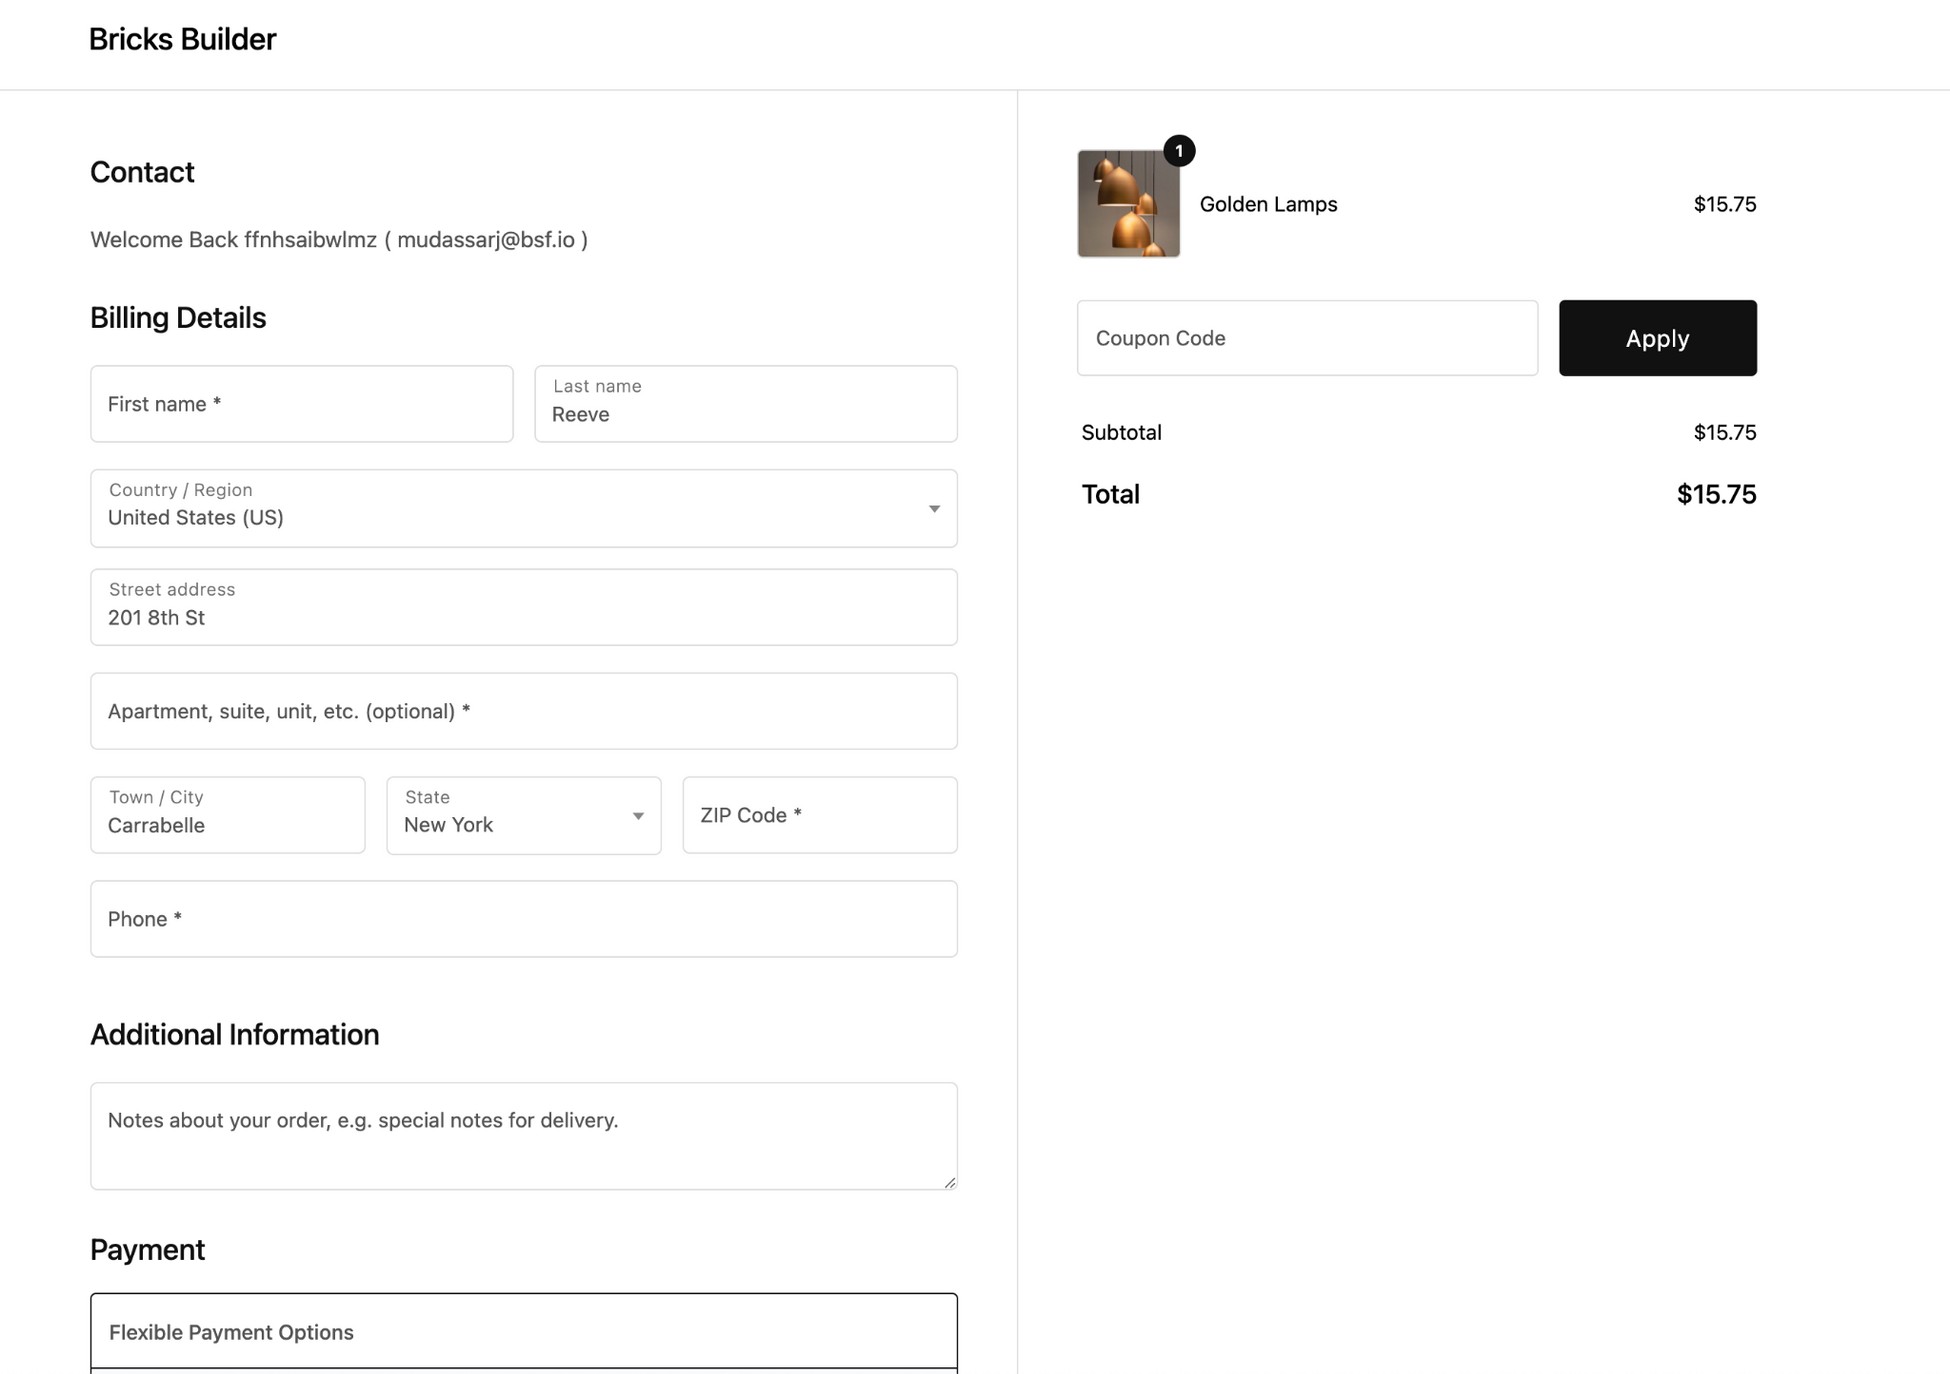
The default checkout form in your sales funnel uses a two-column layout, but you can easily change it to suit your needs.
By default, editing checkout steps is disabled when the Instant Layout option is active in CartFlows.
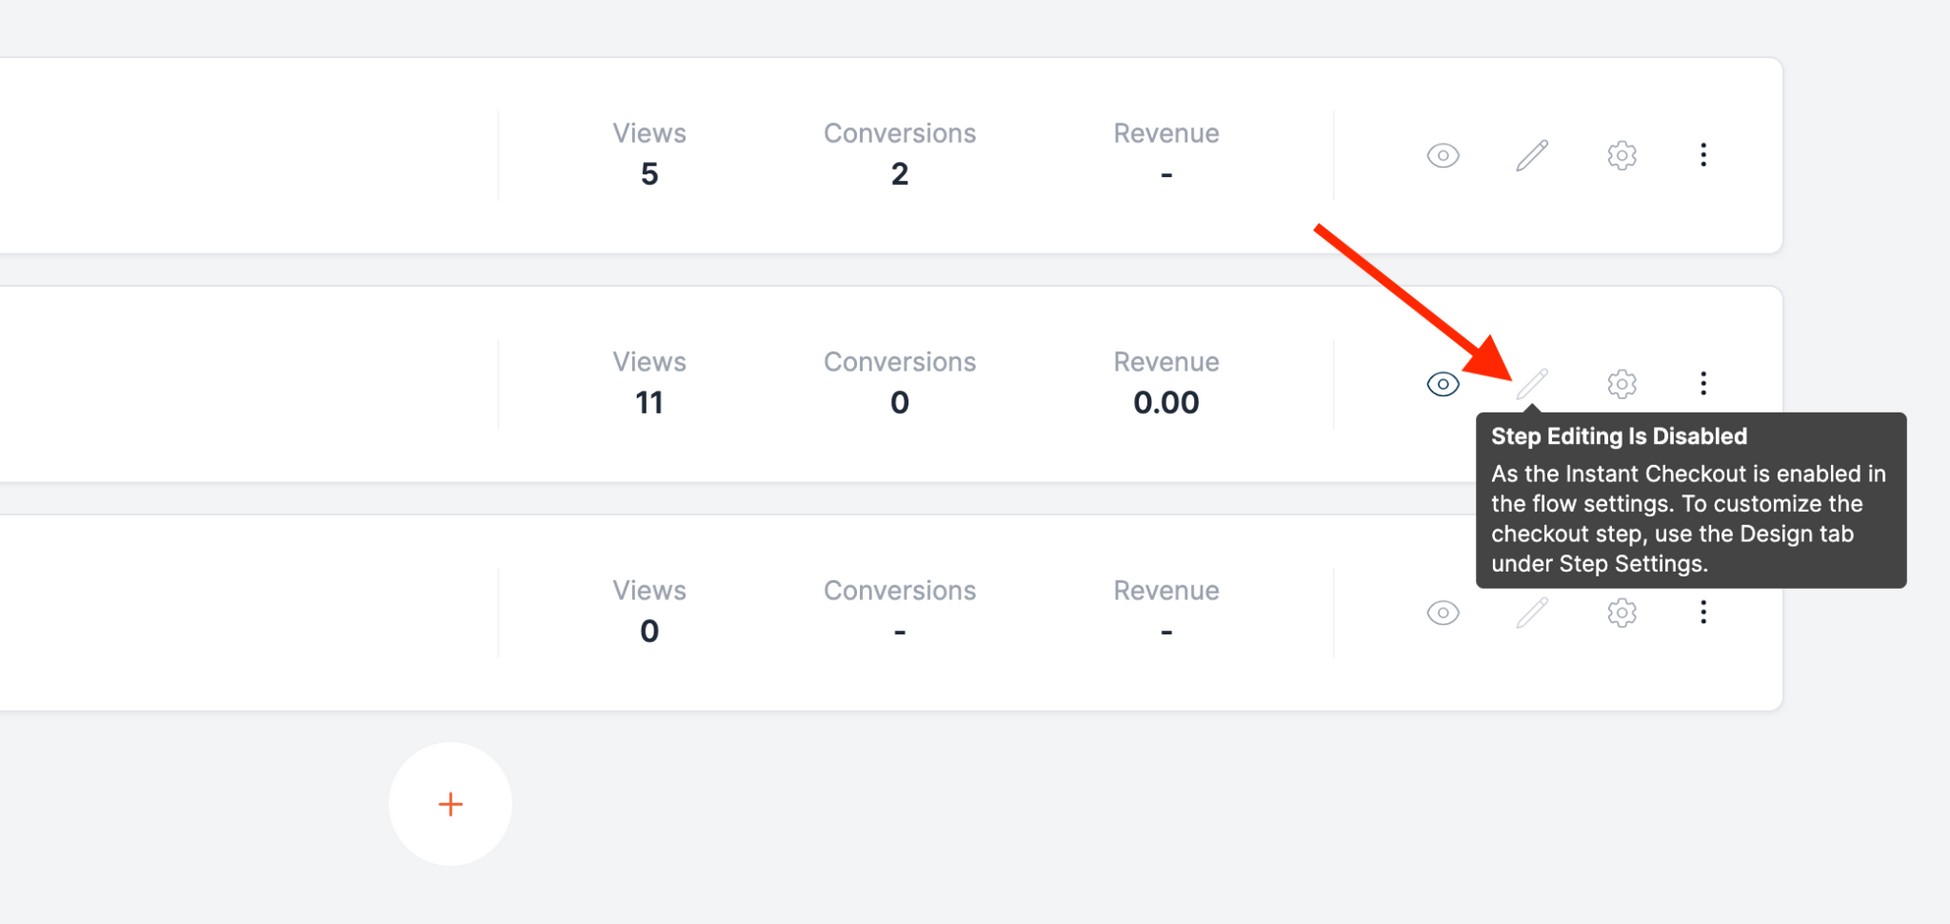
To make changes, you’ll need to disable this setting.
- Click the Open Funnel Settings icon on the right side of your screen.
- In the settings panel, toggle off the Instant Layout option.
- Hit Save, close the panel, and refresh the page to apply the changes.
Now you’re ready to edit the checkout step in Bricks!
When you open it for the first time, you’ll see a blank canvas. Don’t worry – it’s time to bring your checkout to life.
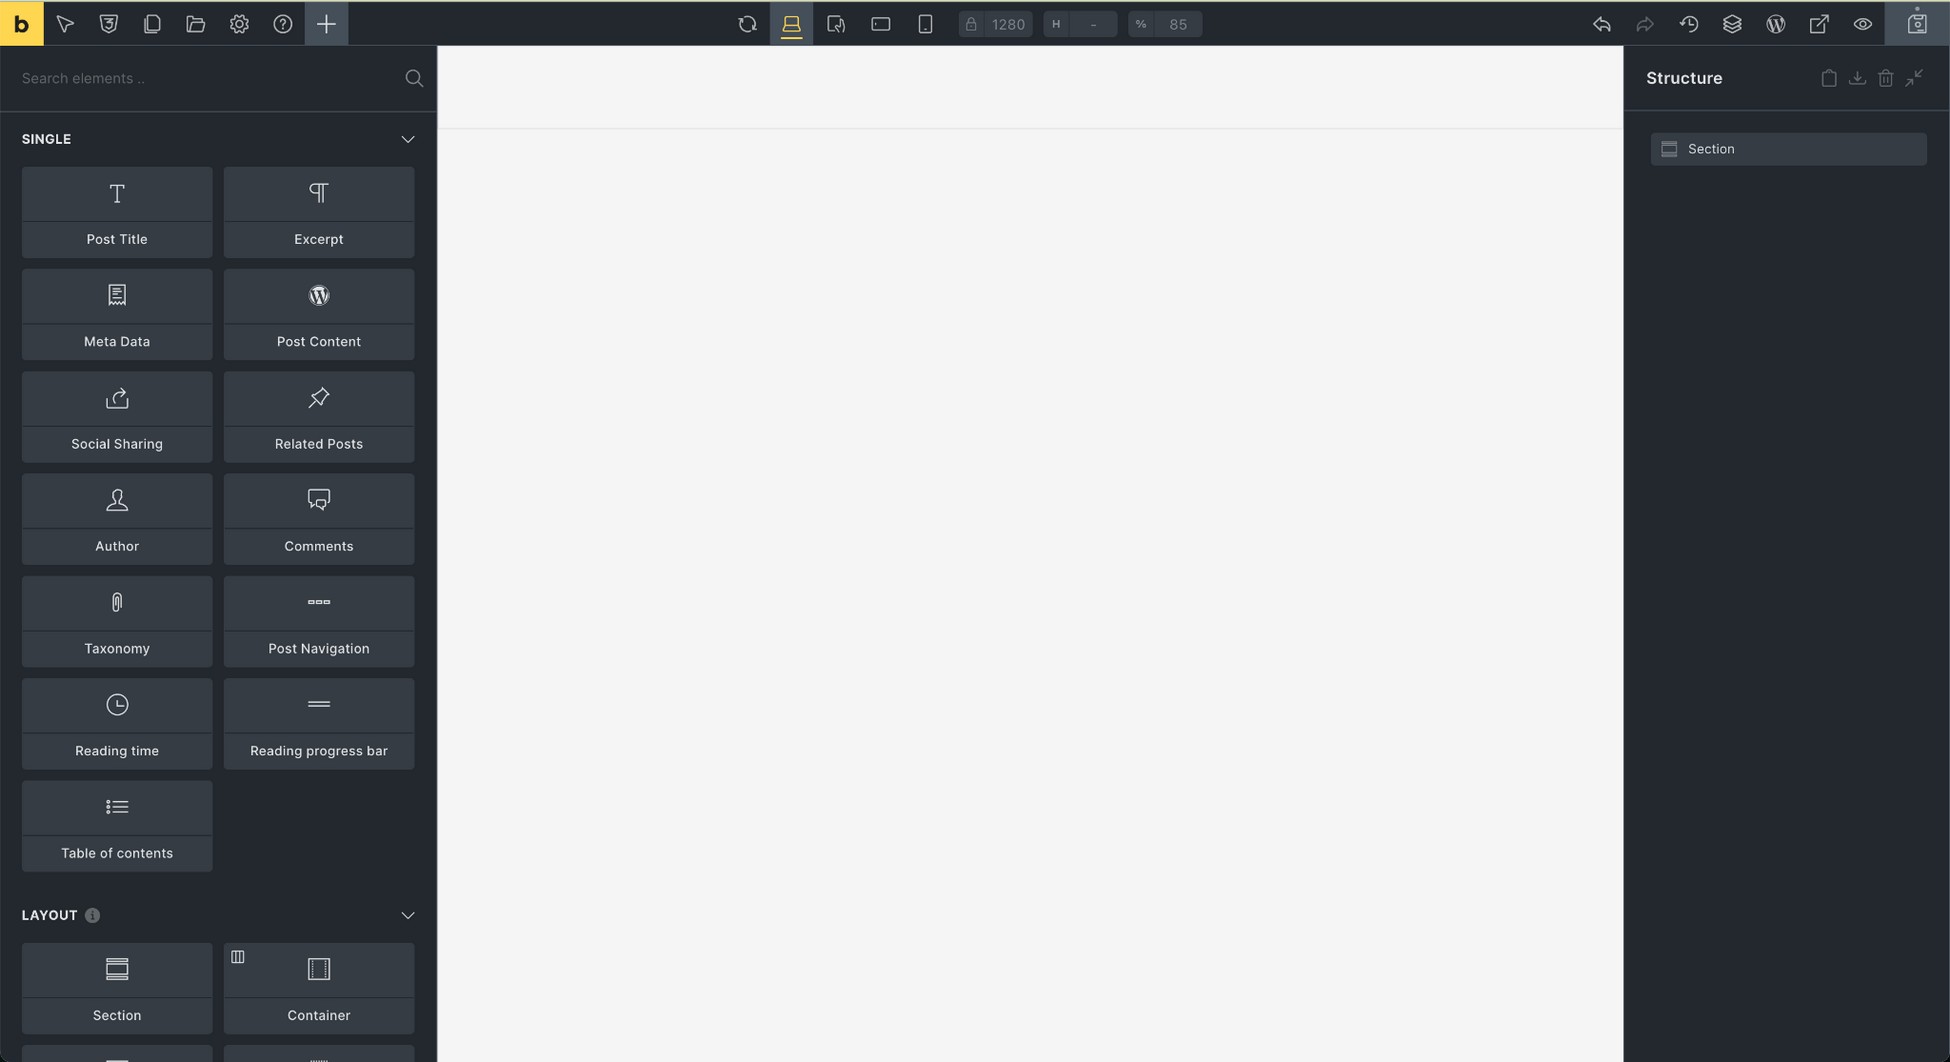
Scroll to the bottom of the elements panel in Bricks and find the CartFlows Checkout Form widget.
Drag the widget onto your canvas.
Here’s how to tweak it:
- Select the form and open the Style tab on the left.
- In the Layout section, adjust margins to match your design.
- Switch to the Content tab and use the Layout dropdown to choose your preferred style.
- Add your unique touch by tweaking colors, fonts, and background styles.
If you want to add or remove fields from your checkout form you can do it from the CartFlows interface.
- Open the Checkout Step Settings for your funnel.

- Navigate to the Checkout Form tab and scroll down to find the Field Editor option.
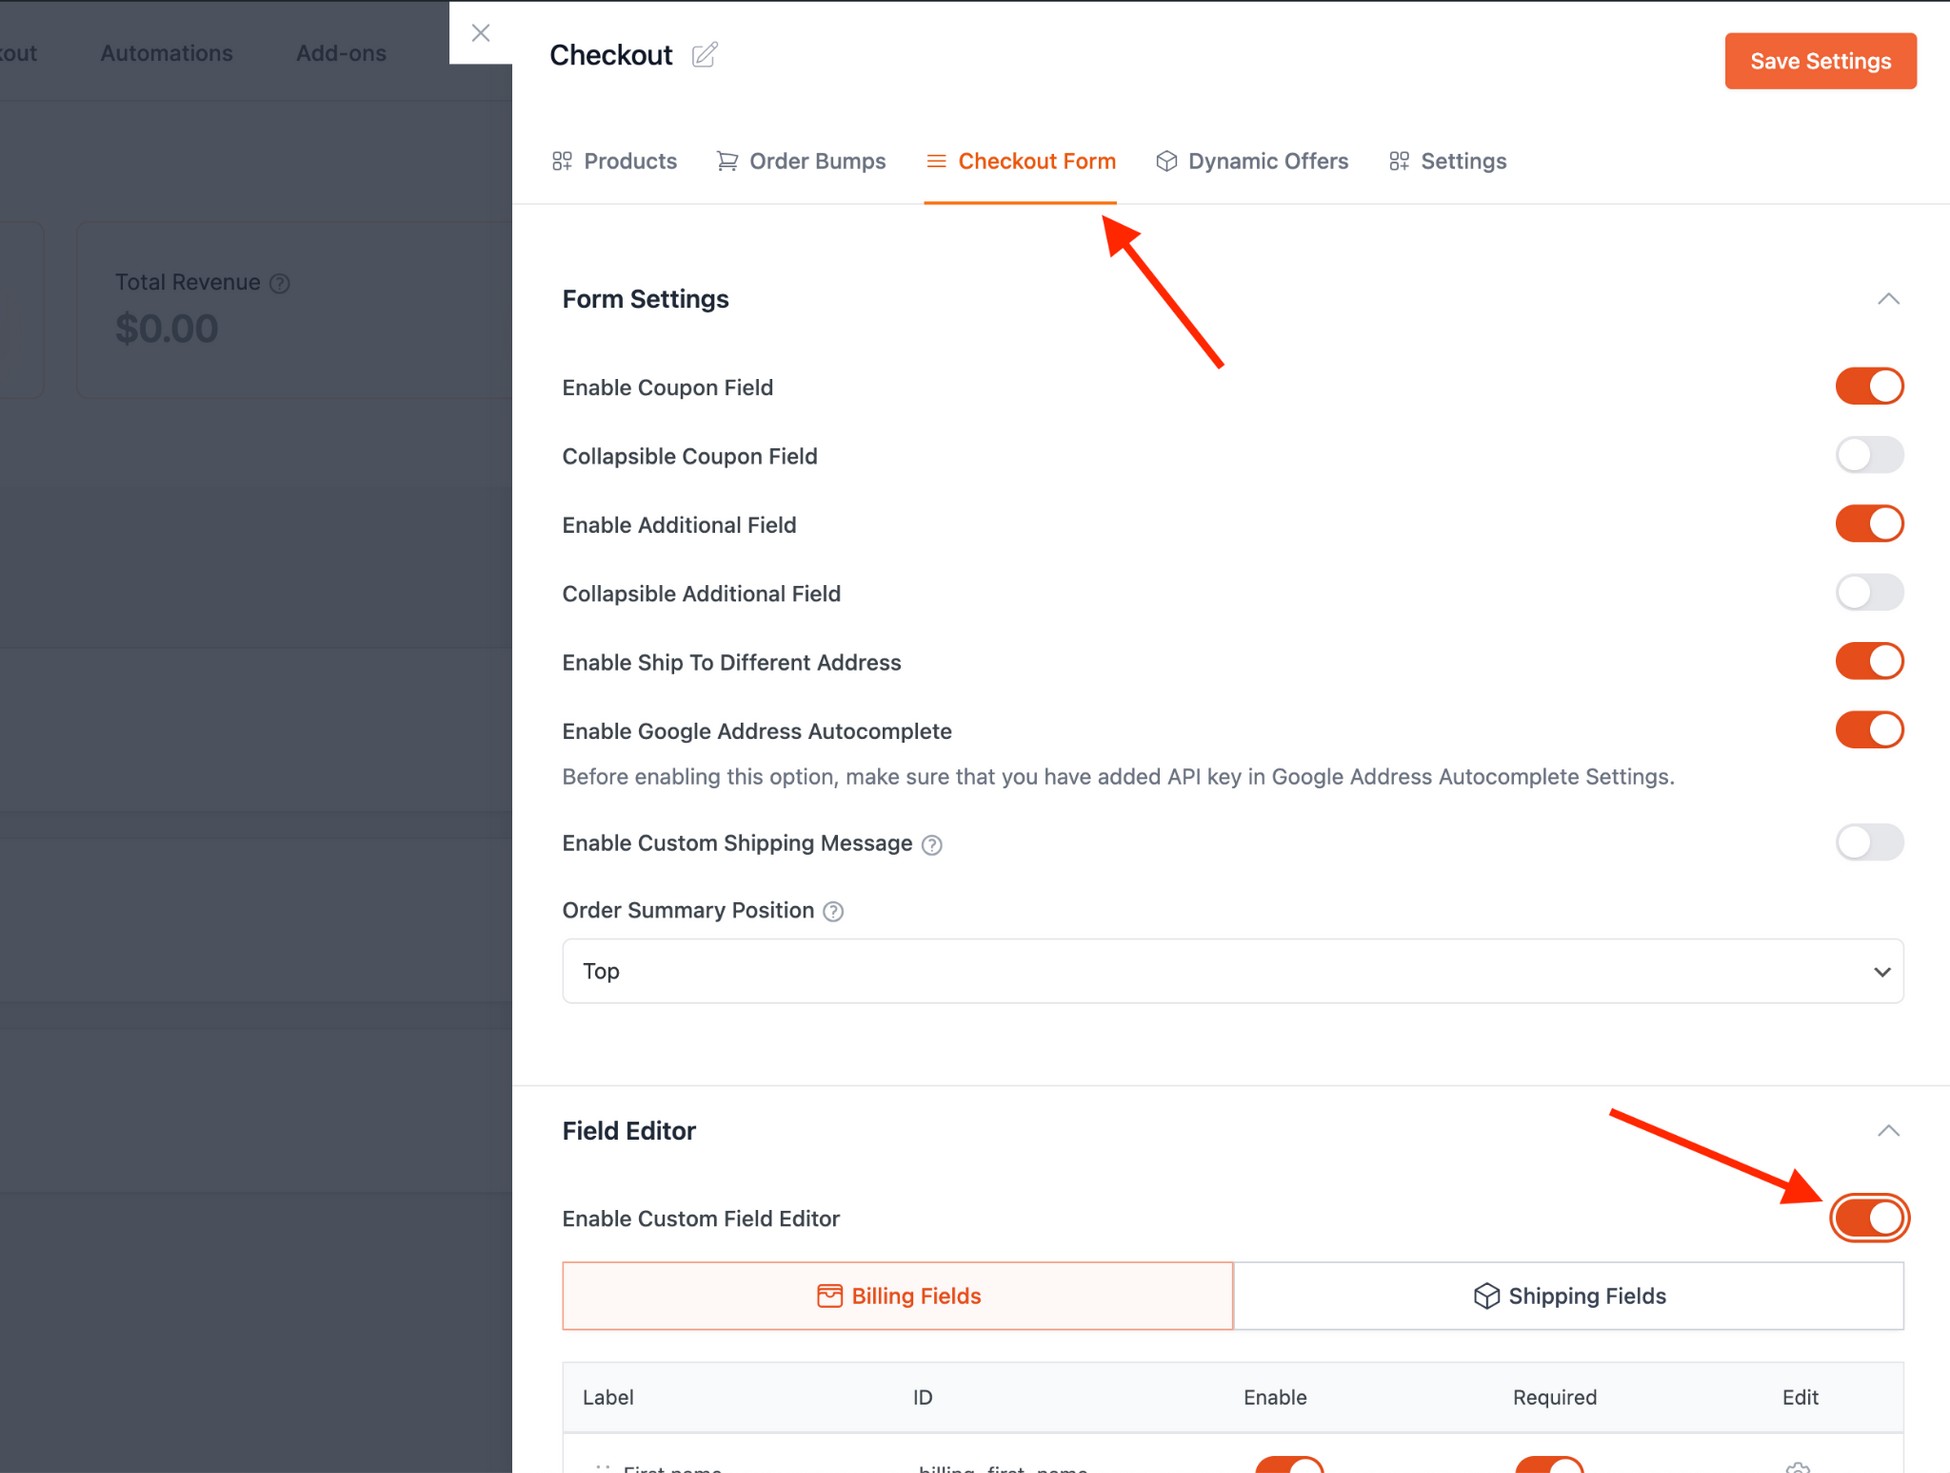
- Enable the Field Editor to show all available fields.
From here, you can enable or disable any field, mark it as required or optional, or add custom fields to suit your needs.
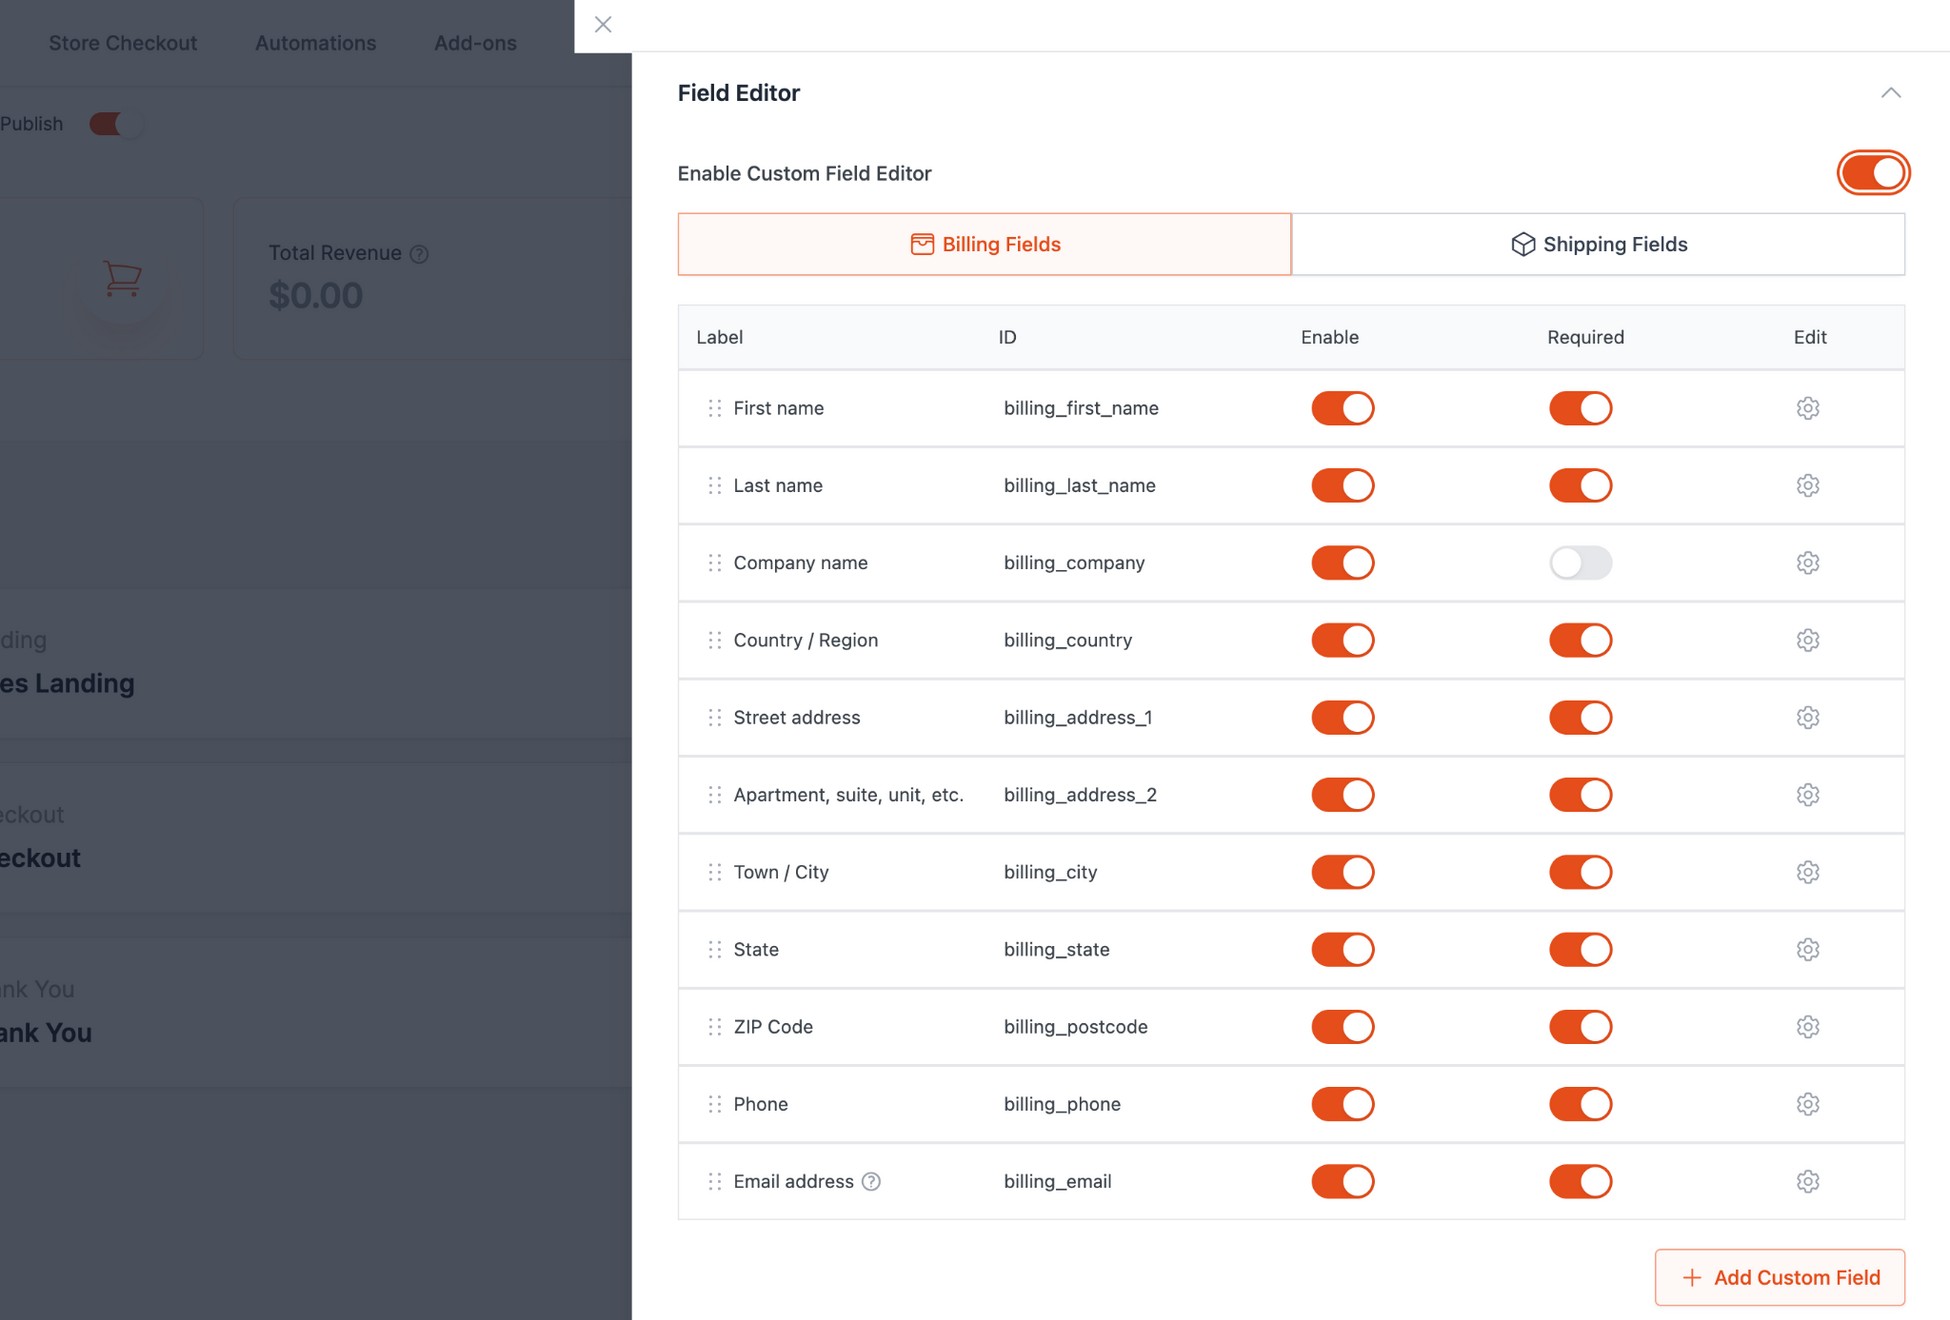
Once you’re done, save your changes to update your checkout form.
Opt-in Form
Opt-in forms let you collect essential details like names, email addresses, and other information at any point in your sales funnel.
Opt-in forms let you collect essential details like names, email addresses, and other information at any point in your sales funnel. They’re perfect for building your mailing list and nurturing customer relationships.
To make your opt-in forms visually engaging, you can enhance them with custom graphics or AI-generated visuals from tools like VistaCreate. This helps capture attention and increase form conversions.
When you create an opt-in step in CartFlows, customizing it with Bricks Builder is as easy as tweaking a checkout form.
But you’ll need a downloadable product (like an eBook) to make it work.
Let’s create and customize an opt-in step:
- Go to your sales funnel and press the Add New Step button.
- From the Select Step Type dropdown, choose Opt-In and hit Create Step.
- Enter a name for your step on the next screen and press Create Step again.
- Once redirected to the funnel screen, assign a product to the opt-in step – make sure it’s a digital product.
- Click the Edit Step icon to open Bricks Builder.
- Drag the Opt-In widget from the elements panel onto your canvas.
- Customize it using the settings panel on the left to match your branding and goals.
If you want to make the process even easier, you can add or remove form fields to reduce friction.
For example, you might want to remove the last name field and give 100% width to the first name field for a simpler layout.
Here’s how:
- Open the settings for the opt-in step and go to the Opt-In Form tab.
- Turn specific fields on or off based on what you need.
- Click the gear icon under the Edit column for any field to adjust size, placeholder, or layout. For example, you can disable the last name field and allocate 100% width to the first name field for a cleaner look.
- Hit the Save Settings button once you’ve made all the adjustments.
With these steps, you’ll create a sleek, effective opt-in form that captures leads while keeping the user experience smooth.
Order Details Form
Want to leave your customers with a memorable post-purchase experience?
The Order Details Form widget is the perfect way to showcase order information clearly and professionally on your Thank You page.
To get started, open the Thank You step in your sales funnel using Bricks Editor.
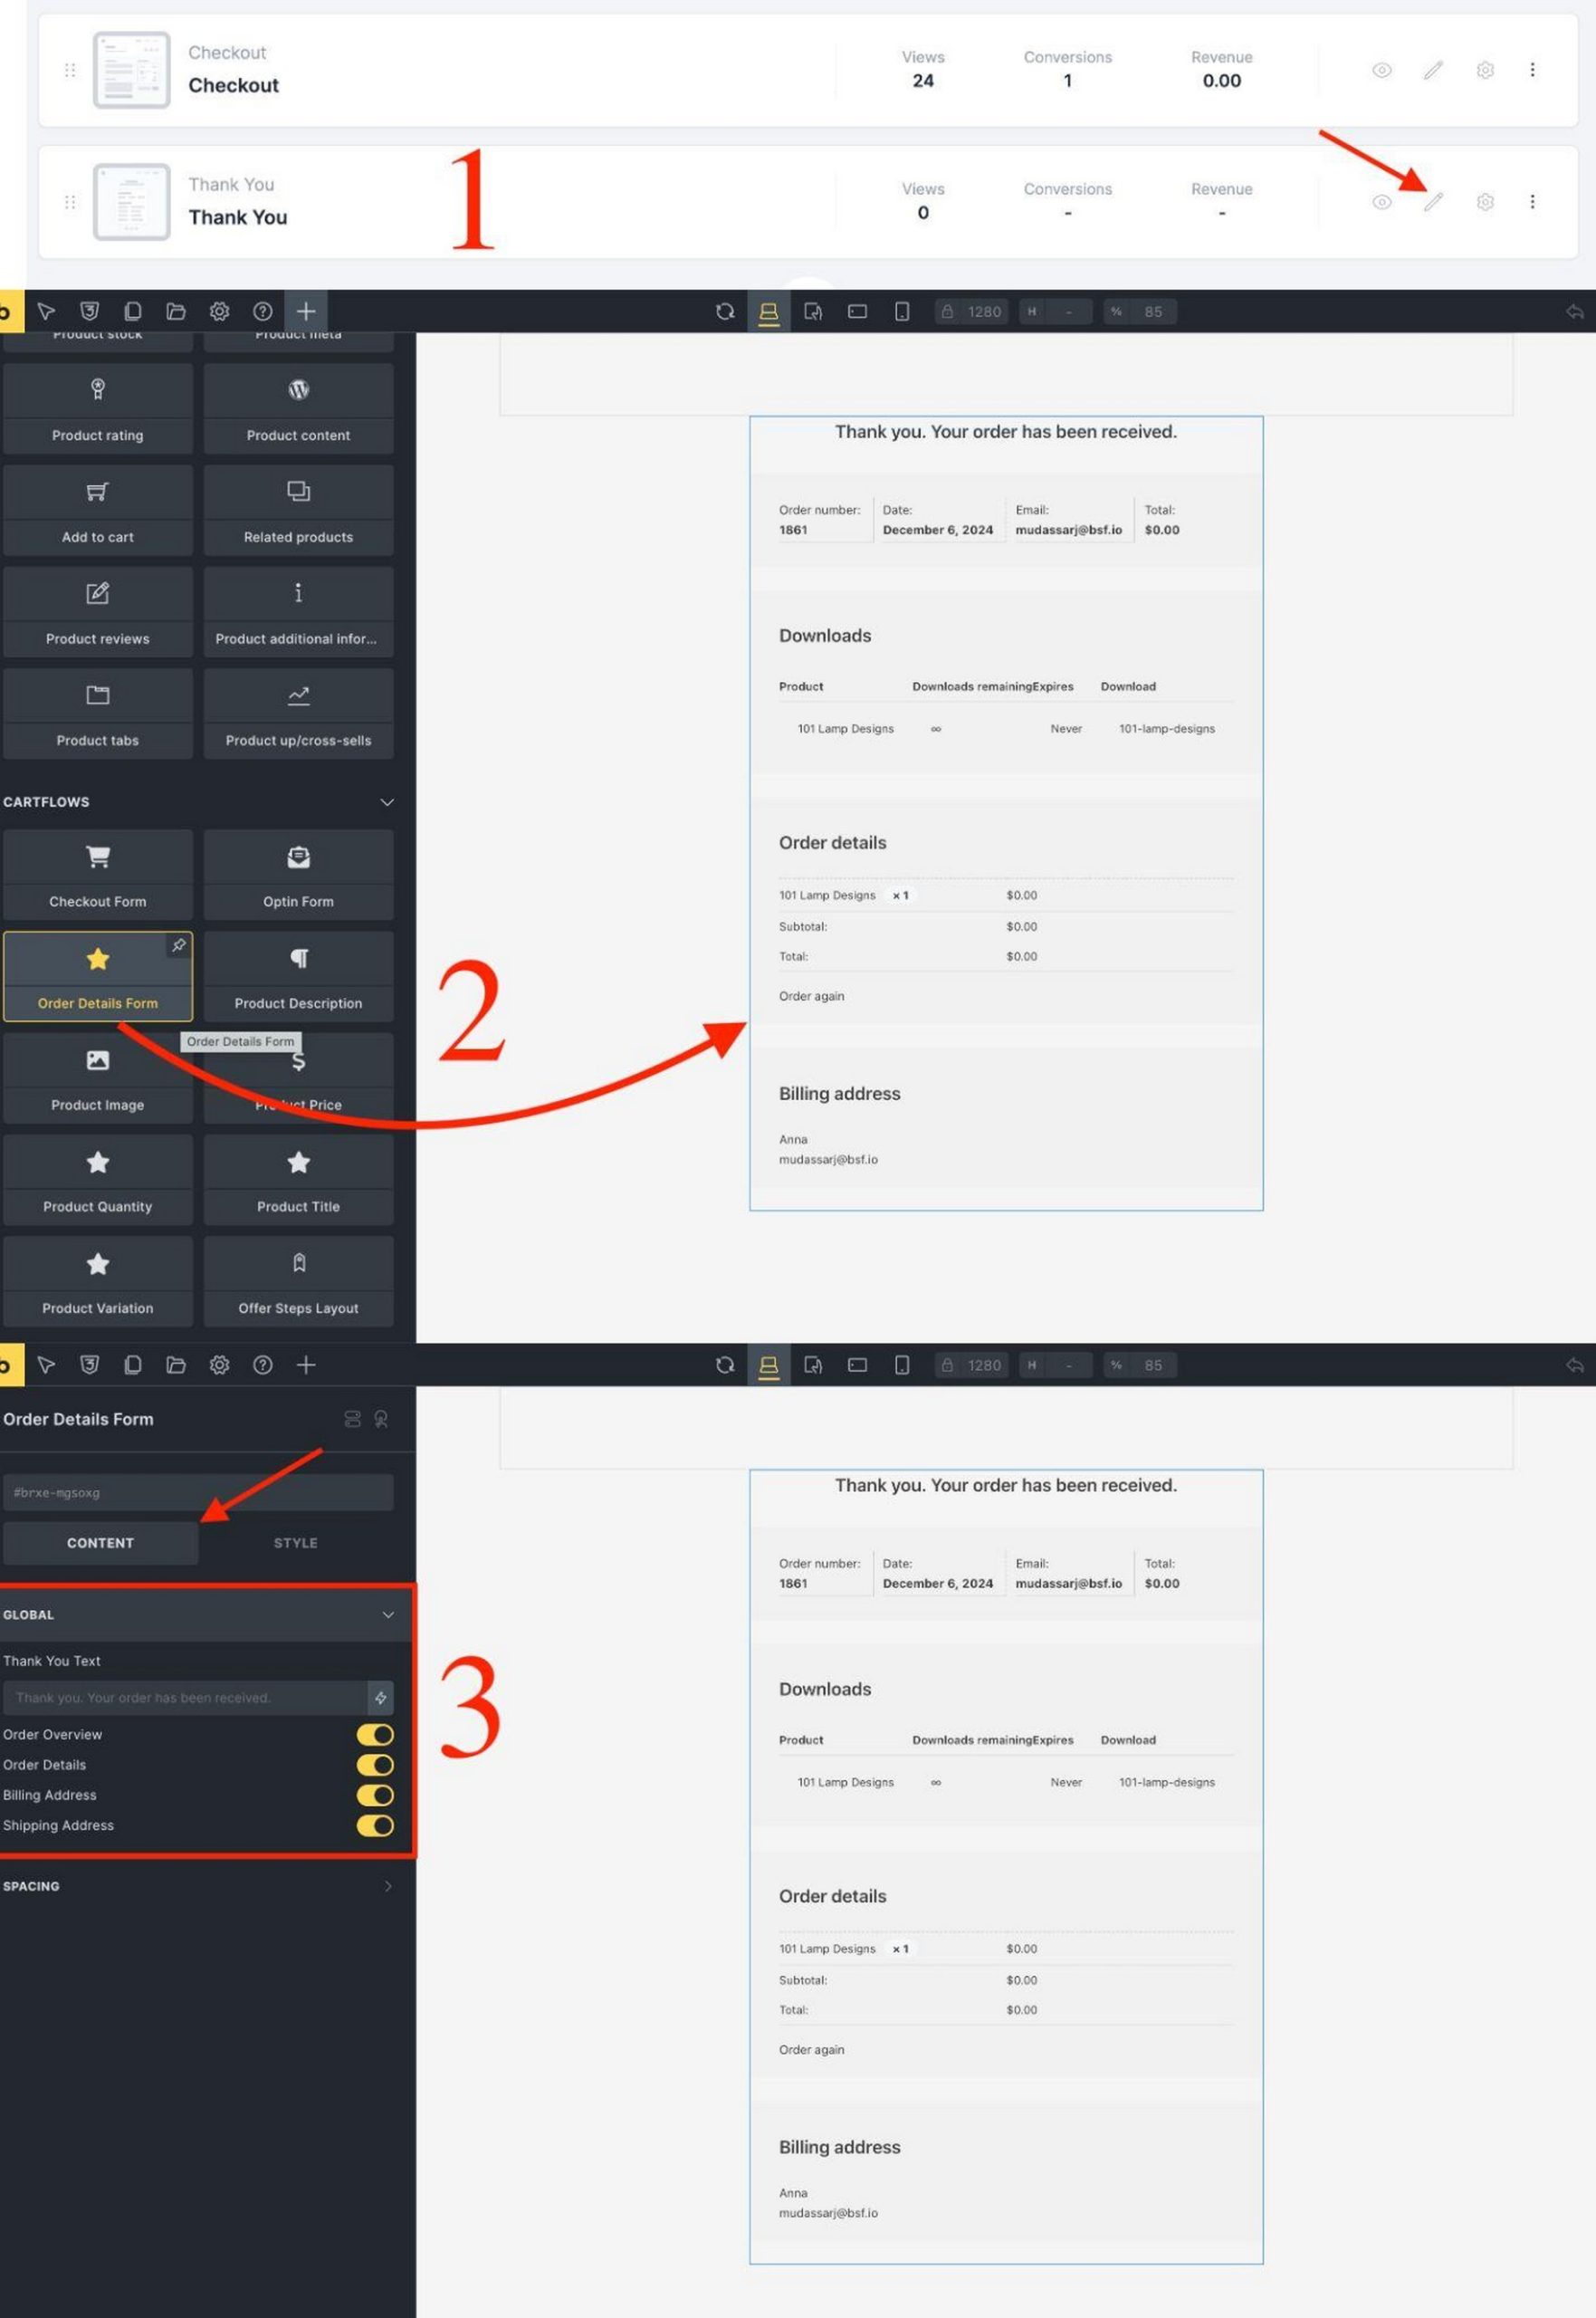
Once inside, locate the Order Details Form widget in the elements panel and drag it onto your canvas.
From there, you can customize the design and layout using the settings panel on the left.
Adjust colors, fonts, and spacing to align with your brand and ensure the information is easy for your customers to read.
This small addition can make a big impact, creating a polished and customer-friendly finish to your sales funnel.
Product Widgets
With the seamless integration of CartFlows and Bricks, you have access to a range of widgets to make your upsell and downsell steps shine.
Widgets include:
- Offer Step Layout
- Product Description
- Product Image
- Product Price
- Product Quantity
- Product Title
- Product Variation
Let’s walk through adding an upsell step to see how these widgets come to life.
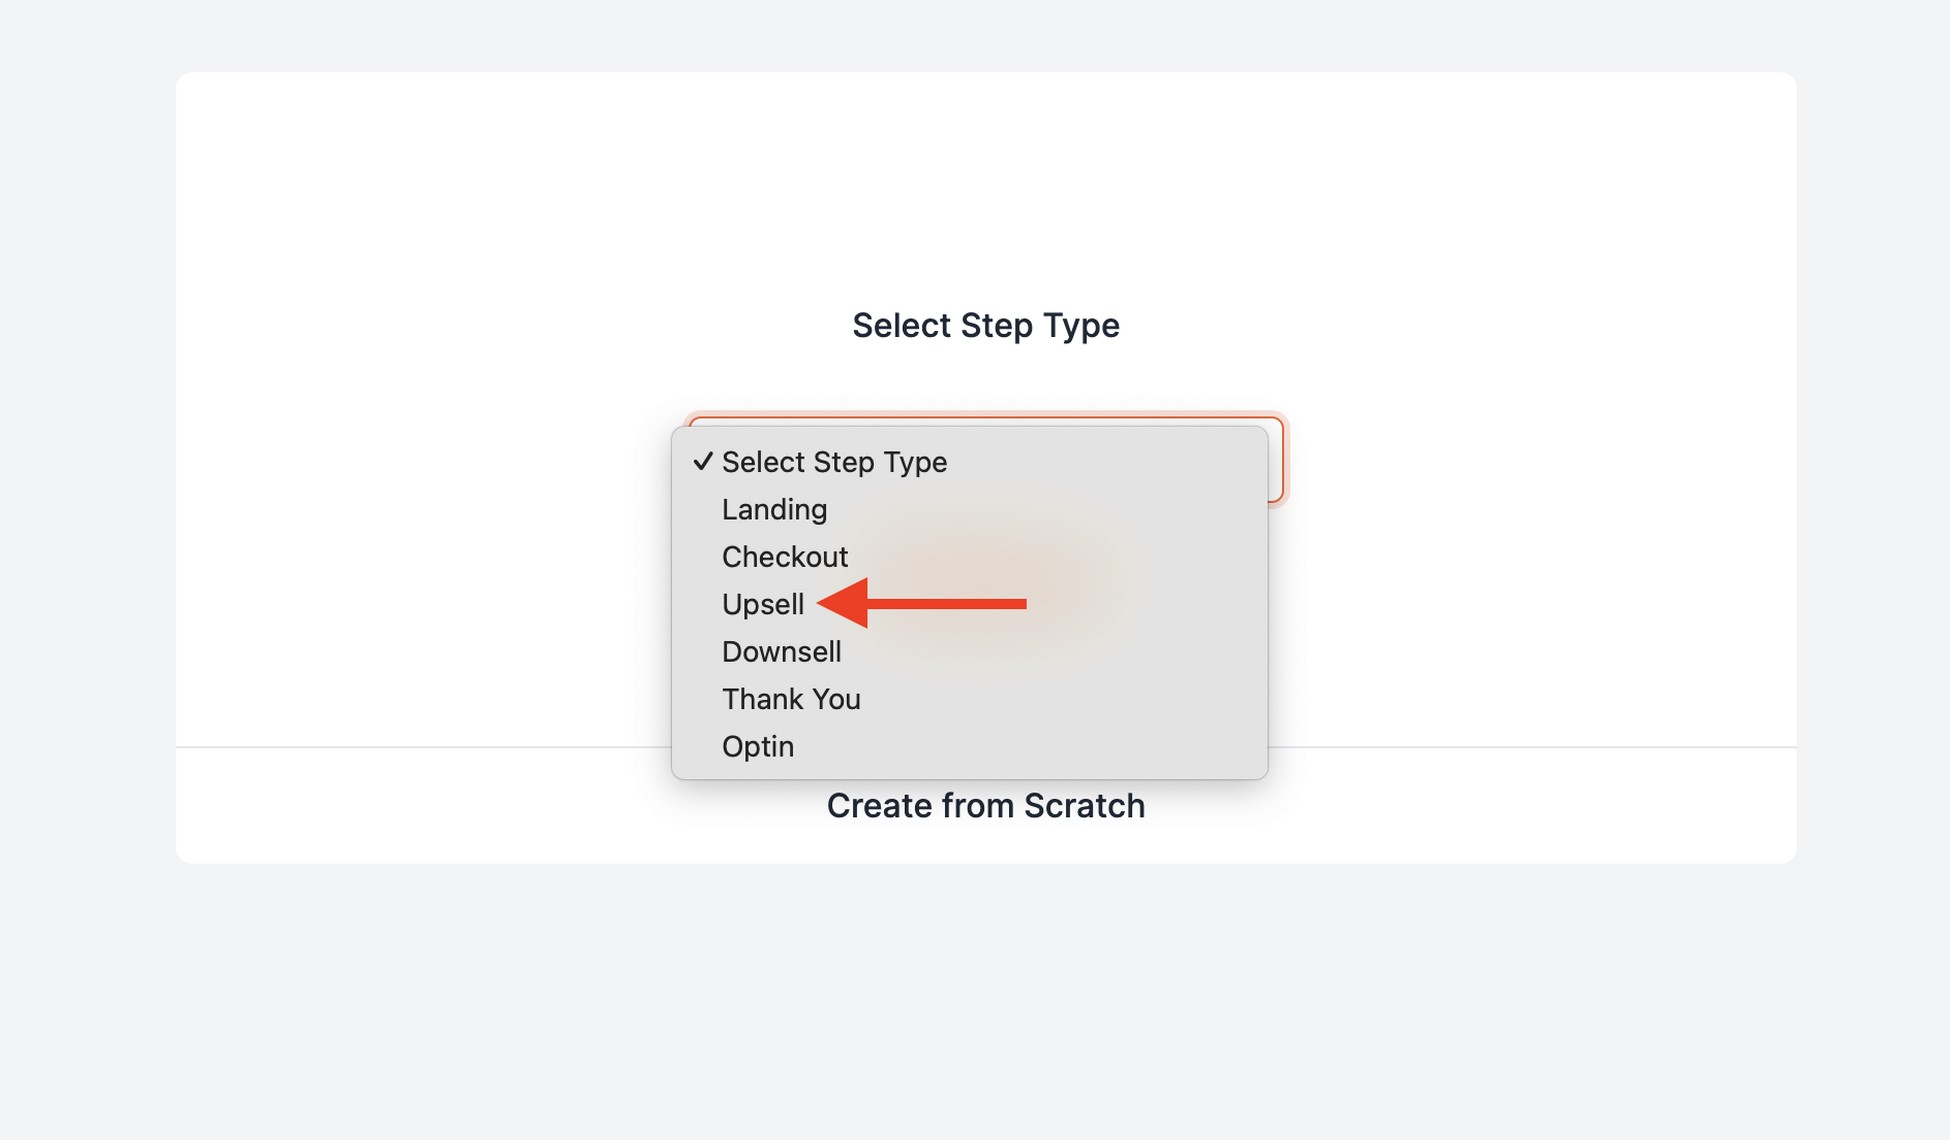
Start by clicking the Add New Step button in your sales funnel and selecting Upsell from the dropdown menu.
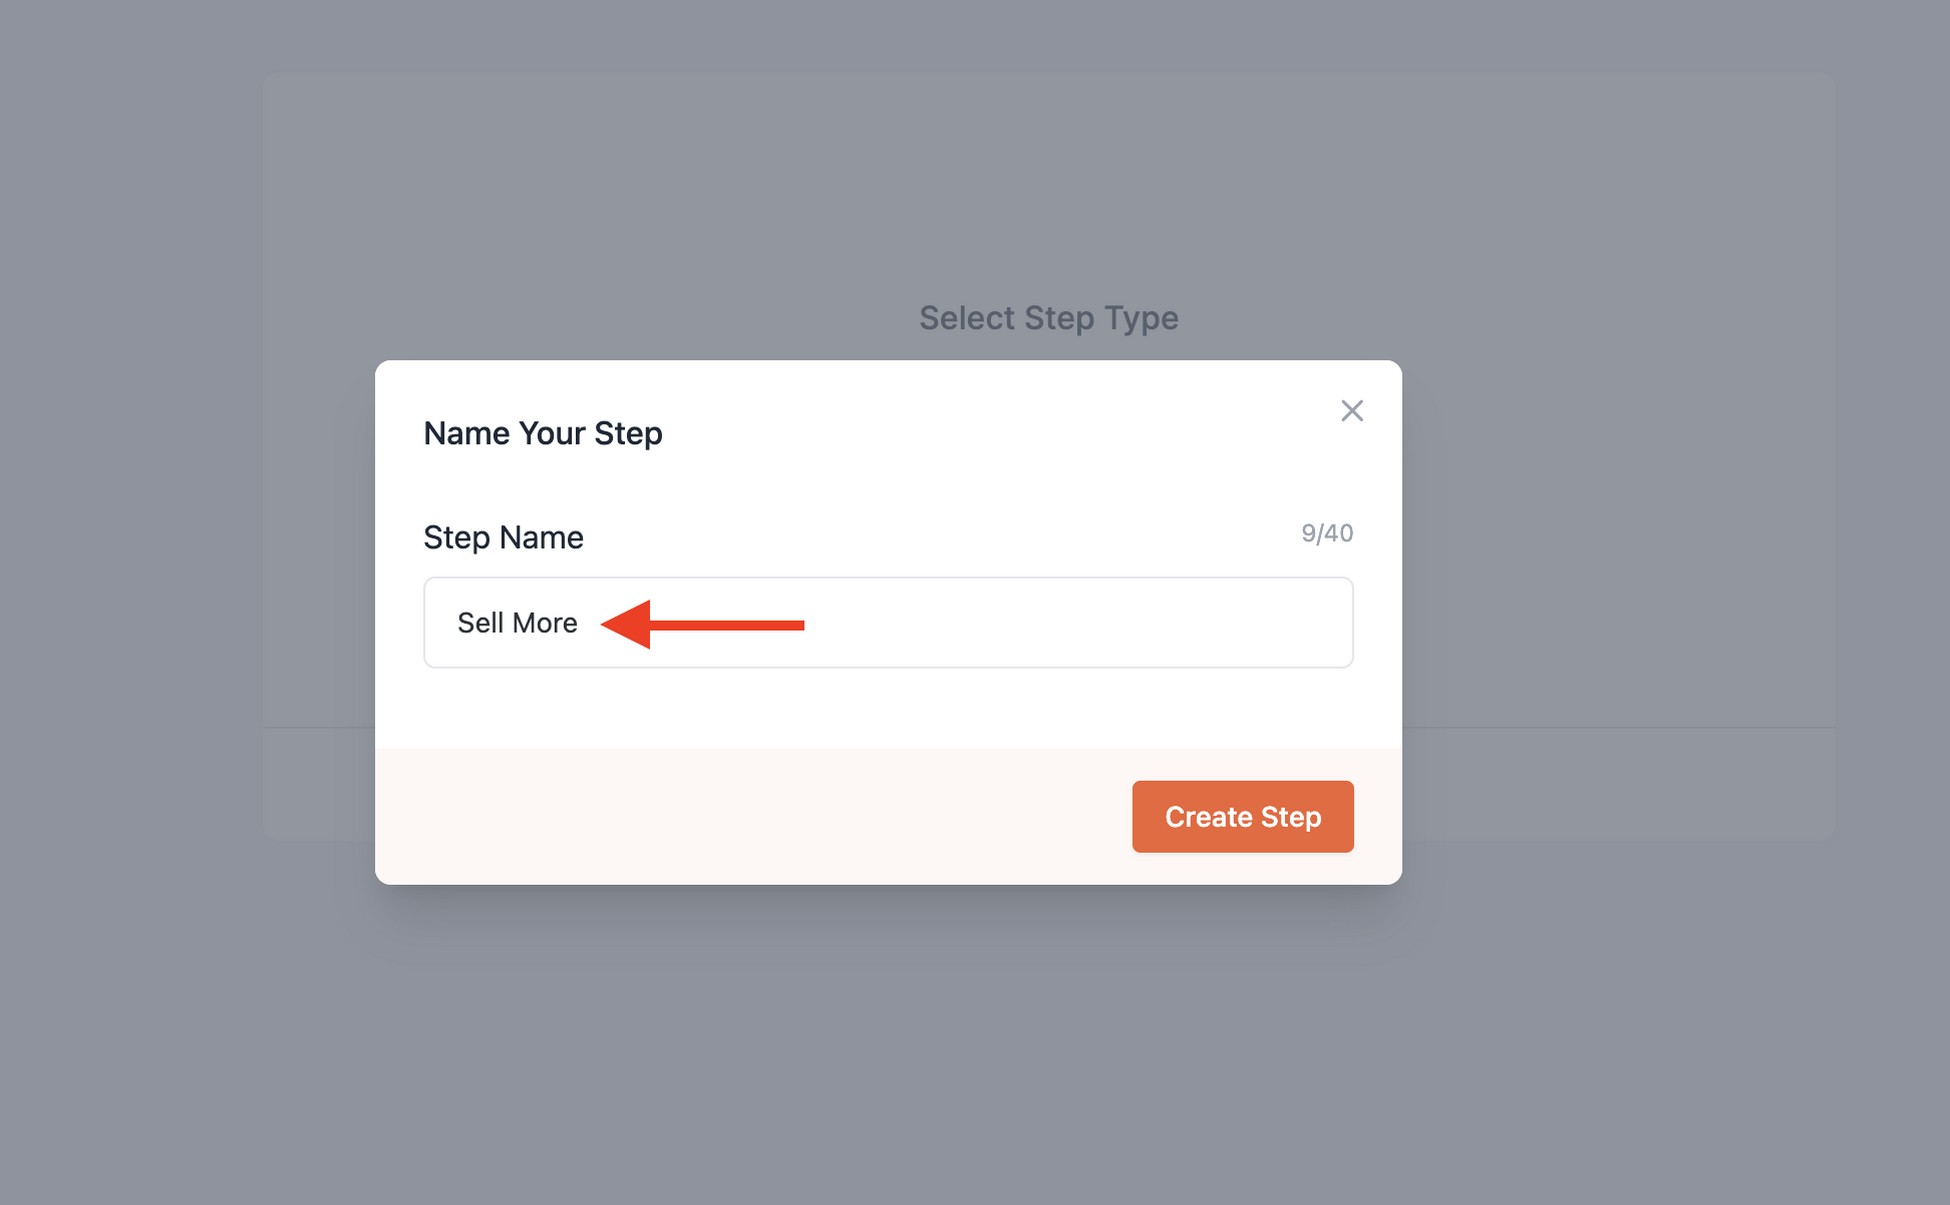
Name your step – let’s call it “Sell More” for this example – and press the Create Step button.
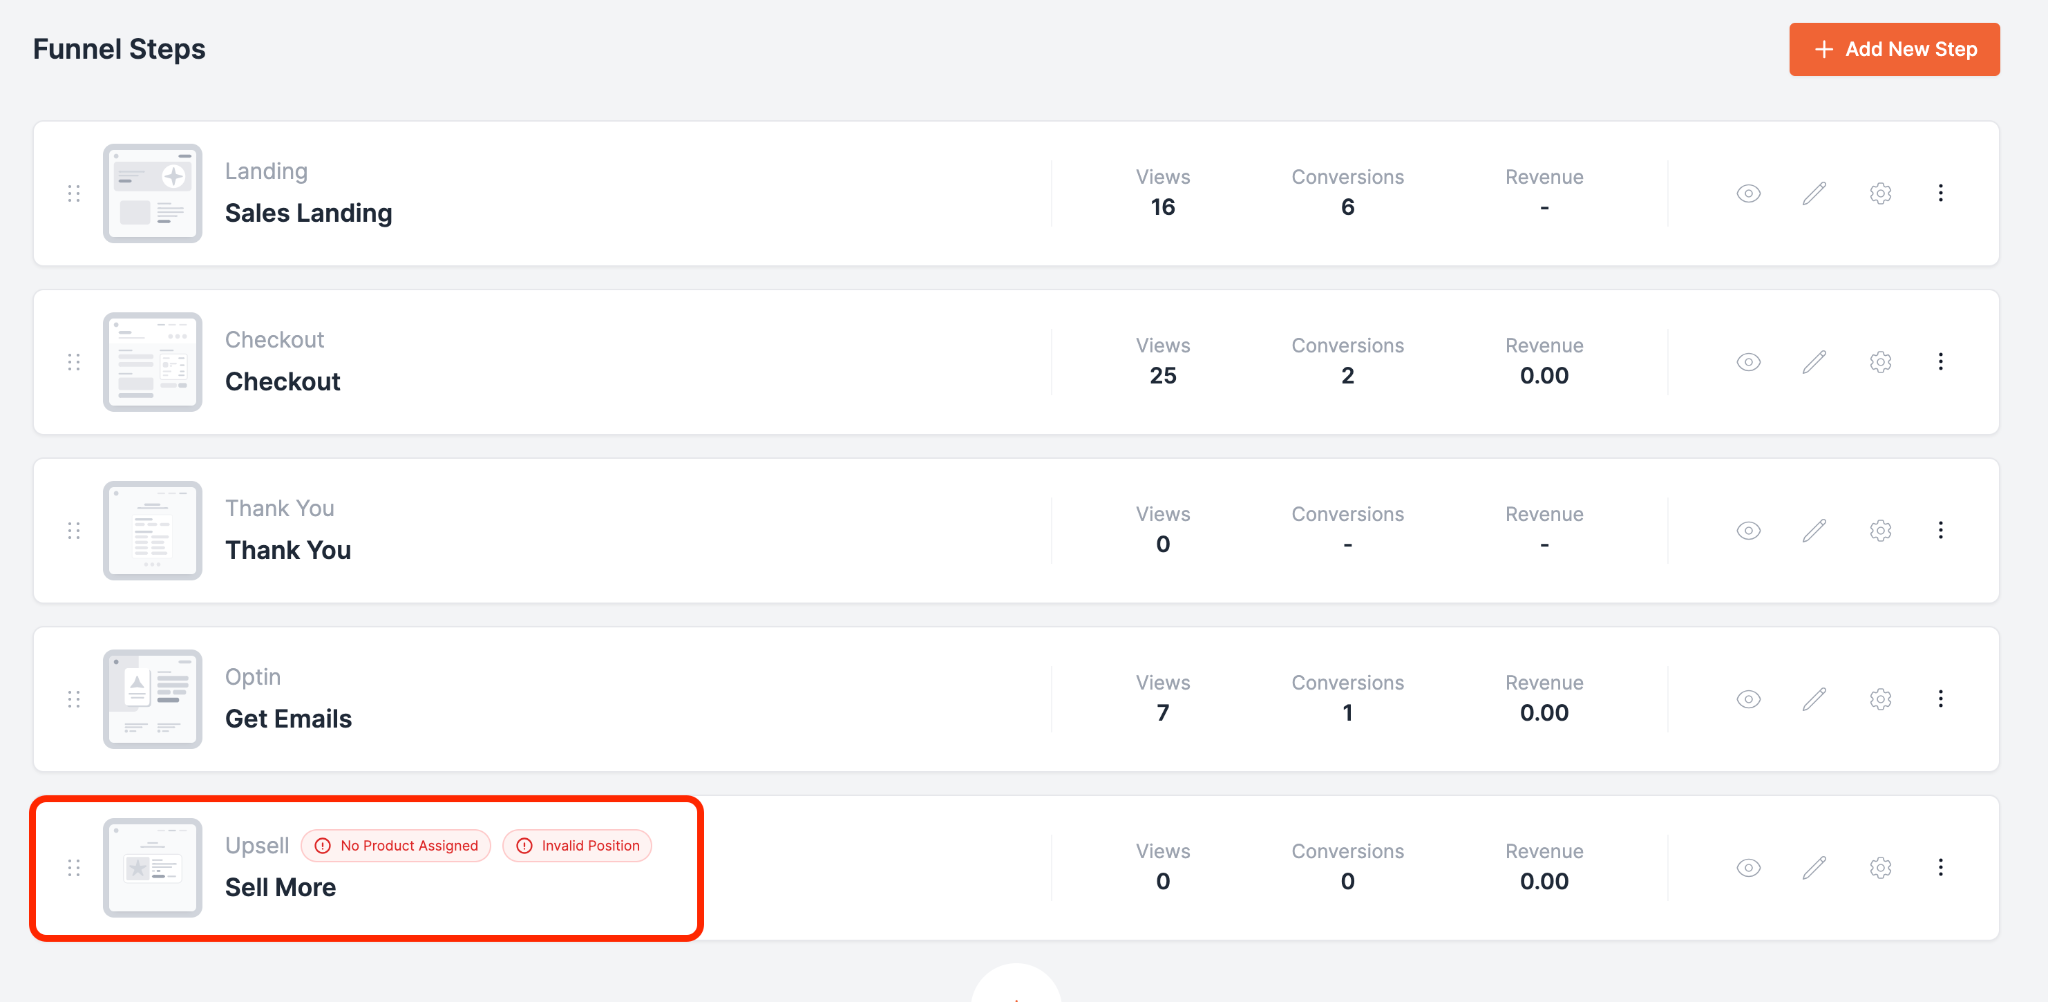
Once the step is created, you’ll notice it’s added at the end of your funnel.
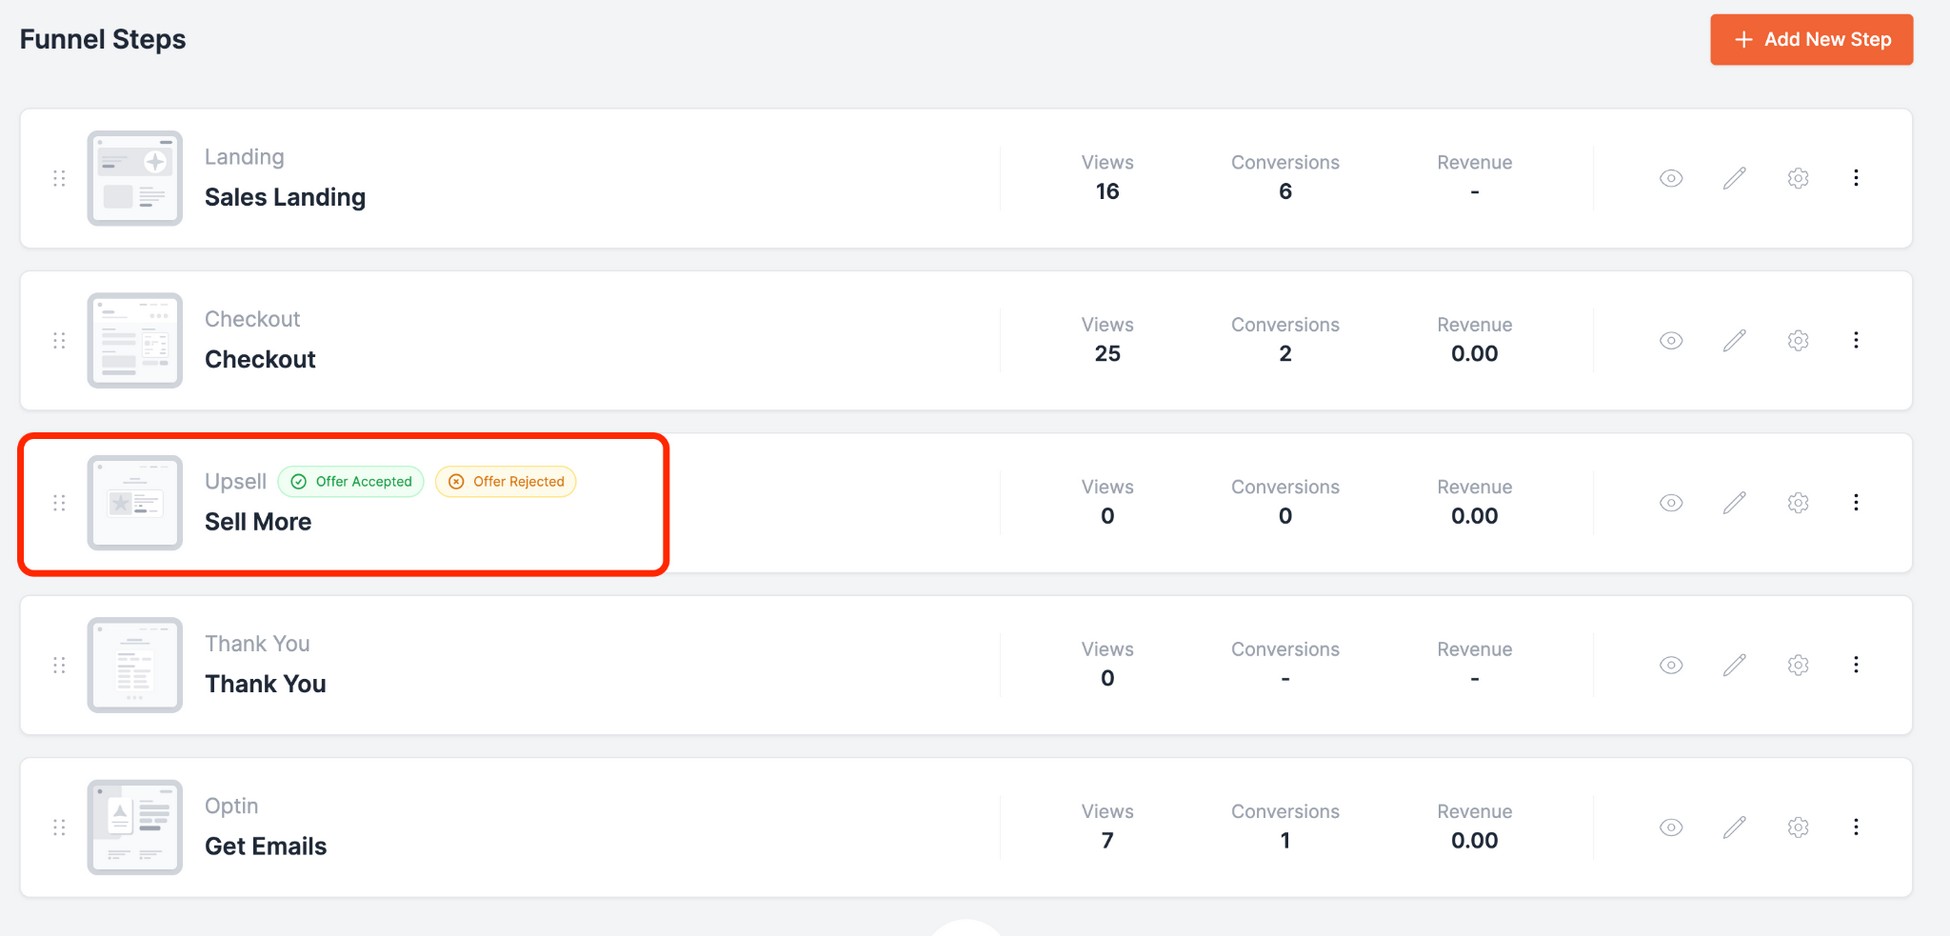
Since that position isn’t ideal, simply drag it to the correct spot to fit your funnel’s flow.
Next, assign a product to this upsell step to make it functional.
Open the upsell step in Bricks Editor. You’ll see all the widgets listed earlier pre-loaded onto the canvas.
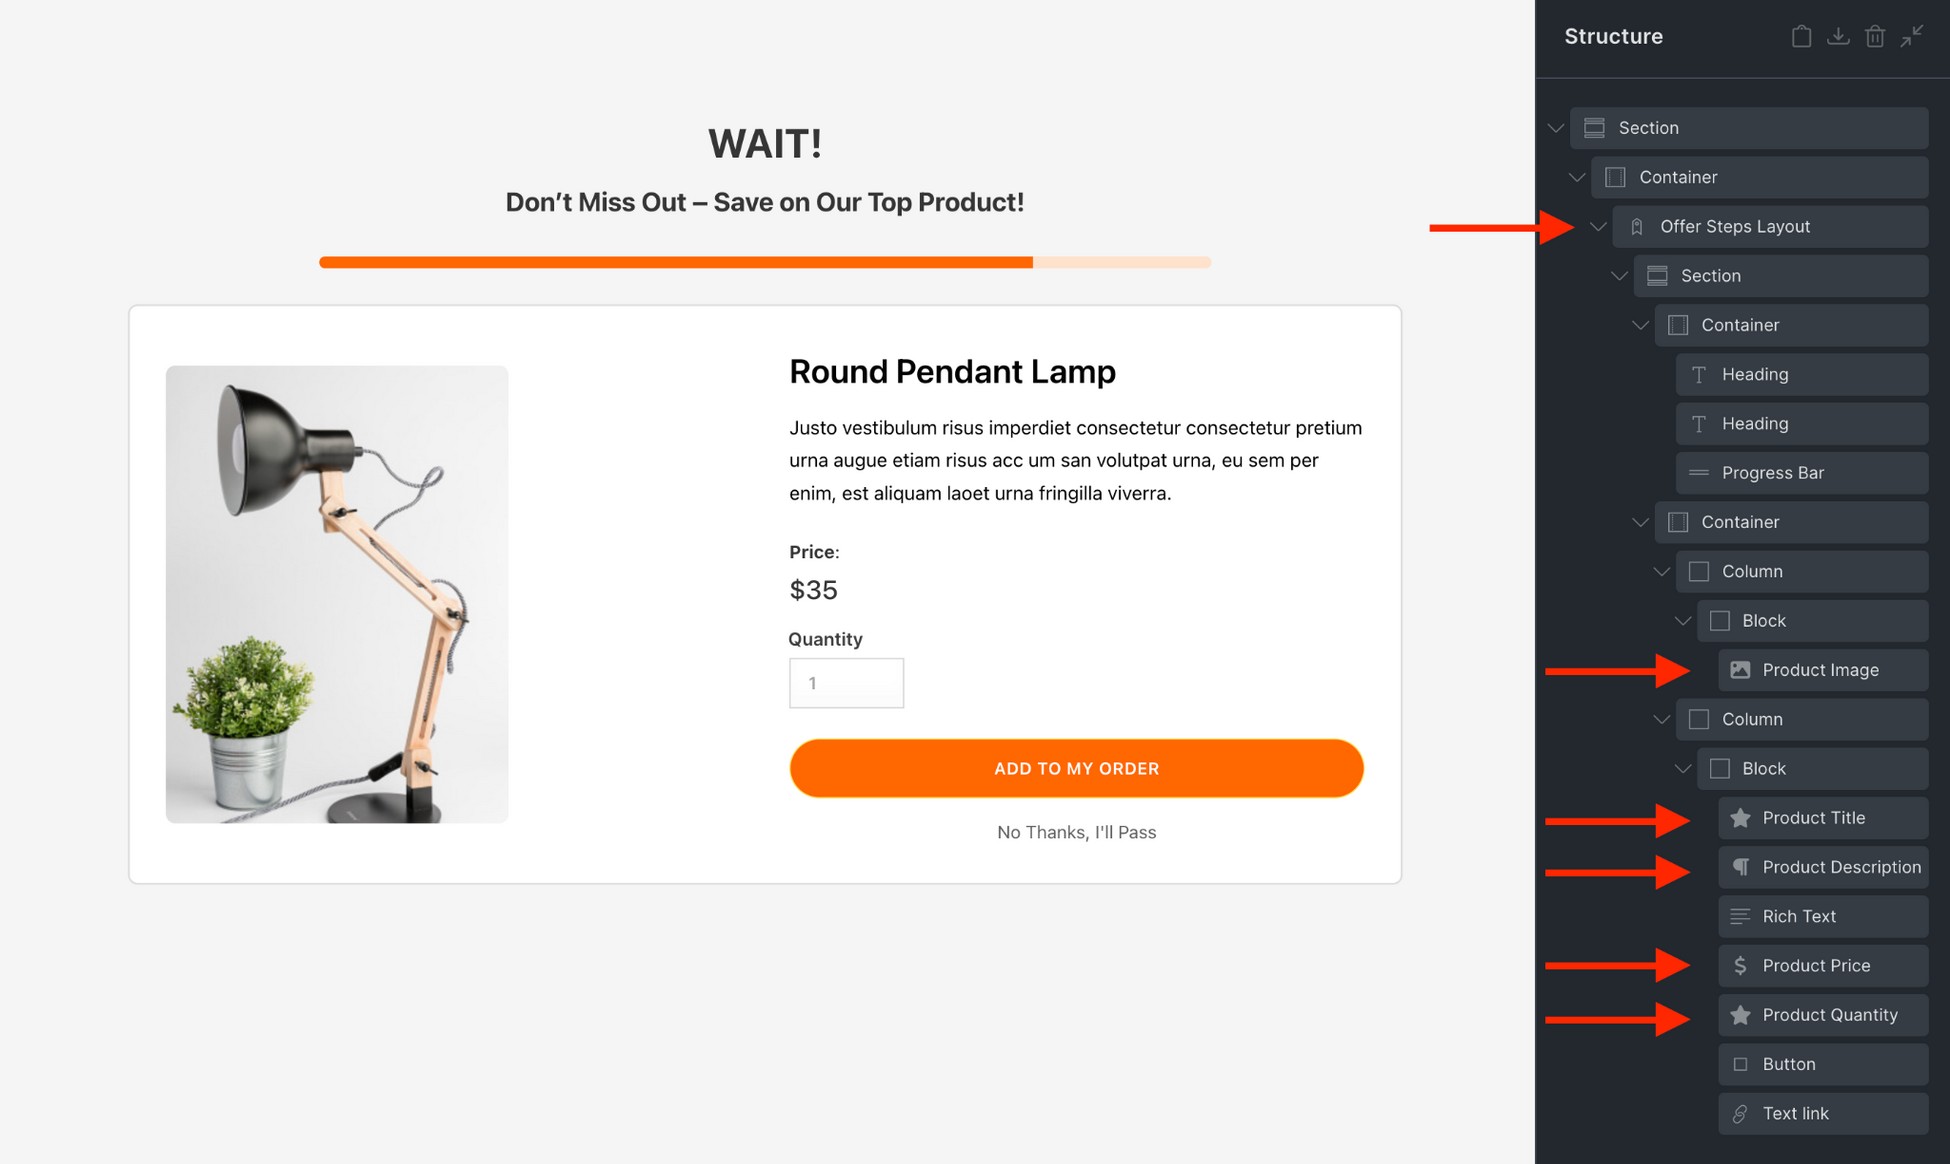
From here, tweak and fine-tune them using the element panel on the left.
Adjust images, prices, product titles, or even layout styles to match your branding and create a visually compelling offer.
This powerful combination of widgets and customization options ensures your upsell and downsell steps not only look professional but also help boost conversions.
Conclusion
Great job. You’ve just unlocked the secrets to using CartFlows and Bricks Builder to create high-converting sales funnels!
These powerful tools give you everything you need to design personalized, professional funnels that not only look incredible but also drive real results.
Whether it’s crafting opt-in pages, dynamic checkouts, or irresistible upsells, you’re fully in control.
Now, it’s your turn. Imagine your WooCommerce store running with smoother workflows, better layouts, and higher conversions – all without breaking a sweat.
So, why wait? Start using CartFlows today and transform your sales process into an experience your customers will absolutely love.
👉 Get started with CartFlows now and watch your revenue soar!
What type of sales funnel do you want to create? Tell us in the comments below.
