Free plus shipping can be a highly lucrative option for eCommerce businesses and drop shippers.
If you’ve been in the eCommerce space for a while, you may have already come across this method to build profitable online stores.
So today, we’ll explore how this business works, how you can choose the right products, and how you can build your own free plus shipping business.
- What Does Free Plus Shipping mean?
- How Does Free Plus Shipping Work?
- Does Free Plus Shipping Work?
- Top 4 Benefits of Free Plus Shipping Offers
- Examples of Free Plus Shipping Products That Don’t Attract Freebie Seekers
- How to Choose the Perfect Free Plus Shipping Products
- How to set up a free plus shipping funnel using CartFlows on WooCommerce
- Conclusion
What Does Free Plus Shipping mean?

Free plus shipping is where a physical product is offered for free while the customer only pays the shipping fee.
It’s a great way to generate new leads and generate initial traction spending even if it may seem like a loss-making venture, state the marketing experts from Bookatrekking, a trekking company popular for providing trekking tours around Berlin high trail, and many other routes all over the globe.
“Why would someone want to give away products for free?”
There are two major reasons:
- Word-of-mouth marketing
- Profit
People love free products. And they’re more likely to share such offers with their friends and family.
Now, depending on how you craft the offer, you can quickly break even, or make a profit.
How Does Free Plus Shipping Work?
Free plus shipping is a great way to generate new leads, get visibility within your niche, and run a profitable business with only free products.
Those who add a free plus shipping to their business have one or more of these goals in mind:
- Break-even and upsell a premium product to everyone who lands on the checkout page.
- Sell profitably by adding a small premium to the cost of the product and shipping.
- Break-even or even make a loss in return for acquiring customers.
Let’s look at an example of how a free plus shipping business works:
Suppose a product costs $2 to purchase from the supplier.
The shipping costs are between $2 to $4 depending on the locations you deliver to.
With a free plus shipping funnel, you’d list the product at $0.00 and charge a shipping fee between $7 to $10. This covers the cost of both the product and shipping and also gives you a small profit.
As the consumer thinks they are getting something for free, the offer is more enticing than if you list the product cost + shipping separately.
In marketing terms, free plus shipping offers are known as tripwires – Insanely low-priced offers that entice customers into making a purchase.
People love free products, and a well-crafted offer can help quickly spread the word and increase your pool of prospects.
Does Free Plus Shipping Work?
Free plus shipping does work and will continue to do so. The catch? People become desensitized to the older offers. So marketers need to keep testing newer product-offer combinations to stay relevant.
But, everyone offers free stuff. Could adding one to your catalog make any difference?
Well, yes and no.
The magic of a great free plus shipping offer lies in finding products that your customers already value.
Larger brands can get away with products like free T-shirts and custom mugs because they’ve built brand equity.
Newer businesses need to be resourceful in finding a desirable low-cost product to offer for free.
For example, a free Swiss-army knife in a survival-kit business could work much better than a free logo printed mug.
We’ll discuss this further when we talk about product selection.
Top 4 Benefits of Free Plus Shipping Offers

What are the main benefits that a free plus shipping product offers to your business?
In this short section, let us share 4 benefits and how they help generate more leads, attract more customers, and build a profitable business with minimal ad spend.
1. Get Your First Customers
Customers love free products and there is no denying that. If a customer has a choice between buying something or getting it for free, the choice is already clear.
Free plus shipping can be a great way to get your first customers when you’re starting in the eCommerce space.
2. Generate Leads and Increase Brand Awareness
A well-crafted free plus shipping offer can spread through word of mouth. And that also spreads your brand name. With minimal time and ad spend, you earn longer-term brand awareness within the niche you’re targeting. If you don’t yet have a brand, you can use an online logo maker to help create one in no time. And to nurture your newly acquired leads, you can use a customer lead management software.
3. Make a Profit
If you want to build a store solely around free plus shipping products, you may want to add a small margin to your shipping cost.
While your customers continue to see the product as free, you generate profits on the volume of sales to fund your future product launches or marketing.
4. Dropshipping
If you want to start dropshipping, you may want to consider free plus shipping. When a brand is new, customers might be hesitant to buy more expensive products.
A free product could just be the thing to give you a start and help build trust with your new customers.
Examples of Free Plus Shipping Products That Don’t Attract Freebie Seekers
Enough with the talk. Let’s start by showing some examples of free plus shipping products that sell well. We’ve also linked to the products so you can see how the checkout flow works.
1. Free Glowing Dog Collars
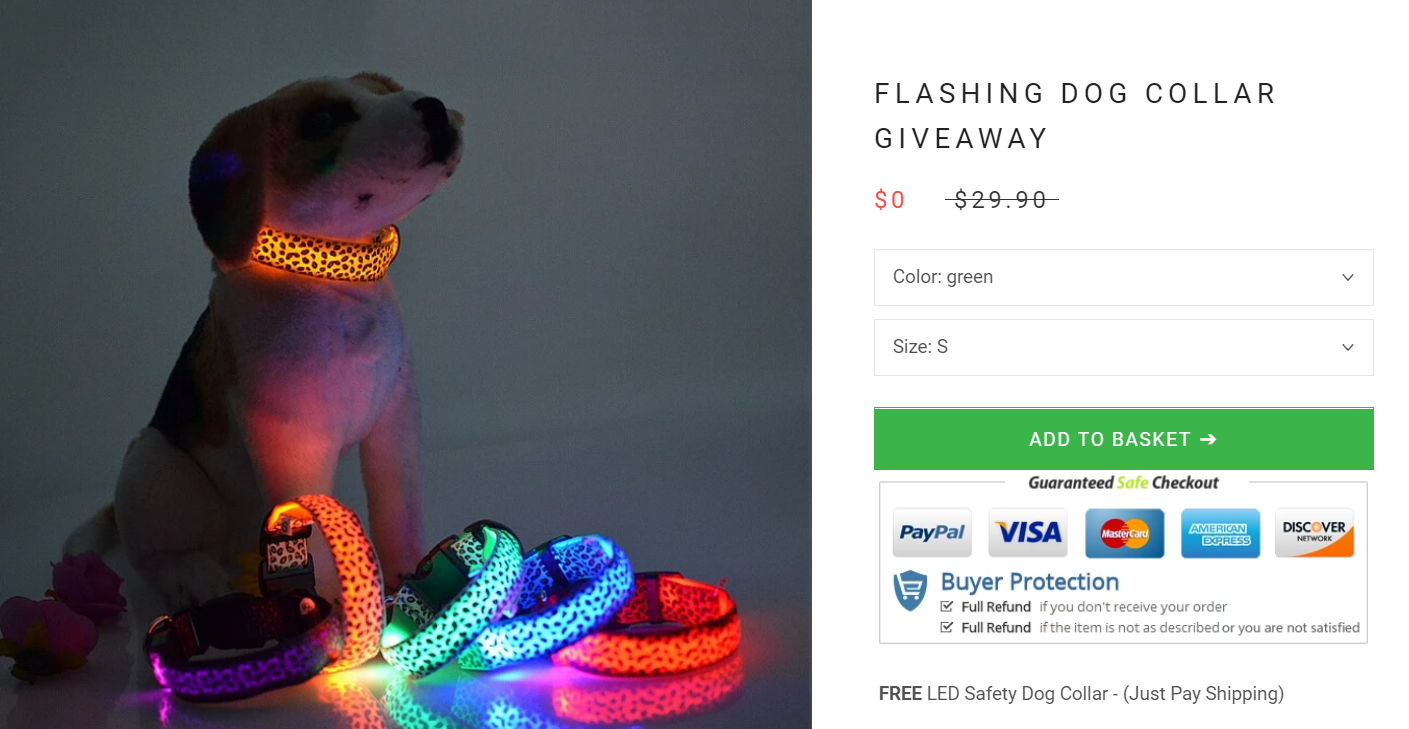
Pet products have picked up massively over recent years. With such interesting new products on the market and more and more people becoming pet parents, the trend does not seem to want to slow down, which offers a great opportunity.
Dog collars are important to dog parents and a legal requirement in many countries. Dogs love to wander and spotting them in the dark can be difficult. This glowing dog collar is an answer to that need.
Also, a glowing dog collar looks very cool too! Making it free hits those triggers we talked about earlier.
2. LED Magnetic USB Phone Cable
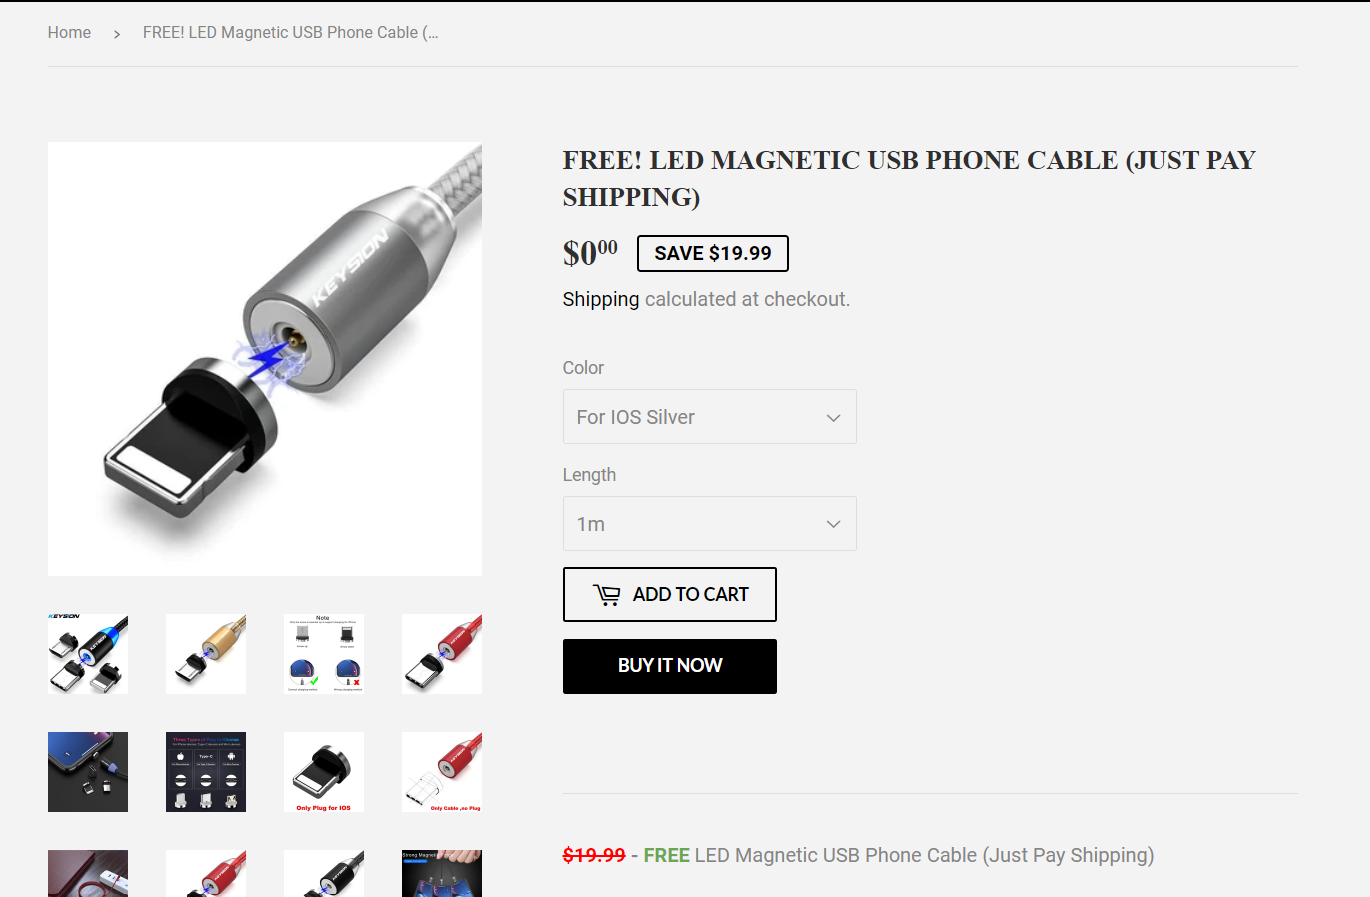
Tech products sell. But in such a saturated market, it’s easy for your brand to get lost.
As you may notice, this is a “desirable” product even though the product doesn’t solve a painful problem.
But because it’s free, customers who come across this page are compelled to make a purchase even though they may not really need the item.
That’s the power of free plus shipping! Much like the curiosity around Etsy shipping time, offering transparency in your shipping times can enhance customer satisfaction.
3. Free Black Gold Turtle Ring
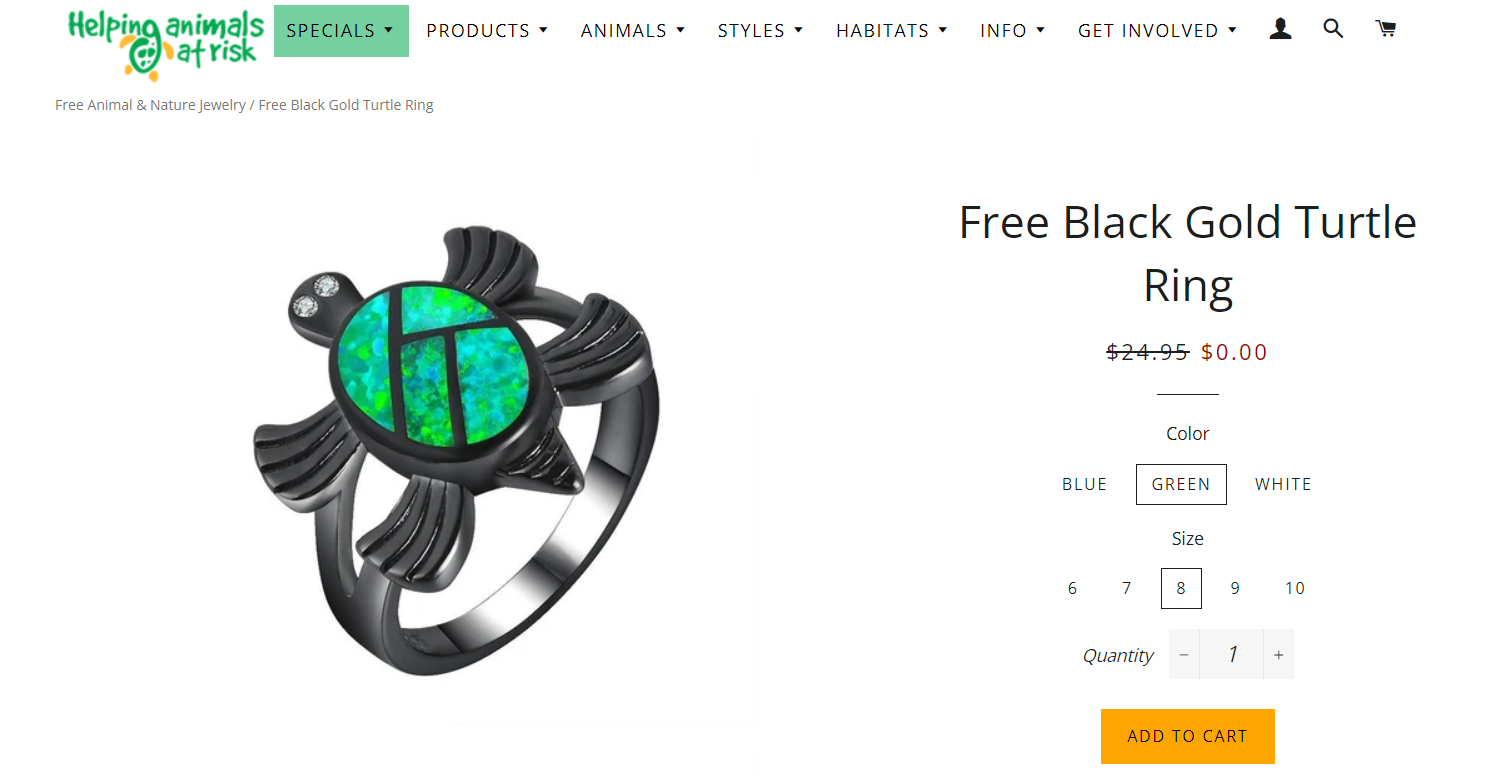
This one’s a cool-looking ring. Aimed towards women, this product is easily a catch if you’re a fan of novelty rings. It’s cheap to source from Asian markets, and dropshipping adds negligible cost.
But, this by itself isn’t an amazing product. What makes it great is the story that’s attached to the product.
This product is free as it symbolizes that you support the “Helping animals at risk” cause. That instantly makes it valuable, desirable, and even more so purchasable to its audience.
How to Choose the Perfect Free Plus Shipping Products
A free product may hold no perceived value to customers due to pricing bias. This bias is also the reason why an expensive product can automatically hold more perceived value in the minds of some.
So how can you choose a product that has a high perceived value?
It’s more of an art than a science. So, let’s talk about the best practices that can help you get started in choosing your first free plus shipping product.
1. Find a product your niche audience already cares about
If you’re launching a free plus shipping product, you need a product that’s in your niche. This will help you bring in relevant visitors who have a high propensity to buy other related products in your store.
When someone chooses a free product, they are exposed to your other products during the sale, which increases the likelihood of them purchasing these products.
2. Choose an inexpensive product option
Because the free plus shipping model requires that you combine the cost of the product with shipping, it should ideally cost you between $2-8.
That does not mean the product should look cheap. What you’re looking for is something that people within your niche buy anyway.
Find a way to source and deliver the product cheaply and use that as your free plus shipping product.
3. Sell a story that backs up the product
A product is worth the story behind it. Share your belief behind the store and the niche. Show how you want your customers to be able to achieve a goal that you probably were not able to before.
Remember that turtle ring from before? That’s a classic example of using a story.
‘Why are we giving them away?? Easy! It is the best way we found to raise awareness of the threats animals face. With Every Ring Sold you Help Saving Animals Across The Globe!’
Make your customers the hero of the story and they are much more likely to engage with it..
How to set up a free plus shipping funnel using CartFlows on WooCommerce
Enough with the talk. Let’s help you get your first free plus shipping products set up and ready to launch.
For this demonstration, we’ll use WooCommerce with Elementor and CartFlows Pro. You’ll need a working WooCommerce website with Elementor and CartFlows installed if you want to follow.
So before proceeding, make sure you download and install CartFlows Pro from here.
1. Set Up a Free Product
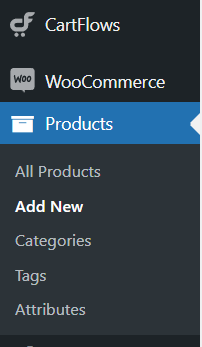
Let’s start by adding a new product. If you have WooCommerce installed, you should see the “Products” section on your sidebar once you log into the WordPress admin dashboard.
- Click Products and then click Add New.
- Now, enter the name of the product, add a description, and set the price to 0.
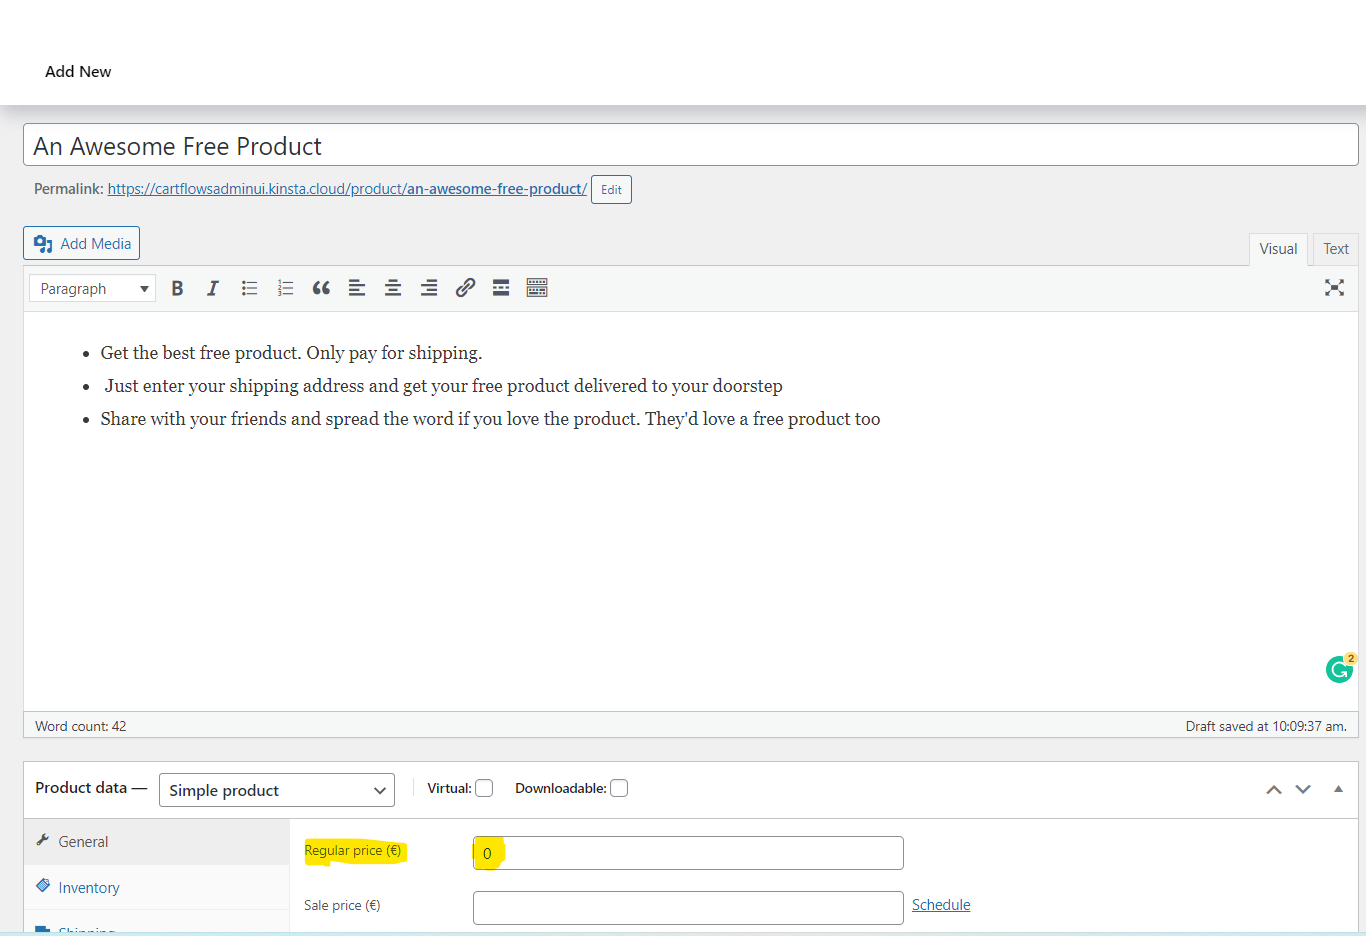
- Add any product images at the end of the page.
- Once you’re done, hit Publish
- You’ll see your product on the All Products page as shown below

2. Add a Shipping Fee
Next, you need to configure a shipping fee in WooCommerce.

- Go to your WooCommerce settings
- Next, click the Shipping tab on the settings page
- Now create a shipping zone by clicking Add Shipping Zone
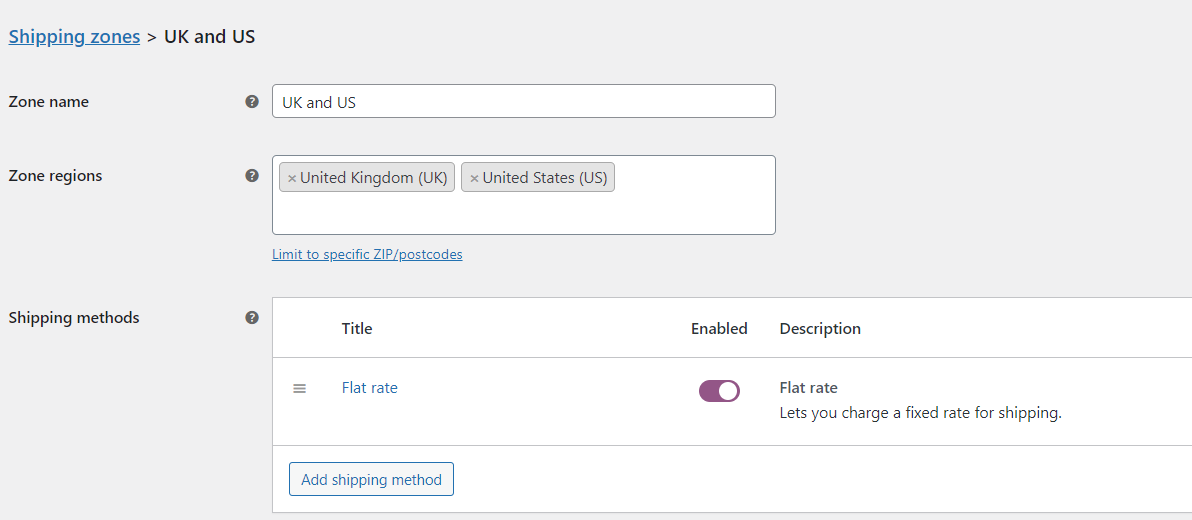
- Enter the name of the zone, select the countries where this zone applies.
- Finally, add a shipping method. I have used the flat rate shipping method in this case. But you can choose the type of shipping that’s most profitable for your store.
NOTE: If you want to add a shipping fee only to your free plus shipping products, follow this guide by WooCommerce to add per product shipping.
Upgrade Your WooCommerce Cart for a Better Experience
Before you move on to creating your free plus shipping funnel, it’s a good idea to make sure your cart experience is just as smooth as your checkout.
WooCommerce’s default cart page can feel clunky and outdated, which may cause visitors to hesitate before reaching checkout , especially when you’re running a free offer.
That’s where Modern Cart comes in. Modern Cart upgrades your WooCommerce cart with real-time product updates, smart product recommendations, easy coupon handling, and a sleek, mobile-friendly design.
Your customers can adjust quantities, apply coupons, and move to checkout smoothly, all without extra page loads or confusion.
If you want to remove every possible friction point and keep your free plus shipping offer looking professional, enabling Modern Cart alongside your CartFlows funnel can make a huge difference.
Modern Cart is easy to set up, fully customizable to your brand, and built to drive more completed checkouts.
Curious to see it in action? This video shows you everything you need to know.
Get started with Modern Cart.
3. Create a new CartFlows flow
Great! We just created our free product. Now let’s create our checkout flow using CartFlows.
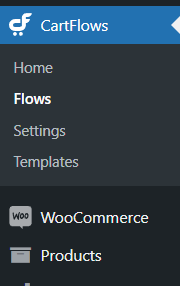
- Click CartFlows from your sidebar and go to Flows
- Next, click Add New
- You can choose from the existing flows or start from scratch here. We will Start from scratch so we can configure everything ourselves.
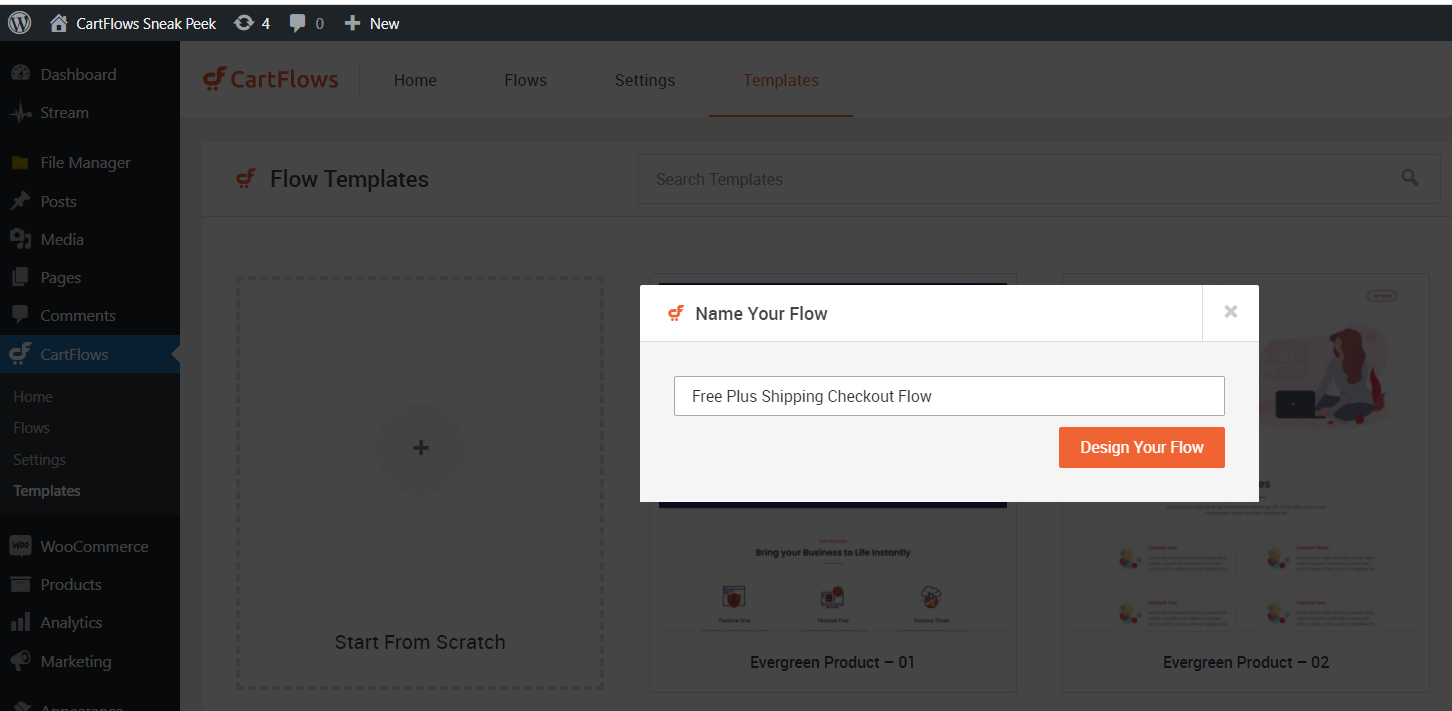
- Enter the name of the flow and click Design Your Flow
- On the flow page, you should see three steps – Sales Landing, Checkout (Woo), and Thank You as shown below

- You can choose to delete them and start from scratch, or simply click Edit for individual steps to change the designs and templates.
- Edit the Sales Landing page from scratch here or import an existing template to begin your editing.
How you edit the landing page to optimize for conversion is a vast subject and a few lines cannot do justice to it. You can check out landing page best practices on Wordstream and Hubspot to get started.
4. Configure the checkout form
Cartflows gives you a very easy way to integrate a checkout form for any page. It is available as a block for your page builder.
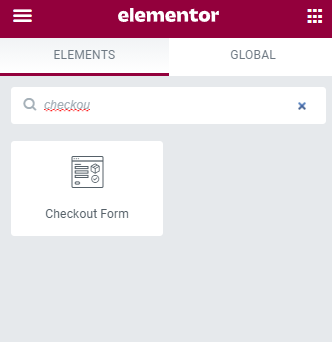
The configuration for this form can be done from the CartFlows flow that you created in the previous step. Let’s learn how.
- Click CartFlows from your WordPress sidebar menu and then click Flows
- Click the flow that you have created for your free plus shipping product.

- Now, click Edit for your Checkout step. In our case, that’s step #2 and is named Checkout (Woo).
- Go to the Form Fields tab and choose to show or hide the fields as required.
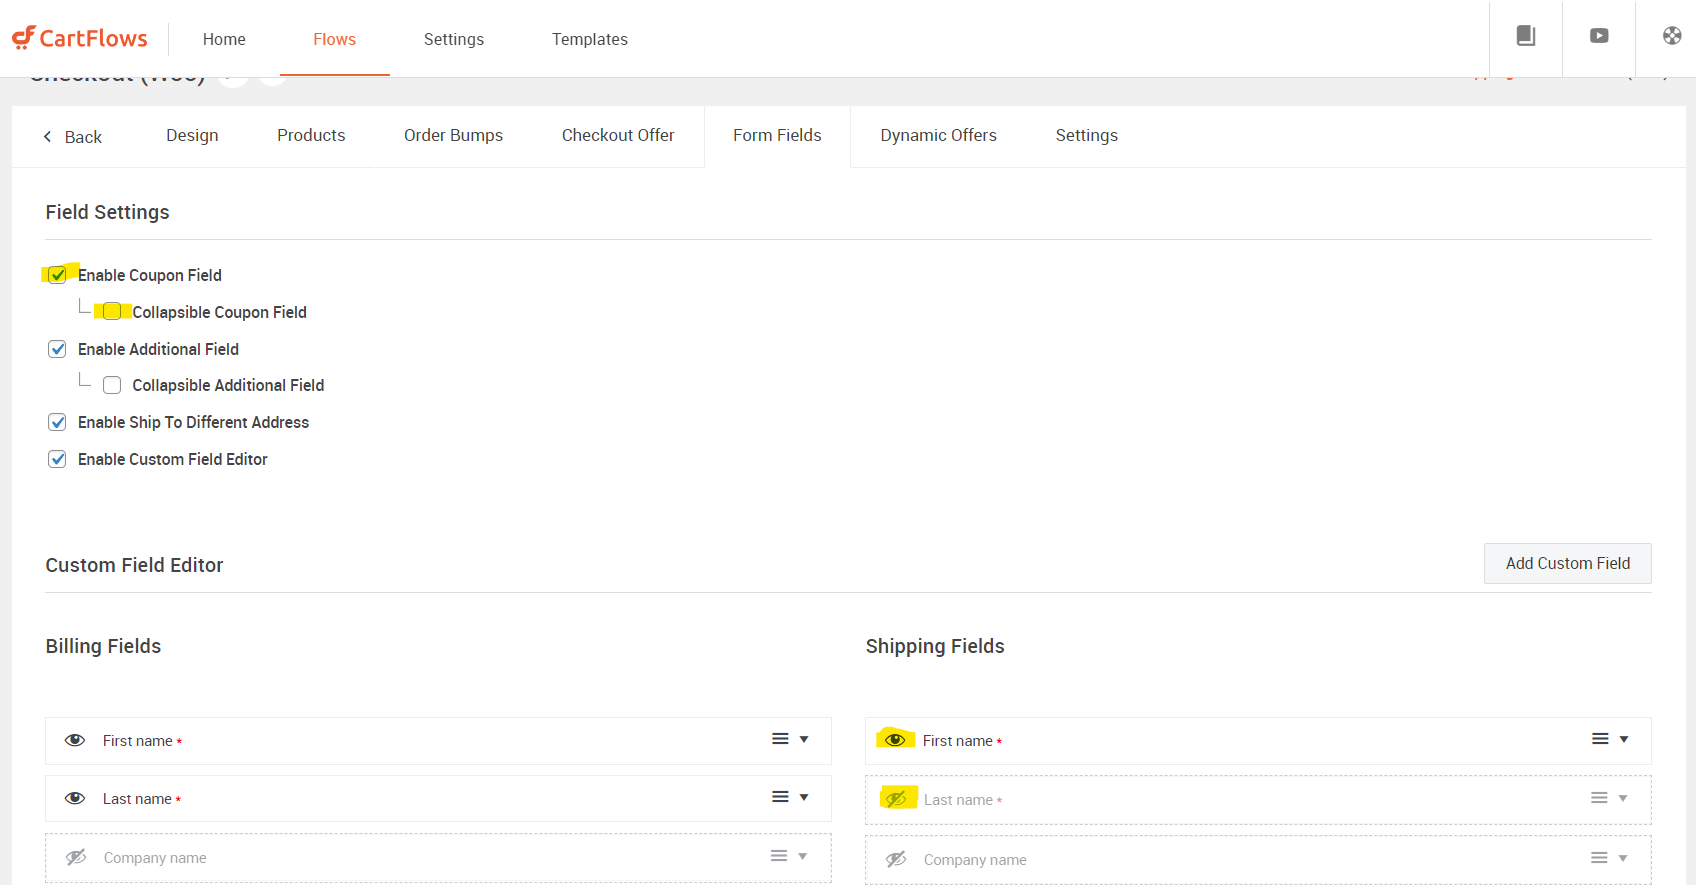
- Play around with the settings in the rest of the tabs to suit your needs and make sure to Save Settings before switching between tabs.
- Finally, add the Checkout Form block to your page as shown in the below image.
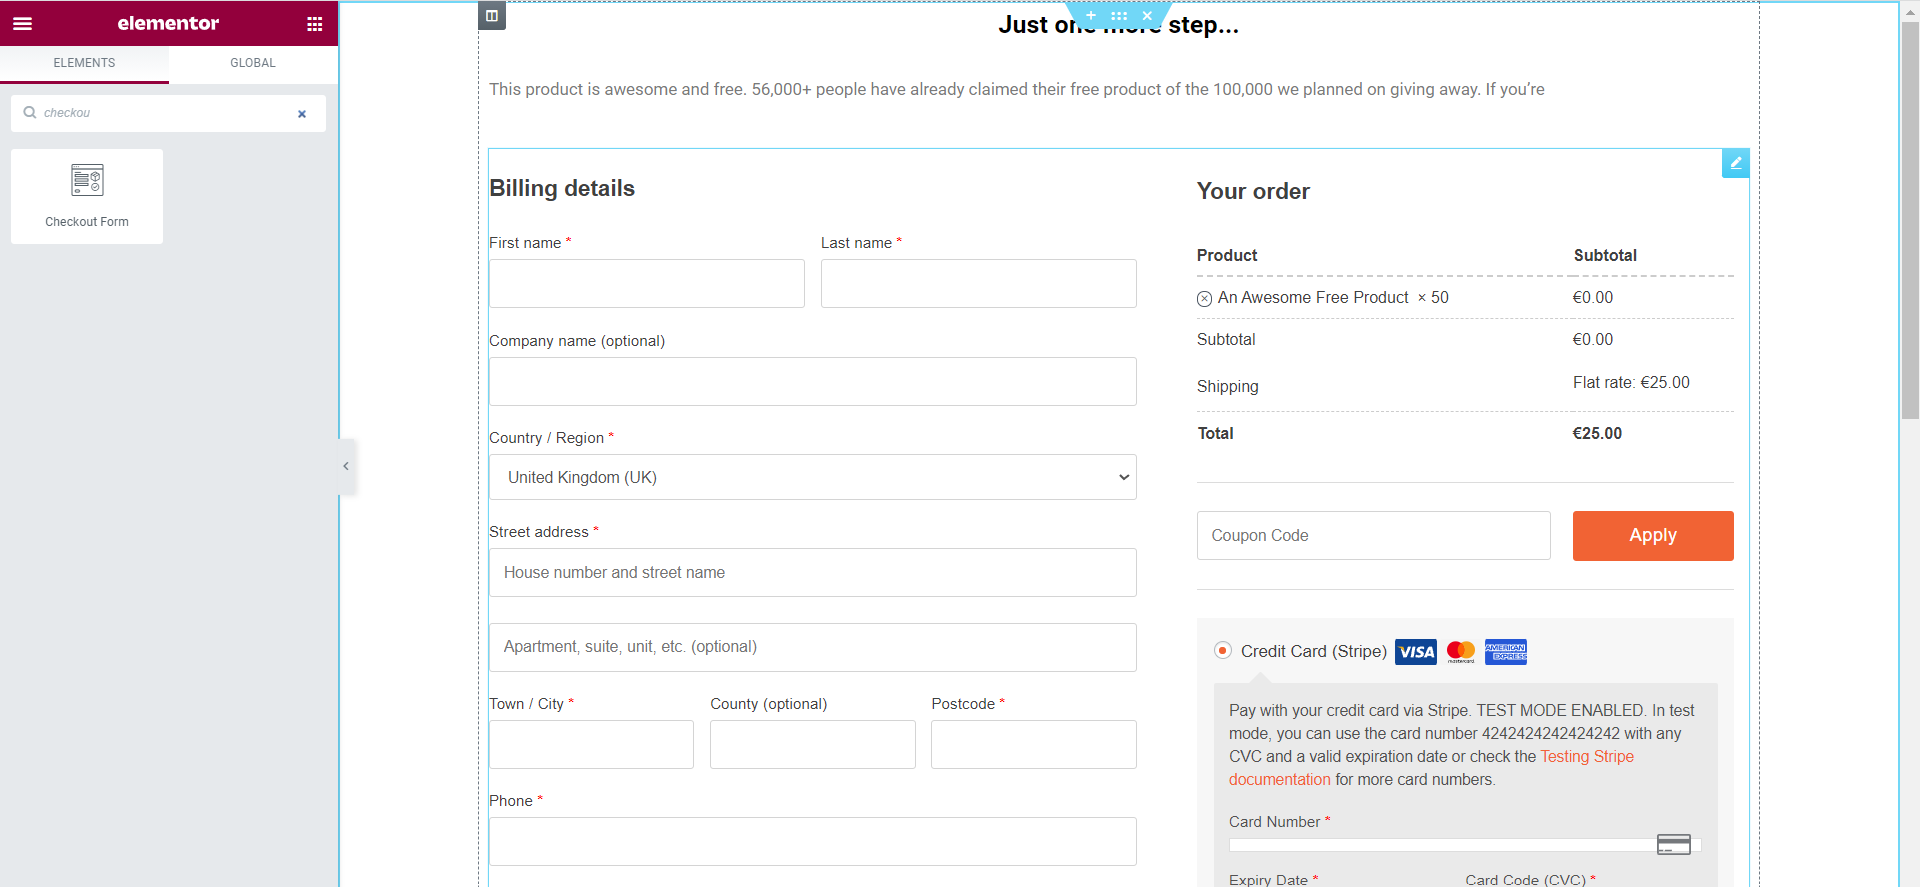
- You’ll notice the shipping fees, the form fields, and all other required fields are automatically added to your page.
Design the rest of your page and save it.
That takes care of our checkout step. Now, let’s implement the upsell.
5. Implement an upsell within the checkout flow
An upsell can help you turn this free plus shipping funnel into a profit machine much faster.
Since the default flow offers 3 steps, we need to add a new step for the upsell.
Let’s go ahead and set up an upsell in this step.
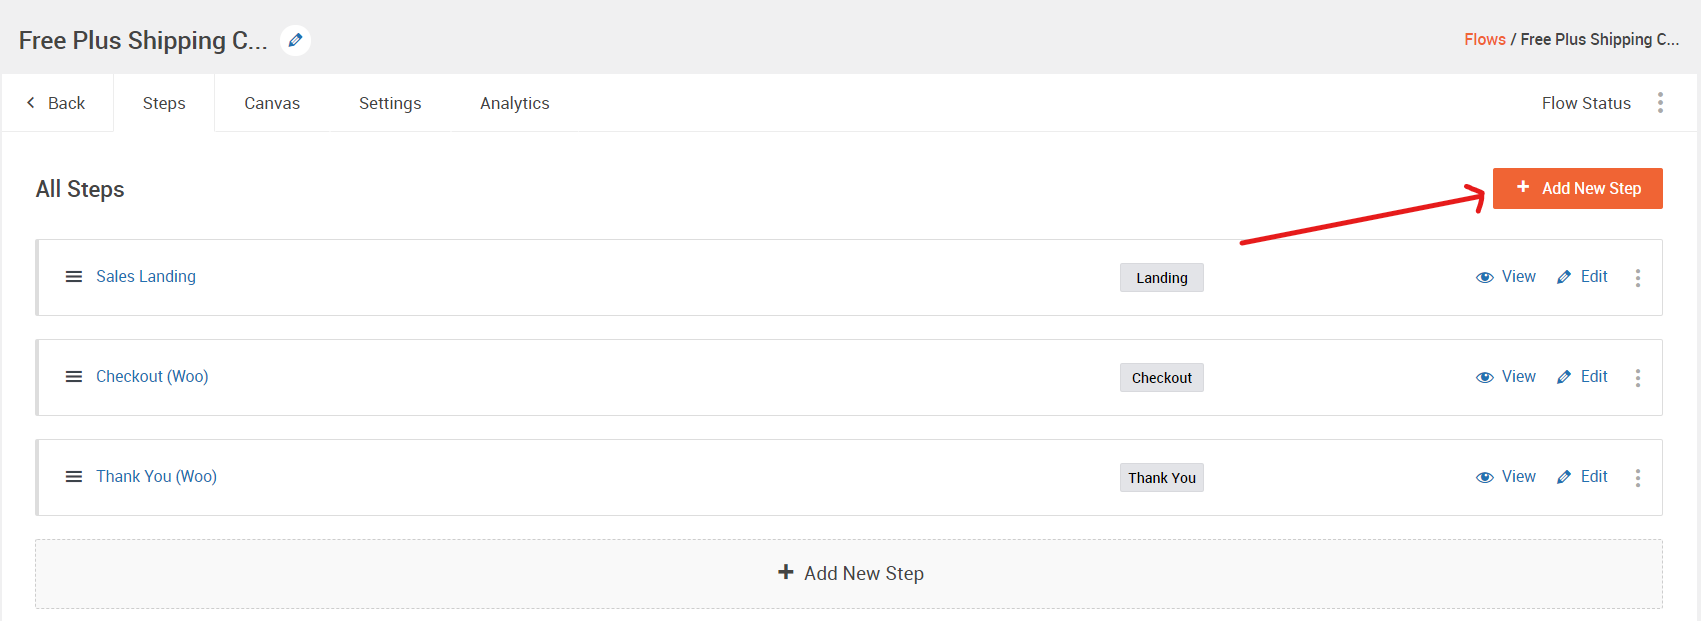
- Start by clicking Add New Step which will redirect you to the step setup page.
- Choose one of the Upsell (Woo) templates from the Ready Templates section or create your own using Elementor as we did for the other steps. Make sure you choose Upsell as the type of step.
- The upsell step is added to the end of the list of steps. So make sure you drag it right above the Thank You step.
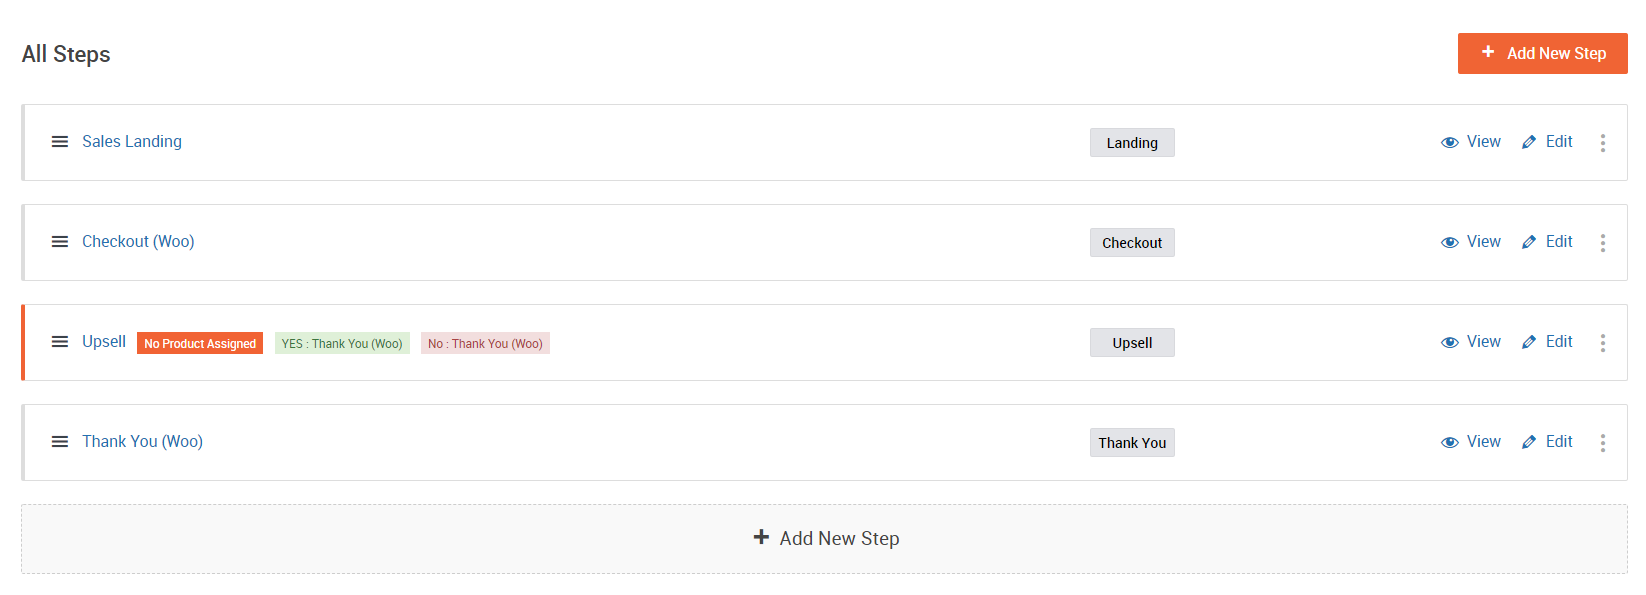
Great, now the upsell step is added. We have to set it up with the right products.
- Edit the upsell step and go to the Products tab.
- Select a product by typing in the first input box and set up the shipping rate and discount for the product
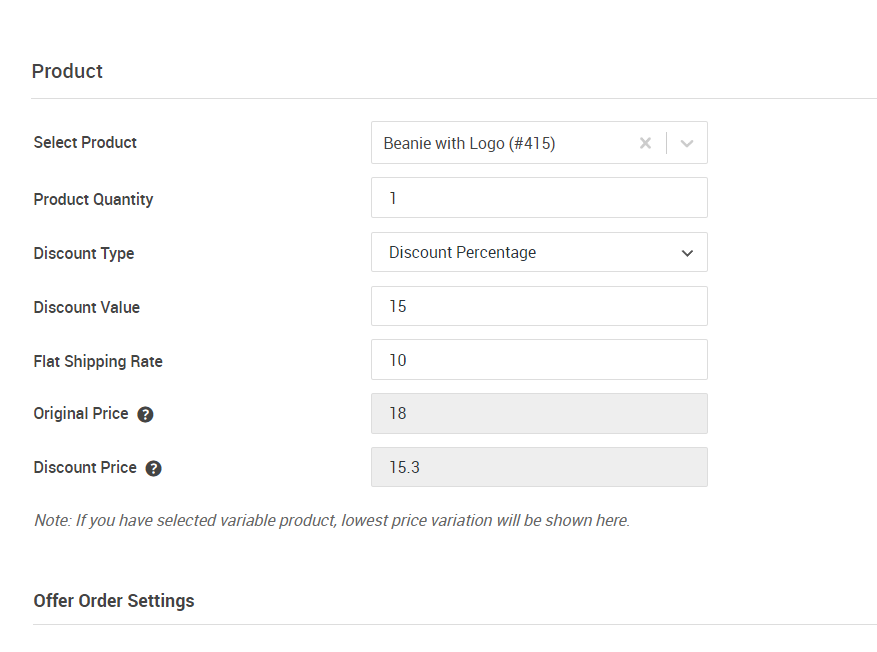
- Click Save Settings.
- You can set up additional steps in the same manner and conditionally redirect the user to those steps from the settings of the upsell step.
- We need to finally design our upsell page as we did for our other pages
Once you’re all set, we move on to our final step.
6. Create a thank you page that makes them come back for more
The closing of the transaction is as important as the landing pages.
We need to ensure that:
- The user gets a confirmation for their payment
- They can find answers to all their questions right away including when they can expect the order, how they can track it, how they can reach out to you for any support, etc.
- A back to home/store page button that keeps customers on your website
Edit the thank you step from the All Steps page of your flow. Use your page builder to add all the required information and make it visually appealing to your customers.
Save your settings and go back to your flows.
Click View to see your newly created checkout flow and landing page.
Conclusion
Free plus shipping is a powerful tool to kickstart an eCommerce business.
This guide was written to help understand the concept and psychological triggers behind free plus shipping, and create a basic free plus shipping checkout flow using CartFlows.
It may require testing to figure out the right product for your niche. But once you find one, the free plus shipping method can be a highly profitable venture.
So go out there and try our different ones. You might just find the best product for your store.
