Instant Layout is a clean, fast-loading, conversion-focused layout built right into CartFlows. It’s ideal for digital products like music, software, and eBooks, and offers a distraction-free experience with an intuitive interface.
How to Enable Instant Layout for Upsell/Downsell Steps
There’s no additional setup needed!
If you already have Instant Layout enabled in your funnel settings:
- The layout will now automatically apply to your Upsell and Downsell steps.
- There’s no need to recreate or manually modify those steps.
If you haven’t enabled Instant Layout yet:
- Go to your Funnel > Click the Settings (
 ) icon in the top-right.
 - Enable the Instant Layout toggle.
Customizing Upsell & Downsell Steps Using Instant Layout
Once enabled, you can customize the appearance of your Upsell and Downsell steps directly in CartFlows:
- Navigate to the Funnel step list.
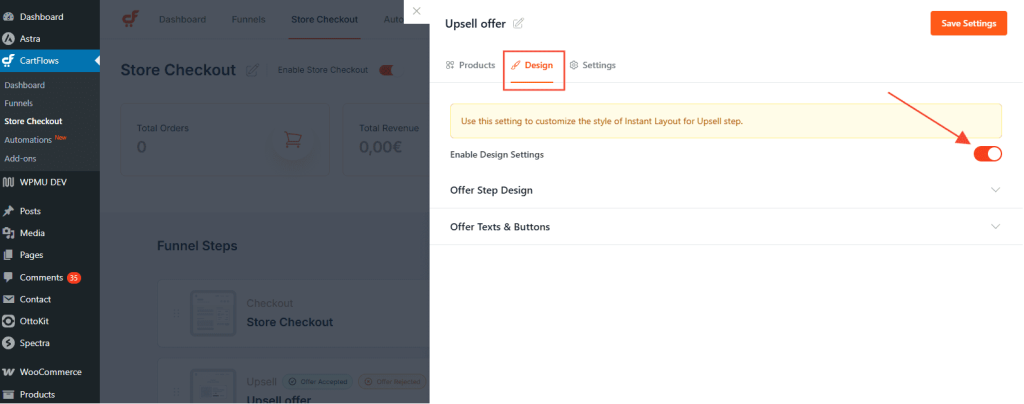
- Click Settings on your Upsell or Downsell step.
- A new Design tab will appear.
- Use the Design options to change:
- Button labels and styling
- Typography
- Colors
- Layout-specific options
This makes customization easy without needing to open a page builder.
Frequently Asked Questions
]]>How to Use the Rollback Feature
To use the Rollback feature in CartFlows, follow the steps below.
1. Navigate to the CartFlows Settings
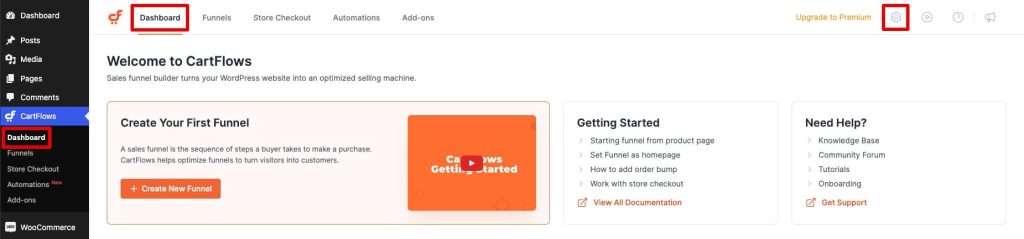
Go to CartFlows > Dashboard and open the Global Settings by clicking the gear icon.
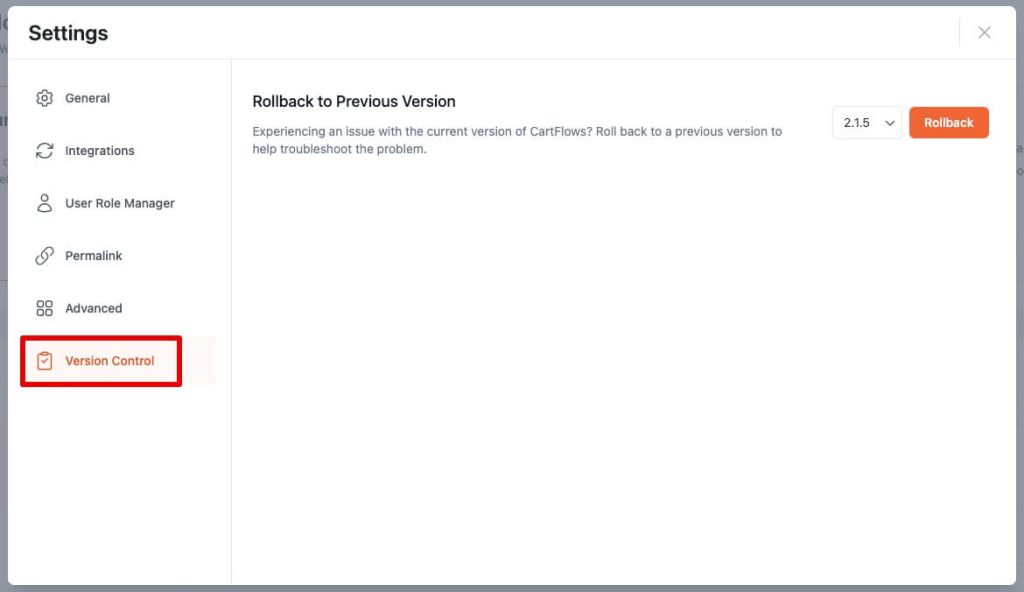
2. Locate the Version Control Section
In the Settings window, find the Version Control section. This section allows you to revert to a previous version of the CartFlows plugin.
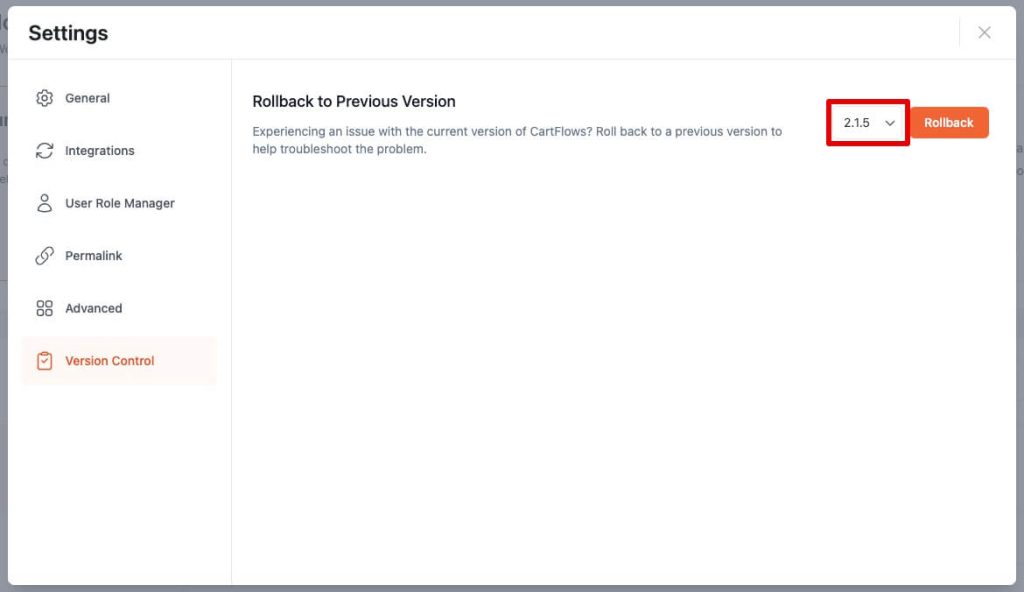
3. Select the Version to Rollback
In the Version Control section, you will see a dropdown menu listing the previous versions of CartFlows. Select the version you want to revert to.
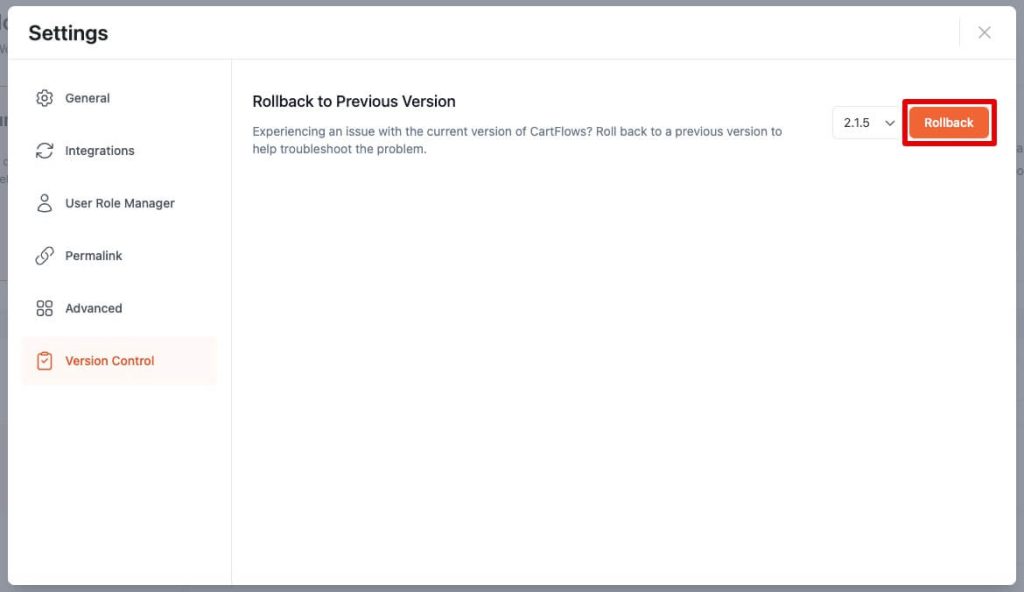
4. Click Rollback
After selecting the desired version, click the Rollback button. The plugin will automatically revert to the selected version.
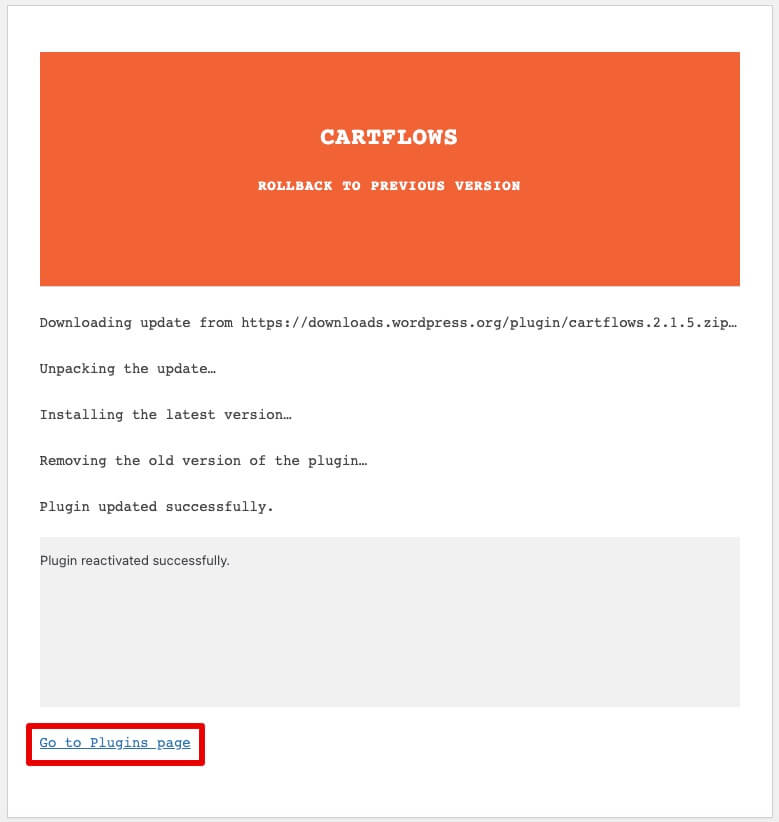
5. Confirm and Return to Plugins Page
Once the rollback process is complete, you will see a confirmation message. Your CartFlows plugin is now reverted to the selected version. Click the Go to Plugins page link to return to the Plugins page.
Important Notes
- Backup Your Site: Before performing a rollback, it is recommended to take a full backup of your website to avoid any data loss.
- Compatibility: Ensure that the version you are rolling back to is compatible with your current WordPress and WooCommerce versions.
Inspired by Shopify’s fast-checkout experience, this layout includes a modern, conversion-focused design with essential customization options. It’s ideal for users who want a straightforward solution that integrates seamlessly with their existing CartFlows funnels or store checkout.
How To Set Up Instant Layout
Step 1: Import a ready-made funnel or create one from scratch.


Step 2: Click on the funnel name to open the funnel steps.

Step 3: On the funnel edit screen, you’ll see a list of all the steps in your funnel.

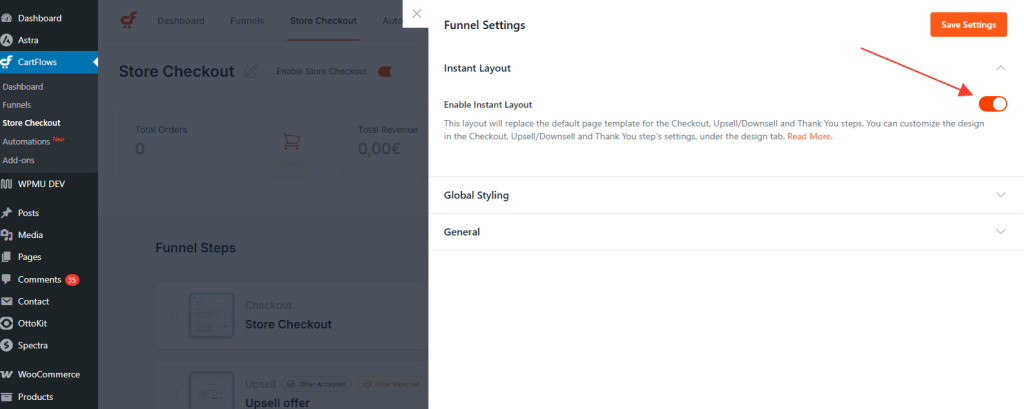
Step 4: Click the Settings button (cog icon) in the top-right corner of the screen.

Step 5: Navigate to the Instant Layout section.

Step 6: Enable the toggle to activate the Instant layout for both the Checkout and Thank You steps.
Once enabled, this layout will be applied immediately, giving your customers a fast and focused checkout experience.
In the latest version of the CartFlows i:e 1.11.6 & 1.11.5 we have introduced a new dynamic offer rule named Order Custom Field. So you can redirect your users to specific upsell/downsell by comparing the values entered on the checkout page by the users. You can use the default WooCommerce checkout fields as well as custom fields added using the custom field editor or any other third-party plugin.
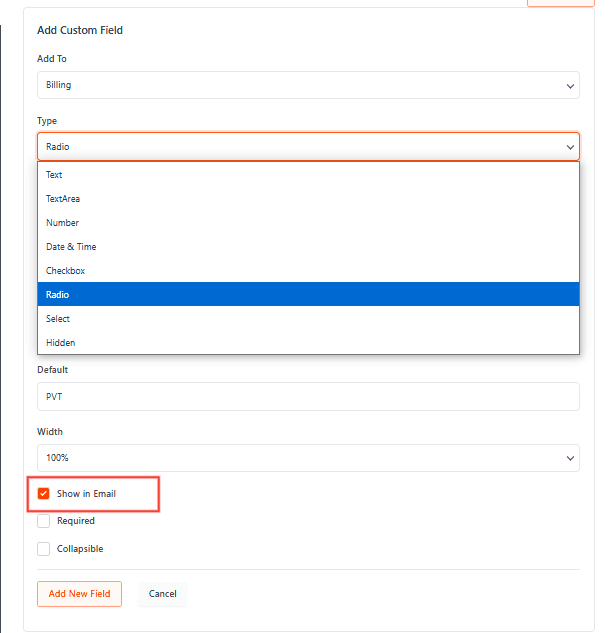
Along with it, we have introduced the Show in email option for the CartFlows checkout field editor. If you want to show custom field details in order emails then just enable it.
So let’s have an example of how to use this new rule. In the below example, we are using the Radio field which is introduced in the same update.
If you are new and don’t know how to add the new custom field on the checkout page, then here is the article which will help you to add a new custom field.
Now, let’s consider you have followed the steps mentioned in the above article to add a new custom field, then below are the steps to add a condition/rule on the checkout page for the newly created custom field.
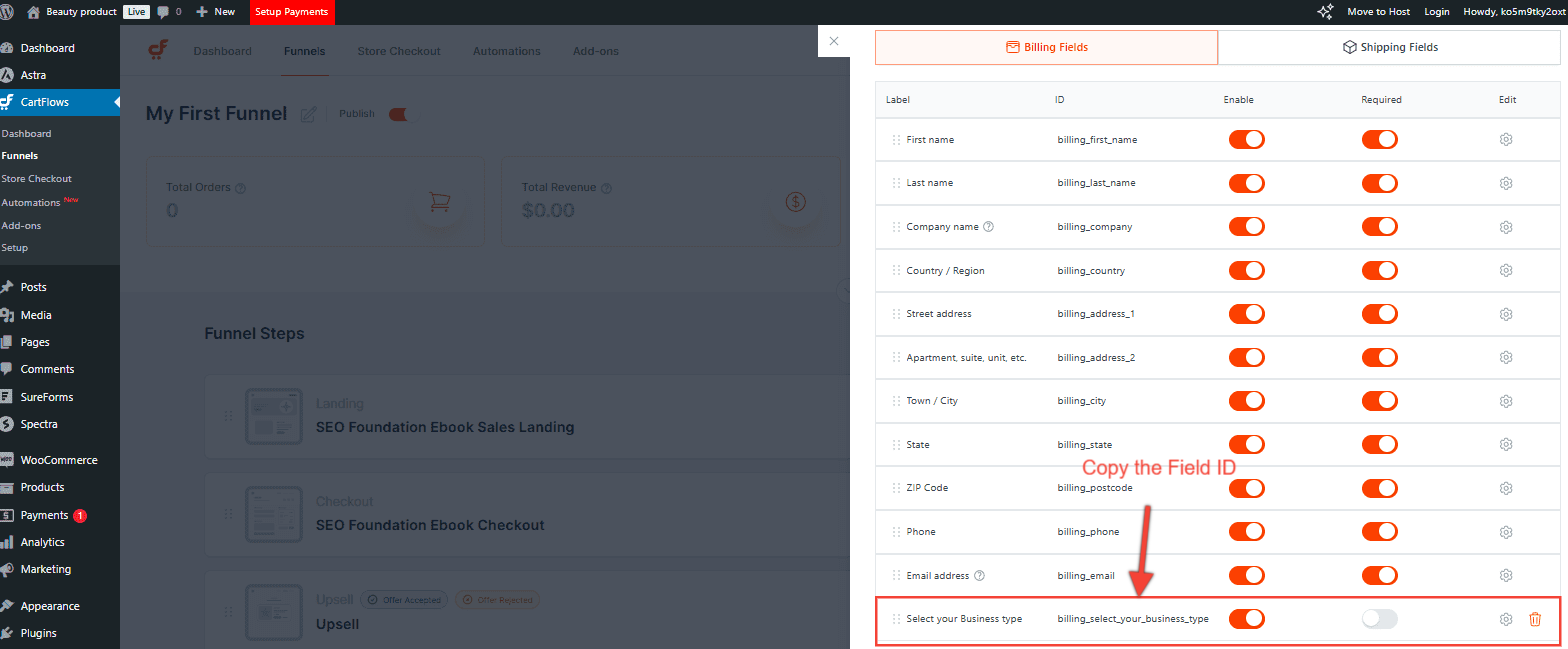
Step 1: Navigate to the custom field editor and look the custom field for which you want to add a condition.
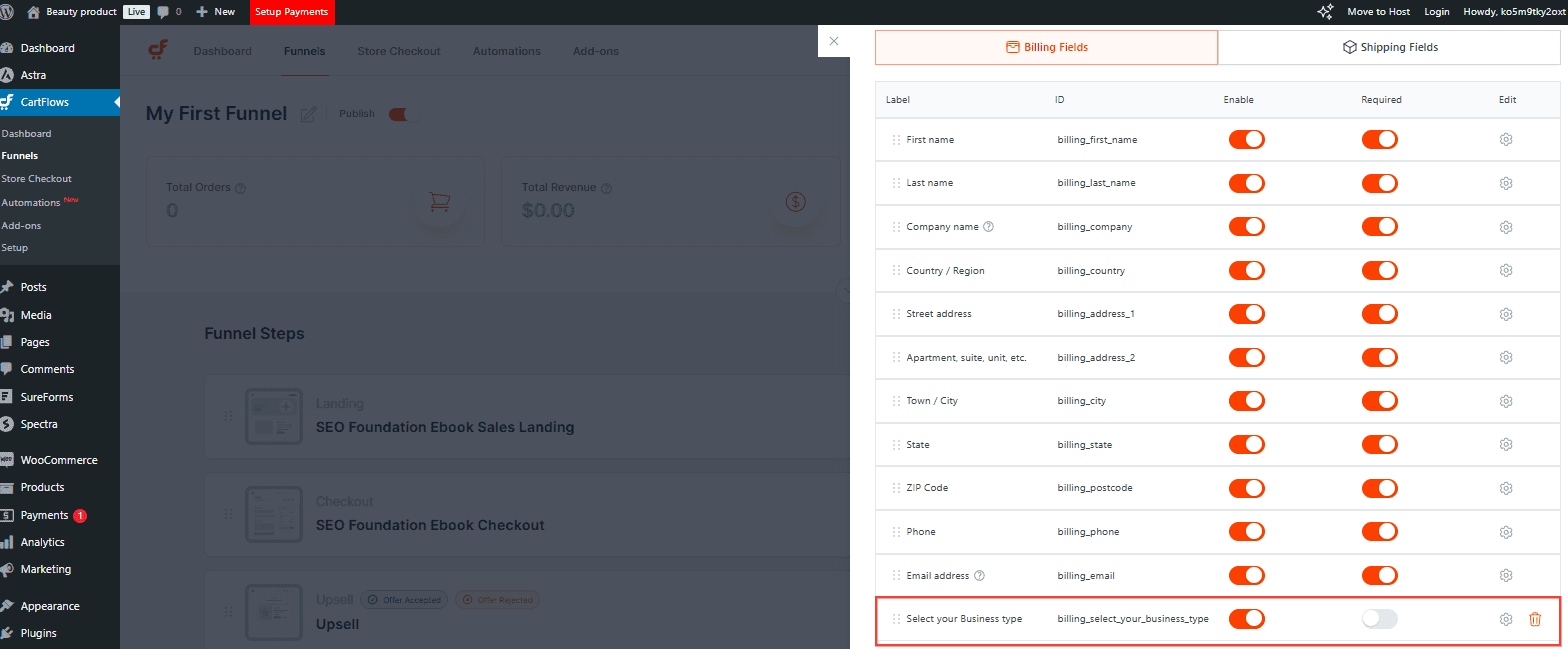
Step 2: After locating the custom field, you will see more options for that field, then copy the field ID.
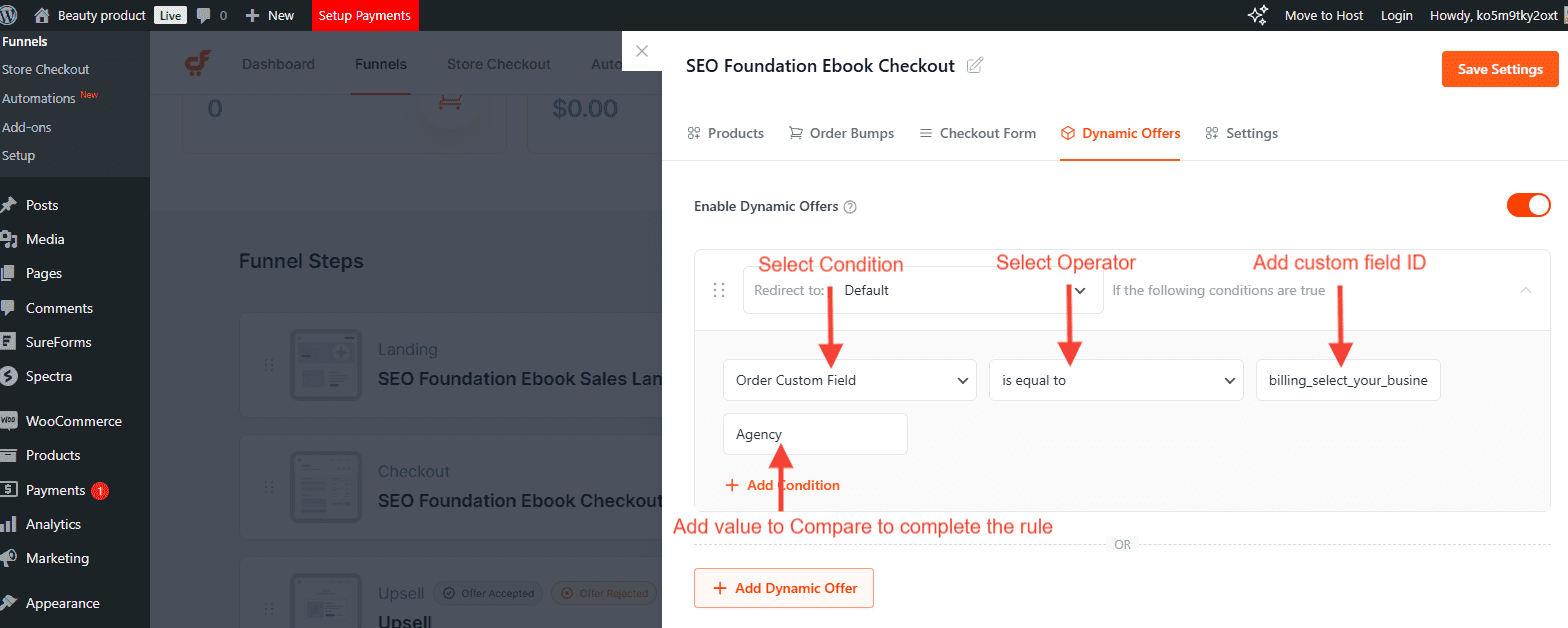
Step 3: Now, navigate to the Dynamic Offers/Conditions tab on the Checkout page and enable it.
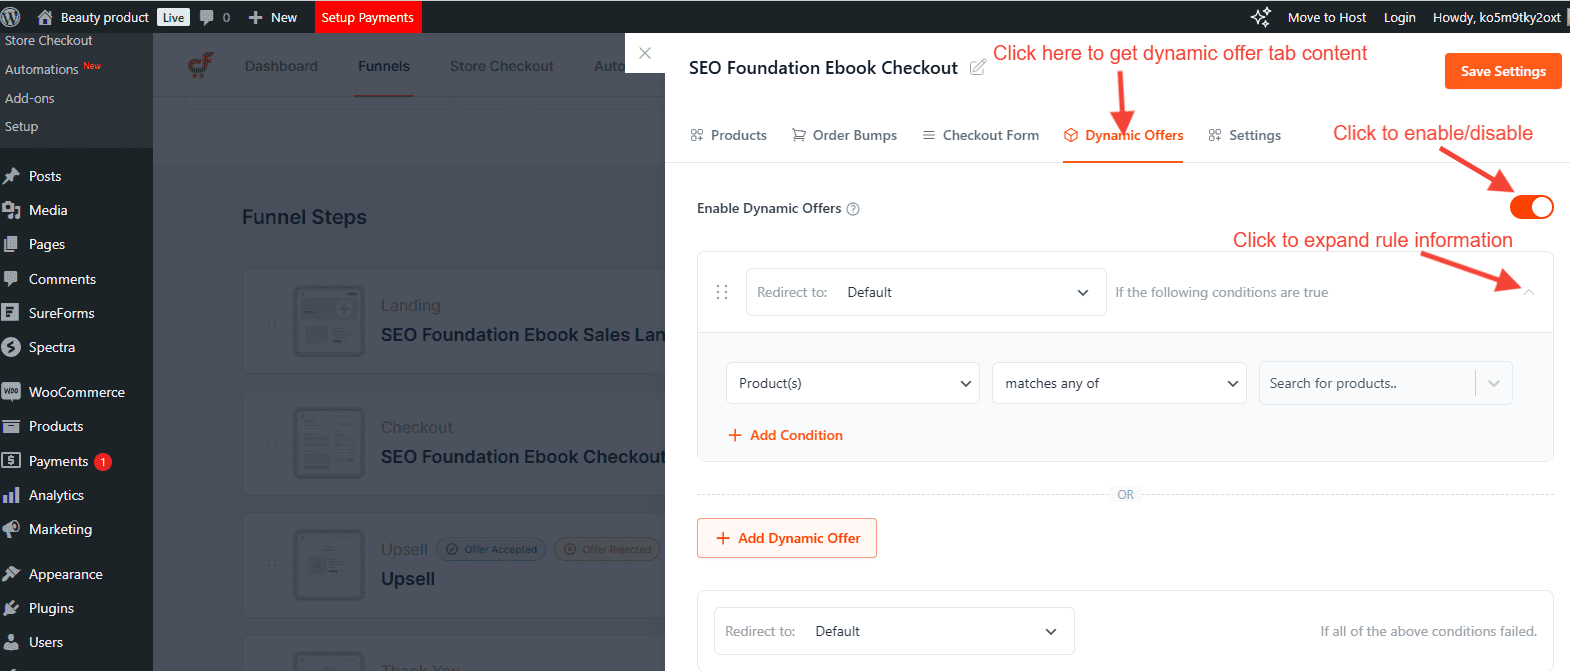
Step 4: Add a rule and select the Order custom field option in the first option.
- Now select the condition
- Then paste the field key in the next field which we have copied in step 2.
- Then add the expected value that will be compared when the order is placed so as to display the offer. Make sure that you add the expected value as it is as you have mentioned in the Options field while creating the custom field.
Step 5: Click the save settings button to save the changes. Now your rule is set and ready to use.
]]>Note: We are deprecating the Next-Step redirection option from Order Bump in the next major update. As we have introduced Dynamic Offers, you can now set the conditional redirection with more robust conditions.
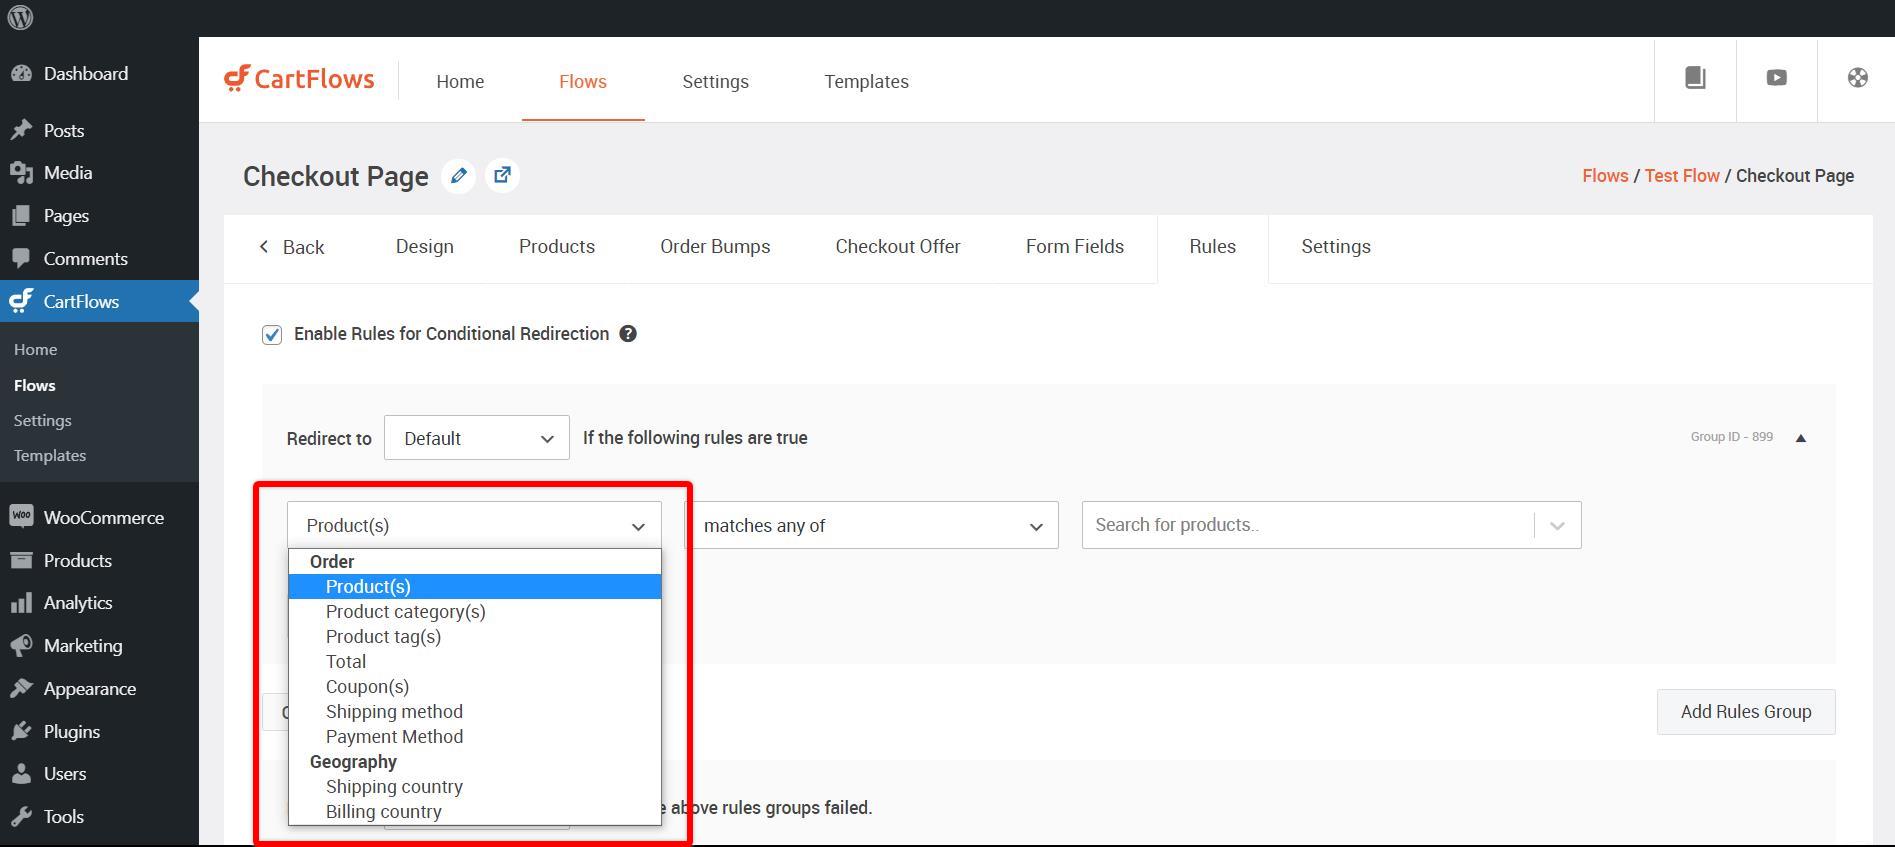
Using this feature, you can set the custom redirect conditions on the checkout page to display the upsells/downsells on the basis of conditions.
For these conditional redirects, we have added many useful conditions using which you can easily achieve your requirements of showing the upsell/downsells with conditions.
In this Dynamic Offers, we have introduced grouping of the conditions, which will provide you the ease of access while setting multiple conditions and a way to group each other.
So, you might be wondering what the groups are?
The simple explanation is that the Groups are the list of combinations of one or more conditions.
In each of the groups, one condition is in the AND relation with another condition and each group is in the OR relation of another group as showing in the below Image.

You can re-order the groups according to your needs or if you want to prioritize the conditions on the checkout page. To re-order the groups, simply drag-drop the groups just like you do in the CartFlows Custom Field Editor.
Let’s see how to use this feature and its setup.
Once you update the CartFlows or install the 1.8.0 Beta version, you will get two new menus.
- Dynamic Offers menu in CartFlows Checkout Setting page
- Canvas menu in Flow where all of the steps are listed.
Let’s see the Dynamic Offers menu
Here is how to set up the rules.
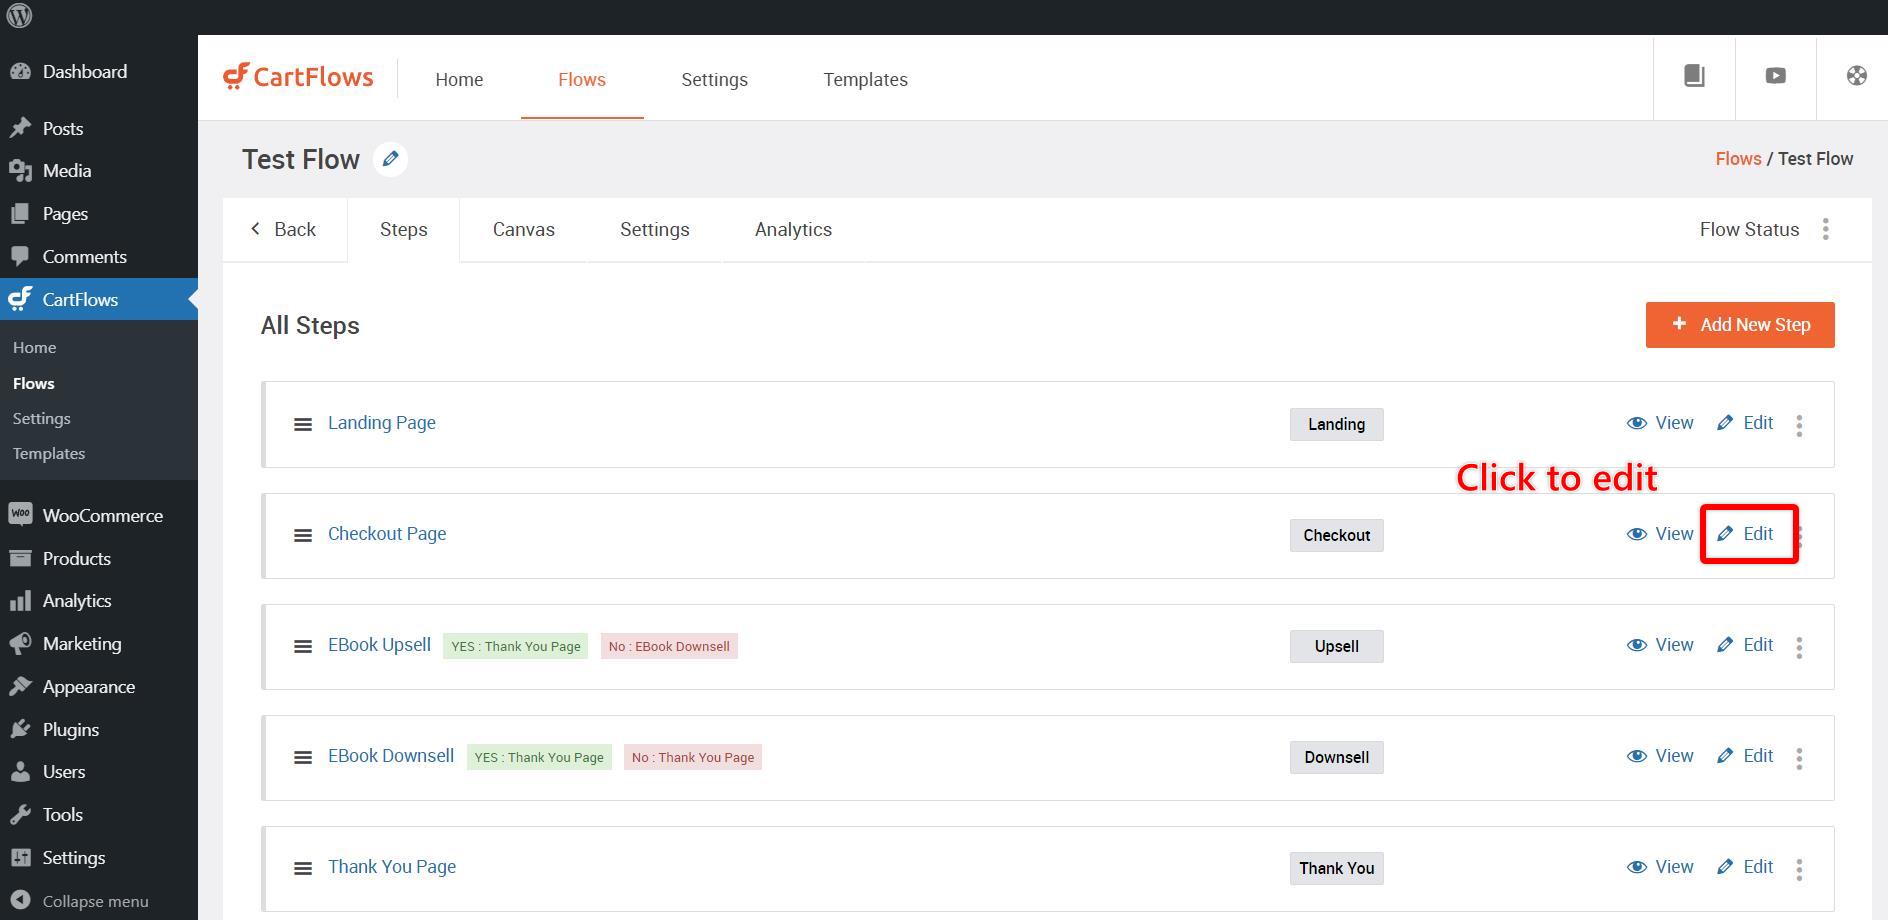
Step 1: Navigate to the CartFlows -> Flows
Step 2: Open your flow in which you want to add/edit/update the conditions.

Step 3: Click the edit button of your Checkout Page.
Step 4: Navigate to the Dynamic Offers Menu.
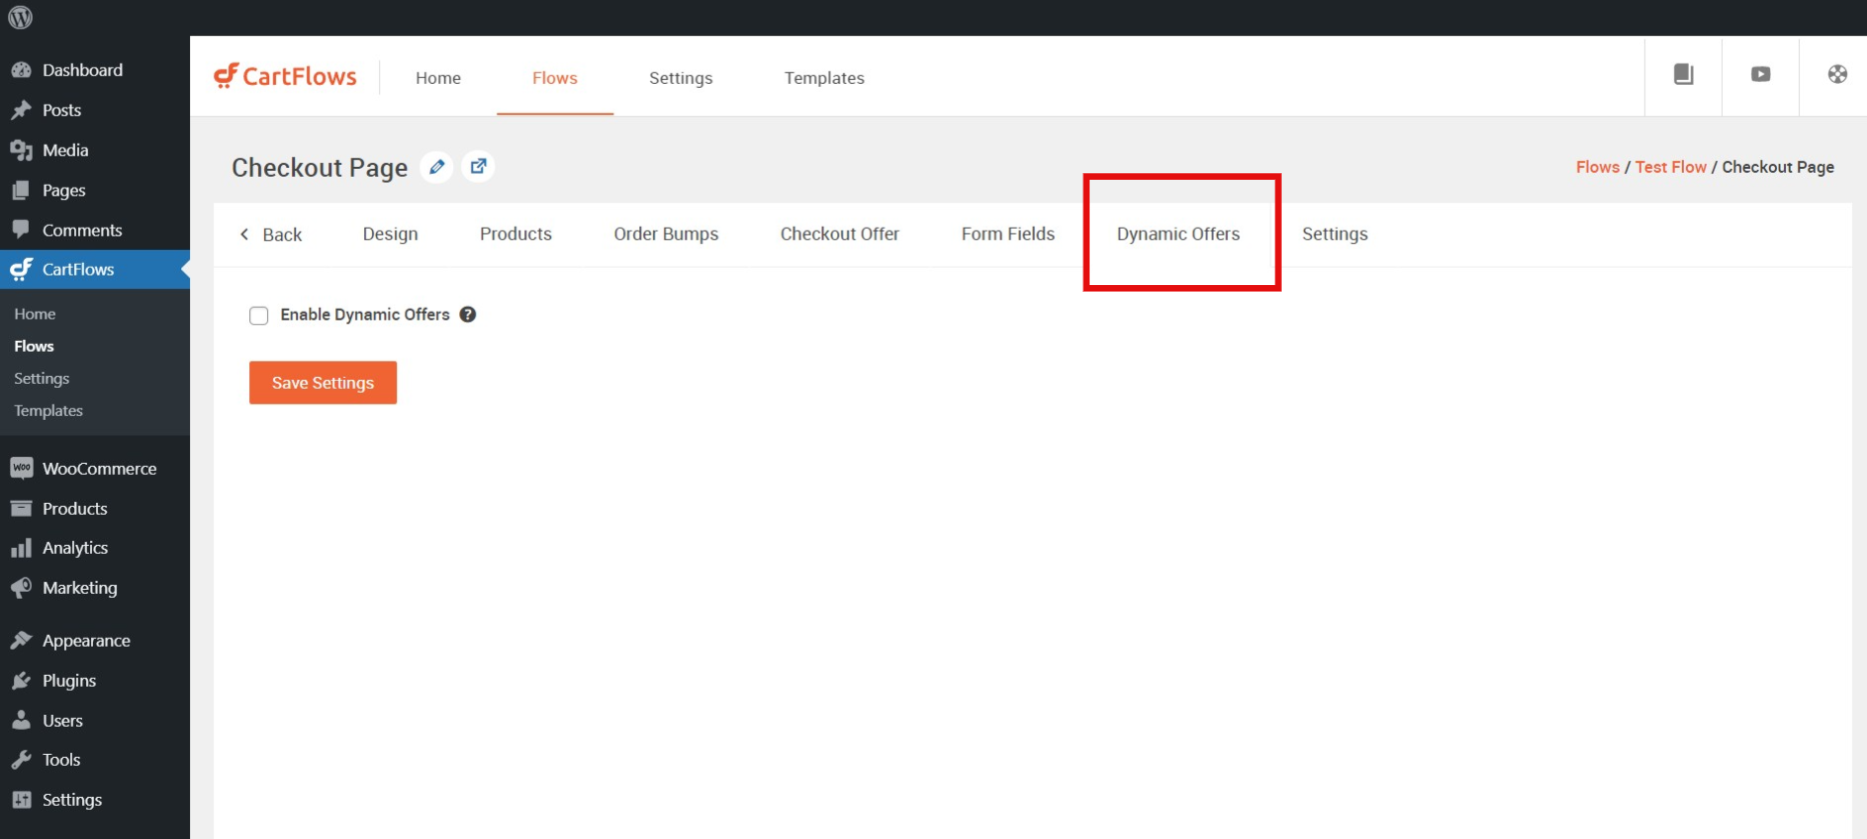
Step 5: Click on the Checkbox to enable the Dynamic Offers setting and click on a small icon to see the conditions.
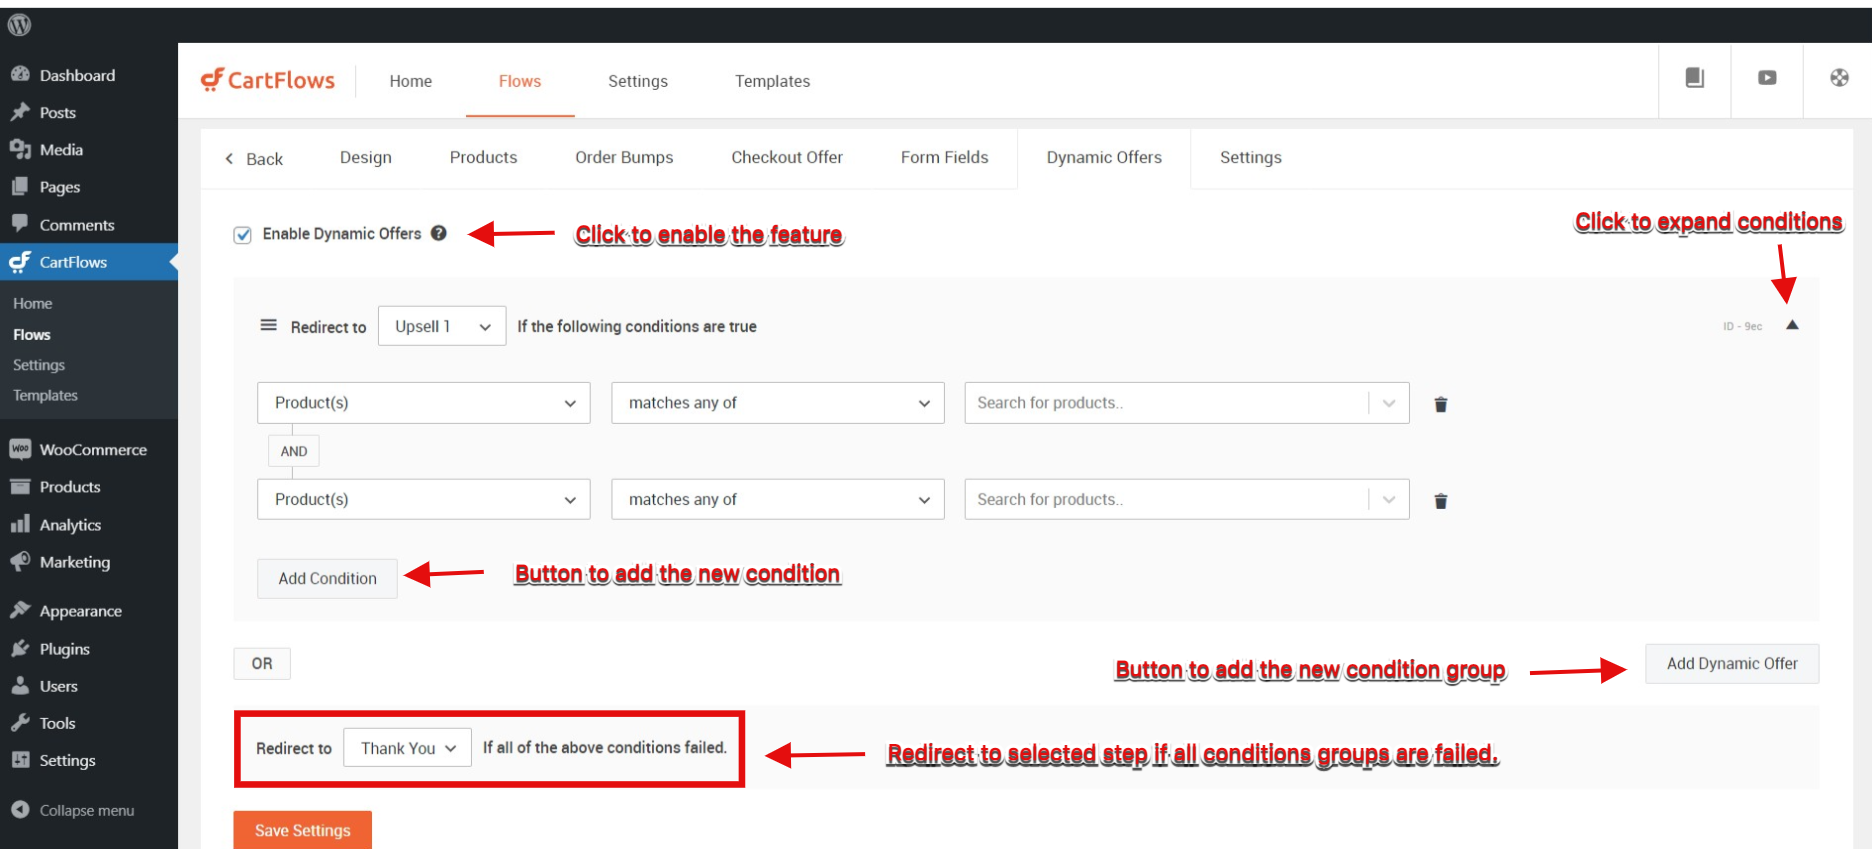
Step 6: Select condition, relation and compare to option to set one condition.
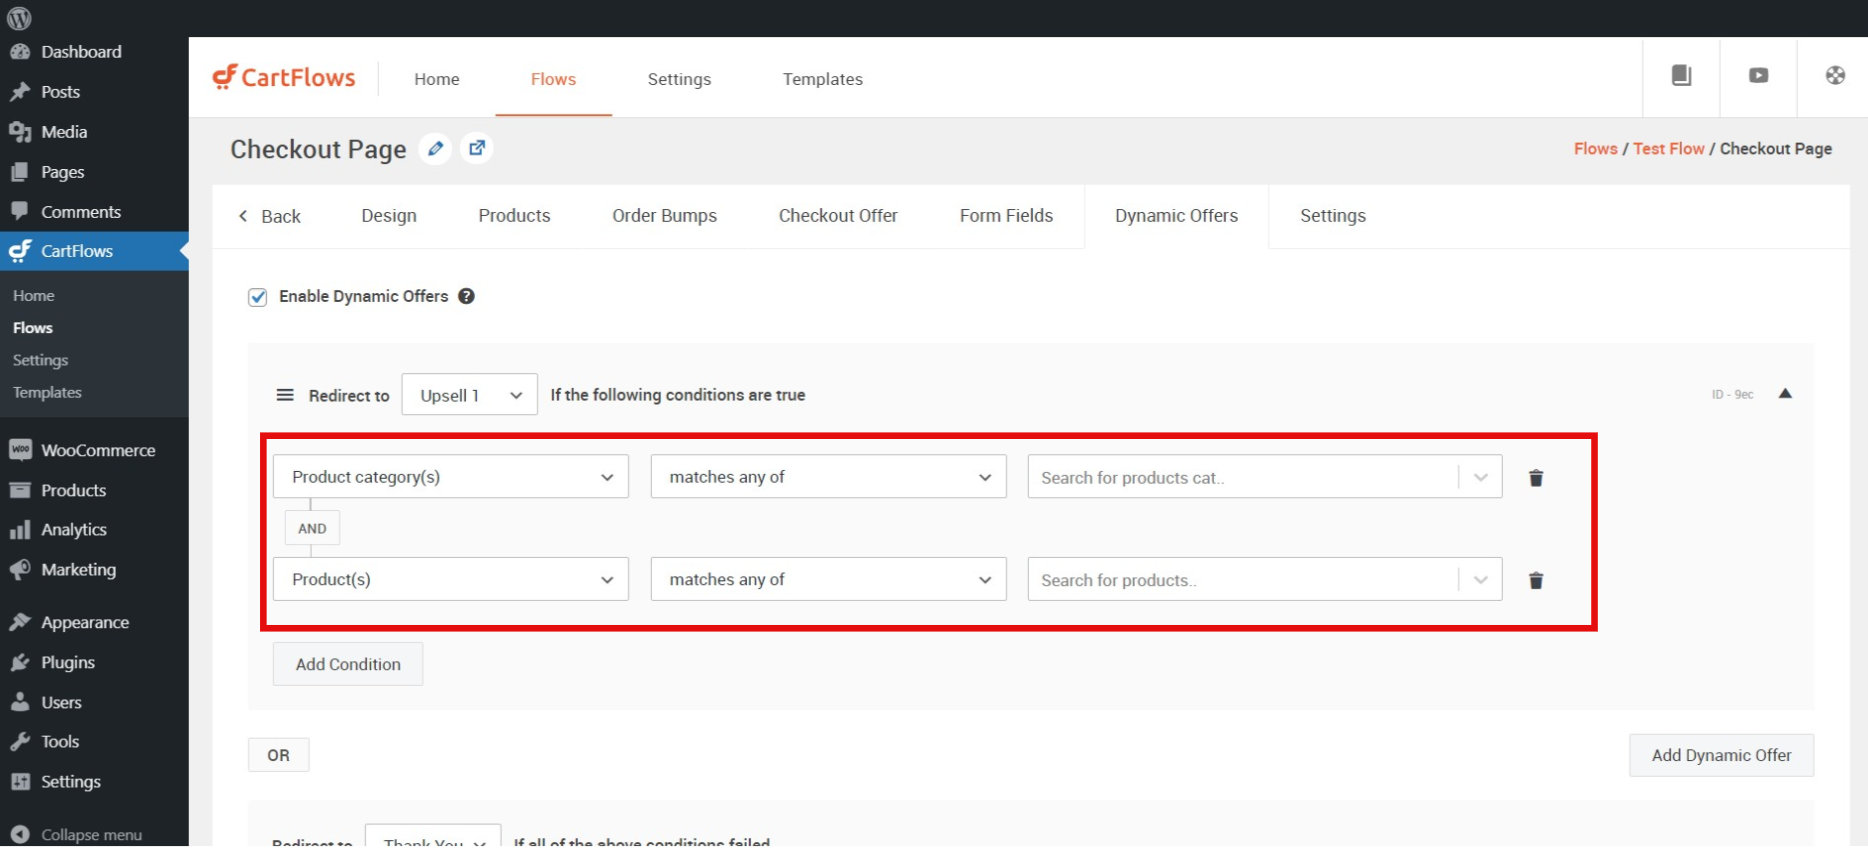
Step 7: Click on Add Condition button to add more condition rows.

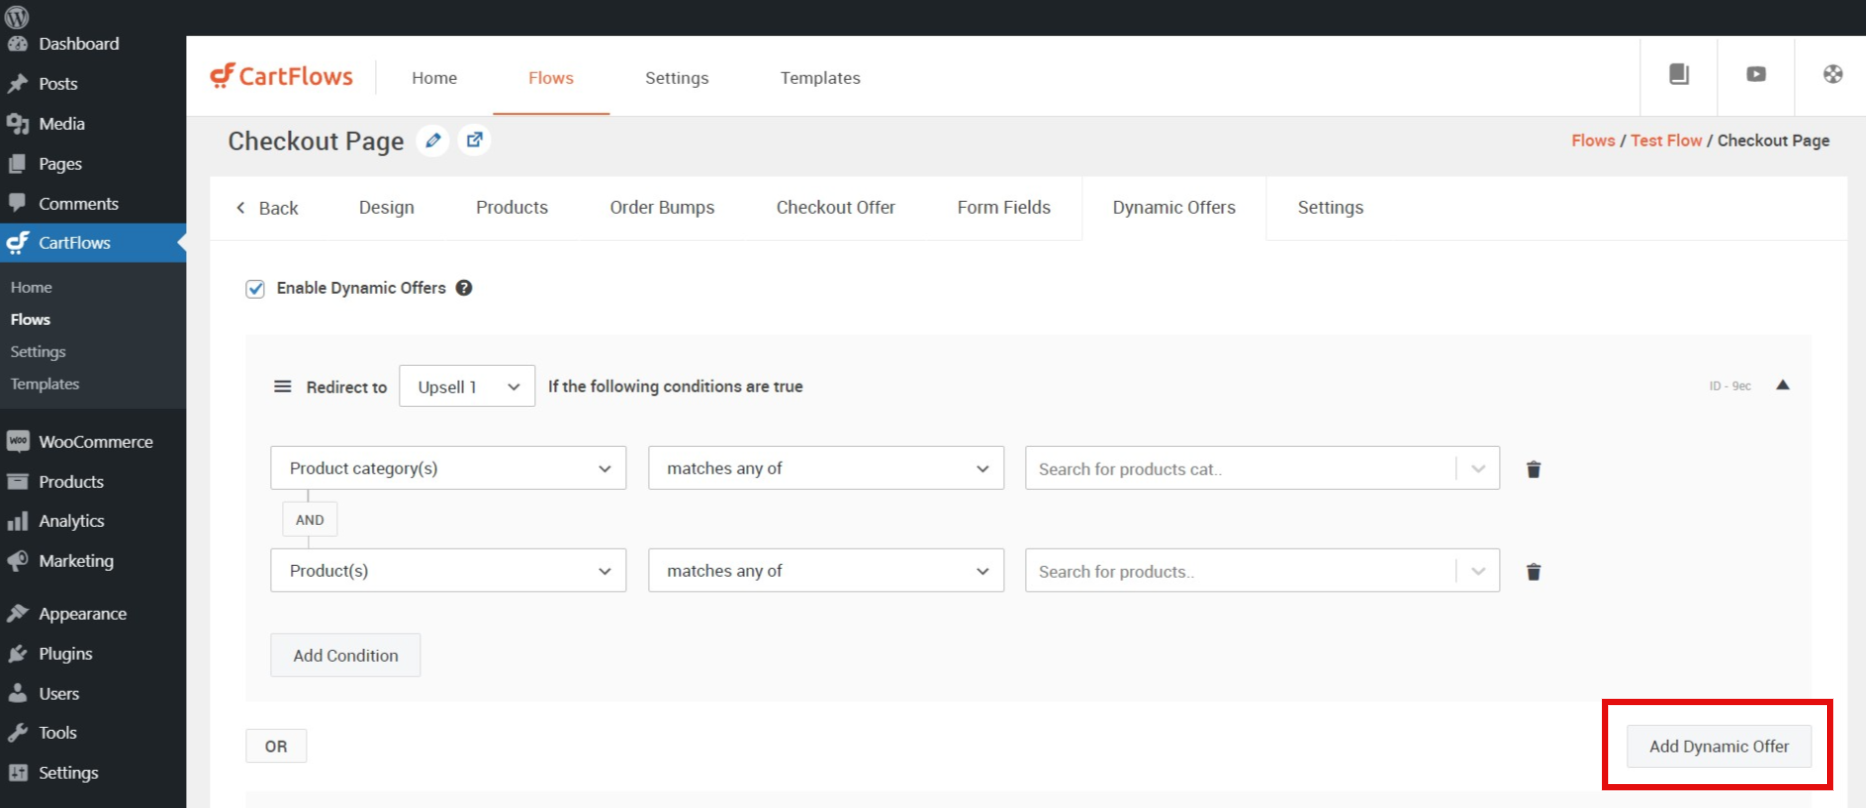
Step 8: Click on Add Dynamic Offer to add more conditions groups.
Step 9: Click the save changes button to save the conditions.
If you want to prioritize the conditions, then drag-and-drop the groups up/down to re-order them. It is not possible to move or drag-and-drop one condition row from any of the groups and add it to another group.
You need to remove/delete that condition row and simply add it again in the second group.
Once you are redirected to desired upsell/downsell pages, you can still use the conditional redirect options on upsell/downsell for the further redirect to complete the flow.
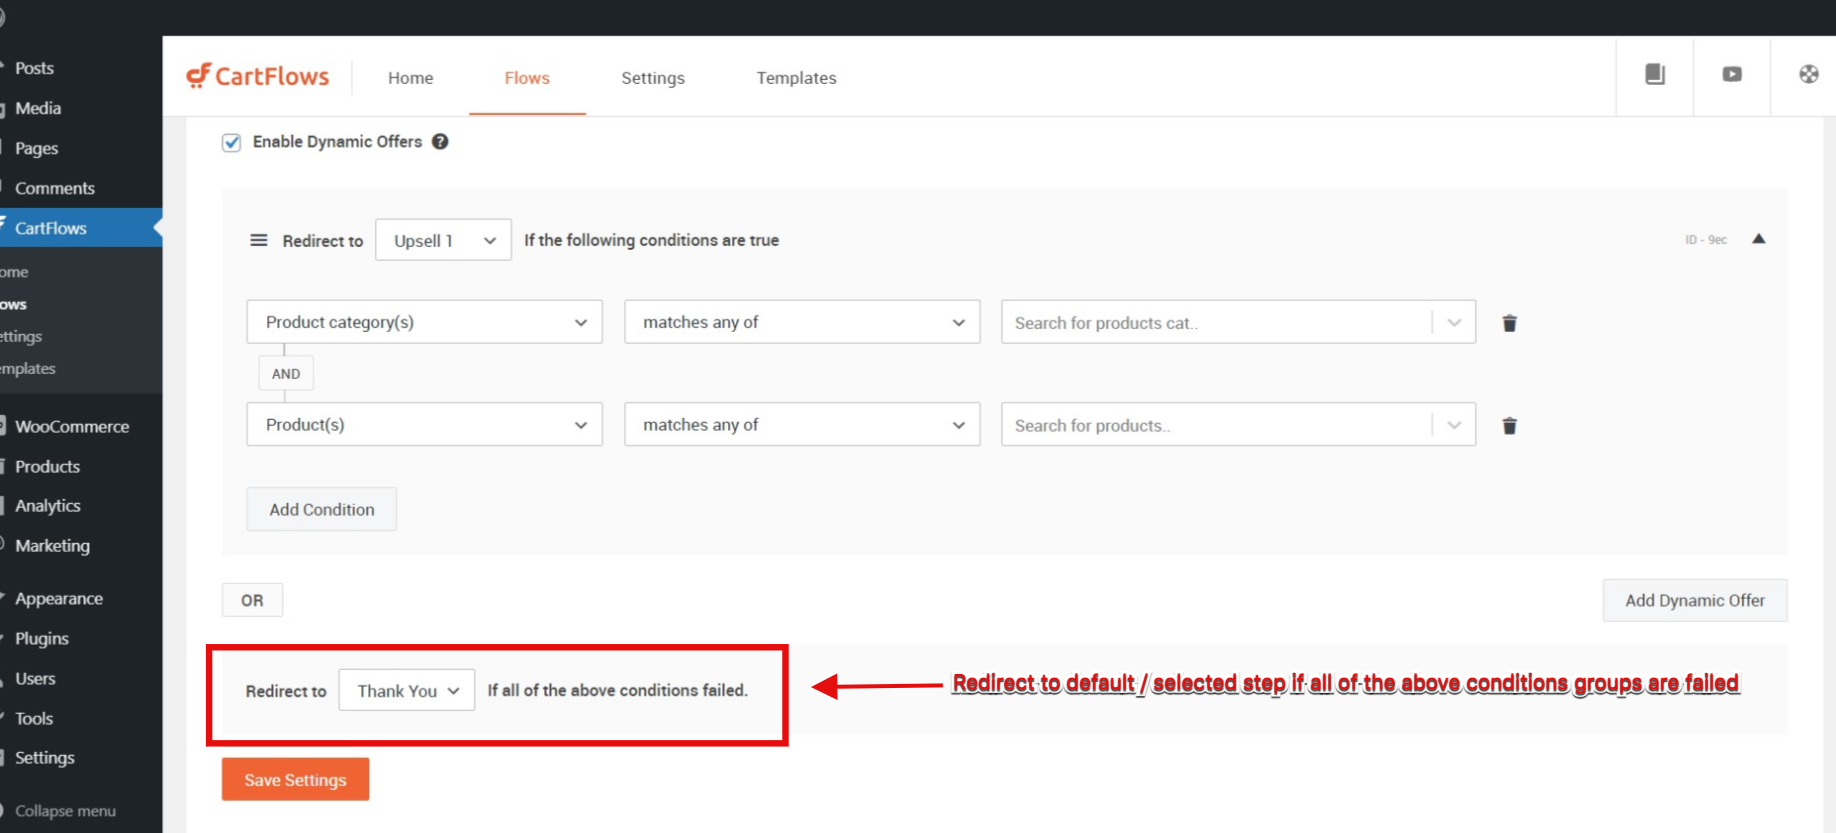
If all of the applied conditions groups are failed or are simply not matched with the user case, then you can set a default redirect that can be used by all types of users on the store.
Let’s see what is Canvas and what is it for?
In the latest update, the new menu is introduced in the Flow named “Canvas”.
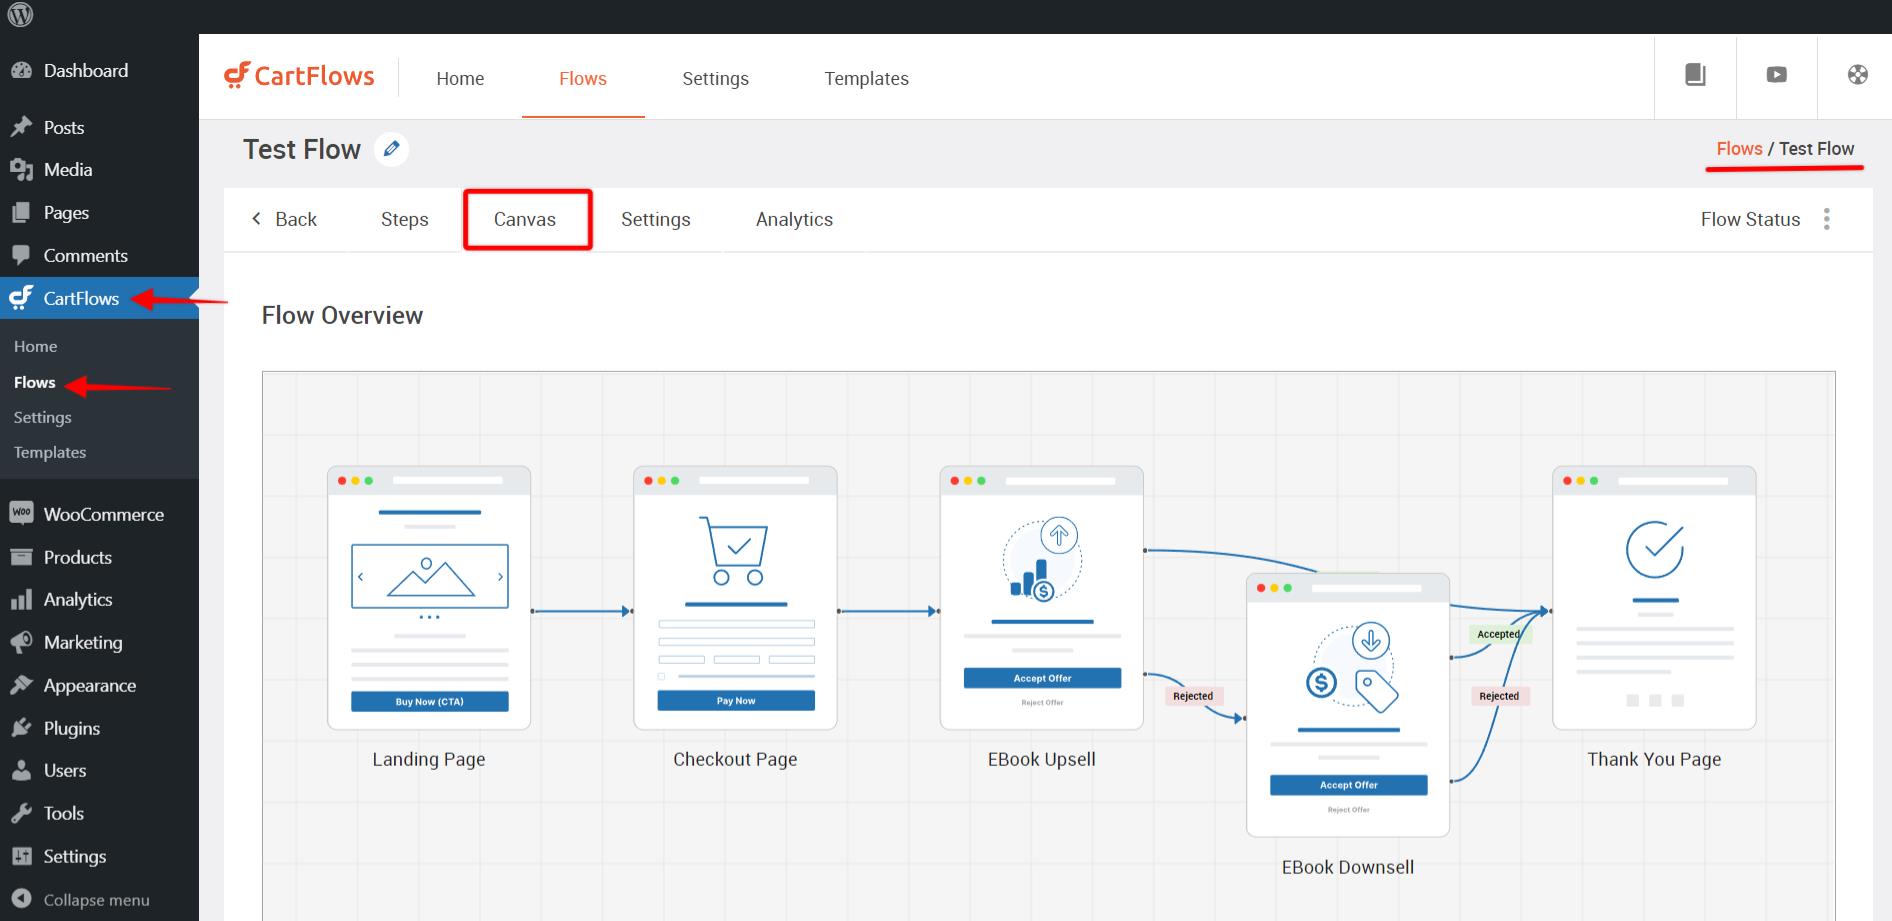
This canvas will give you a visual representation of the rules that you have added on the Checkout page.
Currently, this canvas is just for a visual representation of flow’s steps after applying the rules but in the future, it may be used to manage the Flow, and it’s a step with redirection from that single page.
There are few buttons on the canvas and they are as follows:
- Zoom-In
- Zoom-Out
- Fit to Screen
- Full Screen
Along with the canvas, if you press the control button and scroll up or down with the mouse wheel button it will also trigger the Zoom-in & Zoom-out features but it is for quick 0% to 100% zoom for ease of access.
While viewing the canvas in the fullscreen mode, you can click on the same button to close the fullscreen mode or simply press the control (ctrl) button from the keyboard to close the fullscreen mode.
The fit-to-Screen button will align your flow representation in the center of the canvas for full view.

Few Common Questions (FAQs)
Q- Can this be used for the pre-checkout and order bump products?
Ans – Yes. It will automatically be applied to the Pre-checkout and order bump features. You need to set the product-specific conditions in the CartFlows Dynamic Offers aka Rule Engine.
Q- Can the same conditions be applied on the Upsell/Downsell pages just like the checkout page?
Ans – No. These conditions are introduced for the checkout page of CartFlows. For upsell/downsell conditional redirects, we already have such a feature. Here is the article for the same.
Q- What if I set the conditions on the Checkout page as well as set the Order Bump Conditional redirect which feature will work?
Ans – In this case, the Conditions added on the checkout page will be applied and used. In future updates, we will be deprecating the Order Bump Conditional Redirect feature as we have introduced the conditional redirect feature on the checkout page.
Q- Can I use A/B split test with this condition-based feature?
Ans – Yes. You can use A/B split testing.
This documentation explains how to enable that setting and what it does.
What Gets Deleted?
When this option is enabled, uninstalling CartFlows will:
- Delete all CartFlows settings and options (including Global Settings)
- Will not delete funnels or steps from the database automatically
If you want to completely remove everything, including existing funnels and steps, make sure to delete them manually first before uninstalling the plugin.
Where to Find This Option
You can find this setting by going to CartFlows > Settings > Advanced tab

Steps to Enable the Delete Plugin Data Option
- Navigate to CartFlows > Settings > Advanced tab
- Click the toggle to enable Delete plugin data on plugin deletion
- A confirmation alert will appear
- Enter DELETE (in all caps) to confirm
- Click the Save Settings button
Once this option is enabled, uninstalling the plugin will automatically clean up CartFlows data from the database.
Watch It in Action
Prefer a quick demo? Watch the short video below that shows how to enable this option step by step:
This documentation explains how the feature works, how to structure your URLs, and how to find the product ID required for this functionality.
How the Feature Works
This feature is enabled by default in CartFlows Pro — there’s no need to activate it manually. All you need to do is:
- Use a product ID in the URL to add that item to the cart on the Checkout page
- Optionally include the quantity for each item
When a user opens the Checkout page URL with the appropriate parameter(s), the specified product(s) will automatically appear in the cart.
URL Parameters Format
To add a product to the Checkout page via URL, use the following parameters:
- ?wcf-add-to-cart=product_id
- &wcf-qty=quantity (optional – defaults to 1 if not specified)
Single Product Example
If you want to add Product ID 3 with a quantity of 4, the URL would look like:
https://yourdomain.com/checkout-page/?wcf-add-to-cart=3&wcf-qty=4If you omit the wcf-qty parameter, the default quantity will be 1.
Multiple Products Example
To add multiple products with different quantities, separate each ID and quantity with commas. For example:
https://yourdomain.com/checkout-page/?wcf-add-to-cart=3,6&wcf-qty=4,8This will add Product ID 3 with quantity 4 and Product ID 6 with quantity 8.
Important Notes
If you’ve already selected products in the backend of the Checkout step, and you also pass product IDs via URL — only the products from the URL will be used. The backend-selected products will be ignored.
How to Find the Product ID
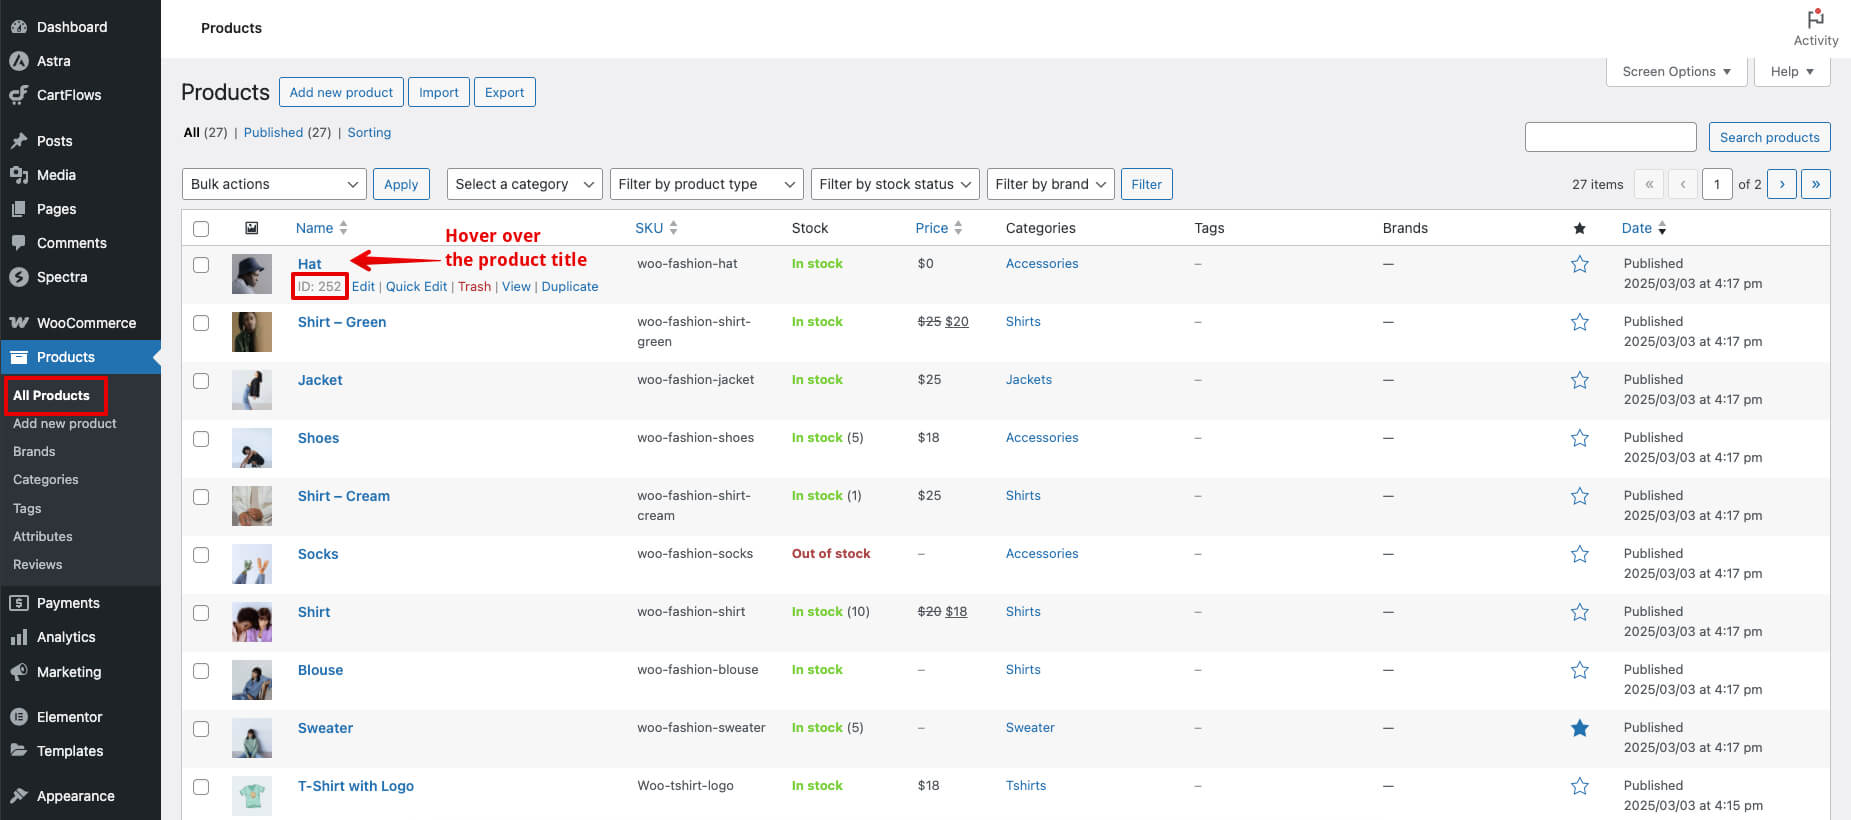
To locate a product’s ID in WooCommerce:
- Go to Products > All Products in your WordPress admin
- Hover your mouse over the product title
- You’ll see the product ID appear below the product title
It is enabled by default and does not require any additional configuration.
Create a WooCommerce Coupon
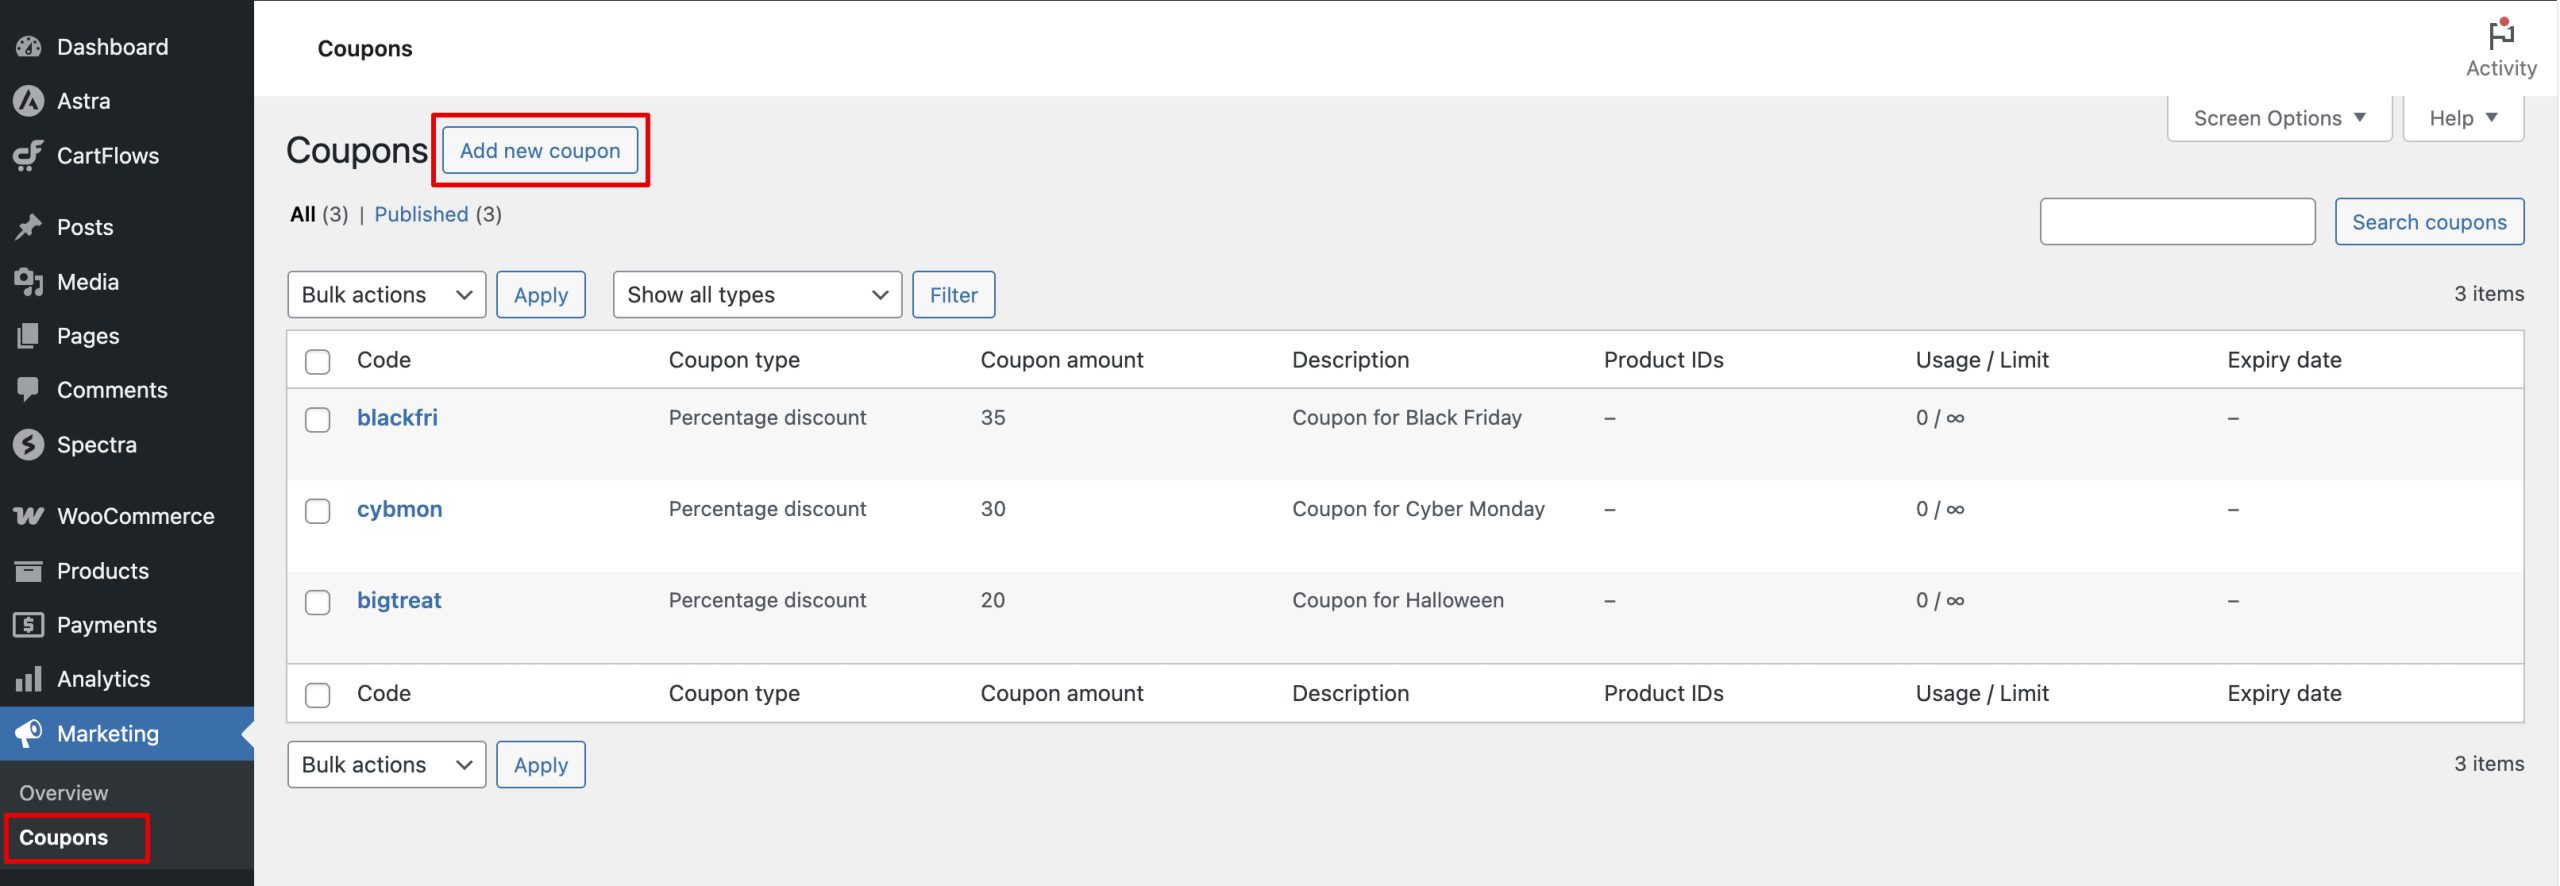
To use this feature, start by creating a coupon in WooCommerce:
- Go to Marketing > Coupons.
- Click Add Coupon and configure your discount settings.
- Save the coupon.
If needed, refer to WooCommerce’s coupon documentation for detailed instructions.
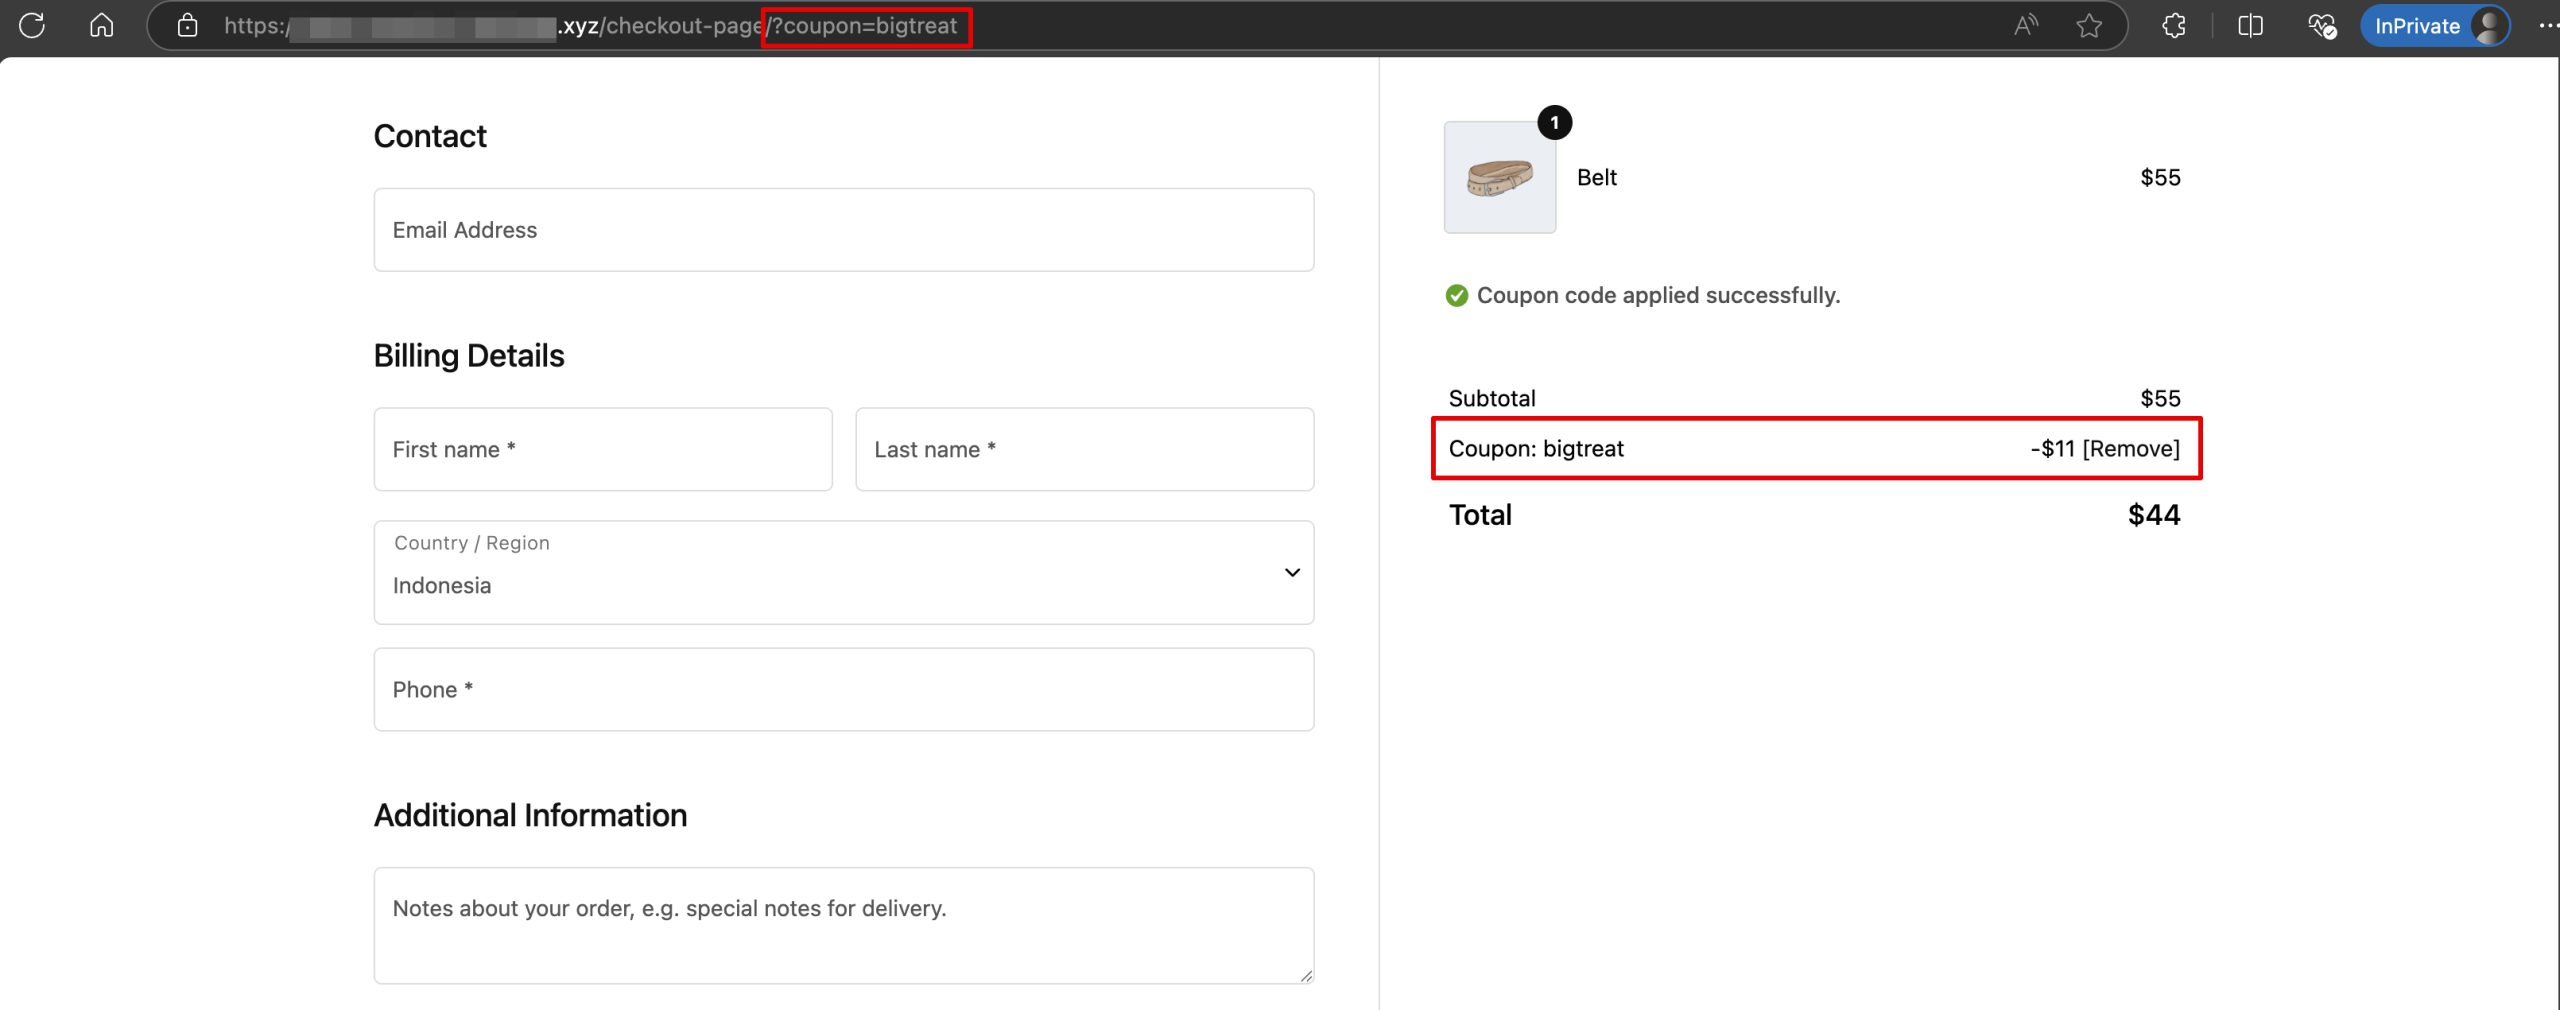
Add the Coupon to a Checkout Page URL
Once the coupon is created, append the coupon code to the URL of your Checkout page.
Format:
yourdomain.com/checkout-page/?coupon=COUPONCODEWhen someone visits this link, the coupon will automatically apply at checkout.
Combine with Other Parameters
You can also combine the coupon with other supported URL parameters such as product and quantity.
Example:
yourdomain.com/checkout-page/?product=252&quantity=1&coupon=DISCOUNT10This will:
- Add the product with ID 252
- Set the quantity to 1
- Apply the DISCOUNT10 coupon
How to Find a Product ID
- Go to Products > All Products in your WordPress dashboard.
- Hover over the product title. You’ll see the Product ID displayed below the title.
How It Works
This feature is enabled by default in CartFlows. To use it, simply send the customer data as URL parameters to your CartFlows Checkout page. The fields will automatically be populated with the provided values when the page loads.
Important: This feature only works on the CartFlows Checkout page and will not function on any other page.
How to Use URL Parameters for Pre-Filling
You can use any contact form or external source that can redirect or link to your checkout page with URL parameters appended.
For example, if you want to pre-fill the customer’s first name and email address, your checkout page URL should look like this:
https://yourdomain.com/checkout-page/?billing_first_name=John&[email protected]
Supported Field Names
Below is the list of billing and shipping field names you can use in the URL parameters to pre-fill the checkout fields.
List of Billing Fields
- billing_email
- billing_first_name
- billing_last_name
- billing_phone
- billing_address_1
- billing_address_2
- billing_city
- billing_postcode
- billing_country
- billing_state
- billing_company
List of Shipping Fields
- shipping_email
- shipping_first_name
- shipping_last_name
- shipping_phone
- shipping_address_1
- shipping_address_2
- shipping_city
- shipping_postcode
- shipping_country
- shipping_state
- Shipping_company
Disabling the Pre-Fill Feature
If you prefer to disable this feature, you can do so by adding the following code snippet to your child theme’s functions.php file. This will disable the pre-fill functionality on all CartFlows Checkout pages:
add_filter( 'cartflows_auto_prefill_checkout_fields', '__return_false' );To use the above code, please refer to this documentation on how to safely add custom PHP code to your WordPress site.
]]>What does this feature do?
This feature allows you to offer an upgraded plan or product on your Upsell/Downsell pages and replace the main product purchased during checkout. For example, if a customer buys an Annual Plan at checkout, you can offer them a Lifetime Plan as an upsell and replace the original order with this upgraded plan seamlessly.
How does it work?
Let’s say you have two products:
- Product A: Annual Plan (sold on the checkout page)
- Product B: Lifetime Plan (offered as an upsell or downsell)
If you want to replace Product A with Product B after checkout, simply select Product B on your Upsell/Downsell page and enable the Cancel Main Order option.
When enabled, CartFlows will:
- Charge the price difference between the upsell/downsell product and the original checkout product
- Cancel the original order
- Replace it with the upgraded product from the Upsell/Downsell page
Important Requirements
To use this feature successfully, please note the following:
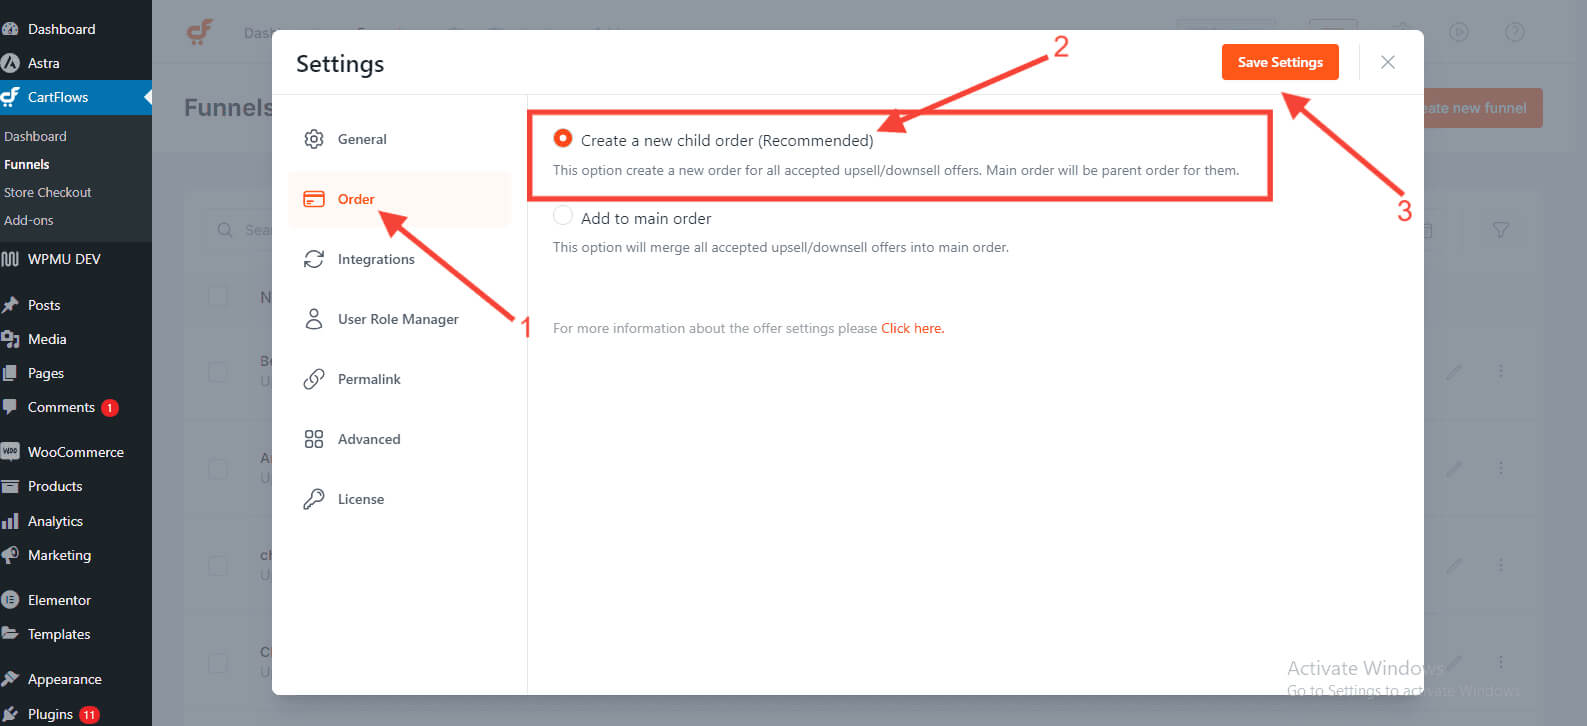
- The Create Child Order option must be enabled in CartFlows > Settings > Order tab
- The upsell/downsell product price must be greater than the main checkout product price
- When using multiple upsells, the main order will be replaced only by the first upsell/downsell offer that meets the criteria
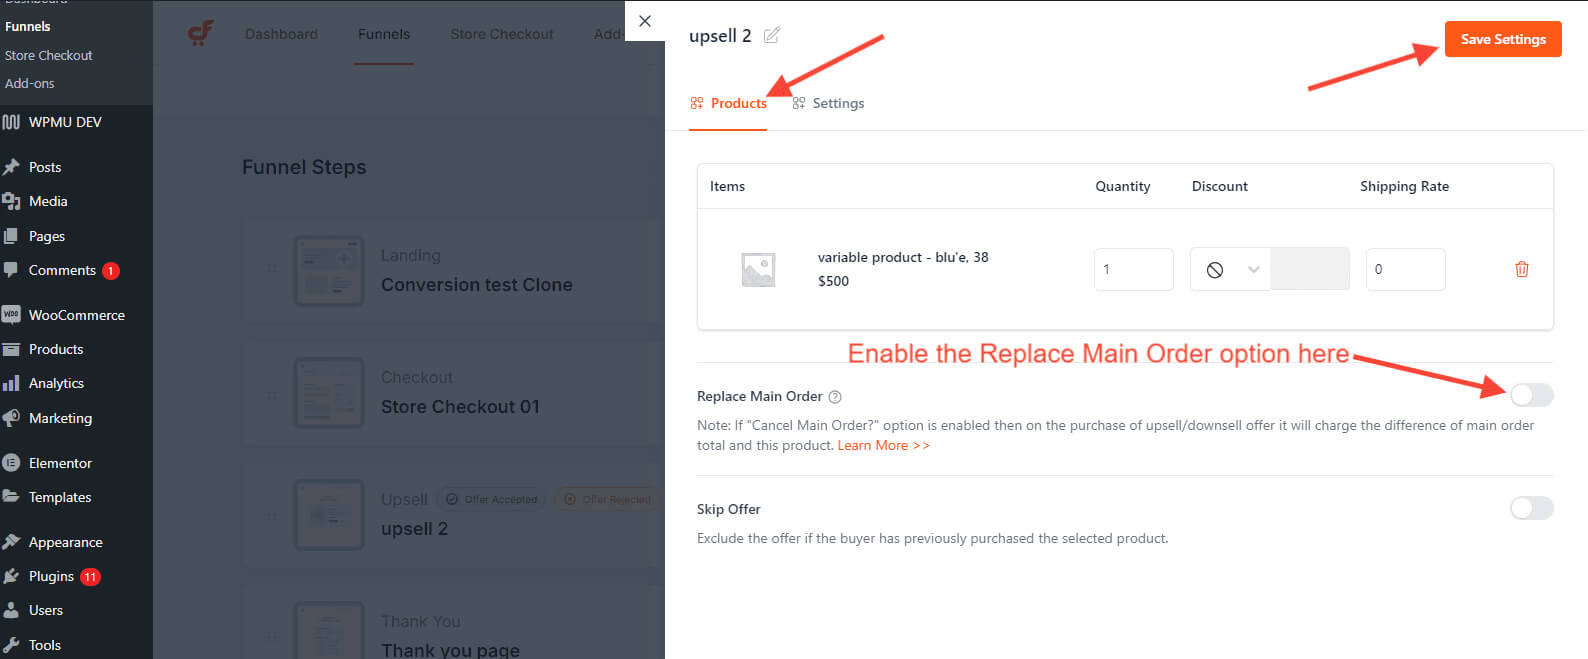
How to enable the Replace Main Order feature
Follow these simple steps:
1: Go to CartFlows > Settings > Order tab and enable Create Child Order
2: Open the backend settings of the Upsell/Downsell page where you want to enable the replacement
3: Select the product you want to offer as the upgrade
4: Enable the Cancel Main Order option